Stihl HL 91 K User manual

STIHL HL 91 K Instruction Manual
Notice d’emploi

Original Instruction ManualPrinted on chlorine-free paper
Printing inks contain vegetable oils, paper can be recycled.
© ANDREAS STIHL AG & Co. KG, 2020
0458-517-8221-B. VA1.B20.
0000008126_002_GB
HL 91 K
English
1
This instruction manual is protected by copyright. All rights reserved, especially the rights to reproduce, translate and process
with electronic systems.
Contents
Dear Customer,
Thank you for choosing a quality
engineered STIHL product.
It has been built using modern
production techniques and
comprehensive quality assurance.
Every effort has been made to ensure
your satisfaction and trouble-free use of
the product.
Please contact your dealer or our sales
company if you have any queries
concerning this product.
Your
Dr. Nikolas Stihl
Guide to Using this Manual 2
Safety Precautions and Working
Techniques 2
Using the Unit 8
Approved Power Tool Attachments 9
Assembling the Unit 9
Fuel 10
Fueling 11
Starting / Stopping the Engine 12
Operating Instructions 14
Cleaning the Air Filter 14
Engine Management 15
Adjusting the Carburetor 15
Spark Plug 16
Lubricating the Gearbox 17
Sharpening Instructions 17
Storing the Machine 17
Inspection and Maintenance by
User 18
Inspections and Maintenance by
Dealer 18
Maintenance and Care 20
Main Parts 22
Specifications 24
Maintenance and Repairs 24
Disposal 25
STIHL Limited Emission Control
Warranty Statement 25

HL 91 K
English
2
Pictograms
The meanings of the pictograms
attached to the machine are explained in
this manual.
Depending on the model concerned, the
following pictograms may be attached to
your machine.
Symbols in text
WARNING
Warning where there is a risk of an
accident or personal injury or serious
damage to property.
NOTICE
Caution where there is a risk of
damaging the machine or its individual
components.
Engineering improvements
STIHL's philosophy is to continually
improve all of its products. For this
reason we may modify the design,
engineering and appearance of our
products periodically.
Therefore, some changes, modifications
and improvements may not be covered
in this manual.
Comply with national safety regulations,
e.g. issued by employers' liability
insurance associations, social security
institutions, occupational safety and
health authorities or other organizations.
If you have never used a power tool
before: Have your dealer or other
experienced user show you how to
operate your machine – or attend a
special course in its operation.
Minors are not allowed to work with the
power tool – except adolescents above
16 years of age who are instructed
under supervision.
Keep children, animals and bystanders
at a safe distance.
When the machine is not in use, put it
down safely so that it does not endanger
anyone. The machine must be secured
against unauthorized access.
Guide to Using this Manual
Fuel tank; fuel mixture of
gasoline and engine oil
Operate manual fuel
pump
Filler hole for gear
lubricant
Safety Precautions and
Working Techniques
Special safety precau-
tions must be observed
when using the hedge
trimmer because it uses a
high-speed cutting
attachment with very
sharp blades and it has a
wide reach.
It is important you read
through and understand
the Instruction Manual
before first use and keep
the manual in a safe
place for future refer-
ence. Non-observance of
the Instruction Manual
may result in serious or
even fatal injury.

HL 91 K
English
3
The user is responsible for accidents or
hazards to third parties or damage to
their property.
The machine may only be given or lent
to people who are familiar with the
model and its use. Always remember to
pass on the Instruction Manual as well!
The use of noise-emitting machines may
be restricted to certain times by national
or local regulations.
Anyone operating the machine must be
well rested, in good physical health and
in good mental condition.
If you have any condition that might be
aggravated by strenuous work, check
with your doctor before operating a
power tool.
If you have a pacemaker: The ignition
system of your machine produces an
electromagnetic field of very low
intensity. An effect on individual
pacemaker types cannot be excluded
entirely. STIHL recommends that you
consult your doctor and the
manufacturer of your pacemaker in
order to avoid health hazards.
Anyone who has consumed alcohol,
medicines affecting their ability to react
or drugs must not operate a power tool.
Use the machine only for cutting
hedges, shrubs, bushes, scrub and the
like.
Other uses are not permitted and may
lead to accidents or damage to the
machine. The machine must not be
modified in any way - this may also lead
to accidents or damage to the machine.
Only use cutting blades or accessories
which have been approved by STIHL for
this machine or which are technically
equivalent. If you have any questions,
consult a STIHL dealer. Use only high
quality tools and accessories. Otherwise
there may be a risk of accidents or
damage to the machine.
STIHL recommends the use of original
STIHL replacement parts. These have
been optimized for the product and the
user's requirements.
Do not modify the machine – otherwise
safety may be compromised. STIHL
excludes all liability for personal injury
and damage to property caused by
using unauthorized attachments.
Do not use a pressure washer to clean
the machine. The strong water jet can
damage the machine parts.
Do not spray the machine with water.
Clothing and equipment
Wear proper protective clothing and
equipment.
WARNING
Wear "personal" hearing protection – for
example, ear defenders.
Wear a hard hat wherever there is any
risk of falling objects.
STIHL can supply a comprehensive
range of personal protective clothing
and equipment.
Transporting the hedge trimmer
Always stop the engine.
Always fit the scabbard over the blades
before transporting the machine, even
for short distances.
Clothing must be sturdy
and snug-fitting, but allow
complete freedom of
movement. Wear close-
fitting clothes such as a
boiler suit, not a loose
jacket.
Avoid clothing that could
get caught on branches
or brush or moving parts
of the machine. Do not
wear a scarf, necktie or
jewelry. Tie up and con-
fine long hair (headscarf,
cap, hard hat, etc.).
Wear safety boots with
steel toe caps and non-
slip soles.
To reduce the risk of eye
injuries, wear tight-fitting
safety goggles conform-
ing to standard EN 166.
Make sure that the safety
goggles fit correctly.
Wear sturdy protective
gloves made of a resist-
ant material (e.g.
leather).

HL 91 K
English
4
Carry the machine by the shaft so that it
is balanced – the cutting attachment
should face rearwards.
Avoid touching hot parts of the machine
and gear housing – risk of burns!
In vehicles: Properly secure the machine
to prevent turnover, damage and fuel
spillage.
Refueling
Switch off the engine before refueling.
Never refuel the machine while the
engine is still hot – the fuel may spill over
– risk of fire!
Open the fuel filler cap carefully so that
any excess pressure is relieved
gradually and fuel does not splash out.
Only refuel the machine in a well
ventilated place. If fuel has been spilled,
immediately clean the machine – do not
allow your clothes to be splashed with
fuel. If that happens, change your
clothes at once.
This helps reduce the risk of engine
vibrations causing an incorrectly
tightened filler cap to loosen or come off
and spill quantities of fuel.
Check for leaks. Do not start the engine
if there is a fuel leak – serious or fatal
burns could result.
Before starting
Check that the machine is in good
working condition – note the
corresponding chapters in the
Instruction Manual:
–Check the fuel system for leaks,
especially the visible parts, e.g.,
filler cap, hose connections, manual
fuel pump (only on machines with a
manual fuel pump). In case of
leakage and damage, do not start
the engine – risk of fire! Have the
machine serviced by a servicing
dealer before using it.
–The stop button must be easy to
push
–Check the knob for warm start,
throttle trigger lockout, throttle
trigger and thumb wheel for smooth
action – throttle trigger must return
automatically to idle position. From
the warm start knob position g, it
must return to the run position F
when the throttle trigger lockout and
throttle trigger are pressed
simultaneously
–Check that the spark plug boot is
firmly seated – if it is loose, sparks
may occur which could ignite the
fuel/air mix as it is delivered – risk of
fire!
–Cutting blades must be in a safe
operating condition (clean, freely
moving, not bent or warped), firmly
seated, correctly mounted, sharp
and thoroughly sprayed with STIHL
resin solvent (lubricant)
–For machines with adjustable cutter
bar: The adjustment mechanism
must be snapped into the start
position
–For machines with a defined
transport position (cutter bar folded
against the shaft): Never start the
machine in the transport position
–Never attempt to modify the controls
or safety devices in any way
–Keep the handles dry and clean –
free from oil and dirt – this is
important for safe control of the
machine
The machine should only be used if it is
in good working order – risk of accident!
Starting the engine
Move at least 3 meters away from the
place at which the machine was refueled
and never start the machine in enclosed
spaces.
The machine may only be used on level
ground. Ensure a firm and secure
footing and hold the machine firmly. The
cutting blades must not touch any
Gasoline is highly flam-
mable – keep away from
fire or flame – do not spill
any fuel – no smoking.
002BA247 KN
After refueling, close the
filler cap as tightly as
possible.

HL 91 K
English
5
objects and must not touch the ground,
as they may start moving when the
machine is started up.
The machine is operated by one person
only – there should not be any other
person within the working area – not
even when starting.
Avoid contact with the cutting blades –
risk of injury!
Do not drop-start the engine – start it as
described in the Instruction Manual.
Note that the cutting blades continue to
move for a short period after you let go
of the throttle trigger – coasting effect.
Check engine idling: The cutting blades
must remain at a standstill when the
engine idles – throttle trigger released.
Keep easily combustible materials (e.g.,
wood chips, bark, dry grass, fuel) away
from hot exhaust gases and the hot
muffler surface – risk of fire!
Holding and controlling the machine
Always hold the machine by the handles
using both hands.
Make sure you always have a good
footing and hold the machine so that the
cutting blades are always facing away
from your body.
Keep your right hand on the control
handle and your left hand on the handle
hose on the shaft – this applies to left-
handed people as well. Wrap your
fingers and thumbs around the handles.
While working
In the event of impending danger or in
an emergency, switch off the engine
immediately – push the stop button.
This distance must also be maintained in
relation to objects (vehicles, window
panes) – risk of property damage!
Watch the cutting blades at all times – do
not cut areas of the hedge that you
cannot see.
Use extreme caution when cutting tall
hedges; someone could be standing
behind them – look beforehand.
Check for correct idling, so that the
blades stop moving when the throttle
trigger is released. Check and/or correct
the idle setting regularly. Have the
machine repaired by a STIHL servicing
dealer if the cutting blades continue to
move nevertheless when idling.
Note that the cutting blades continue to
move for a short period after you let go
of the throttle trigger – coasting effect.
Take care on ice, water, snow, on slopes
or uneven ground, etc. – risk of slipping!
Clear away fallen branches, scrub and
cuttings.
Watch out for obstacles: tree stumps,
roots – risk of tripping or stumbling!
Ensure you always have a firm and
secure footing.
When working at heights:
–always use a lift bucket
–Never work on a ladder or in a tree
–Never work on an insecure support
–Never use the machine with just one
hand
Be particularly alert and cautious when
wearing hearing protection because
your ability to hear warnings (shouts,
alarms, etc .) is restricted.
Take a break in good time to avoid
tiredness or exhaustion – risk of
accidents!
This power tool is not
insulated. Keep away
from power cables – dan-
ger of electrocution!
No one is permitted
within a radius of
5 m from the opera-
tor – the moving
cutting blades and
falling trimmings
pose a risk of injury!
002BA246 KN
5m (17ft)

HL 91 K
English
6
Work calmly and carefully – in daylight
conditions and only when visibility is
good. Take care not to endanger other
people.
To reduce the risk of serious or fatal
injury from breathing toxic fumes,
ensure proper ventilation when working
in trenches, hollows or other confined
locations.
If you feel sick, have a headache, vision
problems (e.g., your field of vision gets
smaller), hearing problems, dizziness or
inability to concentrate, stop work
immediately. Such symptoms may be
caused by an excessively high
concentration of exhaust emissions –
risk of accident!
Keep the noise and exhaust emissions
to a minimum – do not let the engine run
unnecessarily and only open the throttle
when actually working.
No smoking when working with or near
the machine – risk of fire! Combustible
fuel vapor may escape from the fuel
system.
Dust, fumes and smoke produced while
working may be hazardous to health.
Wear respiratory protection in the
presence of major dust or smoke.
If the machine has been exposed to
stress due to improper use (e.g. forceful
impact from a blow or fall), test the
machine for safe-to-operate condition
before continuing work, in every case –
see also "Before start-up". Check the
fuel system for leaks and make sure the
safety devices are working properly. Do
not continue operating a machine which
is damaged. In case of doubt, have the
unit checked by your servicing dealer.
Do not work with the throttle trigger in
the starting throttle position – in that
position of the throttle trigger, the engine
speed cannot be controlled.
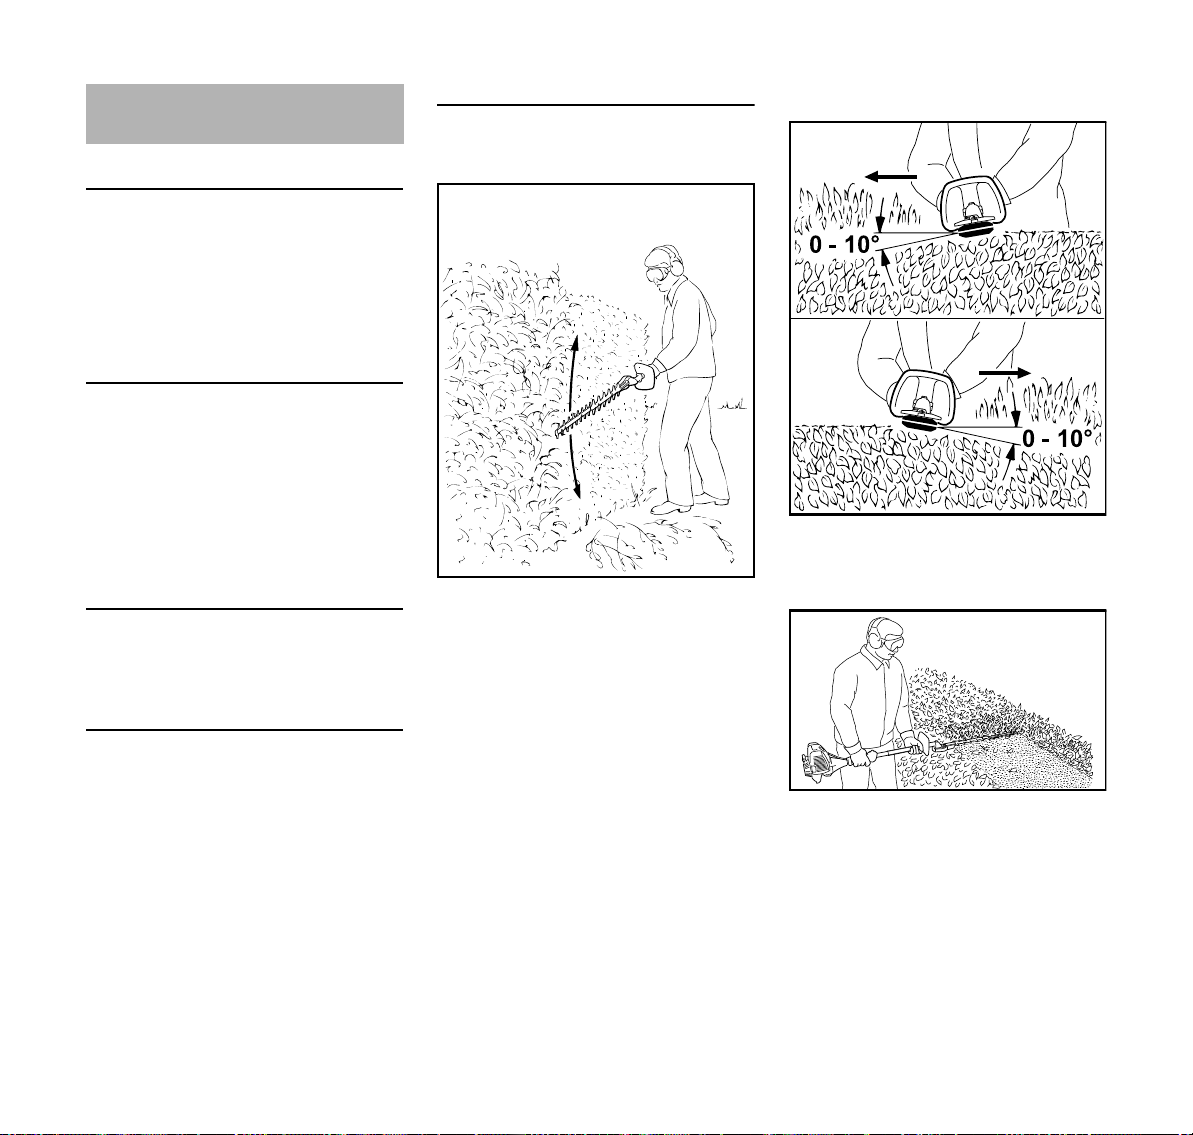
Inspect the hedge and work area to
avoid damaging the cutting blades:
–Remove stones, rocks, pieces of
metal and other solid objects
–When working close to the ground,
make sure that no sand, grit or
stones get between the blades
–Take particular care when cutting
hedges next to or against wire
fences
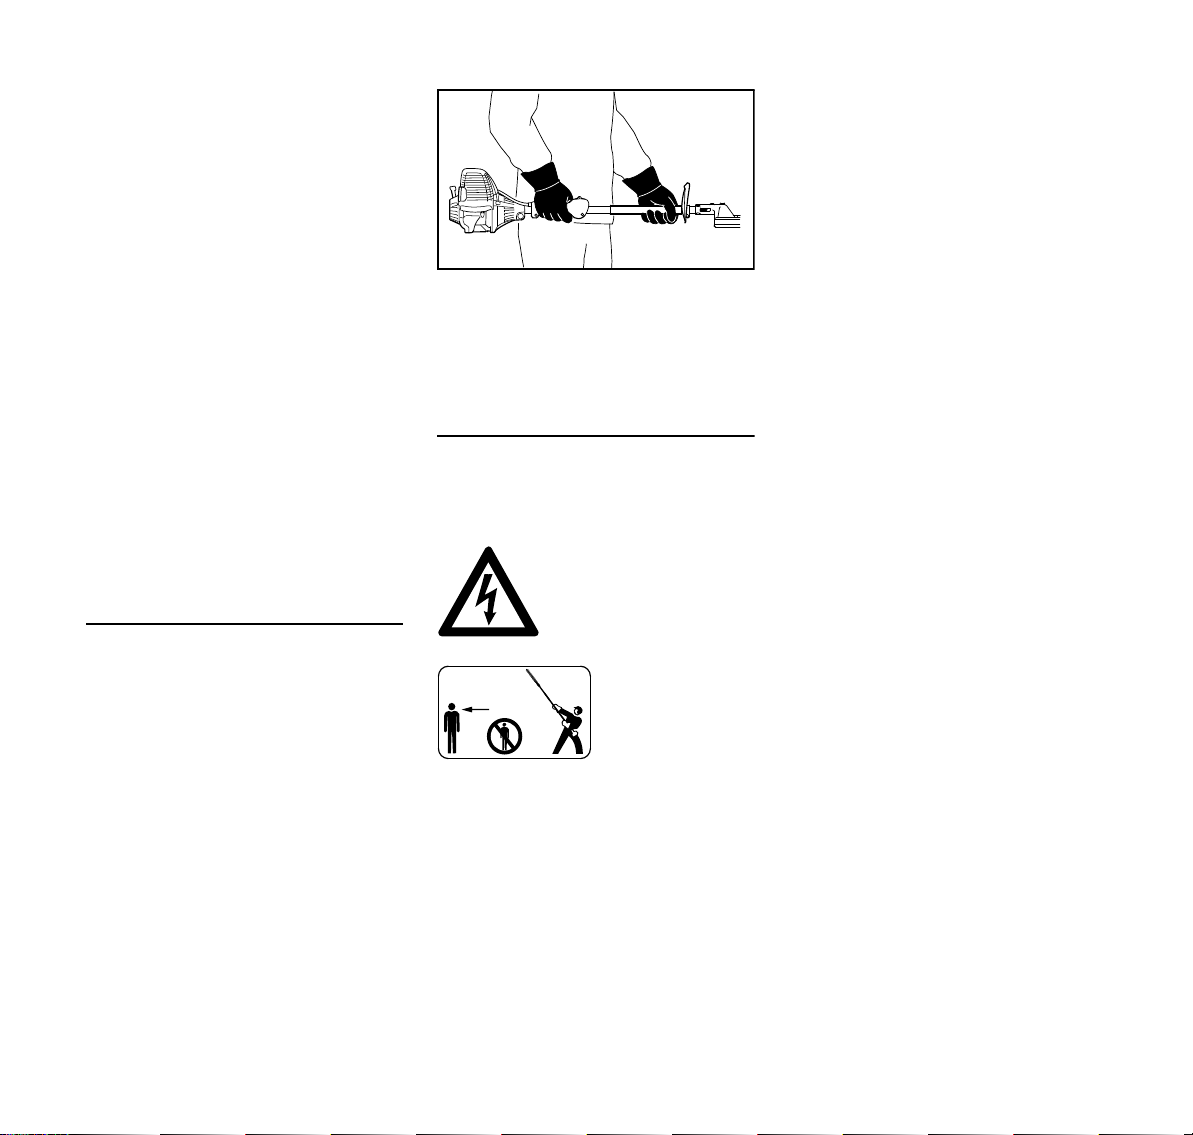
Do not touch electric power lines – never
cut through electric power lines – risk of
electrocution!
Opening the throttle when the blades are
jammed increases the load and reduces
the working speed of the engine. The
constant slipping of the clutch causes
overheating and damage to important
components (e.g. clutch, plastic housing
parts) – thus e.g. due to the blade
moving during idling – risk of injury!
If the hedge is very dusty or dirty, spray
the blades with STIHL resin solvent from
time to time during cutting. This helps
reduce blade friction as well as the
aggressive effects of sap and the build-
up of dirt particles.
Before leaving the machine unattended:
Switch off engine.
Check the cutting blades at regular short
intervals during operation or
immediately if there is a noticeable
change in cutting behavior:
–Switch off engine
–Wait for cutting blades to come to a
standstill
–Check condition and tightness; look
for cracks
–Check sharpness
Always clean plant residue, chips,
leaves and excess lubricant off the
engine and muffler – risk of fire!
Your power tool produces
toxic exhaust fumes as
soon as the engine starts
running. These gases
may be colorless and
odorless and may contain
unburnt hydrocarbons
and benzene. Never use
the machine indoors or in
poorly ventilated areas –
even if your model is
equipped with a catalytic
converter.
The gearbox becomes
hot during operation.
Never touch the gear
housing – risk of burns!
Do not touch the cutting
blades while the engine is
running. If the cutting
blades become jammed
by an object, switch off
the engine immediately
before attempting to
remove the object – risk
of injury!

HL 91 K
English
7
After finishing work
Clean the machine to remove dust and
dirt – do not use degreasing agents.
Spray the blades with STIHL resin
solvent. Run the engine briefly so that
the solvent is evenly distributed.
Vibrations
Prolonged use of the power tool may
result in vibration-induced circulation
problems in the hands (whitefinger
disease).
No general recommendation can be
given for the length of usage because it
depends on several factors.
The period of usage is prolonged by:
–Hand protection (wearing warm
gloves)
–Work breaks
The period of usage is shortened by:
–Any personal tendency to suffer
from poor circulation (symptoms:
frequently cold fingers, tingling
sensations).
–Low outside temperatures.
–The force with which the handles
are held (a tight grip restricts
circulation).
Continual and regular users should
monitor closely the condition of their
hands and fingers. If any of the above
symptoms appear (e.g. tingling
sensation in fingers), seek medical
advice.
Maintenance and Repairs
Service the machine regularly. Do not
attempt any maintenance or repair work
not described in the instruction manual.
Have all other work performed by a
servicing dealer.
STIHL recommends that you have
servicing and repair work carried out
exclusively by an authorized STIHL
servicing dealer. STIHL dealers are
regularly given the opportunity to attend
training courses and are supplied with
the necessary technical information.
Only use high-quality replacement parts
in order to avoid the risk of accidents
and damage to the power tool. If you
have any questions in this respect,
consult a servicing dealer.
STIHL recommends the use of original
STIHL replacement parts. They are
specifically designed to match your
model and meet your performance
requirements.
To reduce the risk of injury, always shut
off the engine before carrying out any
maintenance or repairs or cleaning the
machine. – Exception: Carburetor and
idle speed adjustments.
Do not turn the engine over on the
starter with the spark plug boot or spark
plug removed since there is otherwise a
risk of fire from uncontained sparking.
To reduce the risk of fire, do not service
or store your machine near open flames.
Check the fuel filler cap for leaks at
regular intervals.
Use only a spark plug of the type
approved by STIHL and make sure it is
in good condition – see "Specifications".
Inspect the ignition lead (insulation in
good condition, secure connection).
Check the condition of the muffler.
To reduce the risk of fire and damage to
hearing, do not operate your machine if
the muffler is damaged or missing.
Do not touch a hot muffler since burn
injury will result.
Vibration behavior is influenced by the
condition of the AV elements – check the
AV elements at regular intervals.
Maintenance, replacement, or repair of
the emission control devices and
systems may be performed by any
nonroad engine repair establishment or
individual. However, if you make a
warranty claim for a component which
has not been serviced or maintained
properly, STIHL may deny coverage.
For any maintenance please refer to the
maintenance chart and to the warranty
statement near the end of the instruction
manual.

HL 91 K
English
8
Cutting Season
Observe country-specific or municipal
rules and regulations for cutting hedges.
Do not use your hedge trimmer during
rest periods customary in the
neighborhood.
Cutting Sequence
If a radical cut is necessary, cut a little at
a time in several stages.
Use lopping shears to cut out thick
branches first.
Cut the sides of the hedge first, then the
top.
Disposal
Do not throw cuttings into the garbage
can – they can be composted.
Preparations
NModel with adjustable cutter bar:
Set the cutter bar to the straight (0°)
position.
NRemove the blade scabbard.
NStart the engine
Working Techniques
Vertical Cut
Extra long reach without the need for
other aids.
Swing the cutter bar up and down in an
arc as you move along the hedge – use
both sides of the cutting blades.
Horizontal Cut
Hold the cutter bar at an angle of 0° to
10° as you swing the hedge trimmer
horizontally.
Swing the cutter bar in an arc towards
the outside of the hedge so that the
cuttings are swept to the ground.
Recommendation: Only cut hedges that
are no more than chest high.
Using the Unit
445BA001 KN
445BA007 KN
445BA002 KN

HL 91 K
English
9
The following STIHL attachments may
be mounted to the basic power tool: Mounting the Hand Guard
If a cap is fitted on the end of the drive
tube:
NPull the protective cap off the end of
the drive tube and keep it in a safe
place.
NPush the hand guard (1) over the
drive tube (2) as far as stop with its
convex side facing the control
handle (3).
NFit washer (4) on the screw (5).
NInsert the screw (5) with washer (4)
and tighten it down firmly.
Mounting the Gearbox
NLoosen the clamp screws (10).
NPush the gearbox (11) onto the
drive tube (5), turn the gearbox (11)
back and forth as necessary.
Approved Power Tool
Attachments
Interchangeable
Attachment Application
HL 0°, 500 mm,
with cutter guard
Long reach hedge
trimmer
HL 0°, 600 mm,
with cutter guard
Long reach hedge
trimmer
HL 130°, 600 mm,
with cutter guard
Long reach hedge
trimmer
Assembling the Unit
413BA014 KN
1
2
3
54
0000-GXX-5443-A0
0000-GXX-1855-A0
10 10
11
5

HL 91 K
English
10
Once the end of the drive tube is
inserted beyond the slot in the
clamp (12):
NPush the gearbox (11) fully home as
far as stop.
NTighten down the clamp screws
moderately.
NLine up the gearbox (11) with the
powerhead.
NTighten down the clamp screws
firmly.
This engine is certified to operate on
unleaded gasoline and with the mix ratio
50:1.
Your engine requires a mixture of high-
quality premium gasoline and high-
quality two-stroke air-cooled engine oil.
Use premium branded unleaded
gasoline with a minimum octane rating
of 89 (R+M)/2.
Note: Models equipped with a catalytic
converter require unleaded gasoline. A
few tankfuls of leaded gasoline can
reduce the efficiency of the catalytic
converter by more than 50%.
Fuel with a lower octane rating may
result in preignition (causing "pinging")
which is accompanied by an increase in
engine temperature. This, in turn,
increases the risk of the piston seizure
and damage to the engine.
The chemical composition of the fuel is
also important. Some fuel additives not
only detrimentally affect elastomers
(carburetor diaphragms, oil seals, fuel
lines etc.), but magnesium castings as
well. This could cause running problems
or even damage the engine. For this
reason it is essential that you use only
high-quality fuels!
Fuels with different percentages of
ethanol are being offered. Ethanol can
affect the running behaviour of the
engine and increase the risk of lean
seizure.
Gasoline with an ethanol content of
more than 10% can cause running
problems and major damage in engines
with a manually adjustable carburetor
and should not be used in such engines.
Engines equipped with M-Tronic can be
run on gasoline with an ethanol content
of up to 25% (E25).
Use only STIHL two-stroke engine oil or
equivalent high-quality two-stroke air-
cooled engine oils for mixing.
We recommend STIHL 50:1 two-stroke
engine oil since it is specially formulated
for use in STIHL engines.
To ensure the maximum performance of
your STIHL engine, use a high quality 2-
cycle engine oil. To help your engine run
cleaner and reduce harmful carbon
deposits, STIHL recommends using
STIHL HP Ultra 2-cycle engine oil or ask
your dealer for an equivalent fully
synthetic 2-cycle engine oil.
To meet the requirements of EPA and
CARB we recommend to use STIHL HP
Ultra oil.
Do not use BIA or TCW (two-stroke
water cooled) mix oils!
Use only STIHL 50:1 heavy-duty engine
oil or an equivalent quality two-stroke
engine oil for the fuel mix in models
equipped with a catalytic converter.
Take care when handling gasoline.
Avoid direct contact with the skin and
avoid inhaling fuel vapour.
The canister should be kept tightly
closed in order to avoid any moisture
getting into the mixture.
0000-GXX-1856-A0
11
12
Fuel

HL 91 K
English
11
The fuel tank and the canister in which
fuel mix is stored should be cleaned
from time to time.
Fuel mix ratio
Only mix sufficient fuel for a few days
work, not to exceed 30 days of storage.
Store in approved safety fuel-canisters
only. When mixing, pour oil into the
canister first, and then add gasoline.
Dispose of empty mixing-oil canisters
only at authorized disposal locations.
Fuel filler cap
WARNING
When fueling on a slope, always position
the machine with the filler cap facing
uphill.
NPlace the machine on level ground
so that the filler cap is facing up.
NBefore fueling, clean the filler cap
and the area around it to ensure that
no dirt falls into the tank.
Open the tank cap.
NTurn the cap counterclockwise until
it can be removed from the tank
opening.
NRemove the cap.
Filling up with fuel
Take care not to spill fuel while fueling
and do not overfill the tank.
STIHL recommends you use the STIHL
filler nozzle for fuel (special accessory).
NFill up with fuel.
Close the tank cap.
NPlace the cap in the opening.
NTurn the cap clockwise as far as
stop and tighten it down as firmly as
possible by hand.
Examples
Gasoline Oil (STIHL 50:1 or equiva-
lent high-quality oils)
liters liters (ml)
10.02(20)
5 0.10 (100)
10 0.20 (200)
15 0.30 (300)
20 0.40 (400)
25 0.50 (500)
Fueling
0208BA019 KN
0208BA020 KN
0208BA021 KN

HL 91 K
English
12
Controls
1Throttle trigger lockout
2Throttle trigger
3Stop switch with Run and Stop
positions. Depress the stop switch
(…) to switch off the ignition – see
"Function of Stop Switch and
Ignition System".
4Throttle set wheel – limits travel of
throttle trigger – see "Function of
throttle set wheel".
Function of Stop Switch and Ignition
System
The ignition is switched off and the
engine stopped when the stop switch is
pressed. The stop switch returns
automatically to the Run position when it
is released: The ignition is switched on
again after the engine stops – the engine
is then ready to start.
Function of Throttle Set Wheel
The throttle set wheel (4) enables the
travel of the throttle trigger to be preset
anywhere between idle and full throttle.
–Turn throttle set wheel (4) in
direction of – to reduce throttle
trigger travel and maximum engine
speed.
–Turn throttle set wheel (4) in
direction of + to increase throttle
trigger travel and maximum engine
speed.
–It is possible to override the preset
stop and open the throttle wide by
pulling the throttle trigger firmly – the
preset stop remains unaffected. The
original setting is restored when the
throttle trigger is released.
Starting the Engine
NPress the manual fuel pump
bulb (5) at least five times – even if
the bulb is already filled with fuel.
Cold engine (cold start)
NTurn choke knob (6) and then push
it in at g
Also use this setting if the engine has
been running but is still cold.
–Turn throttle set wheel in direction of
+ as far as stop.
Hot engine (hot start)
NChoke knob (6) remains in F
position.
Starting / Stopping the
Engine
0208BA066 KN
2
1
43
0208BA067 KN
4
5
0000-GXX-5224-A0
2.
1.
6
0000-GXX-5475-A0

HL 91 K
English
13
Cranking
NPlace the unit on the ground: It must
rest securely on the engine support
and the gearbox housing.
NOn units with an adjustable cutter
bar and defined transport position:
Set the cutter bar to the straight (0°)
position.
NIf fitted: Remove blade scabbard
from the cutting blades.
To reduce the risk of accidents, check
that the cutting blades are not touching
the ground of any other obstacles.
NMake sure you have a firm footing,
either standing, stooping or
kneeling.
NHold the unit firmly on the ground
with your left hand and press down
– do not touch the throttle trigger,
lockout lever or stop switch.
NOTICE
Do not stand or kneel on the shaft.
NHold the starter grip with your right
hand.
NPull the starter grip slowly until you
feel it engage and then give it a brisk
strong pull.
NOTICE
Do not pull out the starter rope all the
way – it might otherwise break.
NDo not let the starter grip snap back.
Guide it slowly back into the housing
so that the starter rope can rewind
properly.
NContinue cranking until the engine
runs.
As soon as the engine runs
At temperatures below +10°C (+50°F)
Warm up the engine for at least
10 seconds in position g.
At temperatures above +10 °C (+50 °F)
Warm up the engine for at least
5 seconds in position g.
NDepress throttle trigger lockout and
pull the throttle trigger – the choke
knob moves to the Run F position.
Warm up a cold engineat varying
speeds.
WARNING
Make sure the carburetor is correctly
adjusted. The cutting blades must not
move when the engine is idling.
Your machine is now ready for
operation.
Stopping the Engine
NDepress the momentary contact
stop switch – the engine stops –
release the stop switch – it springs
back to the run position.
Other Hints on Starting
Engine stalls in cold start position g.
NDepress throttle trigger lockout and
pull the throttle trigger – the choke
knob moves to the Run F position.
NContinue cranking in position F until
the engine runs.
1191BA014 KN
1191BA015 KN
1191BA025 KN

HL 91 K
English
14
Running engine stalls in cold start
position g or under acceleration.
NContinue cranking in position F until
the engine runs.
If the engine does not start
NCheck that all settings are correct.
NCheck that there is fuel in the tank
and refuel if necessary.
NCheck that the spark plug boot is
properly connected.
NRepeat the starting procedure.
Engine is flooded
NMove the choke knob to F and
continue cranking until the engine
runs.
Fuel tank run until completely dry
NAfter refueling, depress the manual
fuel pump bulb at least five times –
even if the bulb is already filled with
fuel.
NSet the choke knob according to
engine temperature.
NNow start the engine.
During break-in period
A factory-new machine should not be
run at high revs (full throttle off load) for
the first three tank fillings. This avoids
unnecessary high loads during the
break-in period. As all moving parts
have to bed in during the break-in
period, the frictional resistances in the
engine are greater during this period.
The engine develops its maximum
power after about 5 to 15 tank fillings.
During Operation
After a long period of full throttle
operation, allow the engine to run for a
short while at idle speed so that engine
heat can be dissipated by the flow of
cooling air. This protects engine-
mounted components (ignition,
carburetor) from thermal overload.
After Finishing Work
Storing for a short period: Wait for the
engine to cool down. Empty the fuel tank
and keep the machine in a dry place,
well away from sources of ignition, until
you need it again. For longer out-of-
service periods – see "Storing the
Machine".
If there is a noticeable loss of engine
power
NSet knob for warm start (1) to g
NTurn screw (2) in filter cover (3)
counterclockwise until the cover is
loose
NRemove filter cover (3)
NClean away loose dirt from around
the filter
NGrip into the recess (4) in the filter
housing and remove the felt filter (5)
NReplace felt filter (5) – as a
temporary measure you can knock it
out on the palm of you hand or blow
it out with compressed air – do not
wash
Operating Instructions Cleaning the Air Filter
0208BA034 KN
1
0208BA035 KN
5
4

HL 91 K
English
15
NOTICE
Replace any damaged parts!
NInsert felt filter (5) form-fittingly into
the filter housing
NSet knob for warm start (1) to g
NFit filter cover (3) – make sure not to
tilt the screw (2) – insert screw and
tighten
Exhaust emissions are controlled by the
design of the engine and components
(e.g. carburation, ignition, timing and
valve or port timing).
The carburetor of the machine has been
adjusted at the factory for optimum
performance and fuel efficiency in all
operating states.
Setting the idle speed
Engine stops when idling
NTurn the idle speed screw (LA)
slowly clockwise until the engine
runs smoothly.
Cutting blades move when idling
NTurn the idle speed adjusting
screw (LA) slowly counterclockwise
until the cutting blades stop moving
WARNING
If the cutting blades continue to move in
idle even after adjustment, have the
machine repaired by a STIHL servicing
dealer.
Engine Management Adjusting the Carburetor
0208BA036 KN

HL 91 K
English
16
NIf the engine is down on power,
difficult to start or runs poorly at idle
speed, first check the spark plug.
NFit a new spark plug after about 100
operating hours – or sooner if the
electrodes are badly eroded. Install
only suppressed spark plugs of the
type approved by STIHL – see
"Specifications".
Removing the spark plug
NTurn screw (1) in cap (2) until cap
can be removed
NLay down cap
NPull off the spark plug boot (3)
NUnscrew spark plug,
Checking the Spark Plug
NClean dirty spark plug.
NCheck electrode gap (A) and
readjust if necessary – see
"Specifications".
NRectify the problems which have
caused fouling of the spark plug.
Possible causes are:
–Too much oil in fuel mix.
–Dirty air filter.
–Unfavorable running conditions.
WARNING
Arcing may occur if the adapter nut (1) is
loose or missing. Working in an easily
combustible or explosive atmosphere
may cause a fire or an explosion. This
can result result in serious injuries or
damage to property.
NUse resistor type spark plugs with a
properly tightened adapter nut.
Installing the Spark Plug
NFit the spark plug and tighten it
down firmly.
NPress the boot firmly onto the spark
plug.
NFit the cap (1), insert the screw (2)
and tighten it down firmly.
Spark Plug
1
0208BA037 KN
2
3
0208BA038 KN
000BA039 KN
A
1
000BA045 KN
1
2
0208BA039 KN

HL 91 K
English
17
Blade Drive Gear
Lubricate the blade drive gear with
STIHL gear lubricant for hedge trimmers
– see "Special Accessories".
HL 0° version
NCheck the lubricant level at regular
intervals of about every 25 hours of
operation. Unscrew the filler
plug (1) – if no grease can be seen
on the inside of the filler plug, screw
the tube of grease into the filler hole.
NSqueeze up to 10 g (2/5 oz) grease
into the gearbox.
NOTICE
Do not completely fill the gearbox with
grease.
NUnscrew the tube of grease from the
filler hole.
NRefit the filler plug and tighten it
down firmly.
When cutting performance and behavior
begin to deteriorate, i.e. blades
frequently snag on branches:
Resharpen the cutting blades.
It is best to have the cutting blades
resharpened by a dealer on a workshop
sharpener. STIHL recommends an
authorized STIHL servicing dealer.
It is also possible to use a flat crosscut
sharpening file. Hold the sharpening file
at the prescribed angle (see
"Specifications").
NOnly sharpen the cutting edges –
take care not to file the cutter guard
(see “Main Parts”).
NAlways file towards the cutting
edge.
NThe file only sharpens on the
forward stroke – lift it off the blade
on the backstroke.
NUse a whetstone to remove burr
from cutting edge.
NRemove as little material as
possible.
NAfter sharpening, clean away filing
or grinding dust and then spray the
cutting blades with STIHL resin
solvent.
NOTICE
Do not operate your machine with dull or
damaged cutting blades. This may
cause overload and will give
unsatisfactory cutting results.
For periods of about 3 months or longer
NDrain and clean the fuel tank in a
well ventilated area.
NDispose of fuel properly in
accordance with local
environmental requirements.
NRun the engine until the carburetor
is dry – this helps prevent the
carburetor diaphragms sticking
together.
NClean the cutting blades, check
condition and spray them with
STIHL resin solvent.
NFit the blade scabbard.
NThoroughly clean the machine.
NStore the machine in a dry and
secure location Keep out of the
reach of children and other
unauthorized persons.
Lubricating the Gearbox
0000-GXX-1776-A0
Sharpening Instructions Storing the Machine

HL 91 K
English
18
Throttle Cable
Checking adjustment of throttle cable
Error: Engine speed increases when
only the throttle trigger is pulled.
NStart the engine.
NPull the throttle trigger (1) – do not
press down the throttle trigger
lockout (2).
If the engine speed increases or if the
cutting blades run, the throttle cable has
to be adjusted.
NShut off the engine.
NHave throttle cable adjusted by your
dealer. STIHL recommends an
authorized STIHL servicing dealer.
Spark Arresting Screen in Muffler
If the engine is down on power, check
the spark arresting screen in the muffler.
NWait for the muffler to cool down.
NTake out the screw (1).
NLift the spark arresting screen (2)
and pull it out.
NClean the spark arresting screen. If
the screen is damaged or heavily
carbonized, fit a new one.
NRefit the spark arresting screen.
NInsert the screw and tighten it down
firmly.
Maintenance Work
STIHL recommends that you have
servicing and repair work carried out
exclusively by an authorized STIHL
servicing dealer.
Spacer
The spacer (arrow) is integrally molded
to the shroud.
NCheck spacer (1) for damage.
NIf spacer (1) is damaged, have
shroud replaced immediately.
Inspection and Maintenance
by User
2
1191BA023 KN
1
1191BA017 KN
1
2
Inspections and Maintenance
by Dealer
1191BA018 KN
Table of contents
Languages:
Other Stihl Trimmer manuals