Stihl HLE 71 User manual

Contents
1 Guide to Using this Manual.........................2
2 Safety Precautions and Working Techni‐
ques............................................................ 2
3 Using the Unit............................................. 7
4 Mounting the Drive Tube.............................8
5 Mounting the Loop Handle..........................9
6 Mounting the Gearbox................................ 9
7 Adjusting the Cutter Bar............................10
8 Fitting the Harness....................................11
9 Connecting to Power Supply.....................11
10 Switching On.............................................12
11 Switching Off.............................................12
12 Overload Cutout........................................12
13 Lubricating the Gearbox............................13
14 Storing the Machine.................................. 13
15 Sharpening Instructions............................ 13
16 Maintenance and Care..............................14
17 Minimize Wear and Avoid Damage...........14
18 Main Parts.................................................15
19 Specifications............................................15
20 Maintenance and Repairs......................... 16
21 Disposal.................................................... 16
22 EC Declaration of Conformity................... 17
23 UKCA Declaration of Conformity.............. 17
24 General Power Tool Safety Warnings.......18
Dear Customer,
Thank you for choosing a quality engineered
STIHL product.
It has been built using modern production techni‐
ques and comprehensive quality assurance.
Every effort has been made to ensure your satis‐
faction and trouble-free use of the product.
Please contact your dealer or our sales company
if you have any queries concerning this product.
Your
Dr. Nikolas Stihl
1 Guide to Using this Manual
1.1 Pictograms
All the pictograms attached to the machine are
shown and explained in this manual.
1.2 Symbols in text
WARNING
Warning where there is a risk of an accident or
personal injury or serious damage to property.
NOTICE
Caution where there is a risk of damaging the
machine or its individual components.
1.3 Engineering improvements
STIHL's philosophy is to continually improve all
of its products. For this reason we may modify
the design, engineering and appearance of our
products periodically.
Therefore, some changes, modifications and
improvements may not be covered in this man‐
ual.
2 Safety Precautions and
Working Techniques
Because this unit is a high-speed,
fast-cutting tool powered by electricity
and has very sharp cutting blades
and a long reach, special safety pre‐
cautions must be observed during
operation.
It is important you read and under‐
stand the User Manual before com‐
missioning and keep it in a safe place
for future reference. Non-compliance
with the User Manual may cause seri‐
ous or even fatal injury.
Observe all applicable local safety regulations,
e.g. by trade organizations, social insurance
institutions, labor safety authorities etc.
If you have never used a power tool before:
Have your dealer or other experienced user
show you how to operate your machine – or
attend a special course to learn how to operate
it.
Minors are not allowed to work with the power
tool – except adolescents above 16 years of age
who are instructed under supervision.
Children, animals and bystanders must remain at
a distance.
When not using the machine, it must be laid
down in such a way that it does not endanger
anyone. Ensure that the machine cannot be
used without authorization.
English
2 0458-277-0121-B
© ANDREAS STIHL AG & Co. KG 2021
0458-277-0121-B. VA0.G21.
Printed on chlorine-free paper
Printing inks contain vegetable oils, paper can be recycled.
Original Instruction Manual
0000000888_020_GB

The user is responsible for accidents or risks
involving third parties or their property.
Do not lend or rent your power tool without the
User Manual. Be sure that anyone using it under‐
stands the information contained in this manual.
The use of machines that emit noise may be limi‐
ted to certain hours of the day as specified by
national and/or regional or local regulations.
Anyone operating the machine must be well res‐
ted, in good physical health and in good mental
condition.
If you have any condition that might be aggrava‐
ted by strenuous work, check with your doctor
before operating a machine.
Anyone who has consumed alcohol or drugs or
medicines affecting their ability to react must not
operate a power tool.
Use the machine only for cutting hedges, shrubs,
bushes, scrub and the like.
Other uses are not permitted and may lead to
accidents or damage to the machine.
Always disconnect the machine from the mains
power supply before starting any work on the
machine – risk of accident!
Never jerk the power cord to disconnect it from
the wall outlet. To unplug, grasp the plug, not the
cord.
Unsuitable extension cords may be dangerous.
When using extension cords, ensure that the
minimum conductor cross-sections are main‐
tained (refer to the chapter entitled "Connecting
the machine to the power supply").
The connector and coupling of the extension
cord must be waterproof or routed in such a way
that they cannot come into contact with water.
Only use cutting blades and accessories that are
explicitly approved for this power tool by STIHL
or are technically identical. If you have any ques‐
tions in this respect, consult your dealer. Use
only high quality parts and accessories. in order
to avoid the risk of accidents and damage to the
machine.
STIHL recommends the use of original STIHL
tools and accessories. They are specifically
designed to match the product and meet your
performance requirements.
Never attempt to modify your power tool in any
way since this may increase the risk of personal
injury. STIHL excludes all liability for personal
injury and damage to property caused while
using unauthorized attachments.
Do not use a high-pressure washer to clean the
power tool. The solid jet of water may damage
parts of the unit.
Do not spray the power tool with water.
2.1 Clothing and equipment
Wear proper protective clothing and equipment.
Clothing must be sturdy but allow
complete freedom of movement.
Wear close-fitting clothes such as a
boiler suit, not a loose jacket.
Do not wear clothing which could become trap‐
ped in wood, brush or moving parts of the
machine. Do not wear a scarf, necktie or jewelry.
Tie up and confine long hair above your should‐
ers.
Wear safety boots with steel toe caps
and non-slip soles.
WARNING
To reduce the risk of eye injuries,
wear close-fitting safety glasses in
accordance with European Standard
EN 166. Make sure the safety
glasses are a snug fit.
Wear "personal" sound protection, e.g. ear
defenders.
Wear a safety hard hat where there is a danger
of head injuries from falling objects.
Wear sturdy protective gloves made
of a resistant material (e.g. leather).
STIHL can supply a comprehensive range of per‐
sonal protective equipment.
2.2 Transporting the machine
Always switch off the power tool and unplug it
from the power supply.
Always fit the scabbard over the blades before
transporting the machine even for short distan‐
ces.
For machines with adjustable cutter bar: Engage
the cutter bar.
For machines with a defined transport position:
Bring the cutter bar in transport position and
have it engaged.
2 Safety Precautions and Working Techniques English
0458-277-0121-B 3

Carry the power tool properly balanced by the
shaft – cutting blades behind you.
To reduce the risk of burn injury, do
not touch the gear housing!
Transporting by vehicle: Properly secure the
power tool to prevent turnover and damage.
2.3 Before Starting Work
Check that your power tool is properly assem‐
bled and in good condition – refer to appropriate
chapters in the User Manual:
–Voltage and frequency of the machine (see
rating plate) and the voltage and frequency of
your power supply must be the same.
–Examine the connecting cord, power plug and
extension cord for damage. Damaged cords,
couplings and plugs or connecting cords that
do not comply with the regulations must not be
used
–Extension cord sockets must be splash-proof
–To reduce the risk of stumbling, position and
mark the connecting cord so that it cannot be
damaged or endanger others
–Starting lockout lever and trigger switch must
move freely – the switch must return to the idle
position when it is released.
–Cutting blades must be properly tightened and
in safe operating condition (clean, sharp, not
bent or warped), correctly mounted and thor‐
oughly sprayed with STIHL resin solvent (lubri‐
cant)
–For machines with adjustable cutter bar: The
adjustment mechanism must be snapped into
the start position
–For machines with a defined transport position
(cutter bar folded against the shaft): Never
start the machine in the transport position
–Never attempt to modify the controls or safety
devices
–Keep the handles dry and clean – free from oil
and dirt – this is important for safe control of
the machine
–Adjust carrying harness and handles in
accordance with body height. Observe the
chapter "Fitting the Harness"
To reduce the risk of personal injury, do not
operate your power tool if it is damaged or not
properly assembled!
To prepare for emergencies when using a har‐
ness: Practice setting down the machine quickly.
To avoid damage, do not throw the machine to
the ground when practicing.
To reduce the risk of electric shock:
–Always connect the engine analyzer to a prop‐
erly installed wall outlet.
–Any extension cords used must comply with
the specifications for the particular application
–Check that the insulation of the power cord,
extension cord, plug and coupling is in good
condition
2.4 Holding and guiding the
machine
Always hold the unit firmly with both hands on
the handles.
277BA020 KN
Keep your right hand on the control handle and
your left hand on the loop handle on the shaft –
this applies to left-handed people as well. Wrap
your fingers and thumbs around the handles.
Make sure you always have a good footing and
hold the machine so that the cutting blades are
always facing away from your body.
Some versions of the machine can be carried on
a belt to relieve the weight on the operator's
arms.
2.5 While working
In case of imminent danger or in an emergency,
switch off the motor immediately – release the
trigger switch and starting lockout.
Keep away from power cables – dan‐
ger of electrocution!
English 2 Safety Precautions and Working Techniques
4 0458-277-0121-B

5m (17ft)
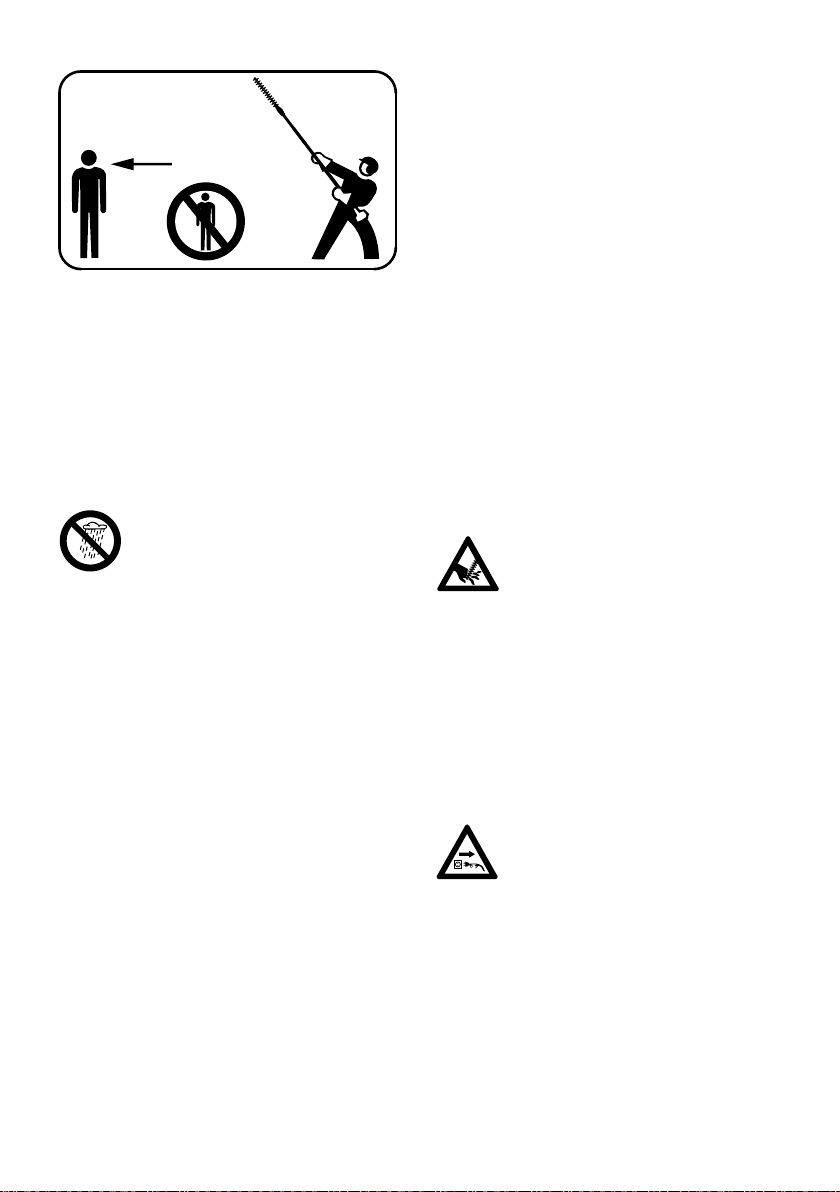
To reduce the risk of injury from moving blades
or falling cuttings, do not allow bystanders within
5 meters of your own position. This distance
must also be maintained in relation to objects
(vehicles, window panes) – risk of property dam‐
age!
Watch the cutting blades at all times – do not cut
areas of the hedge that you cannot see.
Be extremely careful when cutting tall hedges,
check the other side of the hedge before starting
work.
The drive motor is not waterproof. To
reduce the risk of a short circuit or
electrocution, never work with the
power tool in the rain or in wet or very
damp locations.
Do not leave the power tool outdoors in the rain.
Take special care in slippery conditions – damp,
snow, ice, on slopes or uneven ground!
Clear away fallen branches, scrub and cuttings.
Watch out for obstacles: tree stumps, roots – risk
of tripping or stumbling!
Make sure you always have good balance and
secure footing.
2.5.1 When working at heights:
–Always use a lift bucket
–never use the machine while standing on a
ladder
–never work on an insecure support
–Never use the machine with just one hand
Be particularly alert and cautious when wearing
hearing protection because your ability to hear
warnings (shouts, alarms, etc.) is restricted.
Take breaks when you start getting tired or feel‐
ing fatigue – risk of accidents!
Work calmly and carefully – in daylight conditions
and only when visibility is good. Proceed with
caution, do not put others in danger.
The gear head becomes hot during operation. To
reduce the risk of burn injury, do not touch the
gear housing!
If the machine is subjected to unusually high
loads for which it was not designed (e.g., heavy
impact or a fall), always check that it is in good
condition before continuing work - refer also to
the chapter "Before starting work". Make sure the
safety devices are working properly. Never use a
power tool that is no longer safe to operate. In
case of doubt, contact a dealer.
Inspect the hedge and work area to avoid dam‐
aging the cutting blades:
–Remove stones, rocks, pieces of metal and
other solid objects
–Make sure that no sand or stones get between
the cutter blades, e. g., when working close to
the ground
–Take particular care when cutting hedges next
to or against wire fences
Do not touch electric power lines – never cut
through electric power lines – risk of electrocu‐
tion!
Do not touch the cutting blades.while
the engine is running. If the cutting
blades become jammed by thick
branches or other obstructions,
switch off immediately and disconnect
the plug from the power supply before
attempting to free the blades.
If the hedge is very dusty or dirty, spray the cut‐
ting blades with STIHL resin solvent from time to
time during cutting. This will significantly reduce
blade friction, the aggressive effects of sap and
the build-up of dirt particles.
The dust that occurs during operation may be
harmful to health. Wear a dust mask in case of
dust formation.
If the power cord is damaged, imme‐
diately disconnect the plug from the
wall outlet to avoid the risk of electric
shock.
Never jerk the power cord to disconnect it from
the wall outlet. To unplug, grasp the plug, not the
cord.
Avoid damage to the power supply cord. Do not
drive over it, pinch or tug it.
Position the connecting and extension cords cor‐
rectly:
–Do not chafe on edges, pointed or sharp
objects
–don't trap or squeeze the cord in or under
doors or windows
2 Safety Precautions and Working Techniques English
0458-277-0121-B 5

–If cords are twisted – unplug the power tool
and straighten them out
–Always avoid contact with the cutting attach‐
ment
–Always unwind the extension cord completely
from the cable drum to reduce the risk of fire
from overheating.
Before leaving the power tool unattended: Switch
it off and disconnect the plug from the power
supply.
Check the cutting blades at regular short inter‐
vals during operation or immediately if there is a
noticeable change in cutting behavior:
–Switch off the motor; wait until the cutting
blades have come to a standstill; unplug the
power cord
–Check the condition and firm seat, watch out
for fine cracks
–Ensure that the cutting blades are sharp
To replace the cutting blades, switch off the
machine and unplug the power cord. Risk of
injury from the motor starting unintentionally!
Always clean plant residue, chips, leaves and
excess lubricant off the motor – risk of fire!
2.6 After finishing work
Always clean dust and dirt off the machine – do
not use any grease solvents for this purpose.
Spray the cutting blades with STIHL resin sol‐
vent. Run the motor briefly so that the solvent is
evenly distributed.
2.7 Vibrations
Prolonged use of the power tool may result in
vibration-induced circulation problems in the
hands (whitefinger disease).
No general recommendation can be given for the
length of usage because it depends on several
factors.
The period of usage is prolonged by:
–Hand protection (wearing warm gloves)
–Work breaks
The period of usage is shortened by:
–Any personal tendency to suffer from poor cir‐
culation (symptoms: frequently cold fingers,
tingling sensations).
–Low outside temperatures.
–The force with which the handles are held (a
tight grip restricts circulation).
Continual and regular users should monitor
closely the condition of their hands and fingers. If
any of the above symptoms appear (e.g. tingling
sensation in fingers), seek medical advice.
2.8 Maintenance and Repairs
Always switch off the machine and disconnect
the plug from the power supply before carrying
out any maintenance work to reduce the risk of
injury from the motor starting unintentionally.
Service the machine regularly. Do not attempt
any maintenance or repair work not described in
the instruction manual. Have all other work per‐
formed by a servicing dealer.
STIHL recommends that you have servicing and
repair work carried out exclusively by an author‐
ized STIHL servicing dealer. STIHL dealers are
regularly given the opportunity to attend training
courses and are supplied with the necessary
technical information.
Only use high-quality replacement parts in order
to avoid the risk of accidents and damage to the
machine. If you have any questions in this
respect, consult a servicing dealer.
STIHL recommends the use of genuine STIHL
replacement parts. They are specifically
designed to match your machine model and
meet your performance requirements.
Never attempt to modify your power tool in any
way since this will increase the risk of personal
injury.
Regularly check that the insulation of the power
cord and plug is in good condition and shows no
sign of ageing (brittleness).
Electrical components, e.g. power cord, may only
be repaired or replaced by a qualified electrician.
Clean plastic components with a cloth. Do not
use aggressive detergents. They may damage
the plastic.
Do not spray the machine with water.
Check tightness of mounting screws on safety
devices and the cutting attachment and retighten
if necessary.
Clean cooling air inlets in motor housing as nec‐
essary.
Store the machine is a safe and dry place.
English 2 Safety Precautions and Working Techniques
6 0458-277-0121-B

3 Using the Unit
3.1 Cutting season
Observe country-specific or municipal rules and
regulations for cutting hedges.
Do not use your power tool during other people's
rest periods.
3.2 Preparation
Use lopping shears or a chain saw to cut out
thick twigs and branches first.
3.3 Cutting sequence
If a radical cut is necessary, cut a little at a time
in several stages.
Cut the sides of the hedge first, then the top.
3.4 Disposal
Do not throw cuttings in the rubbish bin - they
can be composted.
3.5 Working techniques
3.5.1 Horizontal cut (with angled cutter bar)
277BA021 KN
Cutting close to the ground from a standing posi‐
tion, e.g. low shrubs.
WARNING
The K variant is not approved for cutting near the
ground.
3.5.2 Vertical cut (with angled cutter bar)
277BA022 KN
Cutting without standing directly next to the
hedge, e.g. flowerbed between operator and
hedge.
Swing the cutter bar up and down in an arc as
you move along the hedge – use both sides of
the cutting blades.
3.5.3 Vertical cut (with straight cutter bar)
389BA050 KN
Extra long reach without the need for other aids.
Swing the cutter bar up and down in an arc as
you move along the hedge – use both sides of
the cutting blades.
3 Using the Unit English
0458-277-0121-B 7

3.5.4 Top trimming (with angled cutting bar)
277BA023 KN
Hold and swing the hedge trimmer vertically, this
results in a larger range.
WARNING
Overhead working positions are tiring and should
be used only for short periods for reasons of
work safety. Set the adjustable cutter bar to the
most suitable angle so that the trimmer can be
held in a lower, less tiring position while still pro‐
viding adequate reach.
3.5.5 Horizontal cut (with straight cutter bar)
277BA024 KN
Cutting without standing directly next to the
hedge, e.g. flowerbed between operator and
hedge.
Hold the cutter bar at an angle of 0° to 10° as
you swing the hedge trimmer horizontally.
Swing the blade in an arc towards the outside of
the hedge so that the cuttings fall to the ground.
4 Mounting the Drive Tube
1
238BA016 KN
3
A
2
A
► Pull the protective cap off the drive tube.
► Push the drive tube (1) into the motor hous‐
ing (2) as far as the mark (A), turning the drive
tube back and forth at the same time.
► Tighten down the screw (3) in the housing
firmly.
English 4 Mounting the Drive Tube
8 0458-277-0121-B

5 Mounting the Loop Handle
7
8
2
277BA025 KN
1
6
7
8
9
9
3
► Place the clamp (1) in the loop handle (2) and
place it between the lifting eye (3) and the
handle hose (4) on the shaft (5)
► Position the clamp (6) against the shaft
► Line up the holes
► Insert the screws (7) with washers (8)
► Fit the square nuts (9) and screws
277BA026 KN
A2
► Align the loop handle (2) and move it to the
most comfortable position
Distance (A) must not be more than 45 cm. Rec‐
ommendation: about 35 cm
► Tighten screws
6 Mounting the Gearbox
2
3
277BA007 KN
11
4
► Loosen the clamp screws (1)
► Line up the sliding sleeve (2) – it must be in
line with the opening in the angle drive
► Push the gearbox (3) onto the drive tube (4),
turn the gearbox back and forth as necessary
3
5
277BA027 KN
► Once the end of the drive tube is inserted
beyond the slot in the clamp (5), push the
gearbox fully home
► Screw in the clamping screws as far as possi‐
ble
► Align the gear unit (3)
► Tighten clamping screws
5 Mounting the Loop Handle English
0458-277-0121-B 9

7 Adjusting the Cutter Bar
7.1 Adjustment mechanism 125°
277BA016 KN
In this version, the angle of the cutting bar rela‐
tive to the shaft is adjustable from 0° (completely
straight) to 45° (in 4 stages upward) and to 80°
(in 7 stages downward). Twelve individually
adjustable working positions are possible.
Additionally, the cutting bar can be set to a
defined transport position.
WARNING
Make adjustments only when the cutting blades
are at a standstill – motor switched off.
WARNING
The gearbox becomes hot during operation.
Never touch the gear housing – risk of burns!
WARNING
Never grab the blade when making adjustments
– risk of injury!
3
277BA009 KN
2
1
► Pull back the sliding sleeve (1) and use the
lever (2) to move the joint by one or more
holes in the perforated strip
► Release the sliding sleeve (1) again and allow
the bolt to engage in the perforated strip (3)
When the bolt is engaged (after completion of
adjustment), the sliding sleeve will be flush with
the housing again.
7.2 Transport position
277BA010 KN
For compact transport of the machine, in this ver‐
sion, the cutter bar can be swung parallel to the
shaft and locked in this position.
English 7 Adjusting the Cutter Bar
10 0458-277-0121-B

WARNING
The cutter bar must only be moved from working
position into transport position or the other way
around when the motor is switched off and the
blades are covered by the blade guard.
WARNING
The gearbox becomes hot during operation.
Never touch the gear housing – risk of burns!
3
277BA011 KN
► Switch off the motor
► Slide on the blade guard
► Pull back the sliding sleeve (1) and use the
lever (2) to pivot the joint upward toward the
shaft until the cutter bar is parallel to the shaft
► Release the sliding sleeve (1) again and allow
the bolt to engage in the position provided for
this in the housing
When the bolt is engaged (after completion of
adjustment), the sliding sleeve will be flush with
the housing again.
8 Fitting the Harness
Some versions of the machine can be carried on
a harness.
The type and version of the harness depend on
the market.
8.1 Shoulder strap
2
1
277BA028 KN
► Put on the shoulder strap (1)
► Adjust the length of the strap so that the cara‐
biner (2) is about a hand’s width below your
right hip
9 Connecting to Power Sup‐
ply
The voltage and frequency of the machine (see
rating plate) must match the voltage and fre‐
quency of the power connection.
The minimum fuse protection of the power con‐
nection must comply with the specifications – see
"Specifications".
The machine must be connected to the power
supply via an earth-leakage circuit breaker to dis‐
connect the power supply if the differential cur‐
rent to earth exceeds 30 mA.
The power connection must correspond to
IEC 60364 and relevant national regulations.
9.1 Extension cord
The design of the extension cord must at least
fulfill the same features as the connecting cord
on the machine. Observe the design marking
(type designation) on the connecting cord.
The cores in the cord must have the following
minimum cross-section depending on the mains
voltage and cord length.
Cord length Minimum cross-section
220 V – 240 V:
Up to 20 m 1.5 mm2
20 m to 50 m 2.5 mm2
100 V – 127 V:
Up to 10 m AWG 14 / 2.0 mm2
10 m to 30 m AWG 12 / 3.5 mm2
8 Fitting the Harness English
0458-277-0121-B 11

238BA008 KN
12
► Insert the plug (1) into the extension cord cou‐
pling (2)
9.2 Strain relief clamp, strain relief
flap (supports extension cord
and reduces the likelihood of
disconnection of extension cord
receptacles and trimmer plug)
The strain relief (cable retainer) protects the con‐
necting cable from damage.
4
238BA009 KN
5
3
► make a loop (3) in the extension cord
► Pass the loop (3) through the opening (4)
► Slip the loop (3) over the hook (5) and pull it
tight
► Plug the extension cord into a properly instal‐
led outlet
10 Switching On
2
1
277BA029 KN
► make sure you have a firm and secure stance
► Hold your unit with both hands – right hand on
the control handle – left hand on the loop han‐
dle
► Stand upright – hold the unit in a relaxed posi‐
tion and always on right side of your body.
► The cutting attachment must not touch any
objects or the ground
► Press down the starting lockout lever (1) and
hold it in that position
► Squeeze the trigger switch (2) and hold it in
that position
11 Switching Off
► Release the trigger switch and starting lockout
lever.
WARNING
Note that the cutting attachment continues to run
for a short period after you let go of the throttle
trigger and starting lockout lever – flywheel
effect.
During longer work breaks – disconnect the plug
from the power supply.
When the machine is not in use, shut it off so
that it does not endanger others.
Secure it against unauthorized use.
12 Overload Cutout
The machine is equipped with an overload cut‐
out.
The overload cutout disconnects the power sup‐
ply in the event of mechanical overload, e. g.,
due to
–Excessive feed effort
–"Killing" of the motor speed
–Pinching of the trimmer blades in the cut
English 10 Switching On
12 0458-277-0121-B

If the overload cutout has disconnected the
power:
► Remove the trimmer blades from the cut
► Wait for approx. 3 minutes until the overload
cutout has cooled down
Do not switch on the machine during this time,
because this substantially extends the cooling
down period.
Once the machine starts again:
► Let the machine run for approx. 15 seconds
without load – this cools the windings of the
motor and substantially delays renewed trig‐
gering of the overload cutout
13 Lubricating the Gearbox
13.1 Blade drive
For the blade drive, use STIHL gear lubricant for
hedge trimmers (special accessory).
► Check lubricant filling periodically and after
approx. every 25 hours of operation
► Unscrew the locking screw (1) – if no lubricant
is visible on the inside of it, then screw in the
lubricant tube
► Squeeze up to 5 g of lubricant into the gear
unit
NOTICE
Do not completely fill the gear unit with lubricant.
► Unscrew lubricant tube
► Refit locking screw (1) and tighten securely
13.2 Angle drive
For the angle drive, use STIHL gear lubricant for
hedge trimmers (special accessory).
► Check lubricant filling periodically and after
approx. every 25 hours of operation
► Unscrew the locking screw (2) – if no lubricant
is visible on the inside of it, then screw in the
lubricant tube
► Squeeze up to 5 g of lubricant into the gear
unit
NOTICE
Do not completely fill the gear unit with lubricant.
► Unscrew lubricant tube
► Refit locking screw (2) and tighten securely
14 Storing the Machine
If the machine is to remain out of use for approx.
3 months or more
► Clean the cutting blades, check condition and
spray with STIHL resin solvent
► Fit blade guard over the blades
► Thoroughly clean the machine, especially the
ventilation slots
► Store the machine in a dry, secure place using
the built-in ring on the bottom of the motor
housing. Protect against unauthorized use
(e. g., by children)
15 Sharpening Instructions
When cutting performance and behavior begin to
deteriorate, i.e. blades frequently snag on
branches: Resharpen the cutting blades.
It is best to have the cutting blades resharpened
by a dealer on a workshop sharpener. STIHL
recommends a STIHL servicing dealer.
It is also possible to use a flat crosscut sharpen‐
ing file. Hold the sharpening file at the prescribed
angle (see "Specifications").
► Only sharpen the cutting edge – do not file
blunt projecting parts of the cutting blade or
the cutting blade guard (see "Main Parts and
Controls")
► Always file towards the cutting edge.
13 Lubricating the Gearbox English
0458-277-0121-B 13

► The file only sharpens on the forward stroke –
lift it off the blade on the backstroke.
► Use a whetstone to remove burr from cutting
edge.
► Remove as little material as possible.
► After sharpening, clean away filing or grinding
dust and then spray the cutting blades with
STIHL resin solvent.
NOTICE
Do not operate your machine with dull or dam‐
aged cutting blades. This may cause overload
and will give unsatisfactory cutting results.
16 Maintenance and Care
The following intervals apply to normal operating con‐
ditions only. If your daily working time is longer or
operating conditions are difficult (very dusty work area,
etc.), shorten the specified intervals accordingly.
before starting work
after finishing work or daily
weekly
monthly
every 12 months
if problem
if damaged
as required
Complete machine Visual inspection X
Clean X
Cooling air inlet Visual inspection X
Clean X
Cutting blades Visual inspection X
Clean 2) X
Sharpen1)2) X
Have replaced by servic‐
ing dealer1)
X
Gearbox lubrication Check X
Replenish X
Carbon brushes. Have checked by servic‐
ing dealer1) after every
100 hours of operation
Have replaced by servic‐
ing dealer1)
X
All accessible screws and
nuts
Retighten X
Safety labels Replace X
1)STIHL recommends an authorized STIHL servicing dealer.2)Spray with STIHL resin solvent after
cleaning
17 Minimize Wear and Avoid
Damage
Observing the instructions in this manual helps
reduce the risk of unnecessary wear and dam‐
age to the power tool.
The power tool must be operated, maintained
and stored with the due care and attention
described in this instruction manual.
The user is responsible for all damage caused by
non-observance of the safety precautions, oper‐
ating and maintenance instructions in this man‐
ual. This includes in particular:
–Alterations or modifications to the product not
approved by STIHL.
–Using tools or accessories which are neither
approved or suitable for the product or are of a
poor quality.
–Using the product for purposes for which it
was not designed.
English 16 Maintenance and Care
14 0458-277-0121-B

–Using the product for sports or competitive
events.
–Consequential damage caused by continuing
to use the product with defective components.
17.1 Maintenance Work
All the operations described in the "Maintenance
Chart" must be performed on a regular basis. If
these maintenance operations cannot be per‐
formed by the owner, they should be performed
by a servicing dealer.
STIHL recommends that you have servicing and
repair work carried out exclusively by an author‐
ized STIHL servicing dealer. STIHL dealers are
regularly given the opportunity to attend training
courses and are supplied with the necessary
technical information.
If these maintenance operations are not carried
out as specified, the user assumes responsibility
for any damage that may occur. Among other
things, this includes:
–Damage to the motor due to neglect or defi‐
cient maintenance (e.g. not cleaning cooling
air inlets).
–Damage due to incorrect electrical connection
(voltage, inadequately rated connecting
cords).
–Corrosion and other consequential damage
resulting from improper storage.
–Damage to the product resulting from the use
of poor quality replacement parts.
17.2 Parts Subject to Wear and Tear
Some parts of the power tool are subject to nor‐
mal wear and tear even during regular operation
in accordance with instructions and, depending
on the type and duration of use, have to be
replaced in good time. Among other parts, this
includes:
–Cutting blades
18 Main Parts
34
5
10
13
16
12
11 14
1
2#
7
8
15
6
277BA030 KN
1 Loop handle
2 Drive tube
3 Carrying ring (HLE 71)
4 Starting lockout
5 Switch
6 Strain relief (cord retainer)
7 Power cord
8 Angle screwdriver
9 Cutting blades
10 Blade guard (scabbard)
11 Gearbox
12 Screw plug, blade drive
13 Screw plug, angle drive
14 Quadrant
15 Adjusting lever
16 Sliding sleeve
# Serial number
19 Specifications
19.1 Motor
Rated voltage: 230 - 240 V
Rated current: 2.6 A
Frequency: 50 Hz
Power consumption: 600 W
Fuse: min. 10 A
Protection class: II, E
19.2 Cutting blades
Blade type: Double-sided
Sharpening angle relative to
horizontal:
45°
18 Main Parts English
0458-277-0121-B 15

Tooth spacing: 35 mm
Stroke rate: 4000 rpm
Cutting length: 500 mm
19.3 Length
Total length with cutting blades
HLE 71: 2540 mm
HLE 71 K: 2110 mm
19.4 Weight
complete, with gearbox
HLE 71: 5.9 kg
HLE 711):6.5 kg
HLE 71 K: 5.6 kg
HLE 71 K1):6.2 kg
1)Version with 10 m power cord for Great Britain
19.5 Sound and vibration levels
Sound and vibration levels are determined on
the basis of the operating status at nominal maxi‐
mum speed.
For further details concerning compliance with
the employers' Directive on vibration
2002/44/EC, see www.stihl.com/vib/
19.5.1 Sound pressure level Lp to
EN 60745‑2‑15
HLE 71: 84 dB(A)
HLE 71 K: 85 dB(A)
19.5.2 Sound power level Lw to
EN 60745‑2‑15
HLE 71: 95 dB(A)
HLE 71 K: 96 dB(A)
19.5.3 Vibration level ahv to EN 60745‑2‑15
HLE 71:
Left handle: 7.6 m/s2
Right handle: 3.6 m/s2
HLE 71 K:
Left handle: 6.9 m/s2
Right handle: 4.3 m/s2
The K‑factor in accordance with Directive
2006/42/EC is 2.0 dB(A) for the sound pressure
level and sound power level; the K‑factor in
accordance with Directive 2006/42/EC is
2.0 m/s2 for the vibration level.
The vibration values quoted above have been
measured according to a standardized test pro‐
cedure and may be used to compare electric
power tools.
Depending on the type of usage, the vibrations
that actually occur may differ from the values
quoted.
The vibration values quoted may be used for an
initial assessment of the user's exposure to
vibrations.
The actual exposure to vibrations has to be eval‐
uated. This process may also take into account
times during which the electric power tool is
switched off and times during which it is switched
on but running without load.
Observe measures to reduce vibration exposure
to protect the user – see section on "Vibrations"
in chapter on "Safety Precautions and Working
Techniques".
19.6 REACH
REACH is an EC regulation and stands for the
Registration, Evaluation, Authorisation and
Restriction of Chemical substances.
For information on compliance with the REACH
regulation (EC) No. 1907/2006 see
www.stihl.com/reach.
20 Maintenance and Repairs
Users of this machine may only carry out the
maintenance and service work described in this
user manual. All other repairs must be carried
out by a servicing dealer.
STIHL recommends that you have servicing and
repair work carried out exclusively by an author‐
ized STIHL servicing dealer. STIHL dealers are
regularly given the opportunity to attend training
courses and are supplied with the necessary
technical information.
When repairing the machine, only use replace‐
ment parts which have been approved by STIHL
for this power tool or are technically identical.
Only use high-quality replacement parts in order
to avoid the risk of accidents and damage to the
machine.
STIHL recommends the use of original STIHL
replacement parts.
Original STIHL parts can be identified by the
STIHL part number, the { logo and the
STIHL parts symbol K (the symbol may appear
alone on small parts).
21 Disposal
Observe all country-specific waste disposal rules
and regulations.
English 20 Maintenance and Repairs
16 0458-277-0121-B

000BA073 KN
STIHL products must not be thrown in the gar‐
bage can. Take the product, accessories and
packaging to an approved disposal site for envi‐
ronment-friendly recycling.
Contact your STIHL servicing dealer for the lat‐
est information on waste disposal.
22 EC Declaration of Con‐
formity
ANDREAS STIHL AG & Co. KG
Badstr. 115
D-71336 Waiblingen
Germany
declare under our sole responsibility that
Designation: Long Reach Electric
Hedge Trimmers
Make: STIHL
Series: HLE 71:
HLE 71 K:
Serial identification num‐
ber:
4813
conforms to the relevant provisions of Directives
2011/65/EU, 2006/42/EC, 2014/30/EU and
2000/14/EC and has been developed and manu‐
factured in compliance with the following stand‐
ards in the versions valid on the date of produc‐
tion:
EN 55014‑1, EN 55014‑2, EN 60745‑1,
EN 60745‑2‑15, EN 61000‑3‑2, EN 61000‑3‑3,
EN ISO 10517
The measured and the guaranteed sound power
level have been determined in accordance with
Directive 2000/14/EC, Annex V, and standard
ISO 11094.
Measured sound power level
95 dB(A)
Guaranteed sound power level
97 dB(A)
Technical documents deposited at:
ANDREAS STIHL AG & Co. KG
Produktzulassung
The year of construction, the country of manufac‐
ture and the machine number are shown on the
machine.
Done at Waiblingen, 15.07.2021
ANDREAS STIHL AG & Co. KG
pp
Dr. Jürgen Hoffmann
Director Product Certification & Regulatory
Affairs
23 UKCA Declaration of Con‐
formity
ANDREAS STIHL AG & Co. KG
Badstr. 115
D-71336 Waiblingen
Germany
declare under our sole responsibility that
Designation: Long Reach Electric
Hedge Trimmers
Make: STIHL
Series: HLE 71:
HLE 71 K:
Serial identification num‐
ber:
4813
conforms to the relevant provisions of UK regula‐
tions The Restriction of the Use of Certain Haz‐
ardous Substances in Electrical and Electronic
Equipment Regulations 2012, Supply of Machi‐
nery (Safety) Regulations 2008, Electromagnetic
Compatibility Regulations 2016 and Noise Emis‐
sion in the Environment by Equipment for Use
Outdoors Regulations 2001 and has been manu‐
factured in compliance with the following stand‐
ards in the versions valid on the date of produc‐
tion:
EN 55014‑1, EN 55014‑2, EN 60745‑1,
EN 60745‑2‑15, EN 61000‑3‑2, EN 61000‑3‑3,
EN ISO 10517
22 EC Declaration of Conformity English
0458-277-0121-B 17

The measured and guaranteed sound power lev‐
els were determined in accordance with the UK
regulation Noise Emission in the Environment by
Equipment for Use Outdoors Regulations 2001,
Schedule 8, using the ISO 11094 standard.
Measured sound power level
95 dB(A)
Guaranteed sound power level
97 dB(A)
Technical documents deposited at:
ANDREAS STIHL AG & Co. KG
The year of construction, the country of manufac‐
ture and the machine number are shown on the
machine.
Done at Waiblingen, 15.07.2021
ANDREAS STIHL AG & Co. KG
pp
Dr. Jürgen Hoffmann
Director Product Certification & Regulatory
Affairs
24 General Power Tool Safety
Warnings
This chapter reproduces the pre-formulated, gen‐
eral safety precautions specified in the EN 60745
European standard for hand-held motor-oper‐
ated electric tools. STIHL is required by law to
print these standardized texts verbatim.
The safety precautions and warnings on avoiding
an electric shock given under "2) Electric Pre‐
cautions" do not apply to STIHL cordless electric
power tools
WARNING
Read all safety warnings and instructions. Failure
to follow the warnings and instructions may result
in electric shock, fire and/or serious injury.
Save all warnings and instructions for future ref‐
erence.
The term "power tool" in the warnings refers to
your mains-operated (corded) power tool or bat‐
tery-operated (cordless) power tool.
24.1 1) Work area safety
a)Keep work area clean and well lit. Cluttered or
dark areas invite accidents.b)Do not operate
power tools in explosive atmospheres, such as in
the presence of flammable liquids, gases or dust.
Power tools create sparks which may ignite the
dust or fumes.c)Keep children and bystanders
away while operating a power tool. Distractions
can cause you to lose control.
24.2 2) Electrical safety
a)Power tool plugs must match the outlet. Never
modify the plug in any way. Do not use any
adapter plugs with earthed (grounded) power
tools. Unmodified plugs and matching outlets will
reduce risk of electric shock.b)Avoid body con‐
tact with earthed or grounded surfaces, such as
pipes, radiators, ranges and refrigerators. There
is an increased risk of electric shock if your body
is earthed or grounded.c)Do not expose power
tools to rain or wet conditions. Water entering a
power tool will increase the risk of electric
shock.d)Do not abuse the cord. Never use the
cord for carrying, pulling or unplugging the power
tool. Keep cord away from heat, oil, sharp edges
or moving parts. Damaged or entangled cords
increase the risk of electric shock.e)When oper‐
ating a power tool outdoors, use an extension
cord suitable for outdoor use. Use of a cord suit‐
able for outdoor use reduces the risk of electric
shock.f)If operating a power tool in a damp loca‐
tion is unavoidable, use a residual current device
(RCD) protected supply. Use of an RCD reduces
the risk of electric shock.
24.3 3) Personal safety
a)Stay alert, watch what you are doing and use
common sense when operating a power tool. Do
not use a power tool while you are tired or under
the influence of drugs, alcohol or medication. A
moment of inattention while operating power
tools may result in serious personal injury.b)Use
personal protective equipment. Always wear eye
English 24 General Power Tool Safety Warnings
18 0458-277-0121-B

protection. Protective equipment such as dust
mask, non-skid safety shoes, hard hat, or hear‐
ing protection used for appropriate conditions will
reduce personal injuries.c)Prevent unintentional
starting. Ensure the switch is in the off-position
before connecting to power source and/or battery
pack, picking up or carrying the tool. Carrying
power tools with your finger on the switch or
energising power tools that have the switch on
invites accidents.d)Remove any adjusting key or
wrench before turning the power tool on. A
wrench or a key left attached to a rotating part of
the power tool may result in personal injury.e)Do
not overreach. Keep proper footing and balance
at all times. This enables better control of the
power tool in unexpected situations.f)Dress prop‐
erly. Do not wear loose clothing or jewellery.
Keep your hair, clothing and gloves away from
moving parts. Loose clothes, jewellery or long
hair can be caught in moving parts.g)If devices
are provided for the connection of dust extraction
and collection facilities, ensure these are con‐
nected and properly used. Use of dust collection
can reduce dust-related hazards.
24.4 4) Power tool use and care
a)Do not force the power tool. Use the correct
power tool for your application. The correct
power tool will do the job better and safer at the
rate for which it was designed.b)Do not use the
power tool if the switch does not turn it on and
off. Any power tool that cannot be controlled with
the switch is dangerous and must be
repaired.c)Disconnect the plug from the power
source and/or the battery pack from the power
tool before making any adjustments, changing
accessories, or storing power tools. Such pre‐
ventive safety measures reduce the risk of start‐
ing the power tool accidentally.d)Store idle power
tools out of the reach of children and do not
allow persons unfamiliar with the power tool or
these instructions to operate the power tool.
Power tools are dangerous in the hands of
untrained users.e)Maintain power tools. Check
for misalignment or binding of moving parts,
breakage of parts and any other condition that
may affect the power tool's operation. If dam‐
aged, have the power tool repaired before use.
Many accidents are caused by poorly maintained
power tools.f)Keep cutting tools sharp and clean.
Properly maintained cutting tools with sharp cut‐
ting edges are less likely to bind and are easier
to control.g)Use the power tool, accessories, tool
bits etc. in accordance with these instructions,
taking into account the working conditions and
the work to be performed. Use of the power tool
for operations different from those intended could
result in a hazardous situation.
24.5 5) Service
a)Have your power tool serviced by a qualified
repair person using only identical replacement
parts. This will ensure that the safety of the
power tool is maintained.
24.6 Hedge Trimmer Safety Warn‐
ings
–Keep all parts of the body away from the cut‐
ting blades. Do not remove cut material or
hold material to be cut when blades are mov‐
ing. Make sure the switch is off when clearing
jammed material. A moment of inattention
while operating the hedge trimmer may result
in serious personal injury.
–Carry the hedge trimmer by the handle with
the cutting blades stopped. When transporting
or storing the hedge trimmer always fit the
blade scabbard. Proper handling of the hedge
trimmer will reduce possible personal injury
from the cutting blades.
–Always hold your electric power tool by the
insulated handles because the cutting blades
may contact hidden electrical wires or your
own power cord. Any blade contact with a live
wire may energize metallic parts of the power
tool and result in an electric shock.
–Keep the power cord away from cutting area.
During operation the power cord may be hid‐
den in shrubs and can be accidentally severed
by the blade.
24 General Power Tool Safety Warnings English
0458-277-0121-B 19
Other manuals for HLE 71
6
Table of contents
Other Stihl Trimmer manuals