Stihl HS 86 User manual

Instruction Manual
Notice d’emploi
STIH)
STIHL HS 86

1HS 86 R, HS 86 T
English
BA_SE_177_006_01_02.fmPrinted on chlorine-free paper.
Printing inks contain vegetable oils; paper can be recycled.
© ANDREAS STIHL AG & Co. KG, 2008
0458 443 8221 A. M0,25. B8. PM. Printed in USA
STIHl
Contents
Guide to Using this Manual .............. 2
Safety Precautions and
Working Techniques ......................... 3
Using the Unit ................................... 9
Fuel ................................................ 11
Fueling ............................................ 12
Starting / Stopping
the Engine ...................................... 13
Cleaning the Air Filter ..................... 15
Motor Management ........................ 16
Adjusting the Carburetor ................ 16
Spark Arresting Screen
in Muffler ......................................... 17
Checking the Spark Plug ................ 18
Lubricating the Gearbox ................. 19
Rewind Starter ................................ 19
Storing the Machine ........................ 20
Sharpening Instructions .................. 20
Inspections and
Maintenance by Dealer .................. 20
Maintenance Chart ......................... 21
Parts and Controls .......................... 22
Specifications ................................. 24
Special Accessories ....................... 25
Maintenance and Repairs ............... 25
STIHL Limited Emission Control
Warranty Statement ........................ 26
Allow only persons who understand this
manual to operate your hedge trimmer.
To receive maximum performance and
satisfaction from your STIHL hedge
trimmer, it is important that you read and
understand the maintenance and safety
precautions, starting on page 3, before
using your hedge trimmer.
Contact your STIHL dealer or the STIHL
distributor for your area if you do not
understand any of the instructions in this
manual.
!Warning!
Because a hedge trimmer is a high-
speed cutting tool some special safety
precautions must be observed to reduce
the risk of personal injury.
Careless or improper use may cause
serious or even fatal injury.
STIHL's philosophy is to continually
improve all of its products. As a result,
engineering changes and improve-
ments are made from time to time. If the
operating characteristics or the appear-
ance of your hedge trimmer differs from
those described in this manual, please
contact your STIHL dealer for
information and assistance.

2
English
HS 86 R, HS 86 T
Pictograms
All the pictograms attached to the
machine are shown and explained in
this manual.
The operating and handling instructions
are supported by illustrations.
Symbols in text
The individual steps or procedures
described in the manual may be marked
in different ways:
:A bullet marks a step or procedure
without direct reference to an
illustration.
A description of a step or procedure that
refers directly to an illustration may
contain item numbers that appear in the
illustration.
Example:
Loosen the screw (1)
Lever (2) ...
In addition to the operating instructions,
this manual may contain paragraphs
that require your special attention. Such
paragraphs are marked with the
symbols described below:
Warning where there is a risk of an
accident or personal injury or
serious damage to property.
Caution where there is a risk of
damaging the machine or its
individual components.
Note or hint which is not essential
for using the machine, but may
improve the operator’s under-
standing of the situation and result
in better use of the machine.
Note or hint on correct procedure in
order to avoid damage to the
environment.
Equipment and features
This instruction manual may refer to
several models with different
features. Components that are not
installed on all models and related
applications are marked with an
asterisk (*). Such components may
be available as special accessories
from your STIHL dealer.
Engineering improvements
STIHL’s philosophy is to continually
improve all of its products. As a result,
engineering changes and improvements
are made from time to time. If the
operating characteristics or the
appearance of your machine differ from
those described in this manual, please
contact your STIHL dealer for
assistance.
Therefore some changes, modifications
and improvements may not be covered
in this manual.
Guide to Using this Manual

3HS 86 R, HS 86 T
English
Because this is a high-
speed, fast-cutting power
tool with sharp cutting
blades, special safety
precautions must be
observed during
operation.
It is important that you
read and understand the
instruction manual before
using the unit for the first
time. Keep the manual in
a safe place for future
reference. Non-observance of the safety
precautions in the instruction manual
may cause serious or even fatal injury.
Always observe local safety regulations,
standards and ordinances.
If you have not used this type of power
tool before: Have your dealer or other
experienced user show you how to
operate your power tool or attend a
special course of training in power tool
operation.
Minors should never be allowed to use a
power tool.
Bystanders, especially children, and
animals should not be allowed in the
area where a power tool is in use.
When the machine is not in use (work
break), shut it off so that it does not
endanger others and secure it against
unauthorized use.
The power tool user is responsible for
avoiding injury to third parties or damage
to their property.
Do not lend or rent your power tool
without the instruction manual. Be sure
that anyone using your power tool
understands the information contained
in this manual.
To operate the power tool you must be
rested, in good physical condition and
mental health.
If you have any condition that might be
aggravated by strenuous work, check
with your doctor before operating a
power tool.
Persons with pacemakers only: The
ignition system of your unit produces an
electromagnetic field of a very low
intensity. This field may interfere with
some pacemakers. To reduce health
risks, STIHL recommends that persons
with pacemaker consult their physician
and the pacemaker manufacturer before
operating this tool.
Do not operate the power tool if you are
under the influence of any substance
(drugs, alcohol) which might impair
vision, dexterity or judgment.
Use your power tool only for cutting
hedges, shrubs, scrub, bushes and
similar material.
It must not be used for any other
purpose since this may result in
accidents or damage to the machine.
Never attempt to modify your power tool
in any way since this can be extremely
dangerous and also result in accidents
or damage to the machine.
Safety Precautions and
Working Techniques

4
English
HS 86 R, HS 86 T
Only mount cutting blades and
accessories that are explicitly approved
for this power tool model by STIHL or
are technically identical. If you have any
questions in this respect, consult a
servicing dealer.
To reduce the risk of accidents or
damage to the machine, use only high
quality tools and replacement parts.
STIHL recommends the use of STIHL
original tools and accessories. The
characteristics of these components are
specifically designed to match your
machine and meet your performance
requirements.
Clothing and Equipment
Wear proper protective clothing and
equipment.
Clothing must be sturdy
but allow complete
freedom of movement.
Wear snug-fitting clothing,
e.g. an overall and jacket
combination, do not wear
a work coat.
Avoid loose-fitting jackets, scarves,
neckties, jewellery or anything that could
get caught on moving parts of the
machine. Tie up and confine long hair
(e.g. with a hair net, cap, hard hat, etc.).
Wear sturdy footwear with non-slip
soles.
Wear safety glasses.
Wear hearing
protection, e.g. earplugs
or ear muffs.
Wear heavy-duty
gloves, preferably made
of leather.
STIHL offers a comprehensive range of
safety clothing and equipment.
Transporting the Machine
Always turn off the engine and always fit
the blade scabbard over the cutting
blades – even when you carry the
machine for short distances.
Carry the power tool by the handle –
cutting blades behind you. Avoid
touching hot parts of the machine,
especially the muffler and gear housing
– you could suffer serious burns.
Transporting in a vehicle: Properly
secure your unit to prevent turnover, fuel
spillage and damage.
Fueling
Gasoline is an
extremely flammable
fuel. Keep clear of naked
flames and fire. Do not
spill any fuel – do not
smoke.
Always shut off the engine before
refueling.
Do not fuel a hot engine – fuel may spill
and cause a fire.
Open the fuel cap carefully to allow any
pressure build-up in the tank to release
slowly and avoid fuel spillage.

5HS 86 R, HS 86 T
English
Fuel your power tool in a well-ventilated
area, outdoors only. If you spill fuel, wipe
the machine immediately – if fuel gets on
your clothing, change immediately.
Your power tool comes standard with
either a screw-type or bayonet-type fuel
cap.
After fueling, tighten down
the screw-type fuel cap as
securely as possible.
Insert the fuel cap with
hinged grip (bayonet type
cap) correctly in the
opening, turn it clockwise
as far as stop and fold the
grip down.
This reduces the risk of unit vibrations
causing the fuel cap to loosen or come
off and spill quantities of fuel.
To reduce the risk of serious or fatal
burn injuries, check for fuel leakage. If
fuel leakage is found, do not start or run
the engine until leak is fixed.
Before Starting
Check that your power tool is properly
assembled and in good condition – refer
to appropriate chapters in the instruction
manual:
– Engage the blade lock (if fitted).
– Slide control / stop switch must
move easily to STOP or 0
– Smooth action of throttle trigger and
throttle trigger interlock (if fitted) –
throttle trigger must return
automatically to idle position.
– Check that spark plug boot is secure
– a loose boot may cause arcing
that could ignite combustible fumes
and cause a fire.
– Cutting blades securely mounted
and in good condition (clean, move
freely, not warped), properly
sharpened and sprayed with STIHL
resin solvent (lubricant).
– Never attempt to modify the controls
or safety devices.
– Keep the handles dry and clean,
free from oil and dirt, for safe
control.
To reduce the risk of accidents, operate
your power tool only if it is in good
working order.
Starting the Engine
Start the engine at least 3 meters from
the fueling spot, outdoors only.
Place the unit on firm ground in an open
area. Make sure you have good balance
and secure footing. Hold the unit
securely. The cutting blades must be
clear of the ground and all other
obstructions because they may begin to
run when the engine starts.
Your power tool is a one-person unit. Do
not allow other persons in the general
work area, even when starting.

6
English
HS 86 R, HS 86 T
To reduce the risk of injury, avoid contact
with the cutting blades.
Do not drop start the power tool. The
correct starting procedure is described
in your instruction manual.
Note that the cutting blades continue to
run for a short period after you let go of
the throttle trigger (flywheel effect).
Check the idle speed setting. The cutting
blades must not move when the engine
is idling with the throttle trigger released.
Holding and Controlling the
Machine
Always hold the unit firmly with both
hands on the handles.
Left hand on the control handle, right
hand on the front handle. Wrap your
fingers and thumbs around the handles.
Make sure you always have a secure
footing and operate the machine so that
the cutting blades are always away
from your body.
During Operation
In the event of imminent danger or in an
emergency, switch off the engine
immediately – move the slide control /
stop switch to 0or STOP.
Check that there are no bystanders in
the general work area.
Observe the cutting blades at all times –
do not cut any areas of the hedge that
you cannot see.
When cutting the top of a taller hedge,
check the other side of the hedge
frequently for bystanders, animals and
obstructions.
Make sure the idle speed setting is
correct. The cutting blades must not run
when the engine is idling with the throttle
trigger released.
Check and correct the idle speed setting
at regular intervals. If the cutting blades
still run, have your dealer check your
machine and make proper adjustments
or repairs.

7HS 86 R, HS 86 T
English
Note that the cutting blades continue to
run for a short period after you let go of
the throttle trigger (flywheel effect).
Take special care in slippery conditions
– damp, snow, ice, on slopes, uneven
ground, etc.
Clear away fallen branches, scrub and
cuttings.
Watch out for obstacles such as tree
stumps and roots which could cause you
to trip or stumble.
Make sure you always have firm and
secure footing.
When working at a height that exceeds
the unit’s reach:
– Use a lift bucket
– Never work on a ladder
– Never work on an insecure support
– Never operate your unit with one
hand
Be particularly alert and cautious when
wearing hearing protection because
your ability to hear warnings (shouts,
alarms, etc.) is restricted.
To reduce the risk of accidents, take a
break in good time to avoid tiredness or
exhaustion.
Work calmly and carefully – in daylight
conditions and only when visibility is
good. Stay alert at all times so as not to
endanger others.
Your power tool produces
toxic exhaust fumes as
soon as the engine is
running. These fumes
may be colorless and
odorless. Never run the
engine indoors or in poorly ventilated
locations, even if your model is equipped
with a catalytic converter.
To reduce the risk of serious of fatal
injury from breathing toxic fumes,
ensure proper ventilation when working
in trenches, hollows or other confined
locations.
Operate your power tool so that it
produces a minimum of noise and
emissions – do not run engine
unnecessarily, accelerate the engine
only for cutting.
To reduce risk of fire, do not smoke
while operating or standing near your
power tool. Note that combustible fuel
vapor may escape from the fuel system.
The dust, vapor and smoke created
during operation may be damaging to
health. Wear a suitable respirator in very
dusty or smoky conditions.
The gearbox becomes hot during
operation. To reduce the risk of burn
injury, do not touch the gear housing.
If your power tool is subjected to
unusually high loads for which it was not
designed (e.g. heavy impact or a fall),
always check that it is in good condition
before continuing work – see also
“Before Starting”.
Check in particular that the fuel system
is tight (no leaks) and the safety devices
are working properly. Do not continue
operating your power tool if it is
damaged. In case of doubt, have the
machine checked by your servicing
dealer.
Do not operate your power tool with the
starting throttle lock engaged as you do
not have control of the engine speed in
this position.

8
English
HS 86 R, HS 86 T
Inspect hedge and work area to avoid
damaging the cutting blades:
– Remove stones, rocks, pieces of
metal and other solid objects.
– When working close to the ground,
make sure that no sand, grit or
stones get between the blades.
– Take particular care when cutting
hedges next to or against wire
fences. Do not touch wire with the
cutting blades.
To avoid the risk of electrocution, do
not touch electric power lines – never cut
through electric power lines.
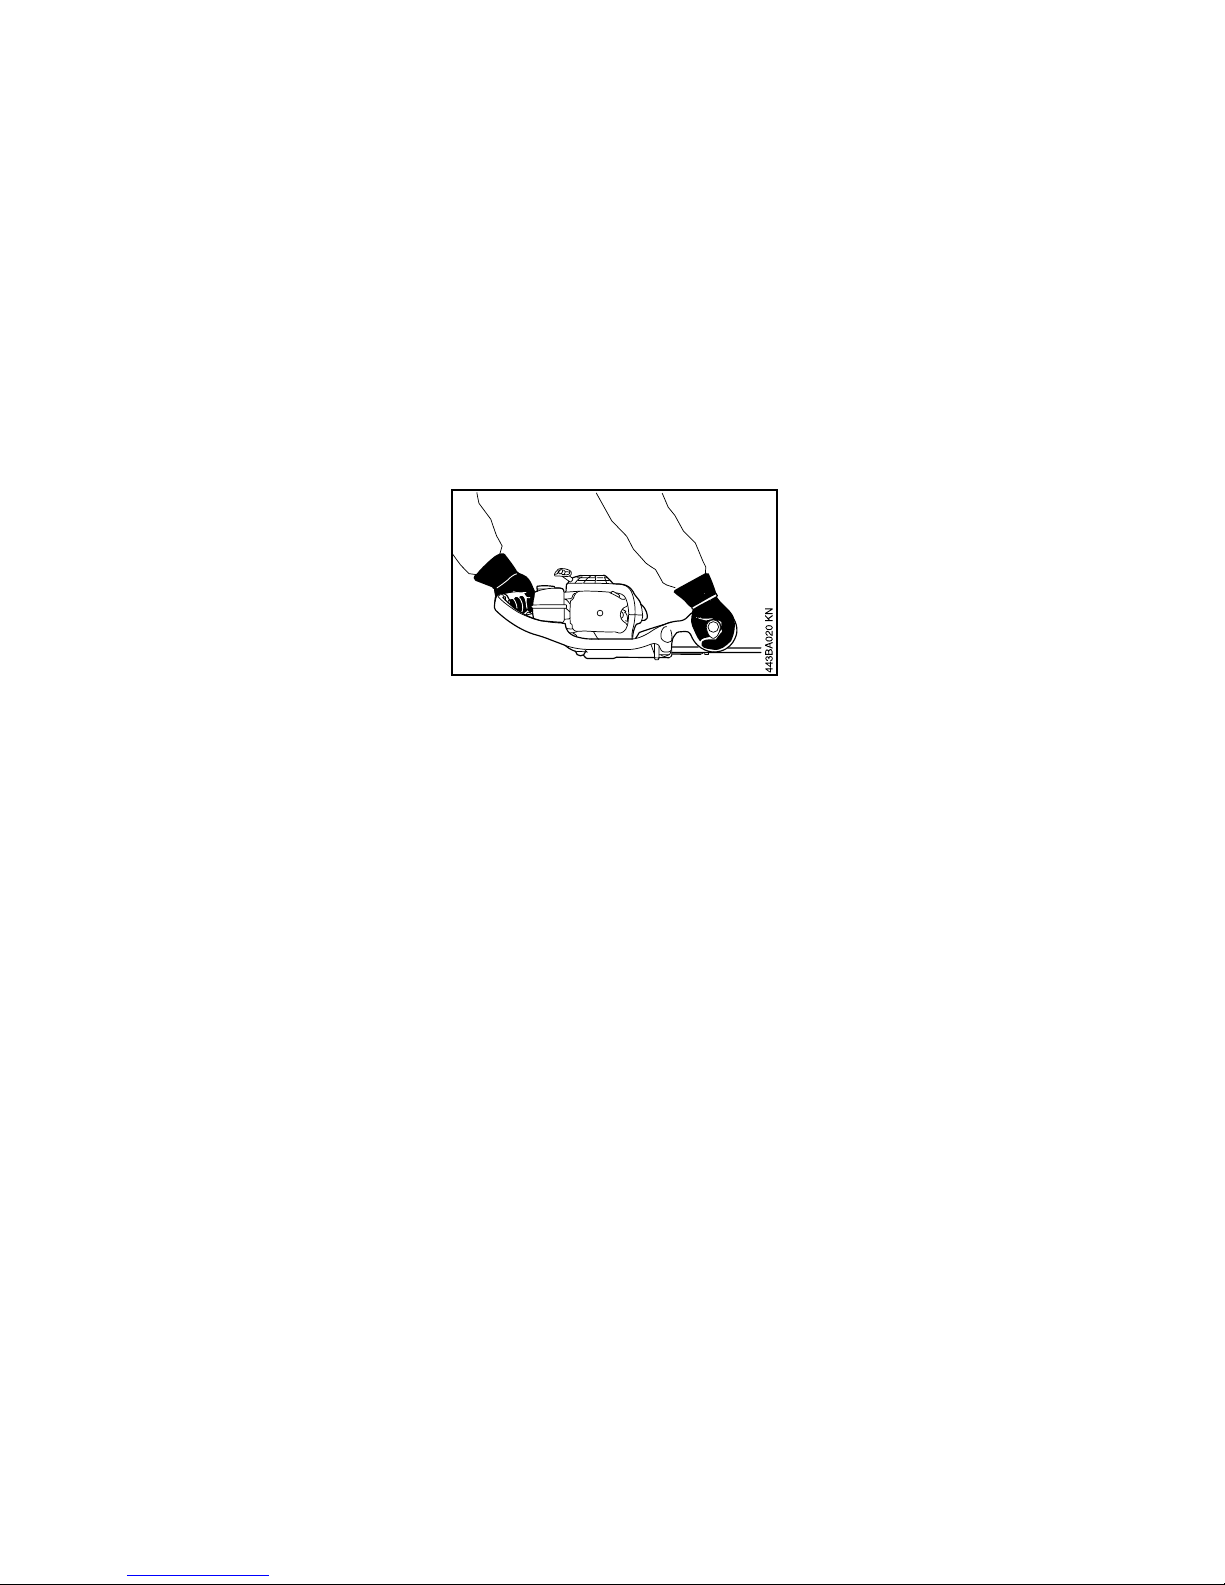
Do not touch the cutting
blades while the engine is
running. If the cutting
blades become jammed
by thick branches or other
obstructions, switch off
the engine immediately before
attempting to free the blades.
Opening the throttle while the blades are
blocked increases the load and reduces
engine speed. The clutch then slips
continuously and this causes
overheating and damage to important
components (e.g. clutch, polymer
housing components) – and this can
increase the risk of injury from the
blades moving while the engine is idling.
If the hedge is very dusty or dirty, spray
the blades with STIHL resin solvent from
time to time during cutting. This helps
reduce blade friction as well as the
aggressive effects of sap and the build-
up of dirt particles.
Always shut off the engine before
leaving the unit unattended.
Check the cutting blades at regular short
intervals during operation or
immediately if there is a noticeable
change in cutting bahvior:
– Shut off the engine.
– Wait until the cutting blades have
come to a complete standstill.
– Check condition and tightness, look
for cracks.
– Check sharpness.
To reduce the risk of fire, always clean
plant residue, chips, leaves and excess
lubricant off the engine and muffler.
After Finishing Work
Always clean dust and dirt off the
machine – do not use any grease
solvents for this purpose.
Spray the blades with STIHL resin
solvent. Start and run the engine briefly
so that the solvent is evenly distributed.
Vibrations
Prolonged use of the unit may result in
vibration-induced circulation problems in
the hands (whitefinger disease).
No general recommendation can be
given for the length of usage because it
depends on several factors.
The period of usage is prolonged by:
– Hand protection (wearing warm
gloves)
–breaks
The period of usage is shortened by:
– Any personal tendency to suffer
from poor circulation (symptoms:
frequently cold fingers, itching).
– Low outside temperatures.
– Gripping force (a tight grip hinders
circulation).
Continual and regular users should
monitor closely the condition of their
hands and fingers. If any of the above
symptoms appear, seek medical advice.

9HS 86 R, HS 86 T
English
Maintenance and repairs
The machine must be serviced regularly.
Do not attempt any maintenance or
repair work not described in your
Owner’s Manual. All other work should
be carried out by a servicing dealer.
STIHL recommends that maintenance
and repair work be carried out only by
authorized STIHL dealers. STIHL
dealers receive regular training and are
supplied with technical information.
Use only high-quality replacement parts,
in order to avoid the risk of accidents or
damage to the machine. Contact a
dealer if in doubt.
STIHL recommends the use of genuine
STIHL spare parts. Such parts have
been optimized for the machine and the
user's requirements.
Before starting any maintenance or
repair work and before cleaning the
machine, always stop the engine and
disconnect the spark plug boot to
avoid all risk of injury if the engine
starts up inadvertently. – Exception:
adjustment of carburetor and idle speed.
Do not service or store the machine near
a naked light – risk of fire due to the
fuel.
Check fuel cap regularly for tightness.
Use only the spark plugs approved by
STIHL – see Specifications.
Inspect ignition lead (insulation in good
condition, secure connection).
To reduce the risk of fire due to ignition
outside the cylinder, move the slide
control / stop switch to STOP or 0before
turning the engine over on the starter
with the spark plug boot removed or the
spark plug unscrewed.
Check that the muffler is in perfect
working condition.
Do not use the machine if the muffler is
damaged or missing – risk of fire! –
Hearing damage!
Do not touch the hot muffler – risk of
burns!
The condition of the anti-vibration
buffers influences the machine's
vibrations – they must be examined
regularly.
HS 86 R
The HS 86 R is designed for cutting
hedges and shrubs with thicker stems
and branches.
HS 86 T
The HS 86 T is designed for shaping
and trimming hedges and shrubs with
thinner branches.
Use the HS 86 R hedge trimmer for
cutting hedges with thicker branches.
Using the Unit

10
English
HS 86 R, HS 86 T
Cutting season
Observe all country-specific and local
regulations and ordinances regarding
hedge trimming.
Do not use your hedge trimmer during
other people’s rest periods.
Cutting sequence
Use lopping shears or a chainsaw to cut
out thick branches first.
Cut both sides of the hedge first, then
the top.
Cutting techniques
Vertical cut:
Swing the cutting blade from the bottom
upward in an arc – lower the nose of the
blade, move along the hedge and then
swing the blade up again in an arc.
Horizontal cut:
Hold the cutting blade at an angle of 0°
to 10° as you swing the hedge trimmer
horizontally.
Swing the blade in an arc towards the
outside of the hedge so that the cuttings
fall to the ground.
Cuttings can be conveniently swept off
the hedge with the aid of the catcher
plate on the cutting blade (special
accessory).

11HS 86 R, HS 86 T
English
This engine is certified to operate on
unleaded gasoline and with the mix ratio
50:1.
Your engine requires a mixture of high-
quality premium gasoline and high-
quality two-stroke air-cooled engine oil.
Use premium branded unleaded
gasoline with a minimum octane rating
of 89 RON.
Note: Models equipped with a catalytic
converter require unleaded gasoline. A
few tankfuls of leaded gasoline can
reduce the efficiency of the catalytic
converter by more than 50%.
Fuel with a lower octane rating may
result in preignition (causing "pinging")
which is accompanied by an increase in
engine temperature. This, in turn,
increases the risk of the piston seizure
and damage to the engine.
The chemical composition of the fuel is
also important. Some fuel additives not
only detrimentally affect elastomers
(carburetor diaphragms, oil seals, fuel
lines etc.), but magnesium castings as
well. This could cause running problems
or even damage the engine. For this
reason it is essential that you use only
high-quality fuels!
Fuels with different percentages of
ethanol are being offered. Ethanol can
affect the running behaviour of the
engine and increase the risk of lean
seizure.
Use only STIHL two-stroke engine oil or
equivalent high-quality two-stroke air-
cooled engine oils for mixing.
We recommend STIHL 50:1 two-stroke
engine oil since it is specially formulated
for use in STIHL engines.
Do not use BIA or TCW (two-stroke
water cooled) mix oils!
Use only STIHL 50:1 heavy-duty
engine oil or an equivalent quality two-
stroke engine oil for the fuel mix in
models equipped with a catalytic
converter.
Take care when handling gasoline.
Avoid direct contact with the skin and
avoid inhaling fuel vapour.
The canister should be kept tightly
closed in order to avoid any moisture
getting into the mixture.
The fuel tank and the canister in which
fuel mix is stored should be cleaned
from time to time.
Fuel mix ratio
Only mix sufficient fuel for a few days
work, not to exceed 3 months of storage.
Store in approved safety fuel-canisters
only. When mixing, pour oil into the
canister first, and then add gasoline.
Examples
Dispose of empty mixing-oil canisters
only at authorized disposal locations.
Fuel
Gasoline Oil (STIHL 50:1 or
equivalent high-quality
oils)
liters liters (ml)
1 0.02 (20)
50.10(100)
10 0.20 (200)
15 0.30 (300)
20 0.40 (400)
25 0.50 (500)

12
English
HS 86 R, HS 86 T
Before fueling, clean the filler cap and
the area around it to ensure that no dirt
falls into the tank.
Position the machine so that the filler
cap is facing up.
Always thoroughly shake the mixture in
the canister before fueling your
machine.
In order to reduce the risk of burns
or other personal injury from
escaping gas vapor and fumes,
remove the fuel filler cap carefully
so as to allow any pressure build-up
in the tank to release slowly.
Opening the cap
:Swing the grip 90° to the upright
position.
:Turn the cap counterclockwise
(about a quarter turn).
:Remove the filler cap.
Closing the cap
:Insert the cap in the opening – with
the grip upright – the marks must
line up.
:Turn cap clockwise as far as stop
(about a quarter turn).
:Fold the grip down so that it is flush
with the top of the cap.
If the grip does not lie completely flush
with the cap and the lug on the grip does
not engage the recess in the filler neck
(arrow), the cap is not properly seated
and tightened and you must repeat the
above steps.
Fueling

13HS 86 R, HS 86 T
English
Change the fuel pickup body
once every year
:Drain the fuel tank.
:Use a hook to pull the fuel pickup
body out of the tank and take it off
the hose.
:Push the new pickup body into the
hose.
:Place the pickup body in the tank.
Starting the engine
Observe safety precautions – see
chapter on “Safety Precautions and
Working Techniques”.
:Press down the interlock lever (1)
and squeeze the throttle trigger (2) –
hold them in that position.
:Move the slide control (3) to START
and hold it that position.
:Let go of the throttle trigger, slide
control and interlock lever in that
order. This is the starting throttle
position.
:Set the choke lever (4):
For cold start to g
For warm start to e
– also use this setting if the engine
has been running but is still cold.
:Press the fuel pump bulb at least
five times, even if it is already filled
with fuel.
Starting / Stopping
the Engine
STOP
443BA038 KN
443BA039 KN

14
English
HS 86 R, HS 86 T
:Put the unit on the ground. Make
sure it is secure.
:Remove the blade scabbard. The
cutting blades must be clear of the
ground and not touch any other
objects.
:Make sure you have a firm footing.
:Hold the unit with your left hand on
the fan housing and press it down
firmly.
:Pull the starter rope slowly with your
right hand until you feel it engage
and then give it a brisk strong pull.
Do not pull out the starter rope all
the way – if might otherwise break.
:Do not let the starter grip snap back
– guide it slowly into the housing so
that the starter rope can rewind
properly.
When engine begins to fire:
:Move the choke lever to eand
continue cranking.
As soon as engine runs
:Immediately blip the throttle trigger,
the slide control moves to the run
position #and the engine settles
down to idle speed.
At very low outside temperatures –
warm up the engine
As soon as engine runs:
:Allow engine to run in starting
throttle position for about 10
seconds.
:Then open the throttle wide, the
slide control moves to the run
position #and the engine settles
down to idle speed.
Stopping the engine
:Move the slide control to 0 or STOP.
If the engine doesn’t start
Fuel tank has been run dry and then
refueled
:Press the fuel pump bulb at least
five times, even if it is already filled
with fuel.
:Now start the engine.
Engine is flooded
:If you did not move the choke lever
to equickly enough after the
engine began to fire, the engine is
flooded.
:Set choke lever to eeven if the
engine is cold.
:Now start the engine with a few
brisk pulls of the starter rope.
STOP

15HS 86 R, HS 86 T
English
Dirty air filters reduce engine power,
increase fuel consumption and make
starting more difficult.
Felt Filter
If there is a noticeable loss of engine
power
:Set choke lever to g
:Take out the screw (1).
:Remove the filter cover (2).
:Clean away loose dirt from around
the filter.
:Remove the felt filter element (3).
:Fit a new felt filter element. As a
temporary measure you can knock it
out on the palm of your hand or blow
it out with compressed air. Do not
wash.
:Install the filter element.
:Fit the filter cover.
:Fit the screw and tighten it down
firmly.
Paper Filter
If there is a noticeable loss of engine
power
:Set choke lever to g
:Take out the screw (1).
:Remove the filter cover (2).
:Clean away loose dirt from inside
the filter cover and around the filter.
:Remove and check the paper filter
element (3) – replace if dirty or
damaged.
:Fit the filter element in the filter
housing.
:Attach the left end of the filter cover
to the filter housing and swing it to
the right – the two lugs (arrows)
must engage the holes in the cover.
:Fit the screw and tighten it down
firmly.
Cleaning the Air Filter
1
443BA040 KN
2
1
443BA034 KN
2
443BA035 KN
3
443BA036 KN

16
English
HS 86 R, HS 86 T
Exhaust emissions are controlled by the
design of the fundamental engine
parameters and components (e.g.
carburation, ignition, timing and valve or
port timing) without the addition of any
major hardware.
General Information
The carburetor comes from the factory
with a standard setting.
This setting provides an optimum fuel-air
mixture under most operating
conditions.
With this carburetor it is only possible to
adjust the high speed screw within fine
limits.
Standard Setting
:Shut off the engine.
:Check the air filter and clean or
replace if necessary.
:Check the spark arresting screen
(not fitted in all markets) in the
muffler and clean or replace if
necessary - see „Spark Arresting
Screen in Muffler.
:Turn the high speed screw (H)
counterclockwise as far as stop (no
more than 3/4 turn).
:Carefully screw the low speed
screw down onto its seat
(clockwise).
:Open the low speed screw (L) one
full turn.
Adjusting Idle Speed
Engine stops while idling
:Check standard setting.
:Turn the idle speed screw (LA)
slowly clockwise until the cutting
blades begin to run – then turn the
screw back 2 1/2 turns.
Cutting blades run when engine is
idling
:Check standard setting.
:Turn the idle speed screw (LA)
slowly counterclockwise until the
cutting blades stop running – then
turn the screw another 2 1/2 turns in
the same direction.
Motor Management Adjusting the Carburetor
L
H
LA
443BA037 KN

17HS 86 R, HS 86 T
English
Erratic idling behavior, poor
acceleration
:Check standard setting.
Idle setting is too lean:
:Turn low speed screw (L) about a
quarter turn counterclockwise until
the engine runs and accelerates
smoothly.
Machine stops when it is swung at
idle speed
:Check standard setting.
Idle setting too rich:
:Turn low speed screw (L) about a
quarter turn clockwise until the
engine idles smoothly.
It is usually necessary to change the
setting of the idle speed screw (LA)
after every correction to the low speed
screw (L).
Fine tuning for operation at high
altitude
A slight correction of the setting may be
necessary if the engine does not run
satisfactorily:
:Check the standard setting.
:Warm up the engine.
:Turn the high speed screw (H)
slightly clockwise (leaner) – no
further than stop.
If the setting is too lean there is a
risk of engine damage due to
insufficient lubrication and
overheating.
If the engine is down on power or if
maximum engine speed is irregular,
check the spark arresting screen (not
fitted in all markets) in the muffler.
Wait for the engine to cool down
completely before performing this
work.
:Take out the screws (1).
:Remove the exhaust pipe (2).
Spark Arresting Screen
in Muffler

18
English
HS 86 R, HS 86 T
:Use a 15 mm socket wrench to
unscrew the spark arresting
screen (3).
:Clean the spark arresting screen.
:If the spark arresting screen is
damaged or severely coked up,
fit a new one.
:Refit the spark arresting screen.
:Fit the exhaust pipe.
:Fit the screws. Wrong fuel mix (too much engine oil in
the gasoline), a dirty air filter and
unfavorable running conditions (mostly
at part throttle etc.) affect the condition of
the spark plug. These factors cause
deposits to form on the insulator nose
which may result in trouble in operation.
If engine is down on power, difficult to
start or runs poorly at idling speed, first
check the spark plug.
:Remove spark plug – see "Starting /
Stopping the Engine".
:Clean dirty spark plug.
:Check electrode gap (A) and
readjust if necessary – see
"Specifications".
:Use only resistor type spark plugs
of the approved range.
Rectify problems which have caused
fouling of spark plug:
:Too much oil in fuel mix.
:Dirty air filter.
:Unfavorable running conditions,
e.g. operating at part load.
Fit a new spark plug after approx.
100 operating hours
or earlier if the electrodes are badly
eroded.
Checking the Spark Plug
000BA002 KN

19HS 86 R, HS 86 T
English
To reduce the risk of fire and burn
injury, use only spark plugs
authorized by STIHL. Always press
spark plug boot (2)snugly onto
spark plug terminal (1) of the proper
size. (Note: If terminal has
detachable SAE adapter nut, it must
be attached.)
A loose connection between spark
plug boot and ignition wire
connector in the boot may create
arcing that could ignite combustible
fumes and cause a fire.
Use STIHL gear lubricant for hedge
trimmers (see “Special Accessories”) to
lubricate the blade drive gear.
After about 25 hours of operation:
:Remove the screw plug (1) from the
gear housing.
:Screw the tube of grease (2) into the
filler hole.
:Roll up the end of the tube to the
next division on the scale. This
forces about 3/4oz (20g) grease into
the gearbox.
:Refit the screw plug and tighten it
down firmly.
To help prolong the wear life of the
starter rope, observe the following
points:
:Pull the starter rope only in the
direction specified.
:Do not pull the rope over the edge of
the guide bushing.
:Do not pull out the rope more than
specified since it might break.
:Do not let the starter grip snap back,
guide it slowly into the housing.
See also chapter “Starting /
Stopping the Engine”!
Have a damaged starter rope
replaced in good time by your
servicing dealer.
0
00BA036 TR
1
Lubricating the
Gearbox
Rewind Starter
Other manuals for HS 86
1
Table of contents
Languages:
Other Stihl Trimmer manuals