Scanomat Classic Brew User manual

User’s manual
Classic Brew
European edition.
Re-ordering No: xxxxxxx
Version No: x


We are pleased that you have chosen a Scanomat Coffee Brewer.
Should you have any questions regarding the coffee brewer and the operation of it please do
not hesitate to contact us.
We are convinced that you will be pleased with your choice!
Vibe Allé 3 •Postboks 131 •2980 Kokkedal
Telefon 49 18 18 00 •Telefax 49 18 01 18


Important
Warning:
Please be aware of the danger of scalding (in the dispensing area) when dispensing the various
hot drinks.
Warning:
Before cleaning, servicing etc. that require the opening of the front door, the switch situated in
the delivery area must be switched off. The brewer has been switched off when the display
light turns off and the blower stops.
Warning:
(Danger of electrical chock) Please be aware that the switch (G) only disconnects control cir-
cuit, not the power supply.


Contents
Operation of the SCANOMAT Coffee Brewer.......................................................................... 1
Technical Specifications: ........................................................................................................... 2
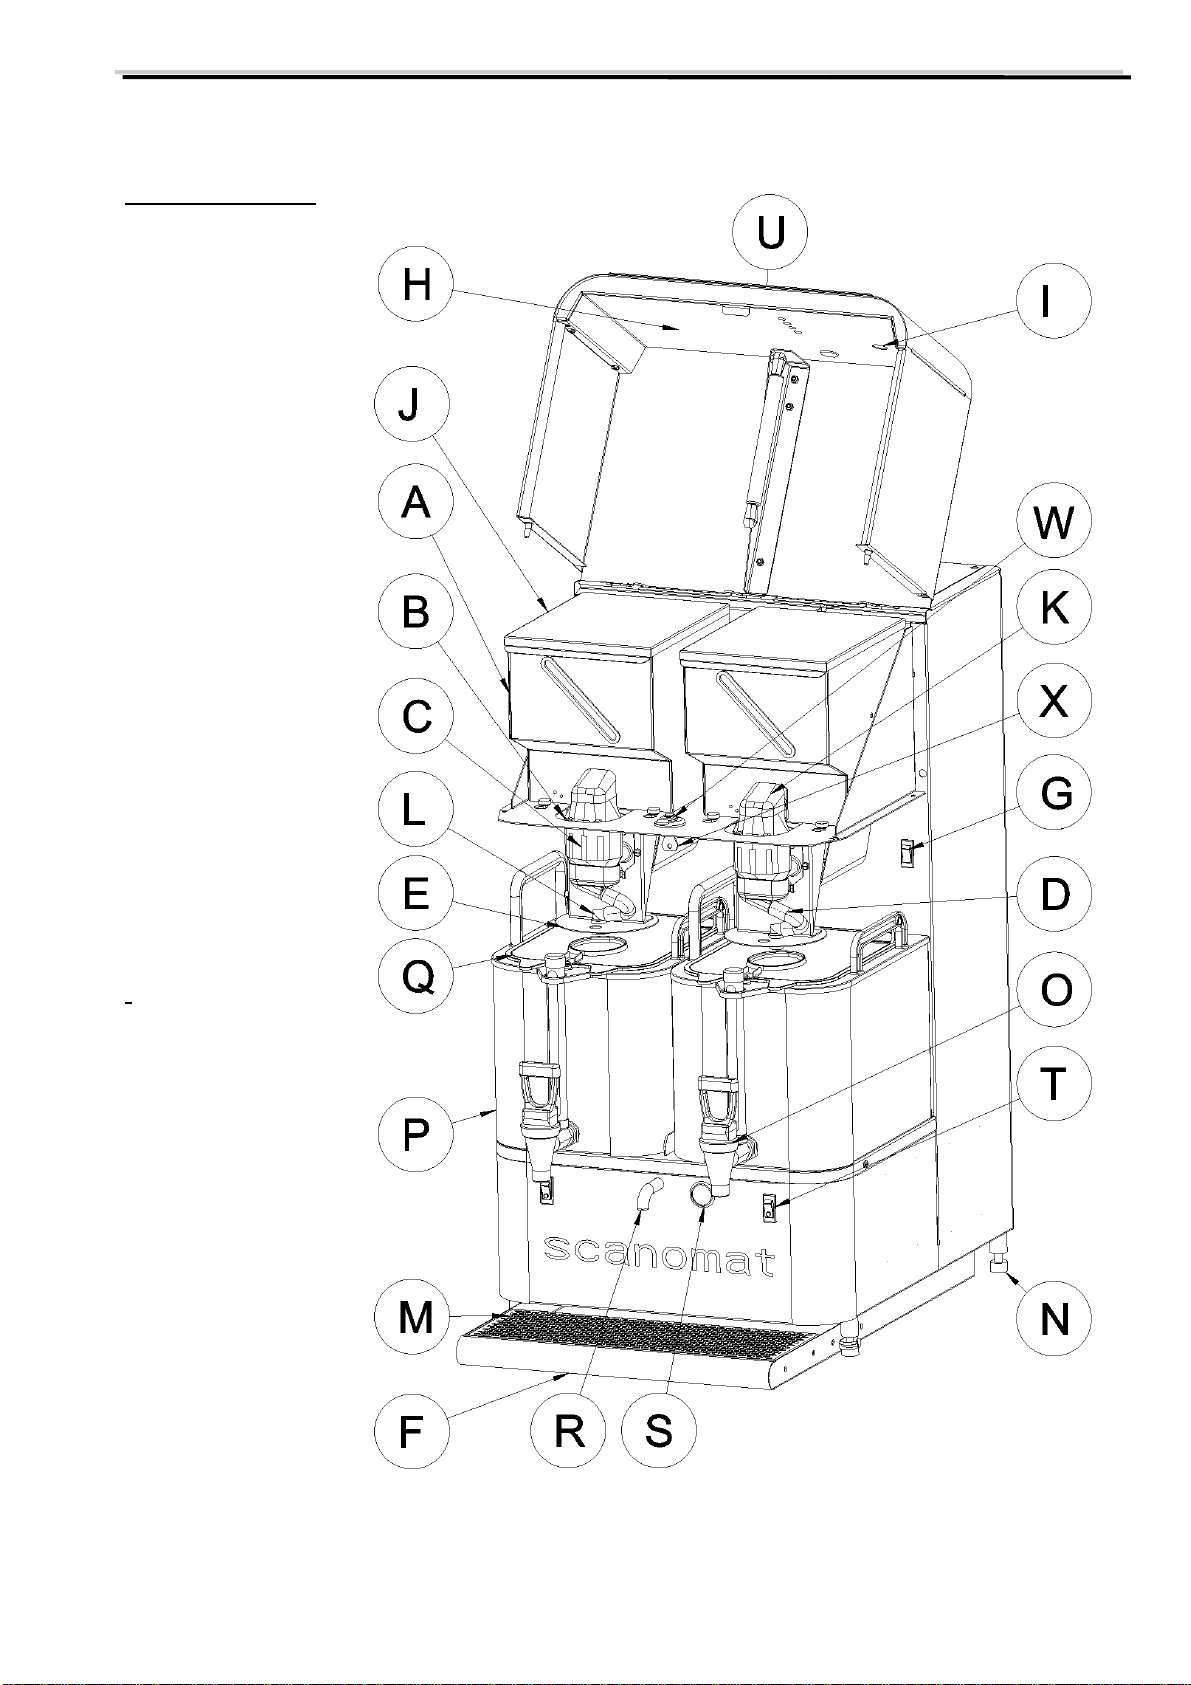
General Drawing ........................................................................................................................ 3
Installation.................................................................................................................................. 4
Water Connection.................................................................................................................. 5
Electrical connection ............................................................................................................. 6
Start up................................................................................................................................... 6
How to drain the machine...................................................................................................... 6
Change of Strength..................................................................................................................... 7
Change of Volume per Cup........................................................................................................ 7
Watch and Timer programming………………………………… …………………………….8
Keyboard Functions.................................................................................................................. 10
Selection buttons: ................................................................................................................ 10
Special functions: ................................................................................................................ 11
Operation Codes....................................................................................................................... 12
Maintenance ............................................................................................................................. 13
Daily Maintenance:.............................................................................................................. 13
Preventive Maintenance....................................................................................................... 14
Trouble Shooting:..................................................................................................................... 15
Connection Chart Classic Brew ............................................................................................... 16

Users manual Classic Brew
Scanomat A/S Vibe Allé 3. Postboks 131 DK-2980 Kokkedal (Copenhagen) Reg.nr. 236.990
Tel: (+45) 49 18 18 00. Fax: (+45) 49 18 01 18 1
Operation of the SCANOMAT Coffee Brewer
The Scanomat coffee and coffee speciality brewers are high technology brewers which by means of a
micro processor controlled brew process dispense various first class quality coffee drinks.
Water is heated in the thermostatically controlled hot water tank with automatic water inlet. The water
tank has built-in over heaters and an overflow leading to the drip tray.
By means of an ingredient throw device the various instant products are led from the canisters to a brew
chamber and here water is added. The hot drink is led to a heated thermo tank with manualy operated
faucets.

Users manual Classic Brew
Scanomat A/S Vibe Allé 3. Postboks 131 DK-2980 Kokkedal (Copenhagen) Reg.nr.236.990
Tel: (+45) 49 18 18 00. Fax: (+45) 49 18 01 18
2
Technical Specifications:
Power supply:
230-240 VAC single phase with ground connection (Idle power consumption approx. 20 watt).
Standard wattage: 8400W.
Dimension:
Height: 740 mm (29.2 in)
Width: 400 mm (15.7 in)
Depth: 480 mm (18.9 in) (with fausets: 575 mm(22.6 in))
Water tank:
Hot water tank capacity: 21 litre, (5.5 gal.)
Coffee tank:
Full tank: 5.2 litre, (1.4 gal.)
Coffee canister:
Coffee: 1000 - 1100 gr. (35 - 39 oz)
Decaff: 1000 - 1100 gr. (35 - 39 oz)
Weight:
Gross 48,5 kg.
Nett 46 kg.
Water connection:
28-85 Psi. 4,5-5,8 BAR - flow min. 1 gal/min.
Water temperature: 4,5 - 38,0 ° C
Environment:
Temperature: 10 - 38 ° C, humidity max. 90%RH.
Shelves/transportation:
Temperature: min. 0° C

Users manual Classic Brew
Scanomat A/S Vibe Allé 3. Postboks 131 DK-2980 Kokkedal (Copenhagen) Reg.nr. 236.990
Tel: (+45) 49 18 18 00. Fax: (+45) 49 18 01 18 3
General Drawing
A Ingredient canister
B Ingredient funnel
C Mixer bowl
D Outlet hose
E Outlet holder
F Drip tray
G Main switch
H Cover plate
I Service switch
J Canister lid
(Optional)
K Mixer lid
L Outlet tube
M Mesh
N Levelling legs
O Faucet
P Thermo tank
Q Lid for thermo tank
R Tea water outlet
S Selection switch -
for tea water
T Heater switch for-
thermo tank
U Light diodes
W Door lock
X Key for door lock

Users manual Classic Brew
Scanomat A/S Vibe Allé 3. Postboks 131 DK-2980 Kokkedal (Copenhagen) Reg.nr.236.990
Tel: (+45) 49 18 18 00. Fax: (+45) 49 18 01 18
4
Installation
Service and repair is only to be carried out by service engineers educated by Scanomat.
The coffee brewer is to be secured additionally in accordance with local regulations.
The coffee brewer must be earth connected (green conductor).
Note: If the supply cable (power cord) has been damaged please note that only a maintenance engineer
recommended by the manufacturer is to renew it as special tools are required.
Earth conductor: green
Phase 1: black
Phase 2: white
Note: Place the coffee brewer on a stable table, adjust the levelling feet until the brewer is level from
front to back and side to side. Be certain all four levelling feet are in contact with the table to prevent
rocking of the brewer. If there is a danger of the brewer falling down from the table it must be bolted
down to the table top (unscrew the levelling feet and fasten by screwing through the table top).
Note: The coffee brewer require ventilation. Therefore there must be a minimum of 50 mm from the
back side of the brewer to the wall. The grating must be inspected frequently and vacuum-cleaned. If
the installation site/environment is especially dusty there must be vacuum-cleaned each month.
Note: Before connecting the coffee brewer draw off some buckets of water by means of the hose (to
clean the pipes and to avoid a disagreeable taste). This procedure is also recommended when the brewer
has not been operating for some time.
Note: We recommend that the brewer is switched on permanently due to the ventilation system among
others.
Note: Never switch on the heating in the thermo tanks when empty.

Users manual Classic Brew
Scanomat A/S Vibe Allé 3. Postboks 131 DK-2980 Kokkedal (Copenhagen) Reg.nr. 236.990
Tel: (+45) 49 18 18 00. Fax: (+45) 49 18 01 18 5
Water Connection
When the water supply is being established please make sure that the coffee brewer is not situated on
the rear end of the water supply system to ensure continuous supply of fresh water (see illustration
below).
1. Connect the coffee brewer to the cold water line which is equipped with an adjustable check
valve (1/2" external screw thread G+F). Before connecting the brewer draw off some buckets of
water to clean the pipes.
If the water quality is not top-quality we recommend that a Scanomat water filter is mounted.
2. Fasten the hose nipple (C) with screws to the connecting nipple (B) (available in angle and
straight version).
3. The connecting nipple is to be screwed on to the valve at the bottom of the coffee brewer.
4. Dirt filter (E) and nipple (D) are to be mounted.
5. The flange of the hose (C) is to be mounted on the nipples (D) and (B).
6. Turn on the water and make sure that all joints and connections are tight.
Note
If the water has a disagreeable taste when heated we recommend that the heated water is drawn off the
brewer and let the brewer take in water anew.
After holidays or weekends when the brewer has not been in operation for some time the water will
loose on quality therefore we recommend activating the "clean programme", perhaps a couple of
times, in order to get fresh water. In special cases it could be necessary to empty the water tank
completely by means of the drain hose and then let the brewer take in fresh water. This operation could
be repeated if necessary.
Scanomat
Shower Sink Dishwasher Coffeebrewer Waterpipe

Users manual Classic Brew
Scanomat A/S Vibe Allé 3. Postboks 131 DK-2980 Kokkedal (Copenhagen) Reg.nr.236.990
Tel: (+45) 49 18 18 00. Fax: (+45) 49 18 01 18
6
Electrical connection
(230/240V single phase, 20/23 amps)
1. The electrical outlet must have an approved, positive ground connection.
2. Turn the main switch to the off position (downwards).
3. Connect the power source in accordance with the diagram.
4. The machine is factory-set at 208 volt, single phase unless otherwise indicated on the back of the
unit.
Start up
1. Switch on the main switch (G) (upwards).
2. Press the service switch (I) on the inside of the front door, the display will show “service”.
3. Press the “Clean” button, then the “Stop” button and the machine will begin to take in water. When
the water tap symbol disappears, the machine is filled with water and when the thermometer symbol
disappears, the water is hot.
4. Fill machine with ingredients.
5. Adjust strength.
6. Adjust volume.
How to drain the machine
1. Switch off power, unplug the machine and turn off the water inlet.
2. Remove the 2 screws positioned at the lower end of the dispensing area.
3. Take out the drain tube.
4. Drain the water tank by removing the drain hose plug. The drain hose is located in the bottom center
of the water tank.

Users manual Classic Brew
Scanomat A/S Vibe Allé 3. Postboks 131 DK-2980 Kokkedal (Copenhagen) Reg.nr. 236.990
Tel: (+45) 49 18 18 00. Fax: (+45) 49 18 01 18 7
Change of Strength
The relative strength of each selection may be increased or decreased in 6% increments by
programming in the respective product numbers 1-31.
1. Press the service switch (I) inside the door, the display will show “service”.
2. Press “ADJ”.
3. Press selection button “FLOW” for the product you wish to change.
Example: Press “FLOW”
The display will show a spoon and the strength that is currently programmed for the selection
chosen.
Example: 16-start-up strength for Coffee
4. Press step, ↓or ↑to adjust 00 →31 →00.
5. Press “set” “set” to store new setting.
Example: Press “↓” until the display indicates “10”, then press “set” “set”, the strength is now
set to 10.
6. Press the service switch inside the door, the service indication on the display will disappear.
Change of Volume
(Not valid in this machine)
Timer functions
This machine is equipped with 5 timers. Each timer can be set with a start and stop time and a
corresponding function. Following function is available:
1. Function 1 = Power off (the machine is blocked for a period).
2. Function 2 = Left tank full
3. Function 3 = Right tank full
4. Disable = timer disabled
When the coffee brewer is in “automatic brew mode” it will fill the tanks only half.
If you wish to fill the left tank fully in the period from 6:00 to 9:00, you have to programme a timer
with start time 6:00 and stop time 9:00 in function 2.

Users manual Classic Brew
Scanomat A/S Vibe Allé 3. Postboks 131 DK-2980 Kokkedal (Copenhagen) Reg.nr.236.990
Tel: (+45) 49 18 18 00. Fax: (+45) 49 18 01 18
8
Watch programming
The coffee brewer is equipped with an internal watch. This can be used for programming the coffee
brewer to different timer controlled actions. The watch have to be set like this:
a) Press while the SERVICE program is active. The display will show:
b) Press and the display will show the actual time with the minutes flashing.
c) Press ⇑and ⇓to adjust these up and down respectively.
d) Press to accept this value (seconds will now be set to 0).
The display will now show the time with the hours flashing.
e) Press ⇑and ⇓to adjust these up and down respectively.
f) Press to accept this value.
Timer programming
The timers can now be adjusted using⇑, ⇓and as described in point c to f.
The display will now show the starting time for the first programmable timer with the minutes
flashing:
g) This time can now be adjusted using⇑, ⇓and as described in point c to f. After pressing
the end time for this programmable timer with the minutes flashing will be on the display:

Users manual Classic Brew
Scanomat A/S Vibe Allé 3. Postboks 131 DK-2980 Kokkedal (Copenhagen) Reg.nr. 236.990
Tel: (+45) 49 18 18 00. Fax: (+45) 49 18 01 18 9
h) This time can now be adjusted using⇑, ⇓and as described in point c to f. After pressing
the function for this will be on the display. There are 3 different timer functions available:
Press ⇑and ⇓to select between the 3 functions and "disabl".
Function 1 = Power off (the machine is blocked for a period).
Function 2 = Left tank full
Function 3 = Right tank full
Disable = timer disabled
Press to accept the new settings for this programmable timer.
The coffee brewer will now proceed to the next programmable timer (point h) until all 5 timers have been
programmed. Pressing at any point during the timer programming will interrupt this and only values,
that have been accepted with will be stored.
Adjusting time format:
The coffee brewer can be set to run with 24 hour format or 12 hour format (Am/Pm). When all 5
programmable timers have been adjusted as described above, the display will show:

Users manual Classic Brew
Scanomat A/S Vibe Allé 3. Postboks 131 DK-2980 Kokkedal (Copenhagen) Reg.nr.236.990
Tel: (+45) 49 18 18 00. Fax: (+45) 49 18 01 18
10
or
a) Press and to select between the 2 functions.
b) Press to accept the new value.
Keyboard Functions
Selection buttons:
AUT Automatic fill mode (timer controlled).
In automatic mode the filling level is by default set to 0.75 gallon.
MAN Manual fill mode.
FILL Not operational (When productbins are filled press this key, and the computer
will count down for each vend and give an alarm when the canister is empty).
FLOW Pressing this key will start the machine brewing coffee into cups and carafes.
1.5 GAL. Pressing this key will start the machine brewing 1.5 gallon of coffee into the
thermo tank.
0.75 GAL. Pressing this key will start the machine brewing 0.75 gallon of coffee into the
thermo tank.
TIMER Pressing this key, the display will show time setting.

Users manual Classic Brew
Scanomat A/S Vibe Allé 3. Postboks 131 DK-2980 Kokkedal (Copenhagen) Reg.nr. 236.990
Tel: (+45) 49 18 18 00. Fax: (+45) 49 18 01 18 11
Special functions:
ON
OFF
CLEAN
READ
STEP
SET
TIMER
ADJ
STOP
Pressing this button, the machine switches between on and off-mode. In off-
mode the display-light is turned off, the keyboard is blocked and the water
temperature in the tank is lowered to 149°F (energy-saving).
Flushing programme - all brewing chambers are rinsed.
Readout of counter indicating total number of portions dispensed.
Is being used in connection with adjustment of strength and volume sizes.
Is being used as updating of an adjustment (enter).
Is being used in connection with timers.
Is being used in connection with adjustment.
In case of wrong selection misfunction press stop.
Setting up the FILL system:
The classic brew is equipped with a system to automatically monitor the contents of the product bins to
avoid brewing with out products present. The function of the system is that whenever a product bin is
lower than 12.5% of its maximum content, an audible and visible alarm will be given upon every
portion dispensed by the machine. If the level of the product bin reaches 0, the brewing from this bin
will be disabled, and the machine will return to manual mode (if it was in auto).
When filling the bins, they must be filled to the programmed level (which should be all full). After
filling SERVICE is activated and the FILL key for the corresponding bin is pressed. The display will
then show FILLED and a long beep tone is heard. If automatic brew mode is desired, this must be re-
enabled.
In order to activate the system, the following 2 setup switches must be set to ON:
1. Fill up system.
2. Fill up alarm.

Users manual Classic Brew
Scanomat A/S Vibe Allé 3. Postboks 131 DK-2980 Kokkedal (Copenhagen) Reg.nr.236.990
Tel: (+45) 49 18 18 00. Fax: (+45) 49 18 01 18
12
To set up the amount in each bin do as follows using the HP200 or PC connected:
1. Go into the DATA menu.
2. Go into the Bin fill status program.
3. Either load settings from a file or from the machine.
4. Edit in bin settings – set the proper product and amount for the 2 bins in use. The products will be
selected from the ones available the actual recipe. The amount for each bin must be measured to
the filled amount.
5. Program bin settings in machine [and save them in a file for later use].
6. Fill the machine using the above described method.
Operation Codes
To operate: Press the service switch (I) on the inside of the door (the display shows “service”), press
the buttons in the shaded area below the display.
1. Total number of vends-number of vends per selection:
Press “read” to show the total number of vends, and press the various selection buttons to show the
vends of the individual selections.
2. Flushing program:
Press “clean” and the machine will flush automatically.
3. Change of product strength:
Press “adjust” and selection “FLOW”. A spoon symbol and a number indicating the strength will show
on the display (16 is standard strength). By pressing “step” it is possible to adjust the strength of the
drink in steps of approx. 6% (up and down). “00” is the weakest strength and “31” the strongest. When
the strength required have been reached, press “set” twice to store.
4. Change of cup size:
Not valid in this machine.
5. Water on/off:
The water flow inside the unit may be shut off electronically if weighing of the products’ gram throws
is desired. Press “adjust” and “clean” simultaneously, then press the “FLOW” selection of which the
gram throw is to be checked. Press “stop” after weighing.
6. Water level:
If the tank is not filled up, a water tap will show on the display. Next “vend” will fill the water tank.
End: Press “service switch” inside door.

Users manual Classic Brew
Scanomat A/S Vibe Allé 3. Postboks 131 DK-2980 Kokkedal (Copenhagen) Reg.nr. 236.990
Tel: (+45) 49 18 18 00. Fax: (+45) 49 18 01 18 13
Maintenance
Important: To maintain sanitary conditions it is of the utmost importance that all components that are
in contact with the drinks are kept clean.
Important: Machines dispensing beverages must be manufactured, installed and operated in a way that
leaves absolutely no risk of pollution or other depreciation of the beverages.
Important: Do not sink the thermotanks into water and do not use high pressure cleaner. Do not wash
the plugs on the back of the thermotanks.
Note: A high quality of the daily maintenance secures a high level of hygiene.
Daily Maintenance:
Caution: Before starting the cleaning procedure make sure that the coffee brewer is switched off in
order to avoid damages and injuries with hot water and rotating parts. Make sure to switch off the
machine on the main switch. Please note that only the low voltage control circuit will be cut off, the
mains voltage will not be cut off.
1. Rinse in hot water with a mild soap solution.
2. Switch off the main switch ("G") of the coffee brewer. Light and text in the display will disappear.
3. Clean outlet tubes, "L", by means of the cleaning brush.
4. Dismount ingredient funnels, "B", and
wash in hot water with a mild soap sol-
ution (dismount by lifting the hinges).
5. Dismount mixer bowls "C" by pressing
the small clips "Y" on both sides and
pull out. Clean in hot water with a mild
soap solution.
6. Empty and wash drip tray “H” and mesh
“T”.
7. Wash cabinet, door, thermo tank and
dispensing area. Use a light detergent
solution and hot water.
8. Re-mount mixer bowls and ingredient
funnels, "C" and "B". The funnels must
be completely dry before re-mounting
(see instruction on the inside of the
door).
9. Switch on the coffee brewer.
10. Flush the brewing system:
a) Place a pot under the dispensing
spouts.
b) Press the Service Switch (I) on
the inside of the door, -the
display will show "SERVIC".
c) Press "CLEAN".
Table of contents
Other Scanomat Coffee Maker manuals

Scanomat
Scanomat TopBrewer User manual

Scanomat
Scanomat San Remo Classico III User manual

Scanomat
Scanomat TopBrewer Pro User manual

Scanomat
Scanomat MiniCafe Troubleshooting guide

Scanomat
Scanomat TopBrewer Pro Troubleshooting guide

Scanomat
Scanomat VENEZIA Touch User manual

Scanomat
Scanomat PRO6 EU Troubleshooting guide

Scanomat
Scanomat TopBrewer Pro User manual

Scanomat
Scanomat TopBrewer User manual