Stoane Lighting Surf Type G User manual
Stoane Lighting Ltd
20 Dryden Road Bilston Glen Ind Est.
Loanhead Midlothian EH20 9LZ UK
T: +44 (0) 131 440 1313
F: +44 (0) 131 440 0049
www.stoanelighting.com
VAT No GB682885284
Limited Company 188910
Surf Type G
Installation and Maintenance
Instructions
ta 35°C Rated maximum ambient temperature
Do not stare at the operating light source
IMPORTANT: All wiring connections must be made before switching on mains power.
European Conformity
Please retain these instructions for future reference
This product should not be disposed of in your general waste
Class III - Extra Low Voltage
Indoor Use Only
IP20
SL Star 3VF3W @ 1050mA
All of our in-house printed paper
is 100% recycled and recyclable
UKCA (UK Conformity Assessed)
Surf Type G Instructions.pdf 1 03/02/2022 16:39:53
Electrical Supply
Installation must be carried out by a qualified electrician in
accordance with BS 7671:2008 Wiring Regulations.
230/240V AC 50/60Hz mains supply to a suitable SELV
LED Driver.
Site conditions: LED equipment is more susceptible to
static damage and over voltage than previous technology.
Before handling or connecting to the mains supply ensure
that all Stoane Lighting (SL) products are protected from
static discharge and that the mains supply is to regulation.
(230V +10 -6%)
This product contains a light source of energy efficiency
class G.
Mains cables must be double insulated, strain relieved
and separated from E.L.V output cables.
This unit requires a constant current driver. 1050mA Max.
Observe polarity:
Positive (+) is marked as RED.
Incorrect supply or reverse polarity can cause irreparable
damage.
All connections must be made before switching on mains.
If the supply is energised prior to making the connections
to the fitting then the resulting surge will damage the LED.
Multiple LEDs should be wired in series, refer to driver
instructions for minimum/maximum load.
The entire dimming control circuit source must be of SELV
insulation class.
Additional items should not be hung or suspended from
this fitting. SL takes no responsibility for additional items
added by others or the consequences of those items.
WARNING: Do not look at exposed LED lamps in
operation. Eye injury can result.
Maintenance:
All lighting equipment is delicate and easily damaged
through misuse or inappropriate installation
(mechanical or electrical). Repairs and replacements
may cause delays and will be chargeable. Contact SL
for support if required.
All Stoane Lighting products are covered by a five year
Warranty and a 25 year Duty of Care. Products are
designed to be upgraded, adapted and refreshed
using our comprehensive ReNew service. For more
information on our ReNew service and for full
Warranty terms and conditions visit stoanelighting.com
or contact us at the address shown.
The light source contained in this luminaire shall only
be replaced by the manufacturer or his service agent
or a similar qualified person.
If the external flexible cable or cord of this luminaire is
damaged, it shall be exclusively replaced by the
manufacturer or his service agent or a similar qualified
person in order to avoid a hazard.
Full disassembly notes are available on our website,
and are accessed by entering your product serial
number into the search function of our website. Serial
numbers are typically located in an area that is not
visible when the fitting is installed.
Cleaning:
Fully isolate the fitting and allow to cool.
Clean the fitting with a slightly damp lint free cloth from
a mild solution of soap and water. The fitting must be
completely dry before reconnecting power.
Incompatible or abrasive chemicals can damage the
fitting, contact SL for advice if required.
Surf Type G Instructions.pdf 2 03/02/2022 16:39:53
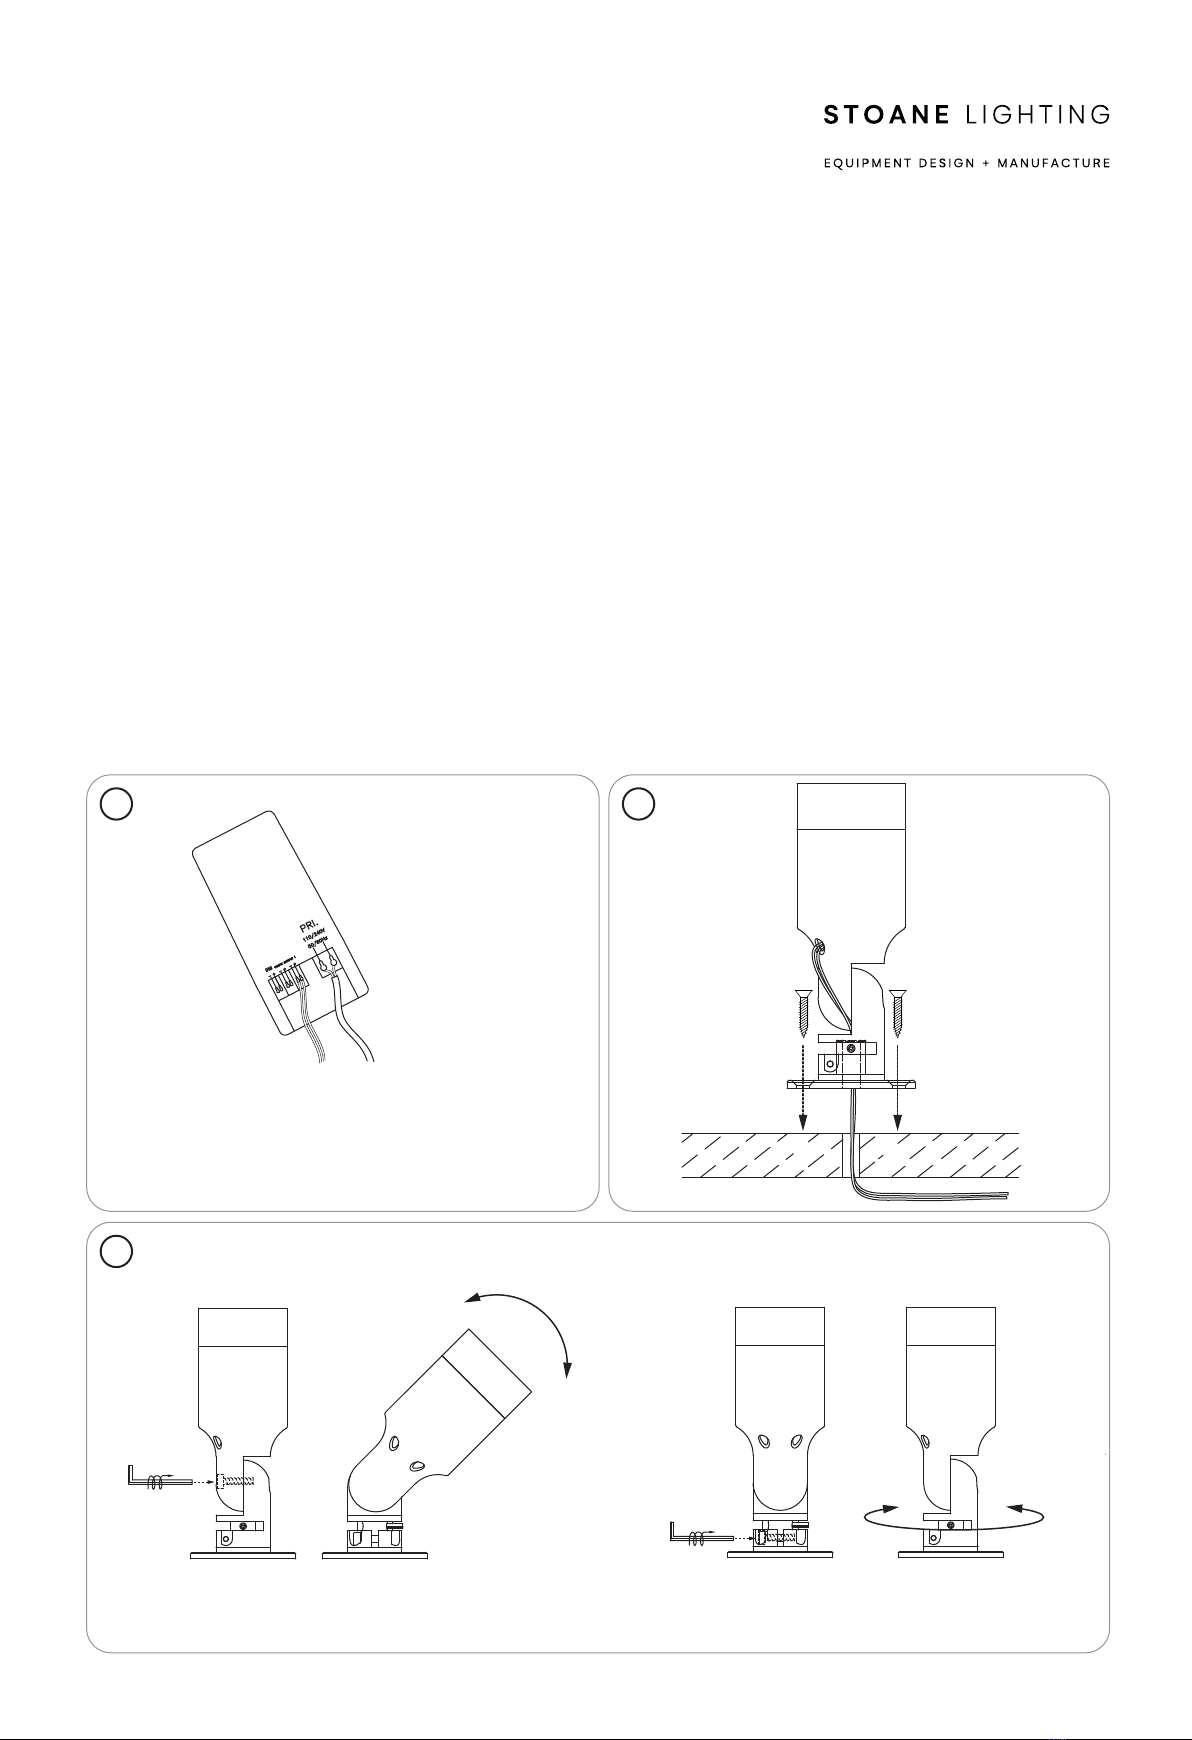
Installation
Check that the mounting surface is suitable for the
installation of this fitting.
This fitting should be mounted out of arms reach to
prevent unauthorized adjustment.
If the cable is fed through the mount plate then a
suitable hole will be required for the cable.
Step 1 Make mains connections to SELV LED driver
and extra low voltage connections to the
fitting.
Step 2 Secure the fitting in position using suitable
fixings.
Step 3 Adjust and lock the pan and tilt position.
1
3
2
Connect to MainsConnect to Fitting
Tilt Pan
Surf Type G Instructions.pdf 3 03/02/2022 16:39:53
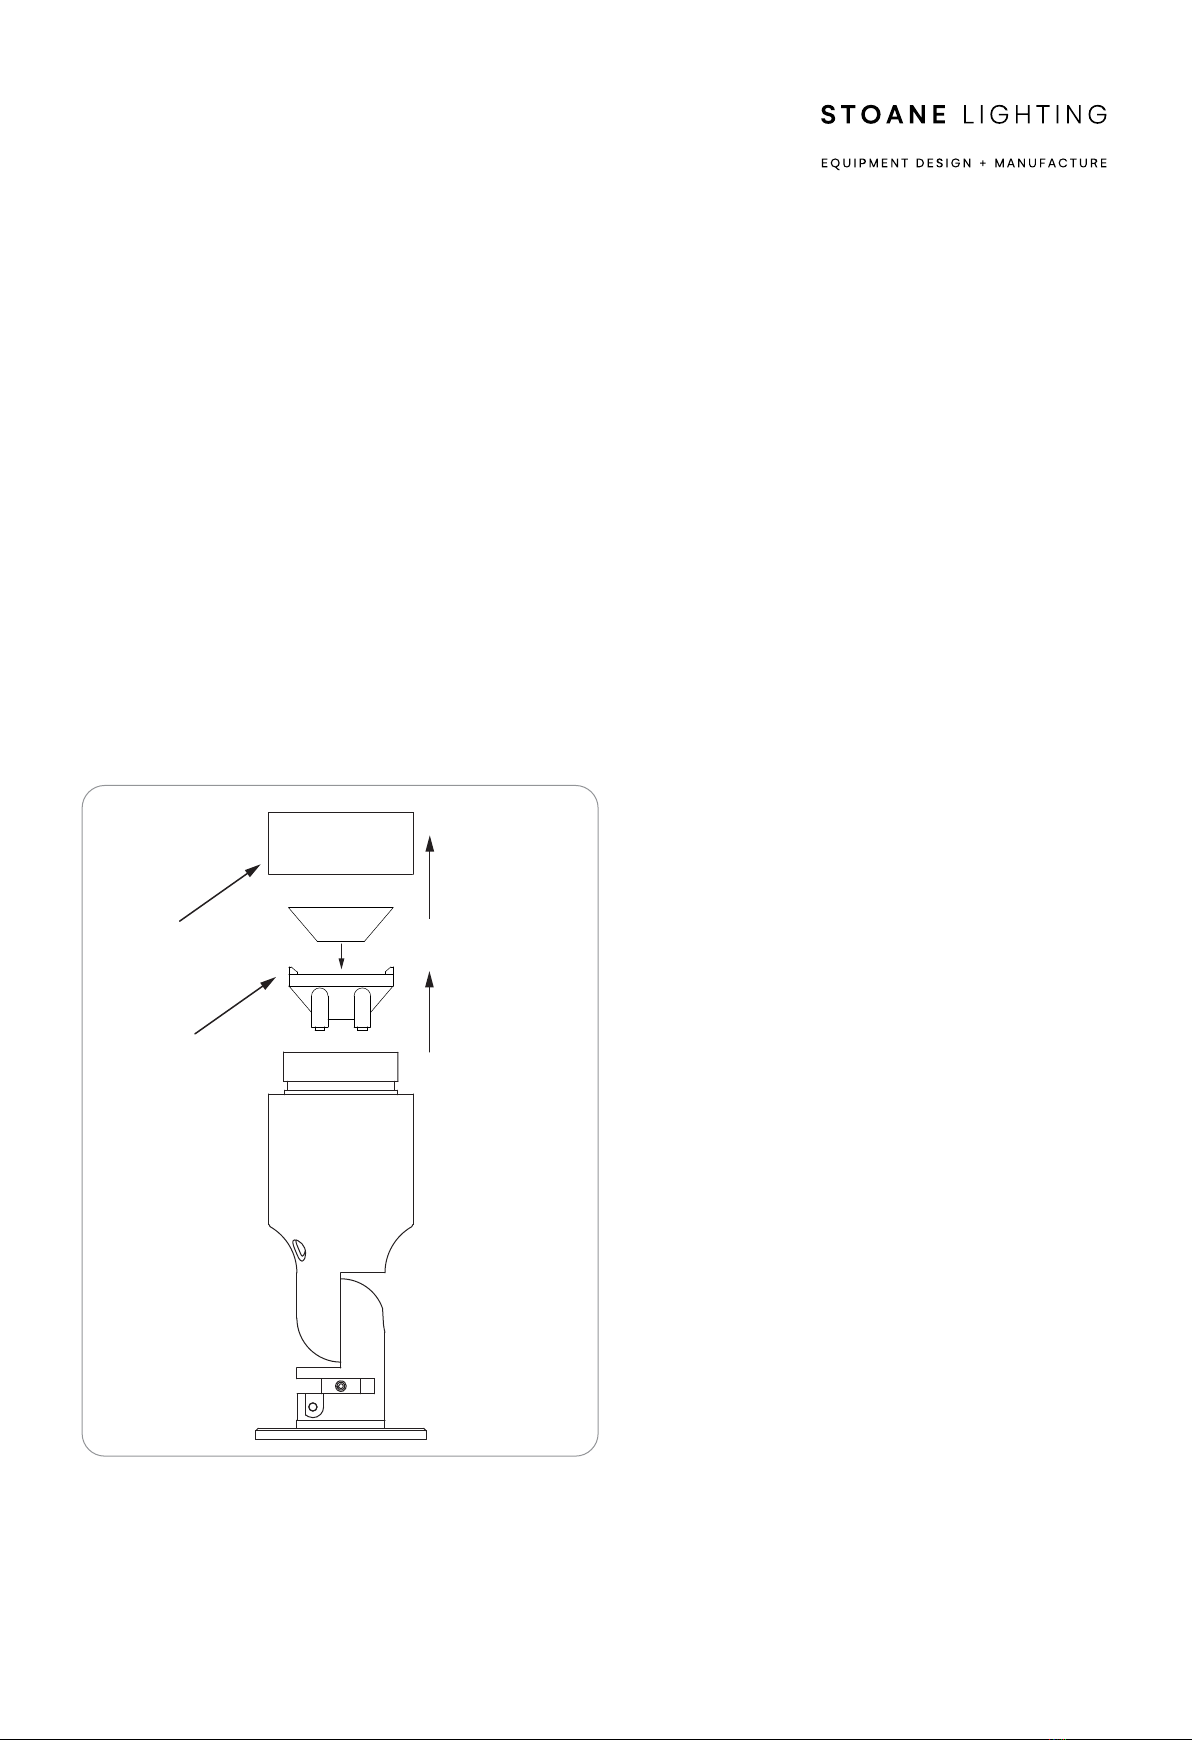
OPTIC CHANGE
Fully isolate and allow fitting to cool sufficiently before
handling.
To change the optic, unscrew the front bezel and remove
the black optic holder.
The optic can be pushed out of its holder and replaced
by another 20mm optic from Stoane Lighting.
To replace the optic place the new optic into the optic
holder. Replace the optic holder in the fitting body being
sure to line the pins of the holder up with the slots on the
LEDs circuit board.
Once in place fully tighten the bezel to close the fitting.
Optic
Bezel
Surf Type G Instructions.pdf 4 03/02/2022 16:39:53

Series Wiring
SUPPLY
Installation must be carried out by a qualified electrician in
accordance with BS 7671:2008 Wiring Regulations.
230/240V AC 50/60Hz mains supply.
Mains cables must be double insulated and strain relieved.
Observe polarity:
Positive (+) is marked as RED.
Incorrect supply or reverse polarity can cause irreparable damage.
All connections must be made before switching on mains.
Ensure supply driver and connectors are housed indoors OR in a
suitable IP rated enclosure.
Ensure LEDs are connected in ‘series’ as shown below to the LED
drivers.
Mains
Output +
-
LED
Driver
LED
LED
LED
LED
Use suitable
connectors
Surf Type G Instructions.pdf 5 03/02/2022 16:39:53

Stoane Lighting firmly believe that we have a responsibility as environmental
custodians, we believe that lighting equipment should be built to last, to be
repaired and to be reused. As a BCorp we have pledged to operate a business not
aiming to just be best in the world but a business best for the world. Stoane
Lighting believe that the circular economy is a fundamental aspect of how we
approach the challenges we face. If you read this at the end of the product life we
encourage you to consider how you can ensure this product sees an extended life.
If removal is unavoidable, please see the disassembly note below.
All Stoane Lighting products are supplied with a 5 year warranty and a 25 year
duty of care.
Stoane Lighting operate a ReNew division, which can take your existing fittings
and refurbish or upgrade without the need for replacing what you already have.
Through the ReNew service, Stoane Lighting provides general repair, deep cleans
and electrical safety checks on luminaires, as well as possible repainting if needed.
We will replace components that are nearing end of life, such as drivers, LEDs,
and optics. If the fittings are to be used in a new area, or the existing space is
undergoing a change in use, ReNew can offer a different mounting method or light
technical performance (such as colour tuning), if needed, alongside the addition of
on-board wireless control. ReNew as a service, depending on location, can be
done on site or by returning equipment to Stoane Lighting.
Once fittings have been repaired or upgraded through ReNew, they will start a new
five-year warranty period, and any unwanted parts will be recycled.
Product Disassembly and Component Recycling - While every effort has been
made to ensure that our products are built to last and are ReNewable, there may
come a point when, as a very last resort, the fittings need to be recycled. The
Stoane Lighting website will provide information on how the fitting can easily be
disassembled into its component parts for more effective recycling. Information on
recycling services in your local region can also be supplied on request.
For more information on the above please visit stoanelighting.com
or contact us at the address shown.
Surf Type G Instructions.pdf 6 03/02/2022 16:39:53
Table of contents
Other Stoane Lighting Outdoor Light manuals


