Stocker Solarjet 0500 User manual

Inox Spotlight
0500
Manual Use
IT
D
E
ES
GB

-
Manuale d’istruzioni –
Introduzione
Grazie per aver acquistato una lampada solare della gamma Solarjet!
La lampada solare modello Inox Spotlight è un articolo innovativo, fabbricato con materiali di alta tecnologia, che
consentono il risparmio energetico. La lampada Black Spotlight fa parte della linea “Spotlights”, con la quale si
possono realizzare nel Vostro giardino eccezionali giochi di luce.
Sono ideali per illuminare sentieri, alberi, terrazze, sculture, ingressi.
Vi preghiamo di leggere attentamente le istruzioni per ottenere il buon funzionamento della lampada.
Vantaggi
•Spotlight decorativo per ingressi e giardini
•3 super LED
•Pannello solare orientabile
•Montaggio facilissimo
•Funziona senza cavi
•Attivazione automatica con sensore
•2 batterie ricaricabili
•Lente stabilizzata UV
•Illuminazione a batteria carica minimo 10 ore
•Ampio raggio di illuminazione fino a 5 m
•Resistente alle intemperie
Posizionamento
1) La lampada deve essere collocata in un luogo
dove le è consentito accumulare luce solare, quindi
lontano da alberi o tetti (vedi fig. 1).
2) Assicurarsi che vicino alla lampada non ci siano altre fonti di illuminazione (ad es. un lampione) altrimenti il
sensore non garantisce l´accensione della lampada.
3) La lampada va lasciata per due giorni sotto il sole prima di ottenere il risutato ottimale.
Istruzioni per il montaggio
1. Rimuovere dalla scatola la lampada ed ogni suo componente
2. Unire la lampada (2) al picchetto (7) con la vite di giuntura e quindi i
componenti (3,4,5,6)
3. Unire il pannello solare (1) alla lampada

Funzionamento
1) Per un utilizzo quotidiano, posizionare l´interruttore su “AUTO”, e la lampada si accenderá
automaticamente durante la notte o appena fará buio. Importante é far caricare la lampada
per due giorni sotto la luce del sole.
2) Il numero di ore di illuminazione è inoltre determinato dalla sua ubicazione, dalle
condizioni meteorologiche e stagionali.
In inverno abbiamo meno ore di luce rispetto ad altre stagioni, pertanto la durata
d’illuminazione della lampada sará minore
Sostituzione batterie
Per un risultato ottimale, è consigliabile sostituire le batterie ogni 12 mesi!
1) Capovolgere la lampada. Togliere la vite dal coperchio.
2) Rimuovere le batterie scariche. Assicurarsi che le nuove batterie siano Ni-MH ricaricabili.
3) Posizionare le batterie correttamente.
4) Riassemblare il tutto prima di riaccendere la lampada.
Mal funzionamento
Se la lampada non dovesse funzionare nonostante il buio e la corretta manutenzione,
verificare che:
1) La lampada non abbia una fonte di luce vicina (ad es. un lampione)
2) La lampada sia sotto la luce del sole durante il giorno
3) Che l’interruttore sia su “AUTO”
4) Che le batterie siano inserite correttamente
Mantenimento
Pulire regolarmente con un panno umido la lampada in modo che il pannello sia sempre pulito.
Non utilizzare alcun tipo di solvente per la pulizia e non esercitare troppa pressione con il panno.

-
Gebrauchsanweisung –
Einleitung
Wir bedanken uns, dass Sie sich entschlossen haben eine Solarlampe bei Solarjet zu beziehen. Mit punktgenauen
Spotlights erzielen Sie in Ihrem Garten ganz besondere Licht-Effekte. Bestrahlen Sie wirkungsvoll Wege, Bäume,
Terrassen, Skulpturen, u.a.
Vorteile
•Mini-Solarscheinwerfer in inox für den Garten
•3 Super LED’s
•mit schwenkbarem Solarpaneel
•Funktioniert ohne Kabel
•Schaltet bei Dunkelheit automatisch mittels eingebautem Dämmerungsschalter ein
•Aufladbarer Akku – 2 Batterien (600mAh AA Ni-Mh)
•Leuchtdauer bei vollgeladenem Akku bis zu 10 Stunden
•Wetterbeständig
•Schein bis zu 5m
Positionierung
1) Um der Lampe optimale Voraussetzungen zu bieten,
platzieren Sie die Solarzellenfläche an einem Ort, wo
Sie die maximale Sonneneinstrahlung sammeln kann (siehe Bild 1)
2) Bitte laden Sie die Batterien zwei Tage vor der Inbetriebnahme auf.
3) In den Wintermonaten nehmen die Solarzellen nicht viel direktes Sonnenlicht auf, deshalb verringern sich die
Leuchtstunden der Solarlampen.
Gebrauchsanweisung
1) Entnehmen Sie die Lampe und jeglichen Gegenstand aus der Verpackung.
2) Verbinden Sie die Teile so wie im Bild angezeigt(3). Stecken Sie den
Stiel direkt in die Erde nicht auf den Stiel oder die Lampe klopfen !
3) Positionieren Sie den Schalter unter der Lampe auf “AUTO”.
Leistung
1) Für den täglichen Gebrauch, positionieren Sie den Schalter unter der Lampe auf
“AUTO”;
2) Die Lampe wird sich bei Dämmerung selbst einschalten. Es ist wichtig vorher die Lampe zwei Tage unter den
Sonnenstrahlen aufladen zu lassen.
3) In den Wintermonaten nehmen die Solarzellen nicht viel direktes Sonnenlicht auf, deshalb verringern sich die
Leuchtstunden der Solarlampe. Bei bewölktem Himmel wird die Batterie nicht für den nächtlichen Betrieb
aufgeladen.

Austausch der Batterie
Um der Lampe optimale Voraussetzungen zu bieten, sollten die Ni-Mh Batterien alle 12 Monate gewechselt
werden.
1) Öffnen Sie die drei Schrauben im Gehäuse, versuchen Sie ein wenig die Lampe herauszunehmen, aber
vorsichtig da es mit den Kabeln verbunden ist. Die Batterien sind an der Lampe befestigt schrauben sie auf
und nehmen sie langsam das Batterien Gehäuse heraus.
2) Wechseln Sie die Batterien und kontrollieren Sie ob die neuen Batterien Ni-Mh Akku Batterien sind.
Wenn die Funktionstüchtigkeit der Batterie erschöpf ist, müssen diese ordnungsgemäß entsorgt
werden. Für weitere Informationen hinsichtlich der Entsorgung setzen Sie sich mit Ihrer örtlichen
Abfallbeseitigungsbehörde in Verbindung. Nicht verbrennen.
Problembehandlung
Sollte Ihre Solarlampe nicht richtig funktionieren, befolgen Sie die folgenden Anweisungen:
1) Vergewissern Sie sich, dass das Solarpaneel der Sonne ausgesetzt ist.
2) Kontrollieren Sie ob die Batterien richtig installiert wurden.
Instandhaltung
Reinigen Sie regelmäßig mit einem feuchten Tuch die Lampe, damit das Solarpaneel immer sauber
ist, benutzen Sie dabei kein Reinigungsmittel und drücke Sie nicht auf das Paneel.

-MANUAL DE INSTRUCCIONES-
Introducción
Gracias por comprar una unidad de calidad. Utilizada con cuidado y en concordancia con las instrucciones
explicadas a continuación, su LÁMPARA DE JARDÍN debería proporcionarle muchos años de uso sin ningún
problema. Por favor, lea las instrucciones detenidamente para obtener los mejores resultados de su compra.
Diseñada elegantemente, este producto tiene las siguientes características:
•Construcción robusta y atractiva en plástico negro.
•Dirección del panel solar ajustable.
•Ángulos de los focos ajustables.
•Panel solar cristalino de alta calidad.
•3 LED’S súper brillantes
•No precisa de fuente de energía o cableado adicionales.
•Encendido de hasta 8 horas
•Sensores automáticos encienden la lámpara al atardecer
•2x pilas recargables AA Ni-MH incluidas
•Interruptor AUTO/OFF
Colocación de la lámpara solar
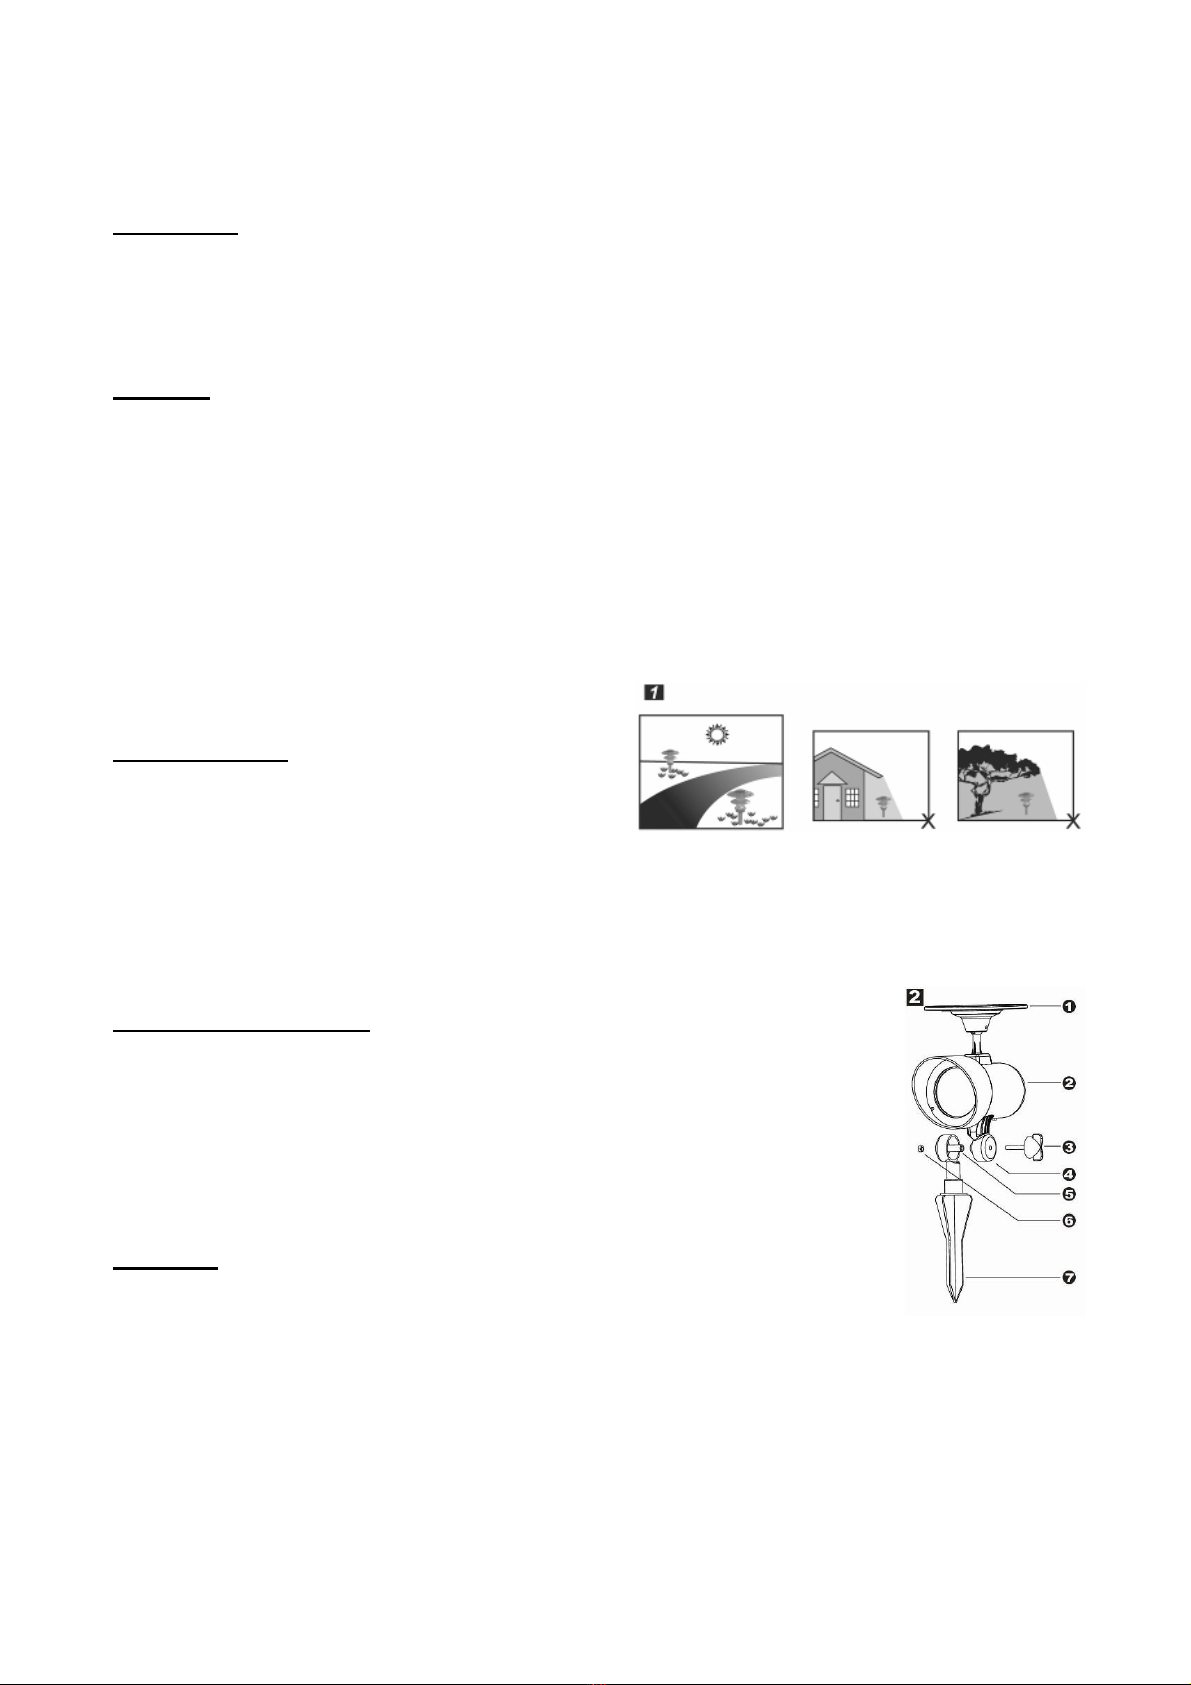
1) La lámpara solar debe ser colocada en una posición donde
pueda tomar luz solar directamente al panel solar y
generalmente sin estar cubierta ni en la sombra. (Como
muestra la figura 1).
2) Asegurarse de que el foto sensor (situado en la parte superior de la lámpara) no vaya a ser afectado por
cualquier otra fuente de luz. De lo contrario la lámpara no iluminará al atardecer.
3) La lámpara solar debe dejarse en carga durante 2 soleados días antes de conseguir los mejores resultados.
Instrucciones de montaje
1) Sacar cuidadosamente la lámpara y todos los accesorios de la caja.
2) Montar los postes (2), y las estacas (3); Introducir la estaca directamente en el suelo sin
martillear la lámpara ni las estacas, (como muestra la figura 2).
3) Encajar cuidadosamente la cabeza del controlador (1) en la parte superior del poste
montable.
4) Ajustar el panel solar en la dirección en la que mejor pueda tomar la luz solar
directamente.
5) Aflojar la llave de unión desenroscándola en el sentido opuesto a las agujas del reloj y
ajustar el ángulo del foco en la dirección que prefiera, fije la llave de unión de nuevo.
6) Ajuste el interruptor de debajo de la tapa de la lámpara a la posición de “AUTO”.
Operación
1) Para operaciones diarias normales, mueve el interruptor a la posición de “AUTO”, automáticamente se
encenderá durante la noche después de haber estado inicialmente 2 días soleados en carga completa.
2) La función de la lámpara solar variará en cada estación del año. Proporcionará más luz cuando haya tenido un
día entero de sol que en un día nublado.

Cambio de pilas
Para mejores resultados las pilas Ni-MH deberían ser cambiadas cada 12 meses.
1) El compartimento de pilas está en la parte trasera del foco, afloje los tornillos con un destornillador y saque el
compartimento de las pilas con cuidado.
2) Quite las pilas viejas. Asegúrese de que las nuevas pilas son Ni-MH recargables.
3) Instale las nuevas pilas en el compartimento de las pilas, asegurándose de que están bien colocadas.
4) Vuelva a montar la pieza revisando el procedimiento anterior.
Problemas de encendido
Si su lámpara solar no se enciende al atardecer a pesar de haber observado todas las instrucciones, por favor
intente seguir los siguientes pasos:
1) Asegúrese de que la lámpara solar no está siendo afectada por ninguna otra fuente de luz.
2) Asegúrese de que la lámpara solar no está bajo la sombra durante el día.
3) Asegúrese de que el interruptor está en la posición de “AUTO”
4) Compruebe que las pilas están colocadas correctamente.
Mantenimiento
Limpie el módulo solar regularmente con un paño húmedo para garantizar un óptimo funcionamiento del panel
solar. No utilice ningún tipo de limpiador y tenga cuidado de no presionar mucho el módulo mientras lo limpia.

-
Instruction Manual –
Introduction
Thank you for purchasing a quality unit. Used carefully and in accordance with the instructions set out below your
GARDEN LAMP should give you many years of trouble free use. Please read the instructions carefully to obtain
the best results from your purchase.
Stylishly designed, your unit features:
•Robust & attractive Black plastic construction
•Direction for solar panel can be adjusted freely
•Angle of the spotlights can be adjusted freely
•Solar powered by high quality crystalline solar panel
•3pcs Super bright LED
•No Mains Power or wiring required
•Up to 8 hours run time
•Automatic sensor turns the light on at dusk
•2 x Solar Rechargeable AA Ni-MH batteries included
•Auto/Off switch
Location of the SOLAR LAMP
1) For the best result, please locate your solar lamp in a position
where it can get direct sunlight on the solar panel, and generally
free from cover and shade. (As shown in figure 1).
2) Make sure that the photo sensor (located on the top of the light)
is not going to be affected by any other light source. Otherwise the light will not illuminate at dusk.
3) The SOLAR LAMP must be left to charge for 2 sunny days before best results are achieved.
Assembly Instructions
1) Carefully remove the UNIT and all the fittings out of the box.
2) Assemble the mounting poles (2), and stakes (3); Push the stake directly into the ground
(DO NOT hammer the light or the stakes) (as shown in figure 2).
3) Slot the controller head (1) on the upper part of the mounting poles carefully.
4) Adjust the solar panel to the direction which can get direct sunlight
5) Release the knob by twisting it anti-clockwise and adjust the angle of the spotlights to
any direction you prefer, fix the knob by twisting it clockwise
6) Adjust the switch under the lid of the lamp unit to “AUTO” position.

Operation
1) For daily normal operation, turn the switch to the “AUTO” position, it will automatically
turn on during the night time after it has had a initial full 2 sunny days to charge.
2) The performance of the SOLAR LAMP will vary with the time of year. It will deliver
more light when it has had a full day in the sun rather than a day in overcast weather.
Replacing the Batteries
For best results Ni-MH batteries should be replaced every 12 months.
1) The battery compartment is at the bottom of spotlight, release the screws by screwdrivers and pull battery
compartments out slowly.
2) Remove the old batteries. Make sure the new batteries are Ni-MH rechargeable batteries.
3) Install the new batteries in to the battery compartment, ensuring the correct polarity is observed.
4) Reassemble the unit by reversing the above procedure.
Trouble Shooting
If your SOLAR LAMP does not come on at dusk despite observance of all the instructions, please try the
following steps:
1) Make sure that the SOLAR LAMP is not being affected by any other light source.
2) Ensure the SOLAR LAMP does not stand in the shade during the day.
3) Make sure the switch is in the auto position.
4) Check that the batteries are installed correctly.
Maintenance
Clean the solar module regularly with a damp towel to guarantee optimum performance of the solar panel. Do not
use any type of solvent for cleaning and be careful not to put too much pressure on the module while cleaning.
www.solarjet.it
Table of contents
Languages:
Other Stocker Spotlight manuals
Popular Spotlight manuals by other brands

LIVARNO LUX
LIVARNO LUX LSS 520 A1 User manual and service information

ACME
ACME LED-707 user manual

Holm
Holm nBeckon-26 Installation notes

LIVARNO LUX
LIVARNO LUX LSL 10 A2 User manual and service information

Show Tec
Show Tec Parcan 16 Product guide

Astral Pool
Astral Pool LUMIPLUS FLEXIMINI MONOCOLOR-RGB DMX instruction manual