Stone Art FC0186BA User manual

Sailor Boy Fountain
ITM./ART. 433941
Model FC0186BA
Questions, Problems, Missing Parts, Replacement Parts?
Please call customer service (English only) at (866) 583-7034 from 8am – 10pm (ET),
Mon. – Sat. or e-mail customerservice@srg-usa.com.
PLEASE READ ALL INSTRUCTIONS BEFORE ASSEMBLY.
•Unpack all parts from the carton on a protected surface to ensure there are no missing or damaged parts. If any parts are missing or
damaged, do not attempt to assemble or use the product. Please contact customer service for replacement.
•For outdoor use only.
•Fully submerge pump in water prior to turning on power source and replenish with water as often as necessary.
•Save these instructions for future use.
1
PARTS LIST
Fountain body 1 pc
includes low-voltage pump with
2 pre-attached low voltage finger lights
each with 10W halogen bulb
Low-voltage pump Part #: FC0186CA01
Sailor boy statue 1 pc
Part #: FC0186CA02
Sailboat 1 pc
Part #: FC0186CA03
Model #: AUO-48122085, 120V AC 1 pc
cULus listed transformer
Part #: CE09203
REPLACEMENT PARTS
Halogen Bulb inside Glass Tube Cover 2 pcs
JC Type, 12 volts, 10 watts Max
NOTE: Diagrams for illustrative purposes only and not to scale.
ASSEMBLY INSTRUCTIONS
1. Assemble the fountain in the location you intend to use it. Do not move with water in the fountain.
2. Place the Sailor Boy statue and Sailboat onto their matching holes on the fountain body. (Fig. 1)
3. From the opening at the back of the fountain body, place the pump and 10W finger lights assembly upright in the basin and insert the water supply tube
into the pump outlet on top of the pump. Lead the unclipped 10W finger light though the cord hole to the front of the basin (Fig. 2) and slide it into the
cord clip at the bottom of the fountain body basin (Fig 1A). Lead the two pin pump power cord out of the basin from the opening at the back of the
fountain body.
4. Add clean water into the basin and fill to fill line indicated on basin. The water level should be approximately 0.8 in / 2 cm lower than the top edge of the
basin.
5. Before connecting to the power source, make sure that the pump is assembled and completely submerged in water. Insert the two pin pump power cord
into the cULus Listed transformer and tighten the lock ring clockwise. Connect the transformer power cord to a GFCI outlet and the product will begin to
function as intended.
CAUTIONS:
•This product is NOT to be operated during freezing temperatures. If installed outdoors and in a freeze-area of the country, ensure that all water is
removed and the unit is completely dry.
•Check for leaks and excessive splashing after initial installation and on a regular basis to eliminate the possibility of water damage to surrounding areas.
•Do not leave the fountain running unsupervised for extended periods of time.
•The fountain is not a toy. Always keep the fountain out of reach of children and pets.
IMPORTANT SAFETY INSTRUCTIONS FOR TRANSFORMERS
When using electrical products, basic precautions should always be practiced including the following:
1. READ AND FOLLOW ALL SAFETY INSTRUCTIONS.
2. Read and follow all instructions that are on the product or provided with the product.
3. For a cord-connected or direct plug-in power unit, do not use an extension cord.
4. Reference the National Electrical Code, ANSI/NFPA 70, specifically for the installation of wiring and clearances from power and lighting conductors.
5. Installation work and electrical wiring must be done by qualified person(s) in accordance with all applicable codes and standards, including fire-rated
construction.
6. For a cord-connected or direct plug-in power unit, do not install or use within 3.05 m / 10 ft of a pool.
7. For a cord-connected or direct plug-in power unit, do not use in a bathroom.
8. For a cord-connected power unit, user should pay attention to below statement
WARNING: Risk of Electric Shock. When used outdoors, install only to a covered Class A GFCI protected receptacle that is weatherproof with the
power unit connected to the receptacle. If one is not provided, contact a qualified electrician or proper installation. Ensure that the power unit and cord do
not interfere with completely closing the receptacle cover.
9. WARNING: Risk of Fire. Installation involves special wiring methods to run wiring through a building structure. Consult a qualified electrician.
10. For a unit intended to be mounted greater than 0.3 m / 1 ft from the ground surface:
WARNING: Risk of Electric Shock. Mount the unit at a height greater than 0.3 m / 1 ft from the ground surface.
SAVE THESE INSTRUCTIONS. This manual contains important safety and operating instructions for power units.
OPERATING INSTRUCTIONS FOR PUMP
2
MAINTENANCE:
1. Keep the water clean and periodically clean the fountain to prevent mineral deposits and
contamination which may clog the pump.
2. Regular cleaning of the pump will be necessary depending upon the environment in which it
is operated. Clean the pump when it is visibly soiled or when a noticeable drop in performance
is detected. Failure to clean the pump may result in overheating of the pump.
3. Before cleaning, always disconnect the pump from the power source.
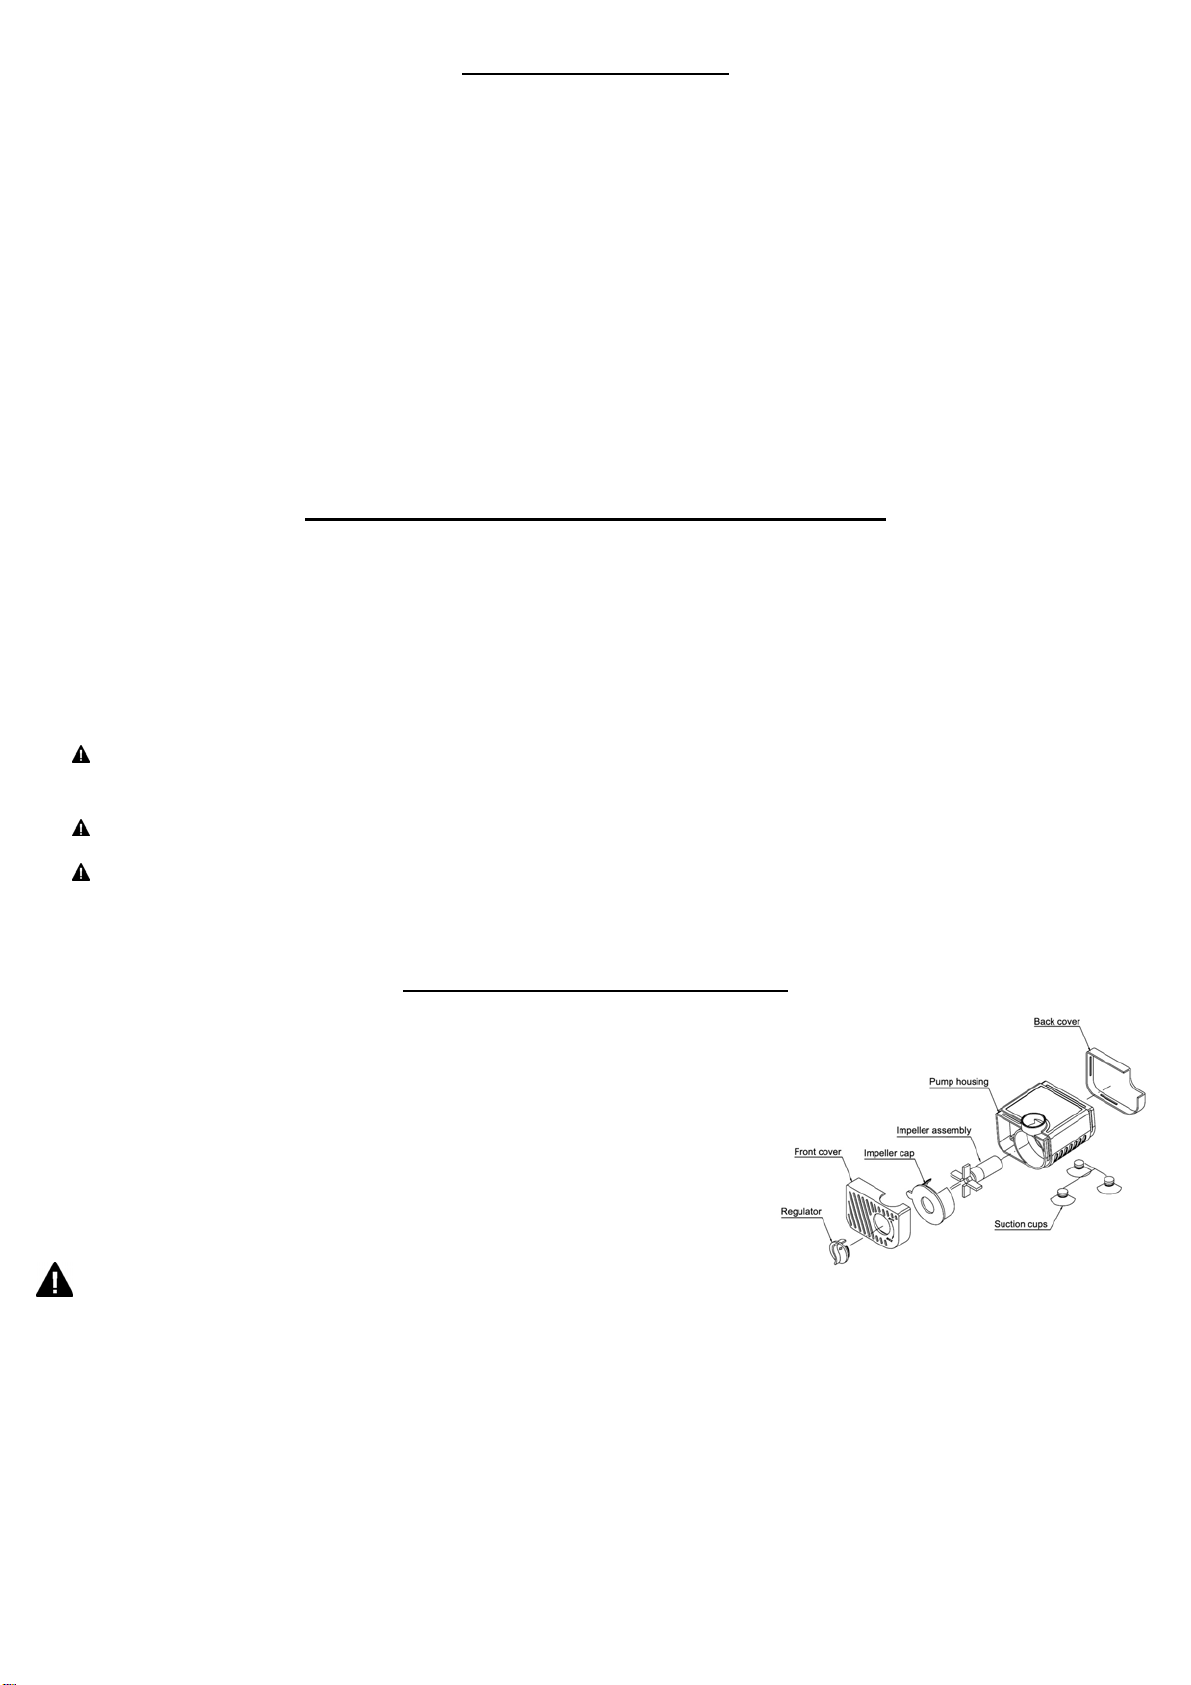
4. Disassemble the pump by removing the inlet screen & the impeller housing. Remove the
impeller/rotor assembly by gently pulling on the impeller blades. Use a soft cloth or brush to
clean the area inside of the pump where the impeller/rotor assembly was. Clean the front cover,
impeller housing & impeller in warm soapy water. Reassemble the pump and inspect for proper
operation.
WARNINGS:
•Risk of electric shock. This pump is supplied with a grounding conductor and grounding-type attachment plug. To reduce the risk of electric shock, be
certain that it is connected only to a properly grounded, grounding-type receptacle (GFCI).
•Do not exceed the voltage shown on the pump.
•Always disconnect the pump from the power source before performing any maintenance on the pump and/or lights (if equipped).
•Inspect cord for damage before installation and/or maintenance. Replace entire pump assembly if damage is found.
•If equipped with a 3-prong, grounded type plug, do not remove the grounding pin from the plug on the power cord.
CAUTIONS:
•The pump has been evaluated for use with freshwater only.
•To reduce the risk of electric shock, use only on portable self-contained fountains no larger than 5 ft / 1.52 m in any dimension.
•Use a proper power source as indicated on the pump label.
•Keep the cord away from high temperatures or other heat sources.
•Do not use the pump in water temperatures below 41° F / 5° C or exceeding 86° F / 30° C.
•Do not pump heated liquids.
•Do not let the pump run dry. Pump must be completely submerged for proper operation and cooling.
•Do not lift the pump by its power cord.

FINGER LIGHT BULB REPLACEMENT INSTRUCTIONS
CAUTION: Halogen bulb life may be shortened by direct contact with oily residue on your fingers. Use clean soft cloth or tissue to handle the bulb during
replacement.
Two replacement halogen bulbs and two glass tube bulb covers are included for your convenience. For additional replacement bulbs and / or glass tube
covers, contact Customer Service. Or go to your local hardware store for replacement bulbs. JC Type, 12 Volts, 10 watts maximum.
1. If an accent light bulb is burned out, unplug the transformer from the power source and allow
a few minutes for the light bulb to fully cool before handling.
2. Detach the lamp from the lamp clip and remove the glass tube by firmly grasping and twisting
the tube away from the bulb socket.
3. The bulb may now be pulled out from its socket and replaced with a new bulb
4. Reattach the glass tube by pushing and twisting onto the bulb socket.
IMPORTANT SAFETY INSTRUCTIONS PERTAINING TO A RISK OF FIRE, OR INJURY TO PERSONS
•WARNING - Lighted lamp gets HOT quickly. Contact only the switch when turning on. Do not touch hot lens or cover.
•Unplug and allow the lamp to cool before handling the lamp.
•Keep lamp away from materials that may burn.
•To avoid possible injury from broken glass, wear gloves when handling or replacing glass bulbs or tubes.
•Do not operate the lamp with a missing or damaged lamp covers.
FOUNTAIN CARE AND MAINTENANCE
1. Keep water clean. Using clean water will reduce mineral deposits and contamination which improves water clarity.
2. Check the water level regularly and add clean water to ensure the pump is completely submerged during operation. In hotter, drier climates the water
level may need to be checked more frequently.
3. To clean, use a wet cloth or sponge to gently wipe heavily stained surfaces. Do not use harsh chemicals or abrasives as this will damage the finished
surface.
4. Disconnect the power and empty the basin if the fountain will not be used for an extended period of time.
Note: Each fountain product may have minor variations in texture, finish and appearance. Some products and finishes are intentionally weathered and worn
in appearance to enhance the aesthetic beauty of the finished product and make each fountain truly unique.
TROUBLESHOOTING GUIDE
If the pump does not operate…
1. Check to make sure the pump is connected to a power source.
2. Check the water level to ensure the pump is completely submerged. Add water as needed.
If the pump operates, but, there is no water flow…
1. Check the water level to ensure the pump is completely submerged. Add water as needed.
2. Check the supply tube for any kinks or folds and correct.
If the pump operates, but there is no water flow and the pump is fully submerged and the supply tubing has no kinks…
1. Disconnect the pump from the power source.
2. Disconnect the supply tube from the pump outlet.
3. Check for clogs or holes and clean the tubing inside and outside if necessary.
4. Check for clogs and clean the pump inlets and outlet if necessary.
5. Place the pump back into the water outlet side up and then re-connect the pump to the power source.
6. Once the water begins to flow from the pump, re-connect the supply tubing to the pump outlet.
7. Check for any air trapped in the water supply tube which may prevent the pump from working.
If the pump runs with low or high water circulation…
1. Check and adjust the regulator dial or slide on the front of the pump. Adjust the dial/slide towards (+) to increase water flow or towards (-) to decrease
water flow.
If the pump operates, but the water flow is uneven or non existent and the pump makes noise…
1. Check the impeller assembly for wear. Remove the front cover and regulator/impeller plate and remove the impeller assembly. Clean the impeller
assembly and inspect for wear. If the rotor spins freely from the magnetic body, the impeller assembly is worn and needs to be replaced. Contact
customer service for replacement parts.
If the pump starts to make noise…
1. Check the water level to ensure the pump is completely submerged. If the water level drops below the pump intake, it may suck in air and cause the
noise or the pump to completely stop working.
2. Move the pump away from the sides of the basin or place a piece of foam or sponge underneath the pump to isolate any vibration which causes the
noise.
If the water starts to foam…
1. Check the water level to ensure the pump is completely submerged. If the water level drops below the pump intake, it may suck in air and cause the
pump to ‘spit’ and foam the water.
2. Add a few drops of anti-foaming water treatment, available at your local home and garden store, to the fountain water.
If the water flow is uneven…
1. Gently sweep across the water surface to achieve even water flow across the face of the fountain or spillway.
2. Check the top of the basin to ensure it is level. If not, shim the basin from the bottom until the top spillway is level or has achieved even water flow all
around.
3
Table of contents
Other Stone Art Outdoor Fountain manuals


Popular Outdoor Fountain manuals by other brands


Silex technology
Silex technology KB60238 owner's manual

Oasis
Oasis VERSACOOLER II Series installation instructions

Murdock
Murdock A151-VR Series Installation & maintenance instructions

Sunnydaze Decor
Sunnydaze Decor HDC-185 quick start guide

Jeco
Jeco FCL061 quick start guide

Campania
Campania Williamsburg Chiswell manual


