StonePoint 1G1200S-PW User manual
Switch Control Security Light
Model: 1G1200S-PW/1G1200S-PB
Please read all instructions thoroughly and carefully prior to installing this product. Retain these instructions for future
reference.
Failure to follow these instructions could result in voiding the product warranty. Keystone Group assumes no liability or
responsibility for claims arising from improper installation or improper use.
For questions in regard to the warranty of this product, contact us at 303.652.6164 or email us at [email protected]
READ FIRST: IMPORTANT SAFETY INSTRUCTIONS
Before you begin installing, servicing, or maintenance of this product, follow these general precautions.
•To reduce the risk of death, personal injury or property damage from fire, electric shock, falling parts, cuts/abrasions
and other hazards please read all warnings and instructions included with and on this product prior to installation.
•For commercial installation: service and maintenance of this product should be performed by a qualified, licensed
electrician.
•For residential installation: If you are unsure about the installation or maintenance of this product, consult a
qualified licensed electrician.
oDo not mount the unit against flammable surfaces.
•This product CANNOT be used with a dimmer switch, motion or occupancy sensor or other electronic switching
devices unless otherwise designated. LED products must be powered directly to a switched circuit.
•This product should not be used in areas with limited ventilation or high ambient temperatures.
•This product is intended to be connected to a properly installed and grounded UL listed junction box.
WARNING: RISK OF ELECTRICAL SHOCK
•Turn off electrical power at fuse or circuit breaker box before wiring product to the power supply.
•Verify the supply voltage is correct before installing (110-240V).
•Make all electrical and grounded connections in accordance with the National Electric Code and any applicable local
code requirements.
•All wiring connections should be capped with UL listed wire connectors.
CAUTION: RISK OF PRODUCT DAMAGE
•Never connect components with power on.
•Do not mount or support product in a manner that can cut the outer jacket or damage the wire insulation.
•Avoid covering LED products with insulation, foam or other materials that will prevent convection or conduction
cooling.
•Never connect an LED product directly to dimmer packs, occupancy sensors, timing devices, or other related control
devices, unless individual product specifications deem otherwise.
•Unless individual product deems otherwise; do not exceed product’s maximum temperatures.
•LED products are Polarity Sensitive, ensure proper polarity before installation.

Revision031417
2
•Electrostatic Discharge (ESD), can cause damage to LED products. Wear personal grounding equipment during
installation and service of the product.
•Do not touch the individual electronic components, it may cause ESD (Electronic Discharge), shorten lamp life or alter
performance.
CAUTION: RISK OF INJURY
•Wear gloves and safety glasses at all times when removing fixture from carton, installing or servicing the product.
•Avoid direct eye exposure to the light source while it is on. LED LIGHTS ARE EXTREMELY BRIGHT, UNDER NO
CIRCUMSTANCES SHOULD YOU STARE DIRECTLY INTO AN LED LIGHT, THIS MAY CAUSE IRREPARABLE DAMAGE TO
THE EYES.
•Please dispose of packaging materials and account for all small parts as these can be hazardous to small children.
WARNING: RISK OF BURN
•Allow fixture to cool completely before handling. Do not touch enclosure of light source.
•Do not exceed maximum wattage marked on the label.
•Keep combustible and other materials that can burn away from the light, lamp/lens.
Installation Instructions
Part
Description
Quantity
A
Light Fixture
1
B
Screw Plastic Cover
1
C
Stainless Steel Screw
1
D
Gasket
1
E
Cross Bar
1
F
Grounding Screw
1
G
Grounding Wire
1
H
Wire Nut
3
I
Stainless Steel Mounting Screw
2
Silicon Sealant required (not included)
Tools Required for Installation:
Phillips screw driver and level

Revision031417
3
MOUNTING AND WIRING THE LIGHT
NOTE: DO NOT MOUNT ON THE GROUND, RECOMMENDED INSTALLATION HEIGHT IS 6 ½ FEET TO 10 FEET
1. Turn off power to the circuit breaker box. DO NOT rely on only the switch power being turned off.
2. Install the cross bar (E) to the junction box and secure with the (2) mounting screws (I). If installing to a wall or
building, pre-drill holes and use appropriate masonry plugs, now install the cross bar to the surface using the (2)
mounting screws (F).
3. On the cross bar you will see a green/yellow wire (labeled GND) this is your ground wire, use a wire nut (H) to connect
to the house ground wire (typically copper). For proper connection, place wire nut over wires and twist clockwise
until tight.
4. Connect supply wires with wire nuts (H) as shown in the figure above.
Black supply wire connects to the Black power supply wire (Live)
White product wire connects to the White supply wire (Neutral)
5. You may use the optional gasket (D) at this time.
6. Install the light fixture (A) to the cross bar grounding screw (F). Use the silicone sealant around the perimeter of the
light to seal for moisture.
7. Turn on your electricity after install has been completed.
Revision031417
4
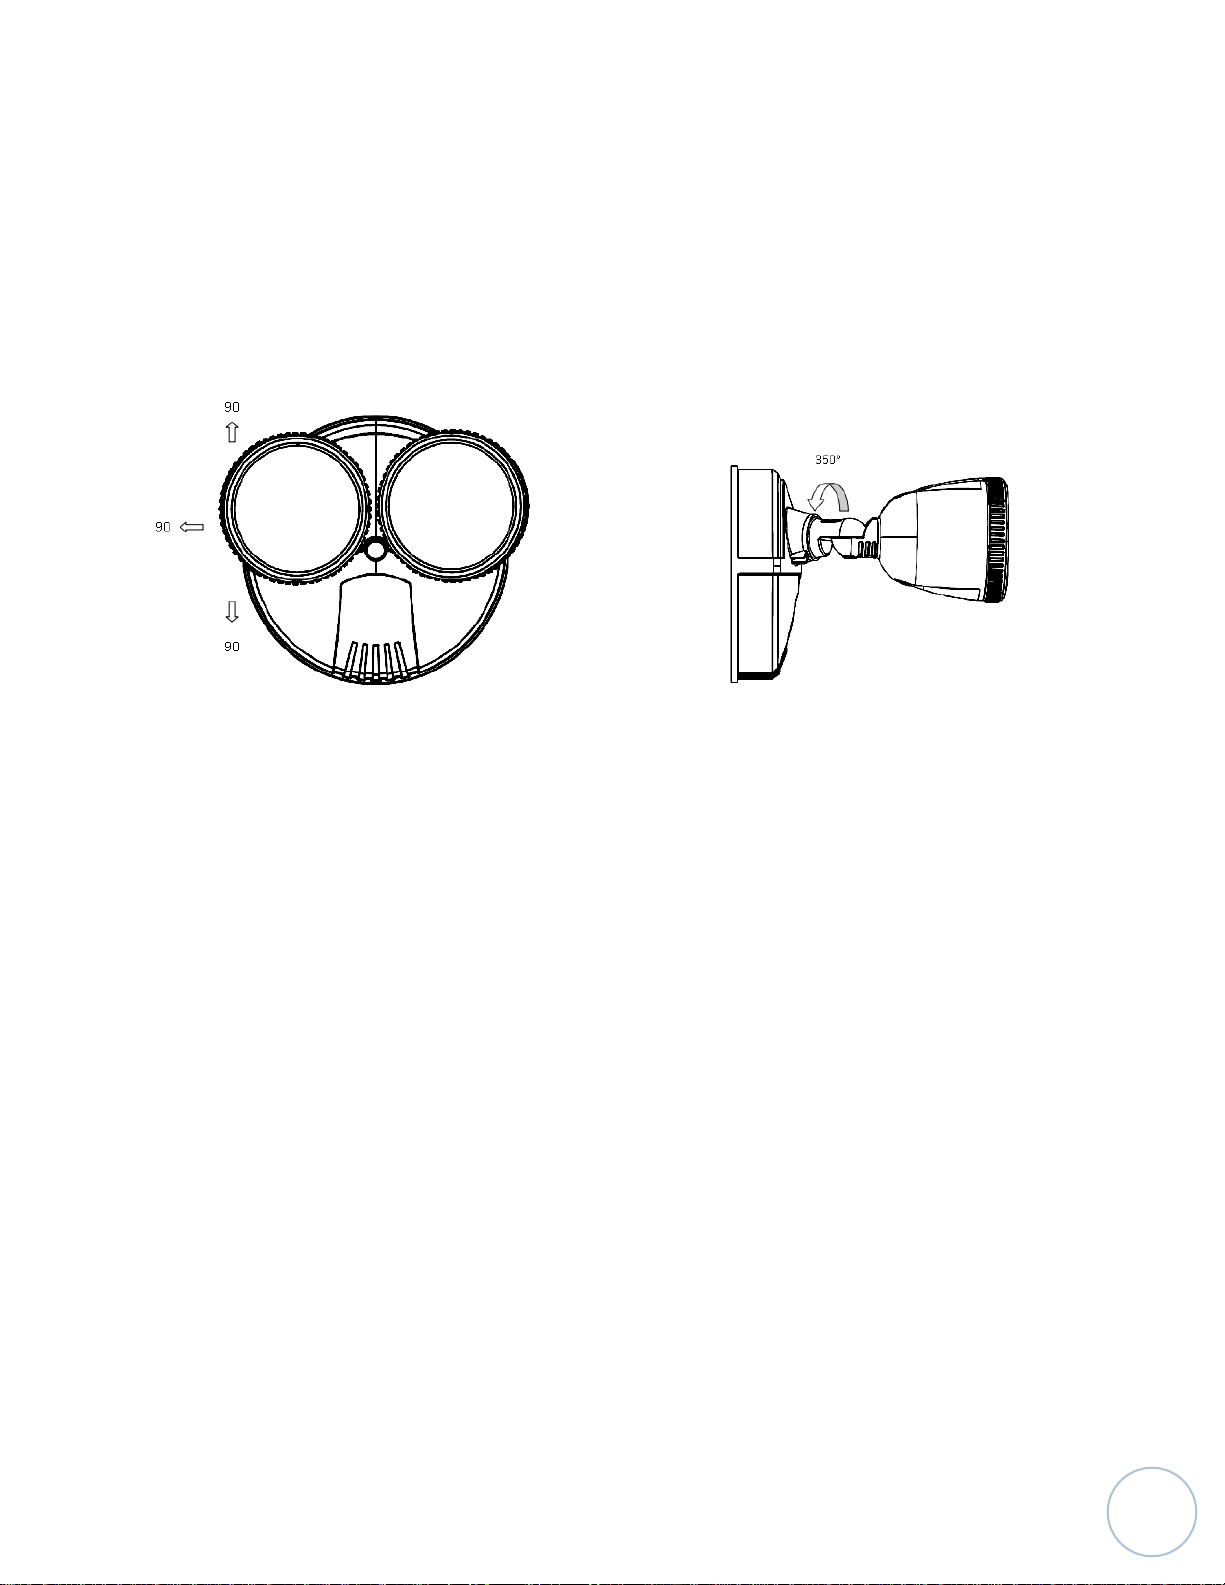
ADJUSTING YOUR LIGHT HEADS
Your light heads can be adjusted by turning the individual light head to desired position. You can also adjust your light head up
and down to your desired position.
TROUBLE SHOOTING
If the light does not come on:
➢Verify the power is turned on at the switch and breaker
➢Verify that the product is properly wired
➢Verify that the line voltage is correct (110-240V)
PRODUCT MAINTENANCE
To clean the surface of the light, use mild soap and water. Do not use scouring pads, powders, steel wool or any other abrasive materials.
For any further questions please contact us at 303.652.6164 Monday through Friday 7am to 4pm Mountain Standard Time.
PRODUCT WARRANTY
Keystone Group will cover any manufacturing defect for a period of three (3) years from the date of purchase with original proof of purchase.
Keystone Group will either repair or replace your product at our discretion. The warranty is not transferable and is only valid to the original
purchaser. This warranty does not apply to the following; acts of God, product that has been modified, opened, disassembled or unauthorized
repair, products not used in accordance with the provided instructions, damages caused by shipping, improper handling, accident or misuse.
The finish of any part of the product, scratches, weathering, corrosion, discoloration, fading, these are all considered normal wear and tear.
This warranty does not cover any damages of merchandise in transit, any damages need to be reported to the carrier and a claim needs to be
filed with the carrier.
a Keystone Group product
This manual suits for next models
1
Table of contents
Other StonePoint Spotlight manuals


Popular Spotlight manuals by other brands


Clevertronics
Clevertronics L10 LIFELIGHT PRO LLIFE-PRO-SPOT Installation & maintenance instructions

LIVARNO home
LIVARNO home 375304 2101 Operating and safety information

Titanium
Titanium TT-TRK-5W-2 quick start guide

Philips
Philips ColorBurst 6 Product guide

Sealey
Sealey AK436.V3 instructions

Stanley
Stanley SPQAK instruction manual