StonePoint HX-WL12000DT User manual

12000 Lumen
LED Work Light
with Double Tripod
MODEL No:
HX-WL12000DT
PACKAGE CONTENTS
This fixture is suitable for
indoor/outdoor use.
Revision Date: 02/22/2022
9.5 in.
24,1 cm
LED Facts:
Total Lumens: 12000 total (6000
Lumens each light)
Color Temperature: 4000K
CRI: 80
Operating Voltage: 100v-277v
LED Life: 50,000 hours
Operating temperature:
-13° to 113°F (-25° to 45° C)
Cord Type: 6 ft. 18/3 SJTW
1
55 in.
139,7 cm
Tripod Fully
Expanded
Star
Adjustment
Knob
Leg Stand
Work Light BackWork Light Front
Shatter-Resistant
Tempered Glass
LED
ON/OFF
Switch
6 ft., 18/3 SJTW Cord
with Grounded Plug
Medium
Star Knob
Fastener
Small
Star Knob
Fastener
Crossbar
Mounting
Fastener
6 in.
15,2 cm
13 in.
33 cm
24.25 in.
61,6 cm
24 in.
60,9 cm
Tripod Fully
Folded Up
Top
Column
Crossbar
Cradle
Center
Mounting
Point Twist Lock
Tripod Base
Adjustment Knob
Adjustment
Collar
Leg
Middle
Column
Twist Lock
Crossbar
Crossbar
Stand
Foam Grip
Small
Star Knob
Fastener
Crossbar Mounting
Fastener
Handle
ADDITIONAL WARNINGS
WARNINGS
WARNING: Do NOT look directly at LED light sources.
WARNING: Avoid direct contact with water.
SAFETY AND PRECAUTIONS
1. Suitable for indoor and outdoor use. Not for use with direct contact with water.
2. Do NOT look directly at LED light sources.
3. The LED modules used in this fixture are not serviceable.
4. This product is inspected prior to shipping. Do not use if product is cracked, broken or missing parts.
5. Suitable for use in operating environments ranging between -13° to 113°F (-25° to 45° C). Lifetime of this product may be
reduced with prolonged exposure to extreme temperatures.
WARNING: Avoid using this product in the immediate
vicinity of highly flammable materials, liquids and gases.
WARNING: This light is not waterproof.
WARNING: DO NOT alter or disassemble the fixture. It is
completely enclosed and does not contain replaceable or
serviceable parts.
2
This device complies with Part 15 of the FCC rules. Operation is subject to the following two conditions: (1) This device may not cause harmful interfer-
ence, and (2) this device must accept any interference received, including interference that may cause undesired operation. Warning: Changes or
modifications to this unit not expressly approved by the party responsible for compliance could void the user’s authority to operate the equipment.
The user is cautioned that any changes or modifications not expressly approved by the party responsible for compliance could void the user’s authority
to operate the equipment. Note: This equipment has been tested and found to comply with the limits for a Class B digital device, pursuant to Part 15 of
the FCC rules. These limits are designed to provide reasonable protection against harmful interference in a residential installation. This equipment
generates, uses and can radiate radio frequency energy and, if not installed and used in accordance with the instructions, may cause harmful interfer-
ence to radio communications. However, there is no guarantee that the interference will not occur in a particular installation. If this equipment does
cause harmful interference to radio or television reception, which can be determined by turning the equipment off and on, the user is encouraged to try
to correct the interference by one or more of the following measures:
1) Reorient or relocate the receiving antenna. 2) Increase the separation between the equipment and receiver. 3) Connect the equipment into an outlet
on a circuit different from that of the receiver. 4) Consult the dealer or an experienced radio/TV technician for help.
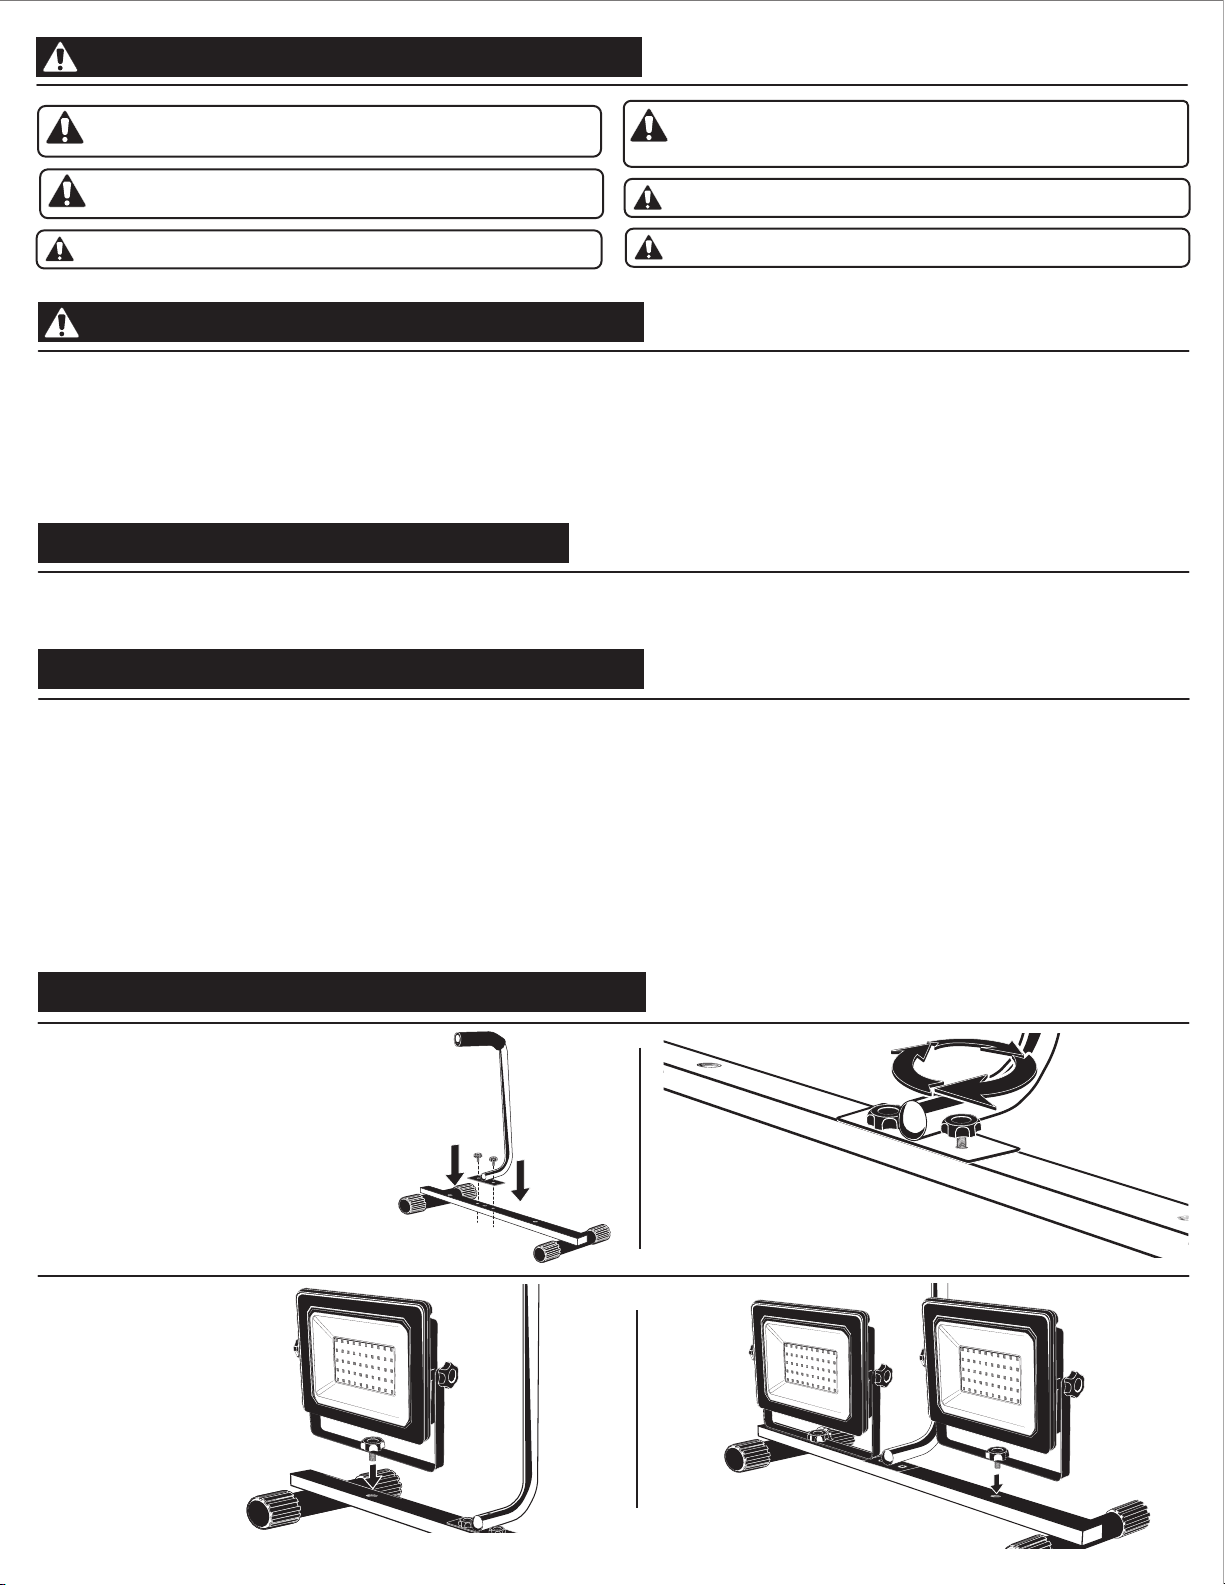
1. Attach the handle to the mounting
crossbar by aligning the holes on the
crossbar with the holes in the handle
mounting plate (Fig 1). Insert the two
small star knob fasteners through the
handle mounting plate and into the
threaded holes in the crossbar and
tighten until the handle is securely
attached (Fig 2).
2. Add both lights to the
crossbar (Fig 3). by
fastening the medium star
knob fastener through the
center hole in the leg
stand of each light and into
the threaded hole on the
mounting crossbar (Fig 4).
Tighten each down until
secure.
DIMMING
• DO NOT USE THIS FIXTURE WITH DIMMERS.
Doing so will void the warranty of this product.
WARNING: Use only in 100-227v, 60Hz circuits.
ASSEMBLY INSTRUCTIONS
Fig 1
Fig 3
Fig 2
Fig 4

3
TRIPOD ASSEMBLY & OPERATION
1. To attach the crossbar to the tripod stand, line up the center hole in the crossbar handle with the threaded hole a top the pole in the tripod.
Rest the crossbar in the tripod cradle and fasten to the tripod stand with the crossbar mounting fastener (Fig 7). Tighten down until the crossbar
securely tightened to the top of the tripod (Fig 8). To remove the crossbar with the mounted lights, unfasten the star fastener and remove.
Fig 5
3. To adjust the light angle, loosen both
star adjustment knobs on the sides of
each light head by turning them in a
counter clockwise manner (Fig 5).
Pivot the light body to redirect the light
(Fig 6). Once the light has been
readjusted, turn the knobs clockwise to
tighten.
Fig 7
Fig 8
Fig 6
2. To adjust the base, loosen the tripod base adjustment knob (Fig 9). For maximum stability, push the collar down until the legs are out as far
as they can go (Fig 10). To attain maximum base height, move the adjustment collar up and bring in the legs as far as possible without risking
the stability of the base (Fig 11).
The tripod stand has several points of adjustment that can determine the height and stability of the light.
Fig 9 Fig 10 Fig 11
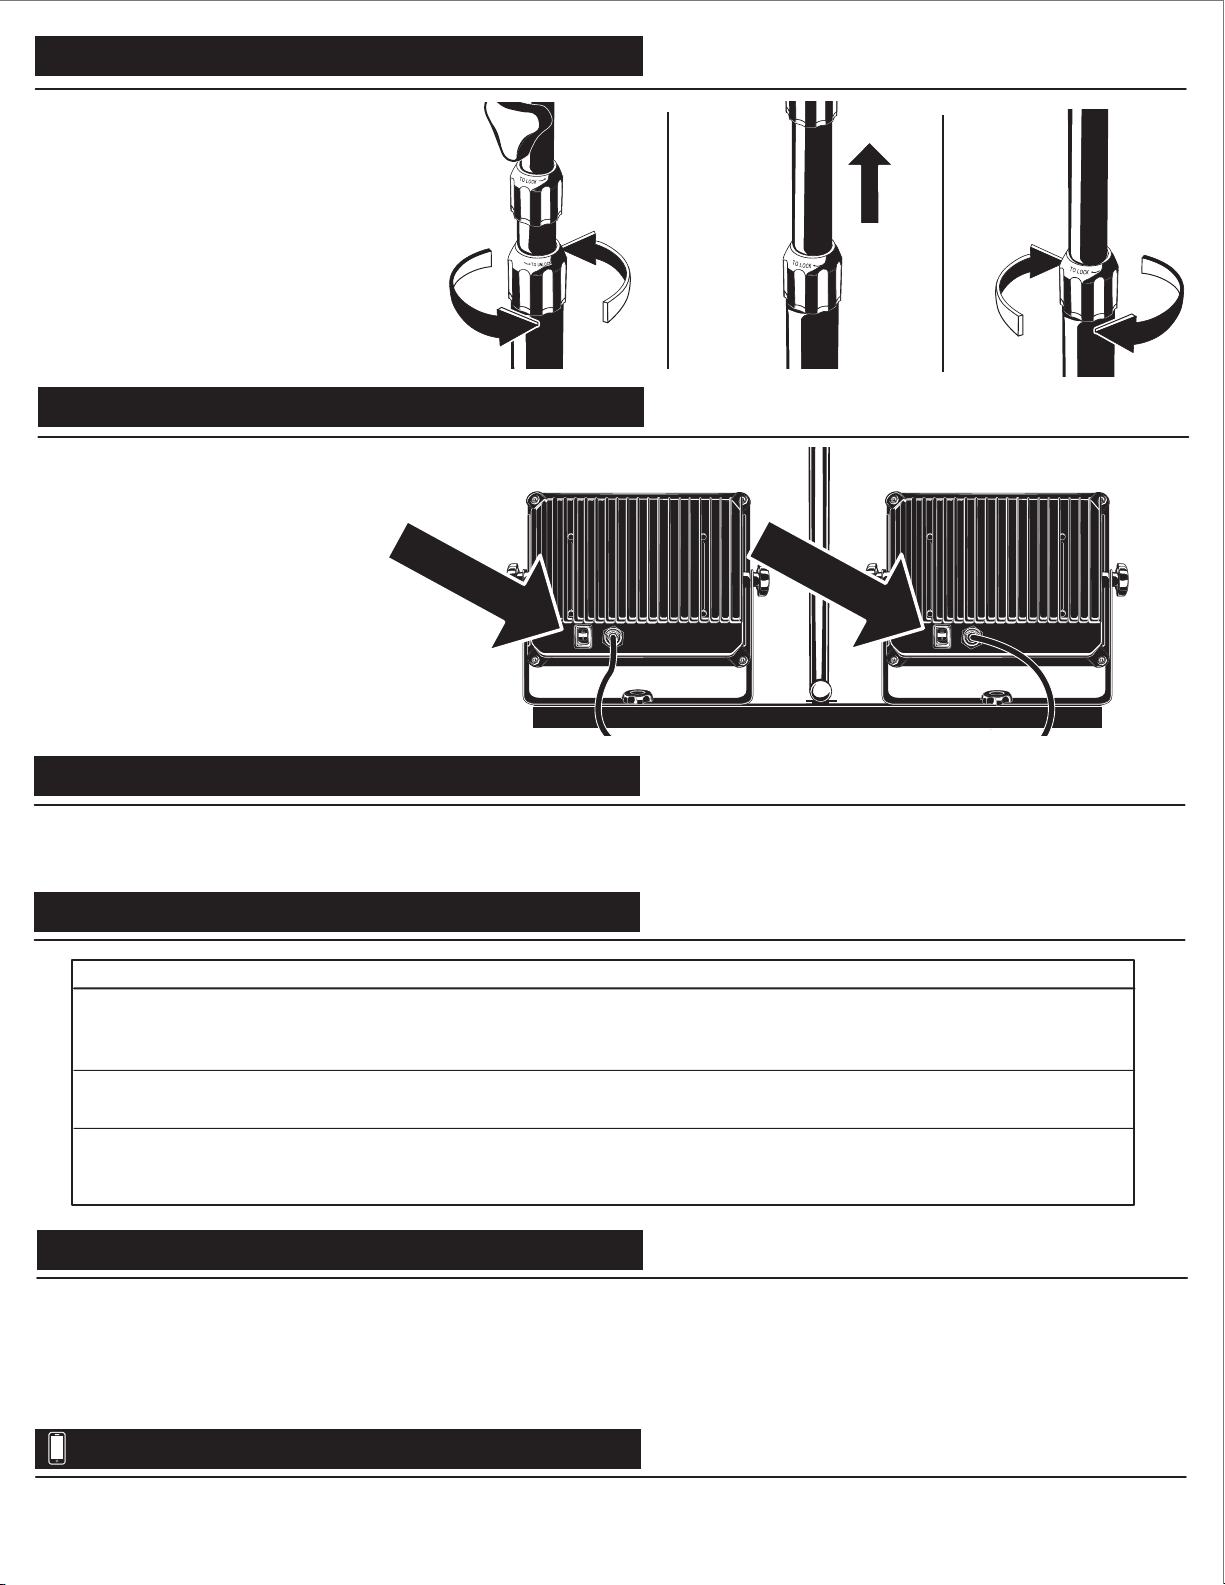
LIGHT OPERATION
2 YEAR LIMITED WARRANTY
This product is guaranteed against failure due to factory defects in materials or workmanship for two (2) years from the date of purchase.
This warranty is non-transferable and applies only to the original owner. Proof of purchase is required for repair or replacement. This
warranty does not cover normal wear of parts or damage resulting from any misuse of the product. Misuse of the product includes, but is not
limited to: washing the product, using in extreme weather conditions, opening the product, or trying to remodel the product. Important: this
warranty is only valid if the product has been purchased through an authorized reseller.
CUSTOMER SERVICE
Stonepoint LED Lighting is a registered trademark of GT Industrial Products.
For questions regarding this product, please e-mail or call GT customer service at [email protected] or 1-800-865-6799.
TROUBLESHOOTING GUIDE
CLEANING INSTRUCTIONS
Using a soft cloth, clean the fixture using a mild, non-abrasive glass cleaner. DO NOT use solvents. DO NOT use cleaners containing
abrasive agents. NEVER spray liquid cleaner directly onto the light.
4
TRIPOD OPERATION CONT.
1. To turn light on and off press ON/ OFF button located
on the back side of each light (Fig 15).
3. The center column of the tripod stand has
two twist locks on it that tighten and loosen
in order to adjust the height of the top
sections of the central column to achieve
differing heights. Rotate the twist lock
counter-clockwise to loosen the lock (Fig
12). Raise or lower the section of the
column (Fig 13). Once the desired height
has been reached tighten the twist lock
clockwise to lock the column section into
place (Fig 14).
Fig 15
Fig 12
Fig 13 Fig 14
Light does not turn on.
Circuit breaker trips or fuse blows
when light is turned on.
Problem Probable Cause
Solution
Stand will not stay up.
1. Switch is off.
2. Not plugged in.
3. Light malfunction.
1. Discontinue use
immediately.
1. Knobs are not tight.
2. Stand legs are too close
together.
1. Turn on switch.
2. Plug cord in.
3.
E-mail [email protected].
1. Call an electrician.
1. Tighten knobs.
2. Re-adjust position of stand legs.
Popular Work Light manuals by other brands


Parkside
Parkside PAL 2200 A3 manual

TOOLCRAFT
TOOLCRAFT 2482470 operating instructions

Howard
Howard LWL-36-120 Installation instructions manual

Lena Lighting
Lena Lighting PROFI SERVICE SET AKKU LED installation instructions

Milwaukee
Milwaukee REDLITHIUM L4 NL400 instruction manual

Bayco
Bayco BAR-2392 instruction manual

Kandolite
Kandolite K64P36W3RGBAW user manual

Home Zone Security
Home Zone Security ES06430V installation instructions

Kompernass
Kompernass Powerfix KH 4077 operating instructions

Evolveo
Evolveo Lumos IQ Series quick start guide

TradeTuff
TradeTuff TRA260 user manual

KRAFTWERK
KRAFTWERK 32070 instruction manual