Stoneridge DSRC Tester User manual

DD 56170 R02 1 © Stoneridge Electronics Ltd
Stoneridge DSRC Tester Manual
Stoneridge Electronics Ltd
Copyright
The information contained in this document is the property of Stoneridge
Electronics Ltd. and should not be reproduced, revealed or appropriated,
either in whole or in part, without the written authority of Stoneridge, Inc.

2
1
INTRODUCTION
The Stoneridge DSRC Tester is a small
hand held DSRC Transceiver intended to
be used for reading DSRC tachograph data
in stationary vehicles, by an operator.
The DSRC tester is designed to operate
from the internal battery for at least a full
working day, under all climatic conditions,
communicating with Optimo through a
Bluetooth connection.
1.1
Antenna area
The antenna covers the shaded area on top of the unit as shown on the picture below. The area
must not be covered when the radio is activated for reading OBUs. The antenna must be pointed
in the direction of the OBU as the arrow indicates.
1.2
Abbreviations
BST
Beacon Service Table
BT
Bluetooth
DSRC
Dedicated Short Range Communication
OBU
On Board Unit
SAM
Secure Application Module
VST
Vehicle Service Table
Figure 1: DSRC Tester system architecture
Terminal
Service
3
2
BATTERY CHARGING
RSE622 is powered by a rechargeable Li-Ion battery. A USB charger and cable are included for
charging the battery from a standard socket. The battery comes partially charged. Charge the battery
for at least 3 hours before the first use of the RSE622.
2.1
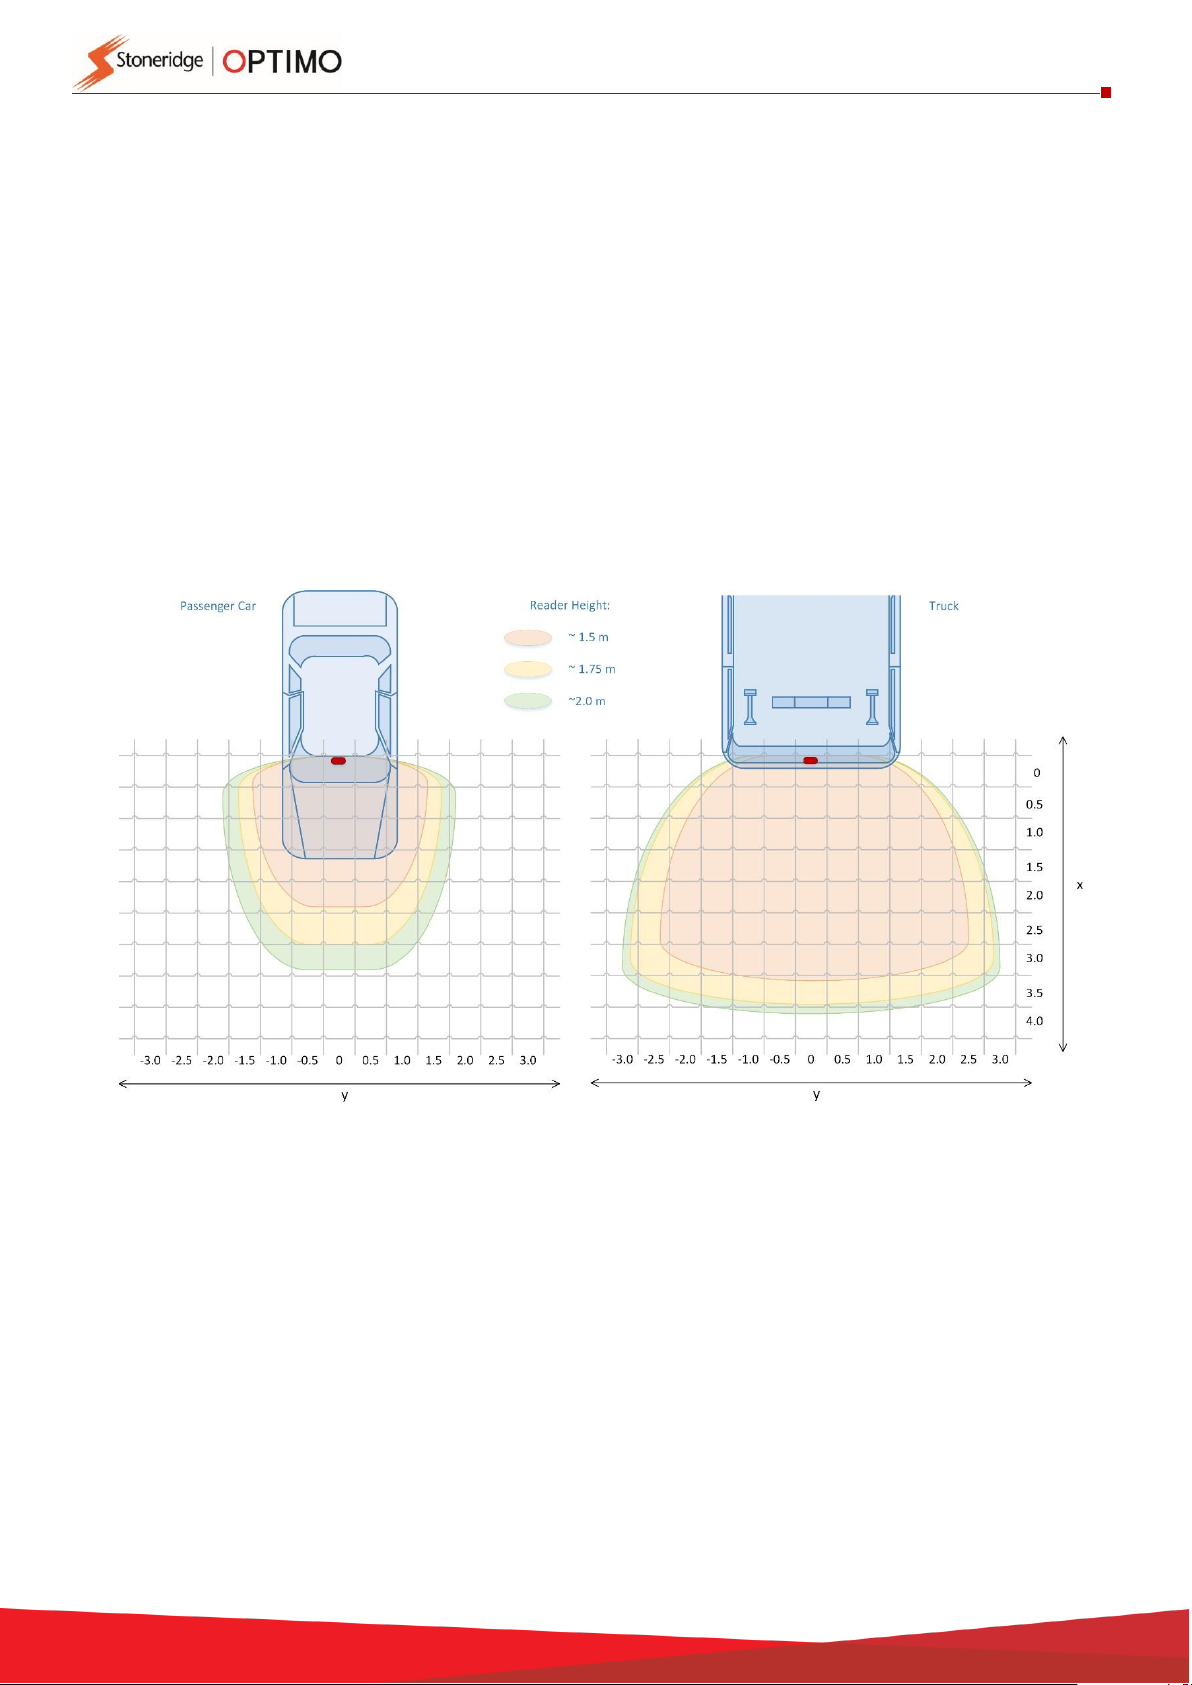
OBU Reading Zones
The longest reading range is achieved when OBU and Transceiver is pointing directly toward each
other. Any angle on RSE622 or OBU is reducing the range.
The drawing below shows the typical OBU reading zones for passenger cars and trucks. The
different coloured reading zones represent the RSE622 height above ground.
The reading zones diagram shows that the reading zone is smaller for light vehicles with angled
windscreen at all height for the DSRC transceiver.When the RSE622 is held at “normal head height
of a person(1,75m) is approximatelyx=3 byy=3 meterswide for alight vehicle (angled windscreen).
The reading zone for a large vehicle with an almost vertical windscreen is x=4 by y=6meters

4
3
HMI FUNCTIONS
The RSE622 has a set of human-machine interfaces as described in the next paragraphs.
3.1
Push Button
A light press on the push button will switch on the DSRC tester, it will respond with a blink, a beep and
a short vibration.
The push button serves different functions depending on how long it is pressed.
Initial State
Push button press time
Result
RSE622 OFF
Any
RSE622 switched ON
RSE622 ON
Less than 3 seconds
DSRC radio activated
RSE622 ON
More than 3 seconds
RSE622 switched OFF
RSE622 ON
More than 20 seconds
RSE622 is reset to factory defaults, and switched OFF
3.2
Light
RSE622 has a multicolour LED on top of the casing. The tables below describes the different LED
indications.
LED indications when the USB cable is connected:
Colour
Interval
Mode
NO
-
RSE622 OFF
Red
3 seconds
RSE622 ON, Battery charging
Green
3 seconds
RSE622 ON, Battery fully charged
Red
0.5 seconds
RSE622 ON, Battery charging, DSRC radio activated
Green
0.5 seconds
RSE622 ON, Battery fully charged, DSRC radio activated
White
0.5 seconds
RSE622 ON, BstTest running
Amber
Constant
RSE622 ON, firmware is being upgraded
LED indications when the USB cable is not connected:
Colour
Interval
Mode
NO
-
RSE622 OFF
Green
3 seconds
RSE622 ON, Battery OK
Yellow
3 seconds
RSE622 ON, Battery low (less than 2 operating hours remaining)
Blue
3 seconds
RSE622 ON, Bluetooth connected (will change to yellow when battery is low)
Blue
0.5 seconds
RSE622 ON, Bluetooth connected, DSRC radio activated (will be yellow when battery is low)
White
0.5 seconds
RSE622 ON, BstTest running

5
3.3
Sound
The built in buzzer signals the following events:
Event
Sound signature
RSE622 switched ON
Short beep
RSE622 switched OFF
Three short beeps
DSRC radio activated
Short beep
Reset to factory defaults
Long beep
OBU communication completed, transaction sent
Short beep
OBU communication timeout, no transaction
Three short beeps
Bluetooth connected
Short beep
Bluetooth disconnected
Three short beeps
3.4
Vibration
The built in vibration signals the following events:
Event
Sound signature
RSE622 switched ON
Short vibration
RSE622 switched OFF
Three short vibrations
DSRC radio activated
Short vibration
OBU communication completed, transaction sent
Short vibration
OBU communication timeout, no transaction
Three short vibrations

6
4. Optimo –Connecting the DSRC Device –1st Time Installation
▪Open Windows Settings on Optimo by touching the Windows Key and selecting the Settings Cog,
then select Devices and Bluetooth
▪Select RSE622 and pair the device, the screen below will appear on completion of pairing
▪Once the device has been paired there will be no need to repeat this process again
7
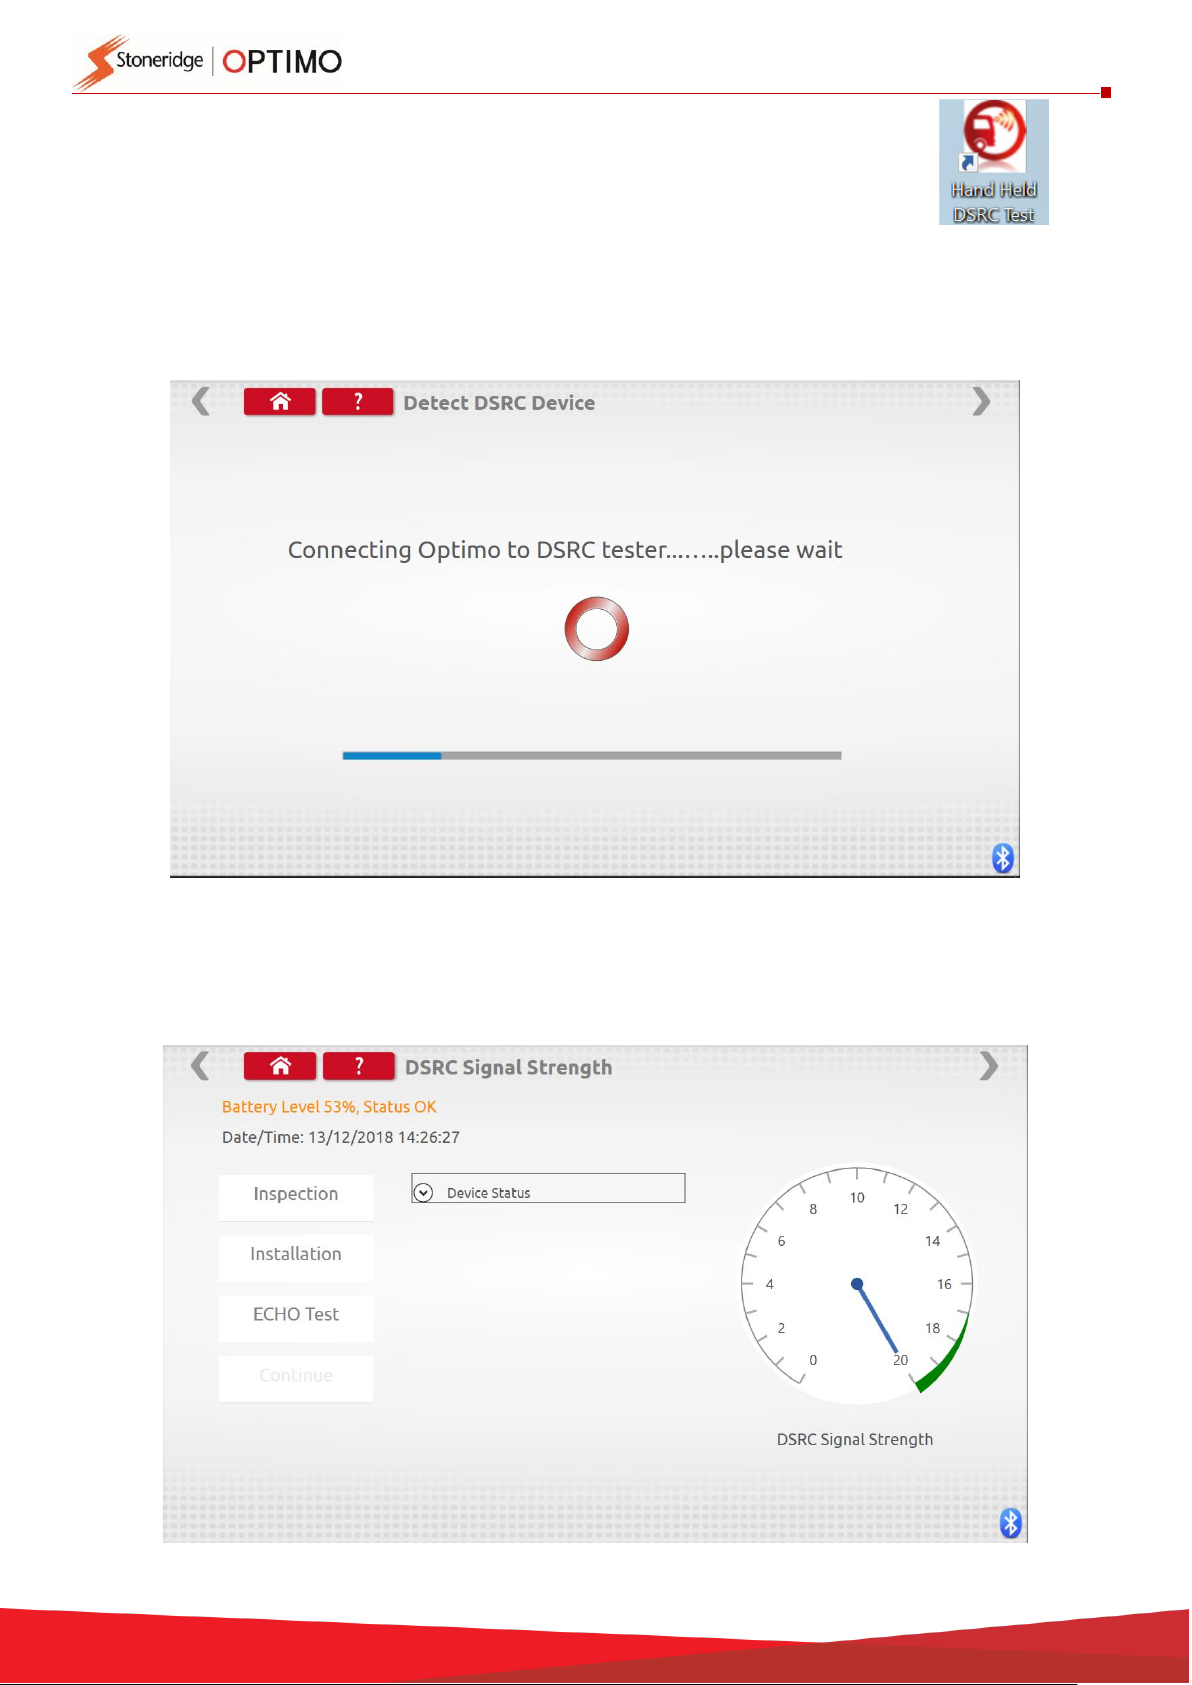
5. Optimo –Echo Test, Inspection Test and Installation Test
▪Switch on the DSRC tester and the led on the unit will indicate green. Place your workshop card
in the slot provided on Optimo, chip side downwards. Select the DSRC icon on the screen.
▪Once the application opens the screen below will be obtained and the led on the DSRC tester will
turn blue when connection is complete. Connection of the device will take several seconds.
▪If you are in range of a DSRC transmitting device the screen below will be obtained. Your screen
must look like this before you can proceed with any DSRC testing.

8
▪Select one of the tests, note that an Echo test is always performed by default no matter which
test is selected
▪Both Inspection test and Installation test show the same screens illustrated below.
▪Inspection test is used during for a vehicle calibration.
▪Installation test is used when the installation of a new, complete tachograph system is fitted to a
vehicle

9
▪Make sure your workshop card is in the card slot in Optimo, chip side down
▪On selection of either test, Optimo will look for your workshop card as illustrated below
▪On completion of the test the results screen below will be shown
▪DSRC Testing now complete, remove your workshop card from Optimo
10
Table of contents


