Stor-It-All WS24MP1 User manual

24" MULTI-PURPOSE CABINET
24" ARMOIRE POLYVALENTE
24" GABINETE MULTIUSO
BEFORE BEGINNING ASSEMBLY
– READ DIRECTIONS THOROUGHLY
– ASSEMBLE NEAR DESIRED LOCATION
– TWO-PERSON ASSEMBLY IS RECOMMENDED
AVANT DE COMMENCER L’ASSEMBLAGE
– LISEZ COMPLÈTEMENT LES INSTRUCTIONS
– ASSEMBLEZ À PROXIMITÉ DE L'EMPLACEMENT SOUHAITÉ
– IL EST RECOMMANDÉ DE SE METTRE À DEUX PERSONNES
POUR L'ASSEMBLAGE
ANTES DE COMENZAR AL ENSAMBLAJE
– LEE LAS INSTRUCCIONES MINUCIOSAMENTE
– ENSAMBLA CERCA DE LA UBICACIÓN FINAL
– SE RECOMIENDAN DOS PERSONAS PARA ENSAMBLAR
TOOLS NEEDED FOR ASSEMBLY*
OUTILS REQUIS POUR L'ASSEMBLAGE*
HERRAMIENTAS NECESARIAS PARA LA
INSTALACIÓN*
*TOOLS NOT INCLUDED
*OUTILS NON COMPRIS
*HERRAMIENTAS NO INCLUIDAS
ASSEMBLY&INSTALLATIONINSTRUCTIONS•INSTRUCTIONSPOURL’ASSEMBLAGEETL’INSTALLATION•INSTRUCCIONESPARALAINSTALACION
Model Number(s):
No de modèle:
Numero(s) de:
STUD FINDER
DÉTECTEUR DE
MONTANTS
DETECTOR DE VIGAS
U180421 / 0522
WS24MP1

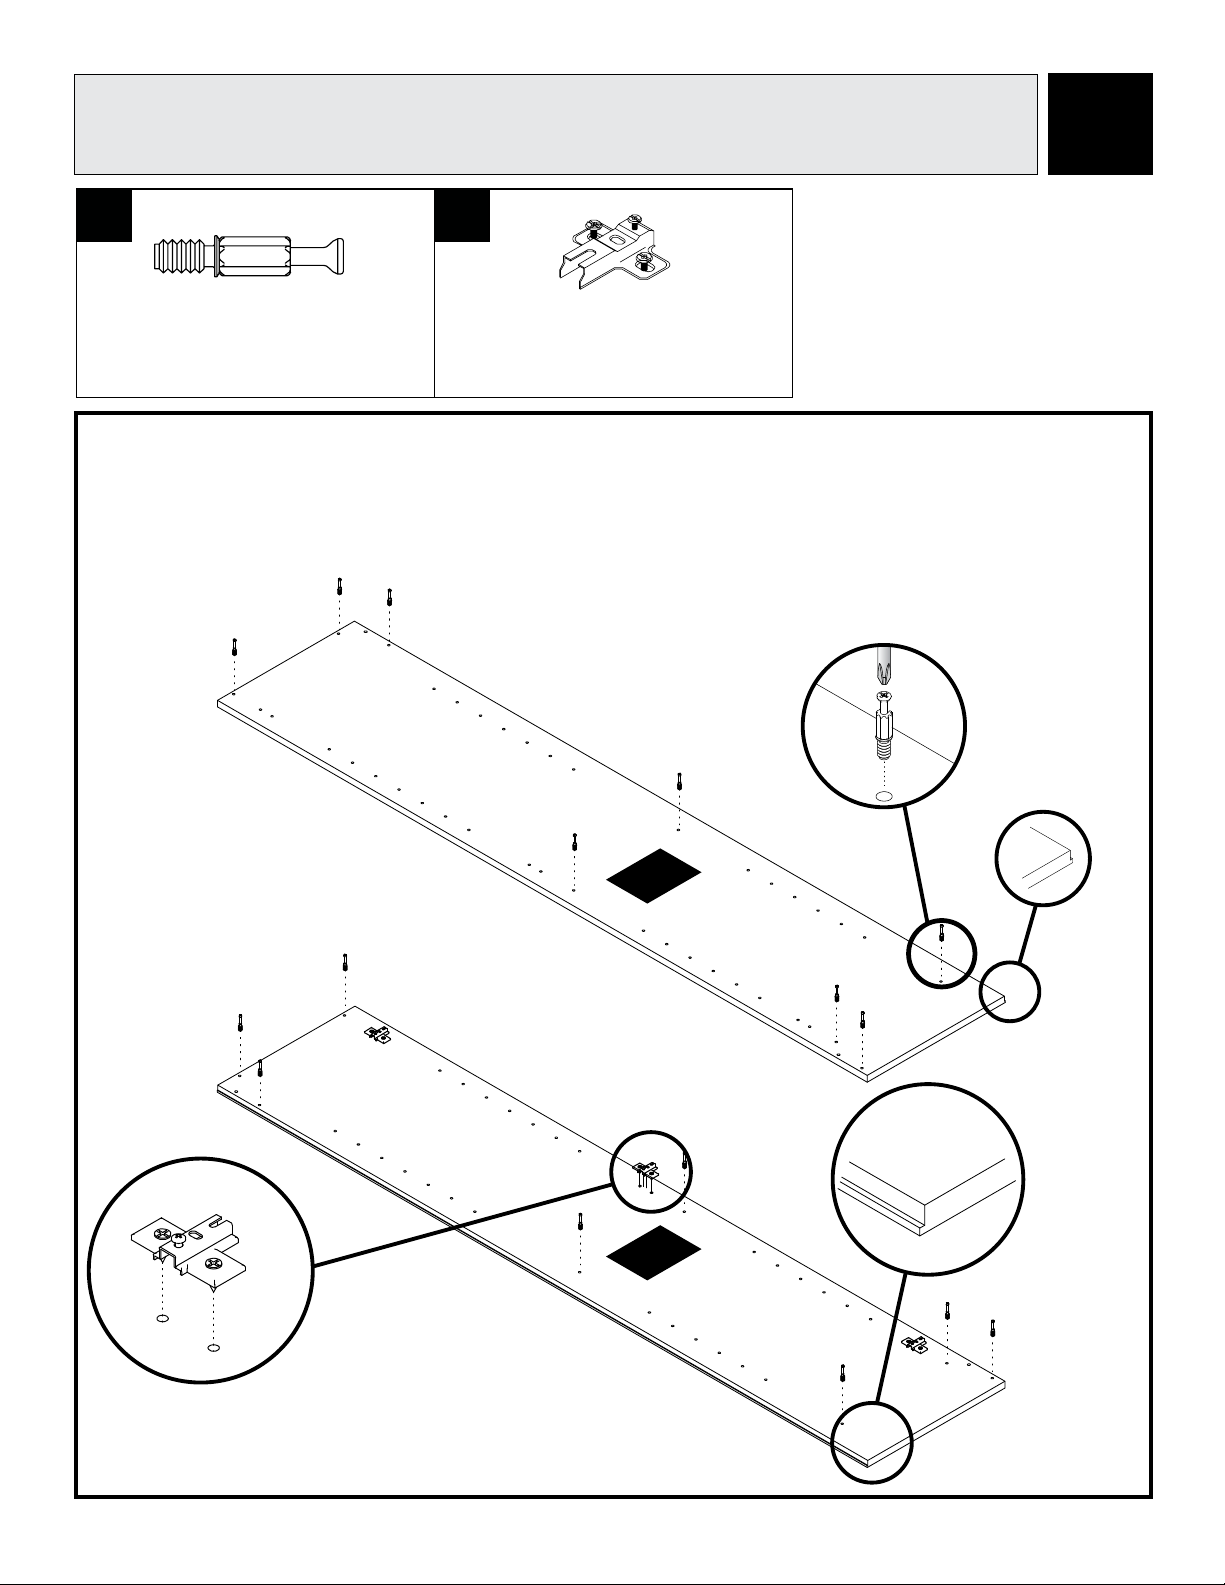
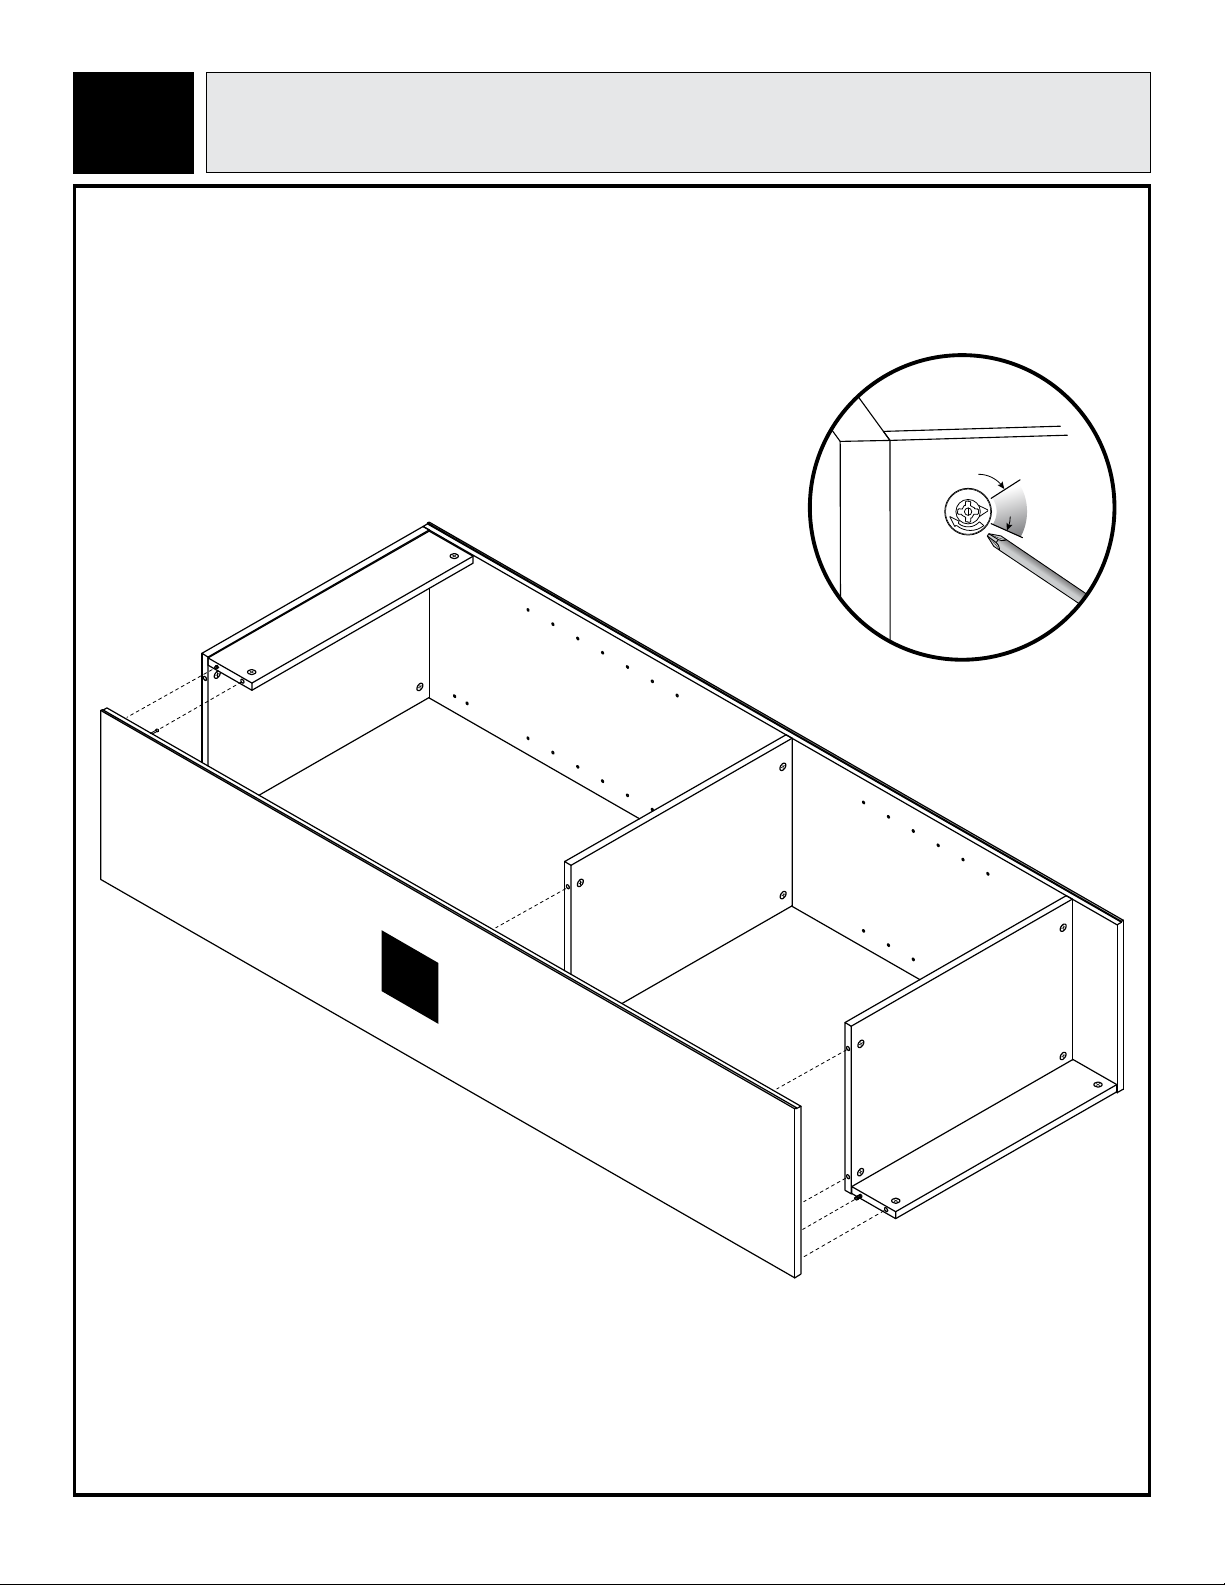
INSTALLING CAM LOCKS
Align the arrow toward the outside edge of the panel.
surface of the panel.
INSTALLER LES VERROUILLAGES À CAME
vous que le verrouillage à came est posé à ras de la surface
du panneau.
COMO INSTALAR LOS CIERRES DE LEVA
del panel.
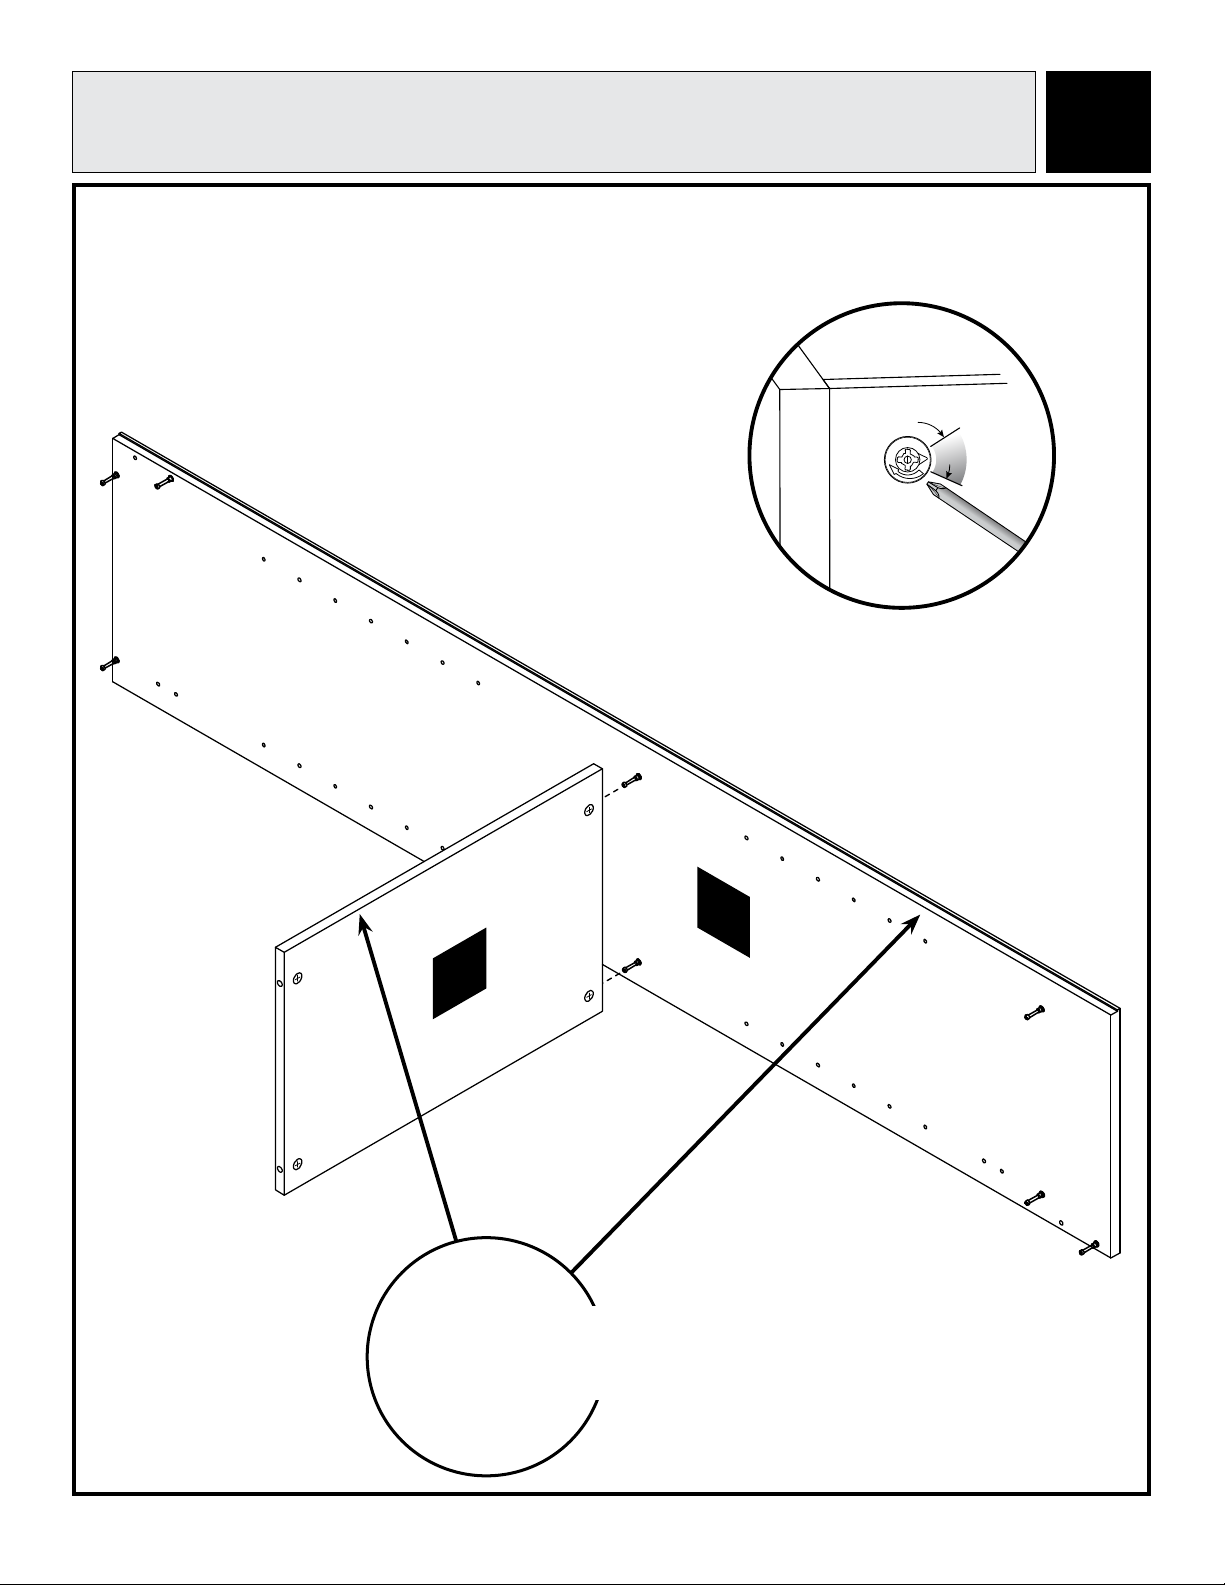
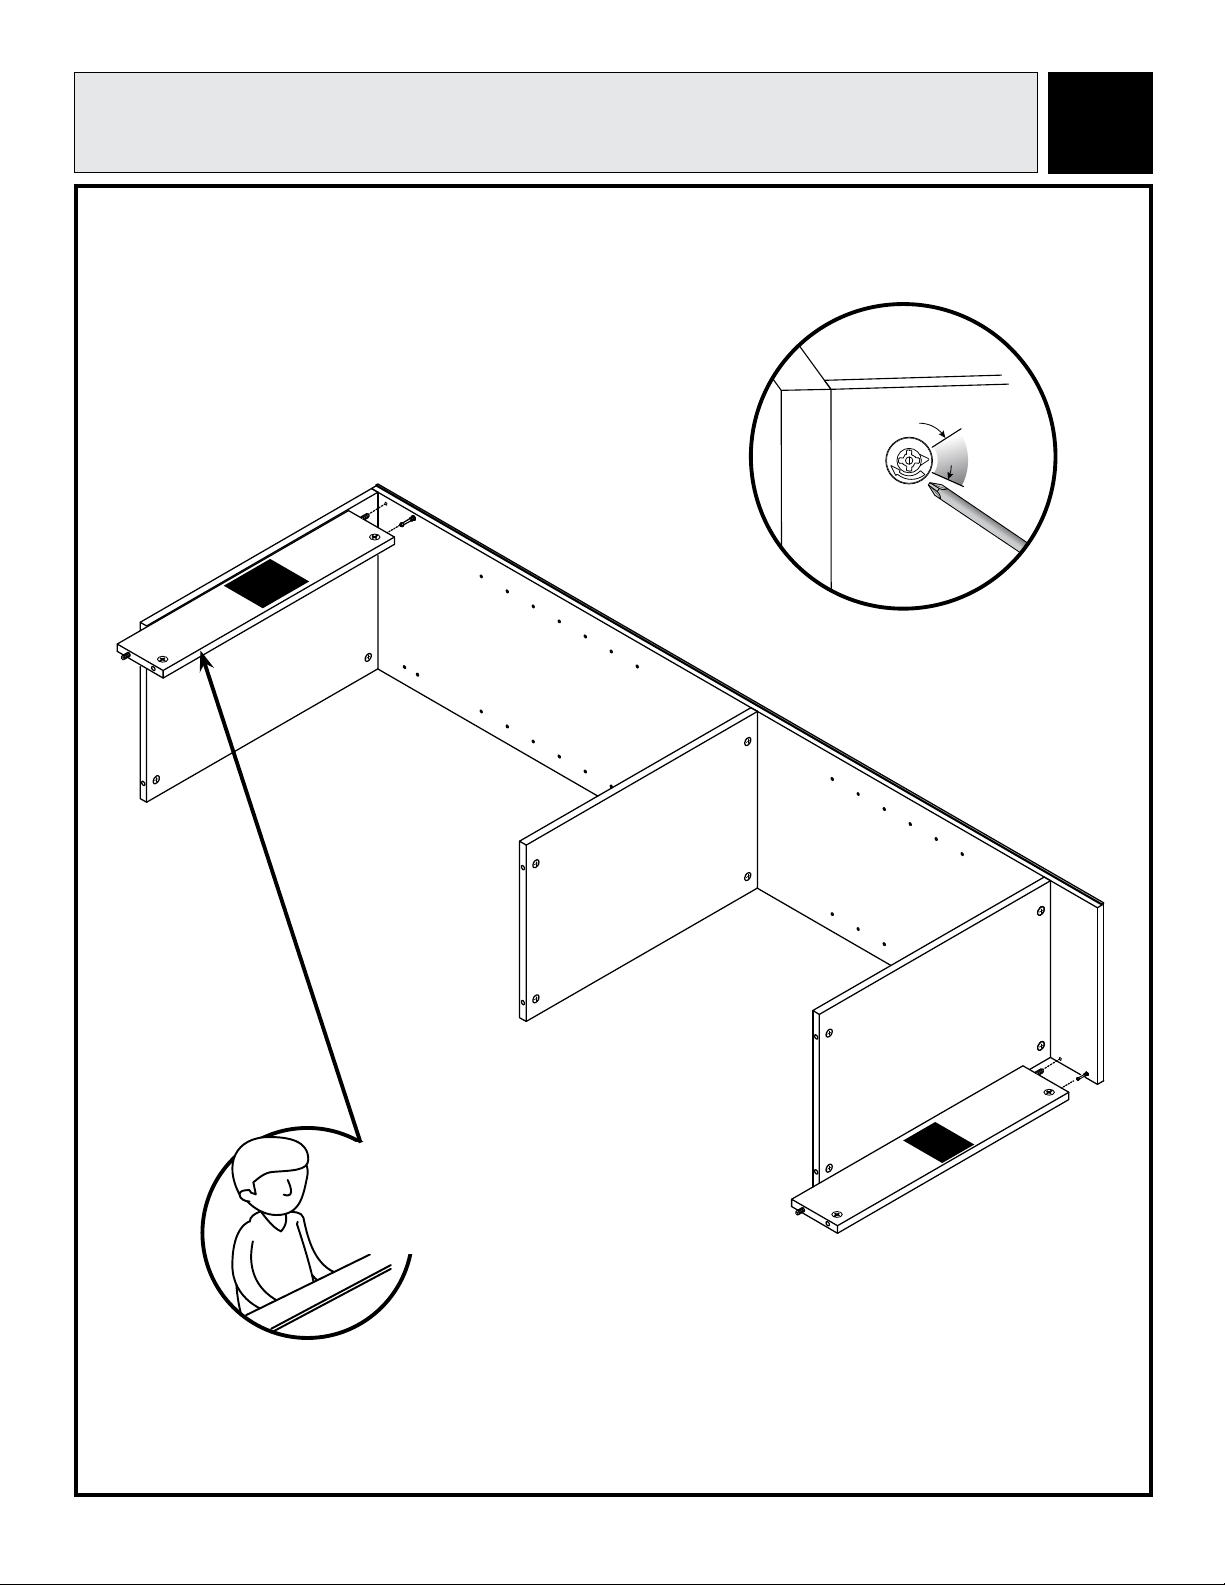
TIGHTENING CAM LOCKS
Once panels are joined, turn the cam lock until it
stops. Cam is considered “locked” when it stops
between the 2 and 4 o’clock positions (when starting
from the 9 o'clock position).
SERRER LES VERROUILLAGES À CAME. Une fois que les panneaux sont joints, tournez le verrouillage à came jusqu'à ce qu'il s'arrête.
COMO APRETAR LOS CIERRES DE LEVA. Una vez los paneles estén unidos, gira el cierre de leva hasta que se detenga. La leva se
considera “cerrada” cuando se detiene entre las posiciones de las 2 y 4 horas del reloj (al iniciar en la posición de las 9 horas).
MIN
LOCKED
MAX
TO CALL FROM THE UNITED STATES:
888-774-8062
6AM-4PM PST MONDAY-FRIDAY
PARA LLAMAR DE MEXICO:
001-714-578-2525
6AM-4PM PST LUNES-VIERNES
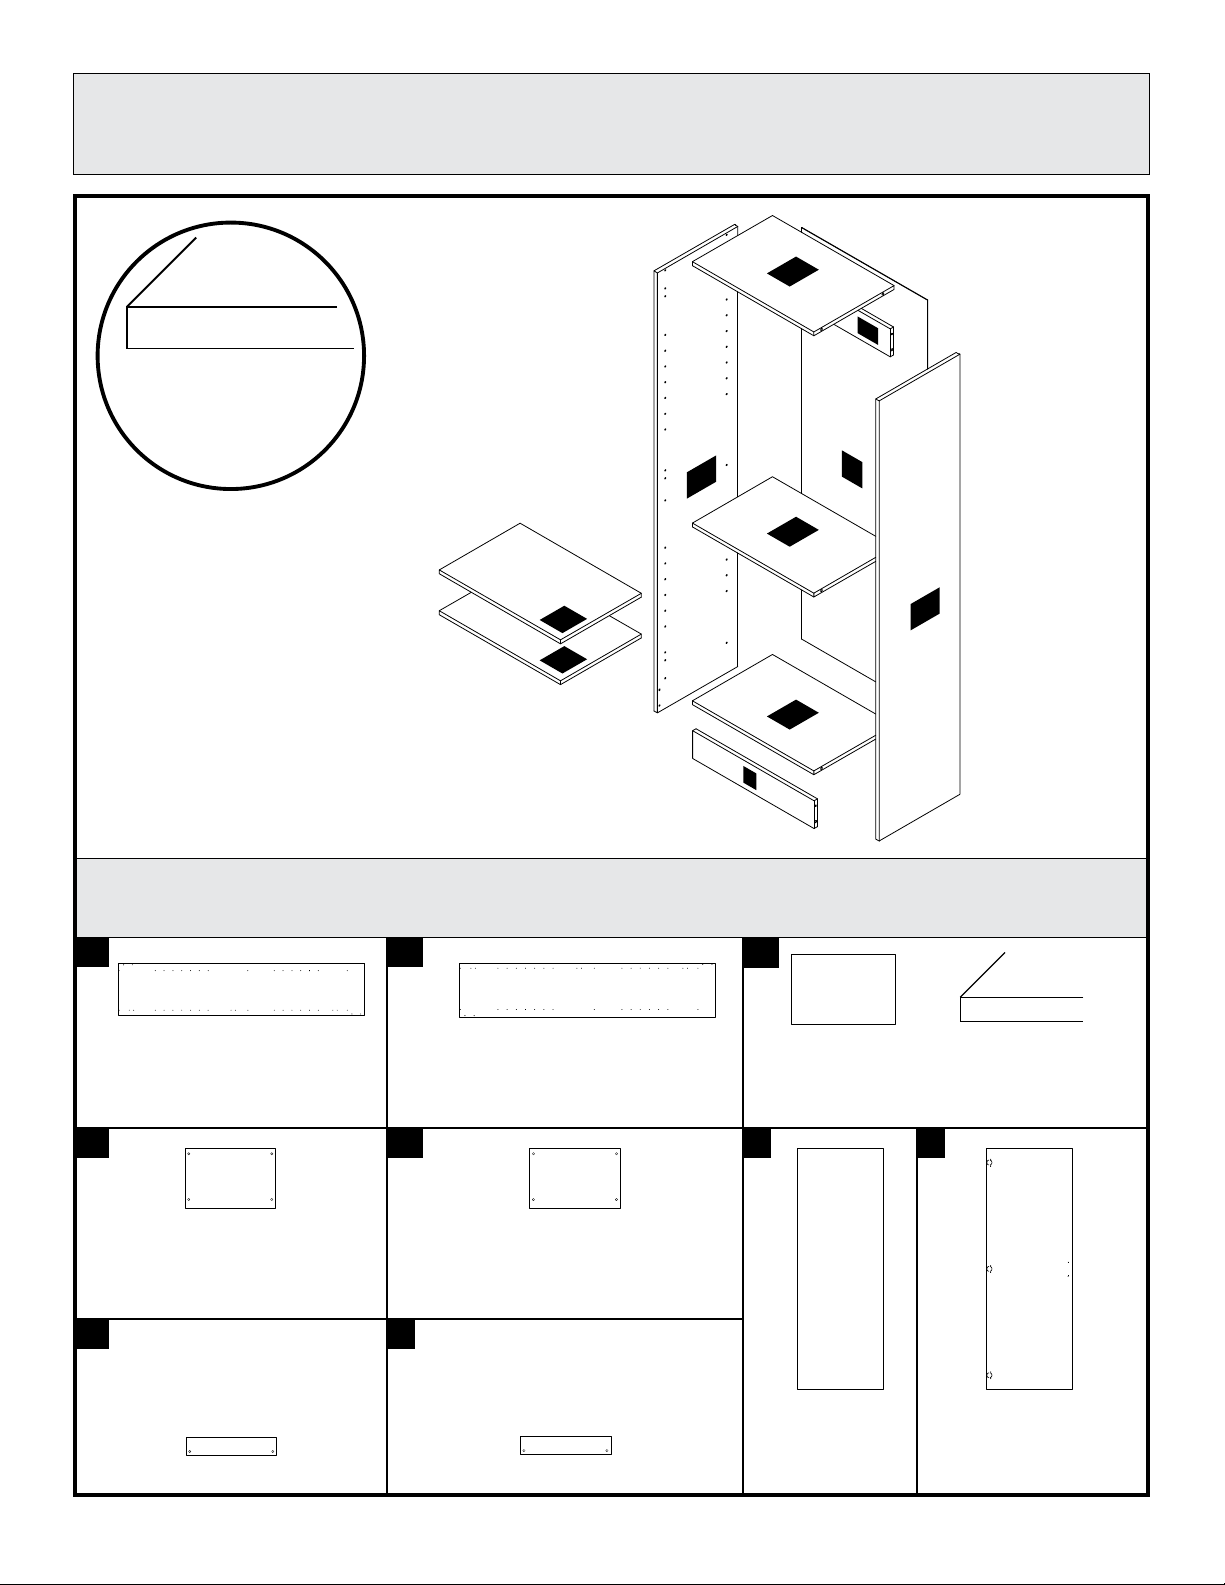
TWO PERSON ASSEMBLY. We recommend assembling this cabinet with two people to
avoid damaging or breaking.
ASSEMBLAGE PAR DEUX PERSONNES. Nous recommandons de se mettre à deux
personnes pour assembler de cette armoire pour éviter d'endommager ou de casser le produit.
SE NECESITAN DOS PERSONAS PARA ENSAMBLARLO. Recomendamos
dos personas para ensamblar este gabinete para así evitar roturas o daños al producto.
DO NOT RETURN PRODUCT TO THE STORE! If you have any problems or missing parts,
please contact American Woodmark Corporation Customer Care at the number provided.
NE PAS RETOURNER LE PRODUIT AU MAGASIN! En cas de problèma ou de pièces
manquantes,veuillez contacter le service clientèle d’American Woodmark Corporation
au numéro indiqué.
¡EN LOS ESTADOS UNIDOS, NO DEVUELVA EL PRODUCTO A LA TIENDA! Si tuviera algún
problema o pieza faltante, por favor póngase en contacto con el servicio de atención al cliente
de American Woodmark Corporation en el número indicado.
HELPFUL TIPS
SUGGESTIONS UTILES
SUGERENCIAS ÚTILES

HARDWARE
QUINCAILLERIE
HERRAJES
CAM LOCK
(QTY. 16)
VERROUILLAGE À CAME
CIERRE DE LEVA
CAM BOLT
(QTY. 16)
BOULON À CAME
PERNO DE LEVA
DOWEL
(QTY. 4)
GOUJON
CLAVIJA
#6 x ½" SCREW
(QTY. 6)
VIS
TORNILLO
HINGE PLATE
(QTY. 3)
PLAQUE DE CHARNIÈRE
PLACA DE BISAGRA
HINGE
(QTY. 3)
CHARNIÈRE
BISAGRA
NAIL
(QTY. 20)
CLOU
CLAVO
#10 x 1" SCREW
(QTY. 2)
VIS
TORNILLO
BUMPER
(QTY. 2)
BUTÉE
PROTECTOR
HANDLE
(QTY. 1)
POIGNÉE
ASA
SHELF CLIP
(QTY. 8)
TAQUET POUR ÉTAGÈRE
GANCHO PARA ESTANTE
NAIL GUIDE
(QTY. 1)
SERRURE DE CAME
BLOQUEO DE LA LEVA
a b
i
c
d
m n t
kg
e f

PANELS
PANNEAUX
PANELES
EXPLODED VIEW
VUE ÉCLATÉE
VISTA AMPLIADA
A2
B2
C2
D2
D2
J2
J2
F2
G
H
A
Panels are identied on edges.
Les panneaux sont identiés
sur les bords.
Los paneles están marcados
en los bordes.
LEFT SIDE PANEL
(QTY. 1)
PANNEAU LATÉRAL GAUCHE
PANEL DEL LADO IZQUIERDO
RIGHT SIDE PANEL
(QTY. 1)
PANNEAU LATÉRAL DROIT
PANEL DEL LADO DERECHO
SHELF
(QTY. 2)
ÉTAGÈRE
ESTANTE
TOP PANEL
(QTY. 1)
PANNEAUSUPÉRIEUR
PANEL SUPERIOR
BOTTOM PANEL / FIXED SHELF
(QTY. 2)
PANNEAUINFÉRIEUR / ÉTAGÈRE FIXE
PANEL INFERIOR / ESTANTE FIJO
BACK PANEL
(QTY. 1)
PANNEAU ARRIÈRE
PANEL POSTERIOR
DOOR
(QTY. 1)
PORTE
PUERTA
TOP RAIL
(QTY. 1)
TRAVERSE SUPÉRIEURE
RIEL SUPERIOR
TOE KICK
(QTY. 1)
COUP-DE-PIED
ZÓCALO
A2 B2
C2 H
J2
K
GF2
D2
A
Panels are identied on edges.
Les panneaux sont identiés sur les bords.
Los paneles están marcados en los bordes.

b e
CAM BOLT
(QTY. 16)
BOULON À CAME
PERNO DE LEVA
HINGE PLATE
(QTY. 3)
PLAQUE DE CHARNIÈRE
PLACA DE BISAGRA
ATTACH HARDWARE TO PANELS A2 & B2
Attacher la quincaillerie aux panneaux A2 et B2
Sujeta los herrajes a los paneles A2 y B2 1
A2
B2
Notes:
• Do not fully tighten hinge plate, to allow for easier installation of the doors. Determine the direction of the door swing
before installing hinges
•
Ne serrez pas complètement la plaque de charnière pour faciliter l'installation des portes. Déterminez la direction de l'oscillation de porte avant
d'installer des charnières.
• No aprietes completamente la placa de la bisagra para facilitar la instalación de las puertas. Determine la dirección del oscilación de la puerta antes de
instalar las bisagras.

INSTALL CAM LOCKS & DOWELS INTO PANELS C2, D2, F2 & G
Installer les verrouillages à came et goujons sur des panneaux C2, D2, F2 et G
Como instalar el cierre de leva y las clavijas en los paneles C2, D2, F2 y G
2
Notes:
• Ensure arrows of cam locks are pointing toward the hole in the edge of the panel.
• Assurez-vous que les èches des verrouillages à came sont orientées vers le trou dans le bord du panneau.
• Asegúrate de que las echas del cierre de leva estén dirigidas hacia el oricio del borde del panel.
C2
D2
G
F2
D2
a c
CAM LOCK
(QTY. 16)
VERROUILLAGE À CAME
CIERRE DE LEVA
DOWEL
(QTY. 4)
GOUJON
CLAVIJA

ATTACH PANEL D2 TO PANEL A2
Attacher le panneau D2 au panneau A2
Une el panel D2 al panel A2 3
A2
D2
Top
Bottom
Raw unnished edges should be facing up. Finished edges should be facing down.
Les bords bruts non nis doivent regarder vers le haut. Les bords nis doivent regarder vers le bas.
Las bordes sin terminar deben mirar hacia arriba. Las bordes terminados deben mirar hacia abajo.
MIN
LOCKED
MAX

ATTACH PANELS C2 & D2 TO PANEL A2
Attacher des panneaux C2 et D2 au panneau A2
Une los paneles C2 y D2 al panel A2
4
C2
A2
MIN
LOCKED
MAX
Top
Bottom
Raw unnished edges should be facing up. Finished edges should be facing down.
Les bords bruts non nis doivent regarder vers le haut. Les bords nis doivent regarder vers le bas.
Las bordes sin terminar deben mirar hacia arriba. Las bordes terminados deben mirar hacia abajo.
D2

ATTACH PANEL F2 & G
Attacher les panneaux F2 et G
Une los paneles F2 y G 5
MIN
LOCKED
MAX
G
F2
Support panel (F2).
Soutenez le panneau (F2).
Sostenga el panel (F2).

ATTACH PANEL B2
Attacher le panneau B2
Une el panel B2
6
B2
Notes:
• Raw unnished edges should be facing up. Finished edges should be facing down.
• Les bords bruts non nis doivent regarder vers le haut. Les bords nis doivent regarder vers le bas.
• Las bordes sin terminar deben mirar hacia arriba. Las bordes terminados deben mirar hacia abajo.
MIN
LOCKED
MAX

SECURE BACK PANEL H
Fixez le panneau arrière H
Asegura el panel posterior H 7
Notes:
• Ensure cabinet is square and secure top two corners rst. Secure perimeter of back panel spacing nails approximately
8"-10" apart.
• Assurez-vous que l'armoire est d'équerre et xez d'abord les deux coins du haut solidement. Fixez solidement le pourtour du panneau arrière en
espaçant les clous d'environ 20,32cm à 25,40cm (8 à 10po).
• Asegúrate de que el gabinete esté perpendicular para asegurar primero las dos esquinas superiores. Asegura el perímetro del panel posterior dejando
aproximadamente de 8" a 10" (20,32 a 25,4 cm) entre cada clavo de separación.
g t
NAIL
(QTY. 20)
CLOU
CLAVO
NAIL GUIDE
(QTY. 1)
SERRURE DE CAME
BLOQUEO DE LA LEVA
13
4
The back panel should set between the lip
on both side panels.
Le panneau arrière devrait placer entre la lèvre
sur les deux panneaux latéraux.
El panel trasero debe jar entre el labio
en los ambos paneles laterales.
2
8"-10"
20,32cm à 25,40cm
20,32 a 25,4 cm
H

SECURE CABINET TO THE WALL
Fixer l'armoire au mur
Asegura el gabinete a la pared
8
WARNING! Failure to properly secure the cabinet to the wall can result
in serious injury or death.
AVERTISSEMENT! Un manque à fixer correctement l'armoire au mur peut entraîner
de graves blessures, voire la mort.
¡ADVERTENCIA! No asegurar adecuadamente el gabinete puede resultar en lesiones
graves o la muerte.
Locate and mark wall studs where cabinet is to be installed. Place the cabinet into position. Use
a level to ensure the cabinet is level and straight. Shim if necessary. Secure to the wall through
the Top Rail with #10x3" screws at stud locations. If no studs are available, or if the wall is made
without studs, it is your responsibility to choose the appropriate hardware. The cabinet MUST
be securely attached to the wall for safety and to be eligible for warranty.
Trouvez et marquez les montants muraux là où l'armoire doit être installée. Mettez l'armoire en place. Utilisez un
niveau pour vous assurer que l'armoire est de niveau et droite. Utilisez une cale au besoin. Fixez solidement au mur
à travers la traverse supérieure à l'aide de vis n° 10x3 po aux emplacements des montants. Si aucun montant n'est
disponible ou si le mur est construit sans montants, c'est à vous de choisir la quincaillerie appropriée. L'armoire DOIT
être xée solidement au mur pour la sécurité et pour pouvoir se prévaloir de la garantie.
Localiza y marca las vigas de pared donde vayas a instalar el gabinete. Coloca el gabinete en posición. Usa el nivel
para garantizar que el gabinete quede nivelado y derecho. Usa cuñas si es necesario. Asegúralo a la pared utilizando
el Riel Superior con tornillos núm. 10x3" en las ubicaciones marcadas en las vigas. Si no hay vigas disponibles, o si
pared fue hecha sin vigas, es tu responsabilidad elegir el herraje adecuado. El gabinete DEBE estar asegurado a la
pared por seguridad y para ser elegible para garantía.
TOP RAIL
TRAVERSE SUPÉRIEURE
RIEL SUPERIOR
STUD
MONTANTS MURAUX
VIGAS
#10 x 3" SCREW
(NOT INCLUDED)
#10 x 3" VIS
(NON FOURNI)
#10 x 3" TORNILLO
(NO SE INCLUYE)

d f
#6 x ½" SCREW
(QTY. 6)
VIS
TORNILLO
HINGE
(QTY. 3)
CHARNIÈRE
BISAGRA
INSTALL HINGES
Installer les charnières
Como instalar las bisagras 9
K

i k m n
(2)
SCREWS (#10 x 1")
VIS
TORNILLO
(2)
BUMPER
BUTÉE
PROTECTOR
(1)
HANDLE
POIGNÉE
ASA
(8)
SHELF CLIP
TAQUET POUR ÉTAGÈRE
GANCHO PARA ESTANTE
INSTALL DOORS, HANDLES & SHELVES.
Installer les portes, poignées, étagères.
Como instalar las puertas, manijas, estantes.
10
IMPORTANT! Cabinet MUST be secured to the wall before installing doors.
IMPORTANT! L'armoire DOIT être solidement fixée au mur avant l'installation des portes.
¡IMPORTANTE! El gabinete DEBE estar asegurado antes de instalarle las puertas.
HINGE ADJUSTMENT / RÉGLAGE DE LA CHARNIÈRE / AJUSTE DE LA BISAGRA
Slide hinge onto
hinge plate and
secure all screws.
Faites glisser la
charnière sur la plaque
de charnière et xez
solidement toutes les vis.
Desliza la bisagra en
la placa de la bisagra
y asegura todos los
tornillos.
J2
J2

LOADING LIMITATIONS*
Limites de charge*
Limitaciones de carga*
CAUTION! Do not exceed the
maximum weight limitations. Doing
so can result in damage, serious
injury, or death.
ATTENTION! Ne dépassez pas les limitations
de poids maximum. Faire ainsi peut avoir
comme conséquence les dommages, les
dommages sérieux, ou la mort.
¡PRECAUCIÓN! No exceda las limitaciones
del peso máximo. El hacer tan puede dar
lugar a daño, a lesión seria, o a muerte.
35 lbs
(15 kg)
35 lbs
(15 kg)
35 lbs
(15 kg)
35 lbs
(15 kg)
*All weights based on an
equally distributed load.
* Tous les poids sont basés sur une
distribution uniforme de la charge.
* Todos los pesos se basan en la distribución
equitativa de la carga.

AMERICAN WOODMARK CORPORATION LIMITED WARRANTY/GARANTÍA LIMITADA DE AMERICAN WOODMARK CORPORATION
What this warranty covers: American Woodmark Corporation (AWC) warrants its parts and products to be free of substantial defects in materials and workmanship from the original date of
purchase under normal home use. This warranty is offered only to the original consumer purchaser and may not be transferred.
How long the warranty lasts: coverage for nished kitchen cabinets, vanity cabinets, and vanity tops lasts for the life of the product. Coverage for vanity cabinet combos, medicine cabinets,
mirrors, light bars and bath storage cabinets lasts for 5 years from the original date of purchase. Coverage for unnished kitchen cabinets lasts 1 year.
What American Woodmark Corporation will do under the warranty: during the warranty period, AWC, at its option, will repair or replace any part or product that proves to have substantial
defects in materials or workmanship, or AWC will provide an equivalent replacement product. In keeping with our policy of continuous product improvement, AWC reserves the right to change
specications in design and materials without notice and with no obligation to retrot products we previously manufactured.
How state law applies: this warranty gives you specic legal rights, and you may also have other rights that vary from state to state.
IMPLIED WARRANTIES: AMERICAN WOODMARK CORPORATION DISCLAIMS ANY IMPLIED WARRANTY OF MERCHANTABILITY, AND THERE ARE NO WARRANTIES THAT EXTEND
BEYOND THE DESCRIPTIONS ON THE FACE HEREOF. TO THE EXTENT THAT SUCH DISCLAIMER IS NOT VALID UNDER APPLICABLE LAW, ANY IMPLIED WARRANTY SHALL BE COEXTENSIVE
IN DURATION WITH THIS WARRANTY.
Wood, cultured marble and solid surface technology characterisics, aging and printing limitations: because of the varying natural characteristics of wood and the effects of aging,
product shown in displays and/or printed materials may not be an exact match to new cabinetry you will receive. Depending on wood characterisics, the age of a sample and the environment of
the showroom, samples will show some degree of variation from new product. In addition, you should not expect all doors, drawer fronts, trim or molding to match exactly in either nish or grain.
Variation in wood, cultured marble and solid surface technology material is normal and unavoidable. In addition, it is not possible to exactly match our colors in printed materials. Therefore, you
should view the actual samples when making your color selection.
What this warranty does not cover: this warranty does not cover any problems or damage which result from improper transportation, improper installation, mishandling, misuse, abuse, neglect,
abnormal use, commercial use, improper maintenance, non-AWC repairs, accidents, or acts of god, such as hurricanes, re, earthquakes or oods. This warranty and any applicable implied
warranties do not cover incidental or consequential damages arising from any defects in the product, such as labor charges for installation or removal of the product or any associated products.
This warranty does not cover defects or damage caused by normal wear & tear, alterations, environmental conditions, humidity absorption, or mold. In addition, variations in wood grain, nish
color, aging or other natural wood and stain characteristics are not considered defects and are not covered by this warranty. Some states do not allow the exclusion or limitation of incidental or
consequential damages, so the above limitation or exclusion may not apply to you.
How to obtain warranty service: if you need replacement parts or would like to make a warranty claim, please contact our customer care professional by mail, email, or telephone at the address
or phone numbers listed on this page. All warranty claims must include the model number of the product, copy of the original receipt and the nature of the problem. In addition, AWC may at its
discretion require inspection of the installation site or authorize the prepaid return of the claimed defective part. Merchandise not pre-approved for return will not be accepted and the associated
claim not accepted.
Products should be examined for defects prior to installation. This warranty also does not cover labor charges for installation or removal of the product or any associated
products. If upon inspection you nd our product has a damaged or missing part, it may not be necessary to return the unit to the store of purchase. Please contact
American Woodmark Corporation Customer Care to possibly obtain a replacement part.
Qué cubre la garantía: American Woodmark Corporation (AWC) garantiza que sus piezas y productos no tendrán defectos signicativos de materiales o fabricación a partir de la fecha original de compra, bajo
condiciones de uso doméstico normal. Esta garantía se ofrece sólo al consumidor original y no puede transferirse.
Cuánto dura la garantía: la cobertura para gabinetes de cocina acabados, gabinetes de tocador y mostradores de tocador, comprende la vida útil del producto. La cobertura para los kits combinados de gabinete
para tocador, botiquines de medicinas, espejos, barras de luces, y gabinetes de baño dura 5 años desde la fecha original de compra. La cobertura para gabinetes de cocina sin acabado es de 1 año.
Que hará American Woodmark Corporation home productos bajo la garantía: durante el período de garantía AWC, a su discreción, reparará o reemplazará cualquier parte o producto que muestre cualquier
defecto signicativo de materiales o fabricación, o AWC lo reemplazará con un producto equivalente. De acuerdo con lo establecido en nuestra política de mejora continua del producto, AWC se reserva
el derecho de cambiar las especicaciones de diseño y materiales sin previo aviso y sin ninguna obligación de renovar los productos fabricados previamente.
Cómo repercuten las leyes estatales: esta garantíale otorga derechos legales especícos y es posible que también goce de otros derechos que varían de un estado a otro.
GARANTÍAS IMPLÍCITAS: AMERICAN WOODMARK CORPORATION SE EXIME DE CUALQUIER GARANTÍA IMPLÍCITA DE COMERCIABILIDAD; NO EXISTEN OTRAS GARANTÍAS MÁS ALLÁ DE LAS AQUÍ
DESCRITAS. EN CASO DE QUE ESTA EXENCIÓN DE RESPONSABILIDAD NO TENGA VALIDEZ EN VIRTUD DE LAS LEYES APLICABLES, CUALQUIER GARANTÍA IMPLÍCITA TENDRÁ LA MISMA DURACIÓN
QUE LA PRESENTE GARANTÍA.
Características y envejecimiento de la madera, el mármol cultivado y materiales de tecnología de supercie sólida, y limitaciones de los materiales impresos: debido a las características variables
naturales de la madera y a los efectos del envejecimiento, el producto mostrado en la exhibición y/o en los materiales impresos puede no coincidir exactamente con los gabinetes nuevos que usted recibirá.
Dependiendo de las características de la madera, la edad de la muestra y las condiciones ambientales de la sala de exhibición, las muestras variarán en cierto grado, del producto nuevo. Adicionalmente, usted no
deberá esperar que todas las puertas, caras de los cajones, acabados o molduras tengan acabados o vetas idénticos. Las variaciones en la madera, el mármol cultivado y el material de tecnología de supercie
sólida son normales e inevitables. Además, es imposible reproducir nuestros colores en el material impreso. Por consiguiente, usted debe ver las muestras reales al elegir su color. Lo que esta garantía no cubre:
esta garantía no cubre ningún problema o daño como resultado de la transportación inadecuada, instalación inapropiada, manipulación incorrecta, uso incorrecto, abuso, negligencia, uso indebido, uso comercial,
mantenimiento inadecuado, reparaciones no autorizadas por AWC, huracanes, incendio, terremotos o inundaciones. Esta garantía y cualquier otra garantía implícita correspondiente, no cubre daños incidentales o
secundarios resultado de cualquier defecto en el producto, tales como cargos por mano de obra por la instalación o retiro del producto o de cualquier producto relacionado. Esta garantía no cubre defectos ni daños
causados por uso y desgaste normales, alteraciones, condiciones ambientales, absorción de la humedad, o moho. Adicionalmente, las variaciones en la veta de la madera, el color del acabado, el envejecimiento u
otras características de la madera o el tinte no se considerarán defectos y no están cubiertos por esta garantía. Algunos estados no permiten la exclusión o limitación de daños incidentales o secundarios, por lo que
las limitaciones o exclusiones anteriores podrían no aplicarse en su caso. Cómo recibir servicio de garantía: si necesita piezas de reemplazo o le gustaría hacer una reclamación de garantía, por favor contacte a
nuestro representante de atención al cliente por email, o teléfono, por medio de la dirección o el número de teléfono provistos en esta página. Todas las reclamaciones de garantía deben incluir el número de modelo
del producto, copia del recibo original y la naturaleza del problema. Además AWC podrá, a su discreción, requerir una inspección del sitio de la instalación o autorizar la devolución prepagada de la pieza defectuosa
por la cual se hace la reclamación. No se aceptará ninguna mercancía cuya devolución no haya sido previamente aprobada ni ninguna reclamación relacionada con tal mercancía.
Antes de la instalación, los productos deben examinarse en busca de defectos. Esta garantía tampoco cubre los cargos por mano de obra relacionados con la instalación
o retiro del producto o productos relacionados. Si al inspeccionar el producto usted encuentra que falta una pieza o que alguna de ellas está dañada, puede que no sea
necesario devolver la unidad a la tienda donde la compró. Por favor contacte a atención al cliente de American Woodmark Corporation para determinar la posibilidad de
obtener una pieza de reemplazo.
Important health notice:
Some of the building materials used in this home (or these building materials) emit formaldehyde. Eye, nose, and throat irritation, headache, nausea and a variety of asthma-like symptoms, including
shortness of breath, have been reported as a result of formaldehyde exposure. Elderly persons and young children, as well as anyone with a history of asthma, allergies, or lung problems, may be at
greater risk. Research is continuing on the possible long-term effects of exposure to formaldehyde.
Reduced ventilation may allow formaldehyde and other contaminants to accumulate in the indoor air. High indoor temperatures and humidity raise formaldehyde levels. When a home is to be located
in areas subject to extreme summer temperatures, an air-conditioning system can be used to control indoor temperature levels. Other means of controlled mechanical ventilation can be used to
reduce levels of formaldehyde and other indoor air contaminants.
If you have any questions regarding the health effects of formaldehyde, consult your doctor or local health department.
Aviso de salud importante:
Algunos de los materiales de construcción usados en esta vivienda (o estos materiales de construcción) emiten formaldehído. La irritación en ojos, nariz y garganta; los dolores de cabeza, náusea y otros síntomas
parecidos al asma, como la falta de aire, han sido identicados como consecuencias de la exposición al formaldehído. Las personas de la tercera edad y los niños pequeños, así como quienquiera que haya
padecido de asma, alergias o problemas pulmonares, pueden enfrentar mayor riesgo. Es continua la investigación de las posibles consecuencias a largo plazo por exposición al formaldehído.
La poca ventilación puede causar que el formaldehído u otros contaminantes se acumulen en la atmósfera interior. Las altas temperatura y humedad en interiores incrementan los niveles de formaldehído. Para
viviendas ubicadas en zonas de temperaturas extremas durante el verano puede usarse un sistema de aire acondicionado a n de controlar los niveles de temperatura en interiores. Otros medios de ventilación
mécanica controlada pueden usarse para reducir los niveles de formaldehído y otros contaminantes del aire en interiores.
Si tienes alguna pregunta o duda con respecto a los efectos del formaldehído sobre la salud, consulta a tu médico o llama al departamento de salud local.
WARNING: This product can expose you to chemicals including formaldehyde which is known to the State of California to cause cancer, and methanol, which is known to
the State of California to cause birth defects or other reproductive harm. For more information go to www.P65Warnings.ca.gov
AVERTISSEMENT: Ce produit peut vous exposer à des produits chimiques, y compris le formaldéhyde, reconnu par l’état de la Californie comme pouvant causer le cancer,
et méthanol, reconnu par l’état de la Californie comme pouvant causer des anomalies congénitales ou d’autres dommages aux fonctions reproductrices. Pour obtenir des
renseignements supplémentaires, visitez www.P65Warnings.ca.gov
American Woodmark Corporation
561 Shady Elm Road, Winchester, VA 22602
American Woodmark Corporation Customer Care
EMAIL: [email protected]
TELEPHONE: U.S. call (888) 578-4009
WEBSITE: www.americanwoodmark.com
Table of contents
Other Stor-It-All Indoor Furnishing manuals
Popular Indoor Furnishing manuals by other brands

Night & Day Furniture
Night & Day Furniture Ginger Twin Loft Bunk Bed Assembly instructions

Hailey Home
Hailey Home CT1813 Assembly instructions

TUHOME Furniture
TUHOME Furniture MEMPHIS BAR CART Assembly instructions

Venjakob
Venjakob 6082 Assembly instructions

Argos
Argos Scandinavia manual

Elm Plus
Elm Plus EPL1007 Assembly instructions