StorageWorks 10/20-GB DLT Manual

Printed in U.S.A. EK–SM1TB–RC. A01
10/20-GB DLT
Cartridge Tape Drive
Operator’s Reference Card
Use this card as a quick reference when operating the
10/20-GB DLT tape drive. For detailed information, see
the User Guide (EK-SM1TB-UG. A01).
110/20-GB DLT Front Panel
All normal-use operating controls and indicators are
provided on the front panel of the 10/20-GB DLT tape
drive, as shown below:

2
2 Power-On Self-Test
(POST) Sequence
When you turn on operating power to the 10/20-GB DLT
tape drive (i.e., turn on pedestal power if the DLT tape
drive is mounted in a StorageWorks enclosure, or
depress top (“1”) portion of 1/0 rocker switch on rear
panel if the DLT tape drive is a tabletop unit), the
following results should occur, in sequence:
NOTE 1
If the WRITE-PROTECTED indicator flashes
orange and the TAPE IN USE indicator
flashes yellow continuously for more than
30 seconds in the following test, then the
POST test has failed. Repeat the test to
clear the failure (power off and then on); if
the test still fails, replace the drive.
NOTE 2
The indicator sequence described in the
following procedure describes what
happens when the 10/20-GB DLT unit is
connected to an active SCSI bus. If the
SCSI bus is not connected, all left-side
panel indicators remain on at all times while
power is applied to the unit.
1. All left-side panel indicators will initially light, with
all right-side indicators then lighting sequentially,
from top to bottom.
2. If the SCSI bus is not connected, all left-side panel
indicators will stay lit. If the SCSI bus is connected,
all left-side panel indicators should go out within 1
second after power is applied, while all right-side
panel indicators should remain lit for 3 to 5 seconds
and then go out except for the TAPE IN USE indicator.
3. The TAPE IN USE indicator should continue to blink
for a few seconds, while the tape mechanism
searches for tape, and then go to one of the
following two states:

3
a. If no tape cartridge is already mounted in the
DLT tape drive, the TAPE IN USE indicator
should go out within 20 seconds, with the green
OPERATE HANDLE indicator then becoming
steadily lit to indicate that the door latch is
released and that the cartridge insert/release
handle can be pulled up to allow insertion of
tape. (To load tape, see Section 4.)
b. If a tape cartridge is already mounted in the
DLT tape drive (left over from previous use),
the TAPE IN USE indicator should continue to
blink while the tape mechanism engages the
tape and then moves the tape under the
recording heads, at which time the TAPE IN USE
indicator should become steadily lit. You can
now either record on or read from that tape, or
else press the Unload push-button switch to
direct the DLT tape drive to unlatch the
insert/release handle so that you can remove the
mounted tape.
3Meaning of Indicators and Controls
Use the information in the following table to determine
the DLT tape drive’s operating condition:
Indicator State Meaning
TZ87
(yellow) On (default) Tape in DLT tape drive
was recorded in TZ87
format.
Blinking Tape in DLT tape drive
was last recorded in
some other density, but
TZ87 density has been
selected for new
recording. (This selection
will be written from
beginning of tape.)
TZ85 &
TZ86
(yellow)
Same as 10/20-GB DLT, preceding,
except applicable to designated density
format.
(Continued on Next Panel)

4
Indicator State Meaning
Compress
(yellow) On Compression mode is
enabled.
Off Compression mode is
disabled.
Density
Override
(yellow)
Blinking DLT tape drive is in
density selection mode.
On Density selection was
set from front panel.
Off (default) Density selection was
chosen by host
computer (automatic
mode).
DENSITY
SELECT
(PUSH-
BUTTON)
Recessed
(pushed
in)
If the Density Override
indicator is off,
activates the density
selection mode,
causing that indicator
to blink. If the Density
Override indicator is
blinking, selects the
next higher density
format option.
At rest
(out) Normal inactive
condition for this
spring-loaded push-
button switch.
WRITE
PROTECTED
(ORANGE)
On Loaded tape is write-
protected.
Off Loaded tape is write-
enabled.
TAPE IN USE
(yellow) On Tape is loaded, ready for
use.
Blinking Tape is moving.
USE
CLEANING
TAPE
(yellow)
On Drive write/read heads
need cleaning, or else
current data cartridge is
bad.
(Continued on Next Panel)

5
Indicator State Meaning
Off Cleaning is
unnecessary (or
complete if just done).
Remaining
on after you
unload
cleaning
tape
Cleaning tape attempted
to clean the drive heads,
but was expired
(insufficient cleaning
area), so the heads were
not adequately cleaned.
Turns on
again when
the data
cartridge is
loaded after
cleaning
Data cartridge may be
defective; try another
cartridge.
OPERATE
HANDLE
(green)
On Cartridge
insert/release handle is
unlocked and can be
operated.
Off Cartridge
insert/release handle is
locked. Do not operate
handle.
UNLOAD
(PUSH-
BUTTON)
Recessed
(pushed
in)
Used to unlock the
tape cartridge
insert/release handle
(press and hold for 1 to
2 seconds).
At rest
(out) Normal inactive
condition for this
spring-loaded push-
button switch.
All left or
right
indicators
simultaneo
usly
Steadily On Power-on self-test is in
progress (momentary
sequence triggered
whenever power is
applied to the DLT tape
drive unit).
Blinking A DLT tape drive fault
has occurred. Press the
Unload button or turn
DLT tape drive unit
power off and on again
6
Indicator State Meaning
to clear the error. If the
error remains, contact
service personnel.
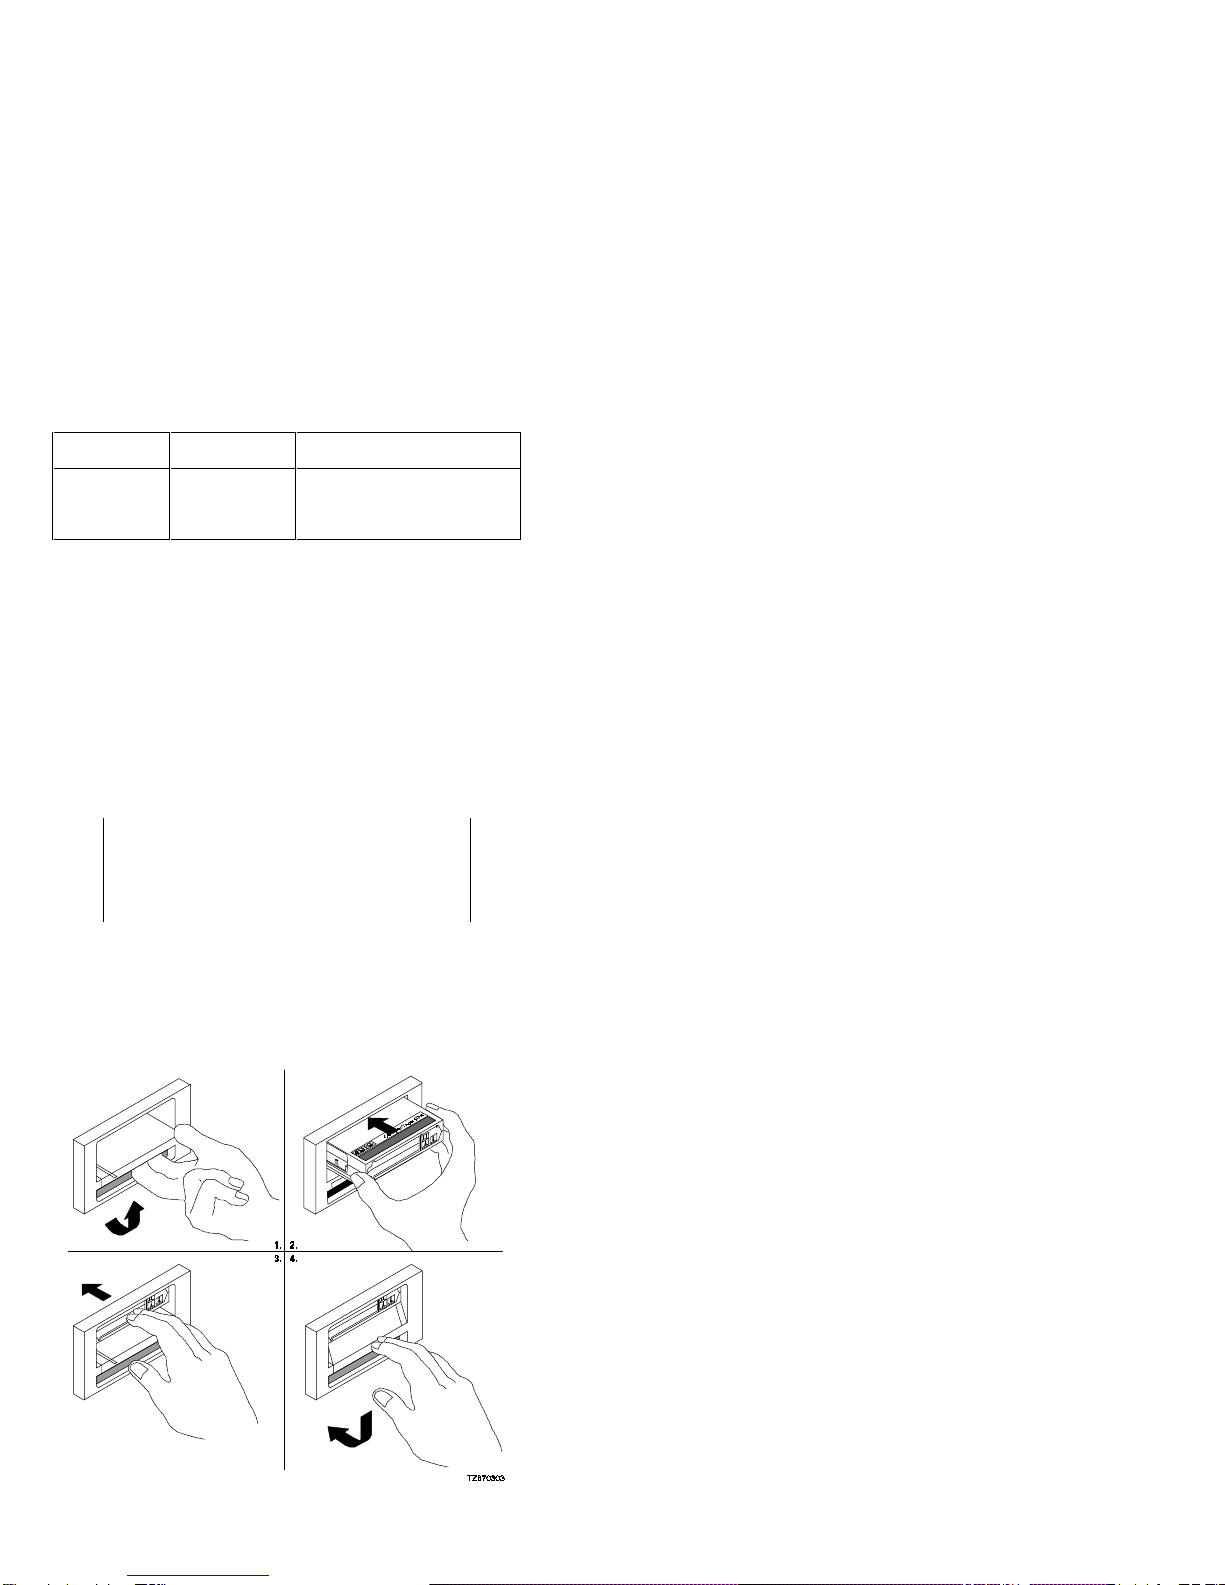
4Loading A Tape Cartridge Into the
DLT Tape Drive
The cartridge insert/release handle on the front of the
drive provides outline procedures for loading a cartridge
into the DLT tape drive (right side of handle) and
unloading a cartridge from the drive (left side of handle).
The following is a more detailed version of the
procedure for loading a cartridge, as illustrated below.
CAUTION
Never operate the cartridge insert/release
handle unless the green OPERATE HANDLE
indicator is steadily lit.
1. When the green OPERATE HANDLE indicator is lit
steadily, pull the cartridge insert/release handle open
by pulling the bottom edge up and forward.

7
2. Insert rear end of cartridge (opposite from end
containing write-protect switch) into the aperture
behind the handle, right side up (name on top, with
arrows on front write-protect switch pointing down).
3. Push the cartridge assembly into the drive until the
cartridge reaches its full-stop position.
4. Push the insert/release handle closed by pushing
front edge back and down.
After you close the door, the green OPERATE HANDLE
indicator goes out and the yellow TAPE IN USE indicator
blinks to show that the tape is loading. When the tape is
at the BOT (beginning of tape) marker, the yellow TAPE
IN USE indicator lights steadily. The tape is then ready
for use.
5Unloading a Tape Cartridge from
DLT Tape Drive
CAUTION
Remove a cartridge from the DLT tape
drive before turning off or powering down
the host system. Failure to remove a
cartridge can result in damage to the
cartridge and/or to the DLT tape drive.
To prolong the life of a cartridge, return the
cartridge to its plastic case and secure the
case cover when you remove the cartridge
from the DLT tape drive
The cartridge insert/release handle on the front of the
drive provides outline procedures for loading a cartridge
into the DLT tape drive (right side of handle) and
unloading a cartridge from the drive (left side of handle).
The following text is a more detailed version of the
procedure for unloading a cartridge, as illustrated on the
next panel.

8
NOTE
The following procedure presumes that the
operator manually initiates the unloading
sequence by pressing the UNLOAD push-
button. In some host-driven applications,
the application software may issue the
appropriate system software command to
initiate the same unloading sequence.
CAUTION
Never operate the cartridge insert/release
handle unless the green OPERATE HANDLE
indicator is lit steadily.
1. Press the UNLOAD push-button on the front panel’s
right side (or issue the appropriate system software
command). The yellow TAPE IN USE indicator blinks
as the tape rewinds.
2. When the green OPERATE HANDLE indicator lights
steadily, pull the cartridge insert/release handle open
by pulling the bottom edge up and forward.
3. Remove the cartridge by pulling it forward from the
aperture.
4. Push the insert/release handle closed by pushing
front edge back and down.
9
6Operating Hints
• Never operate the cartridge insert/release
handle if the green OPERATE HANDLE light is not
on steadily or blinking.
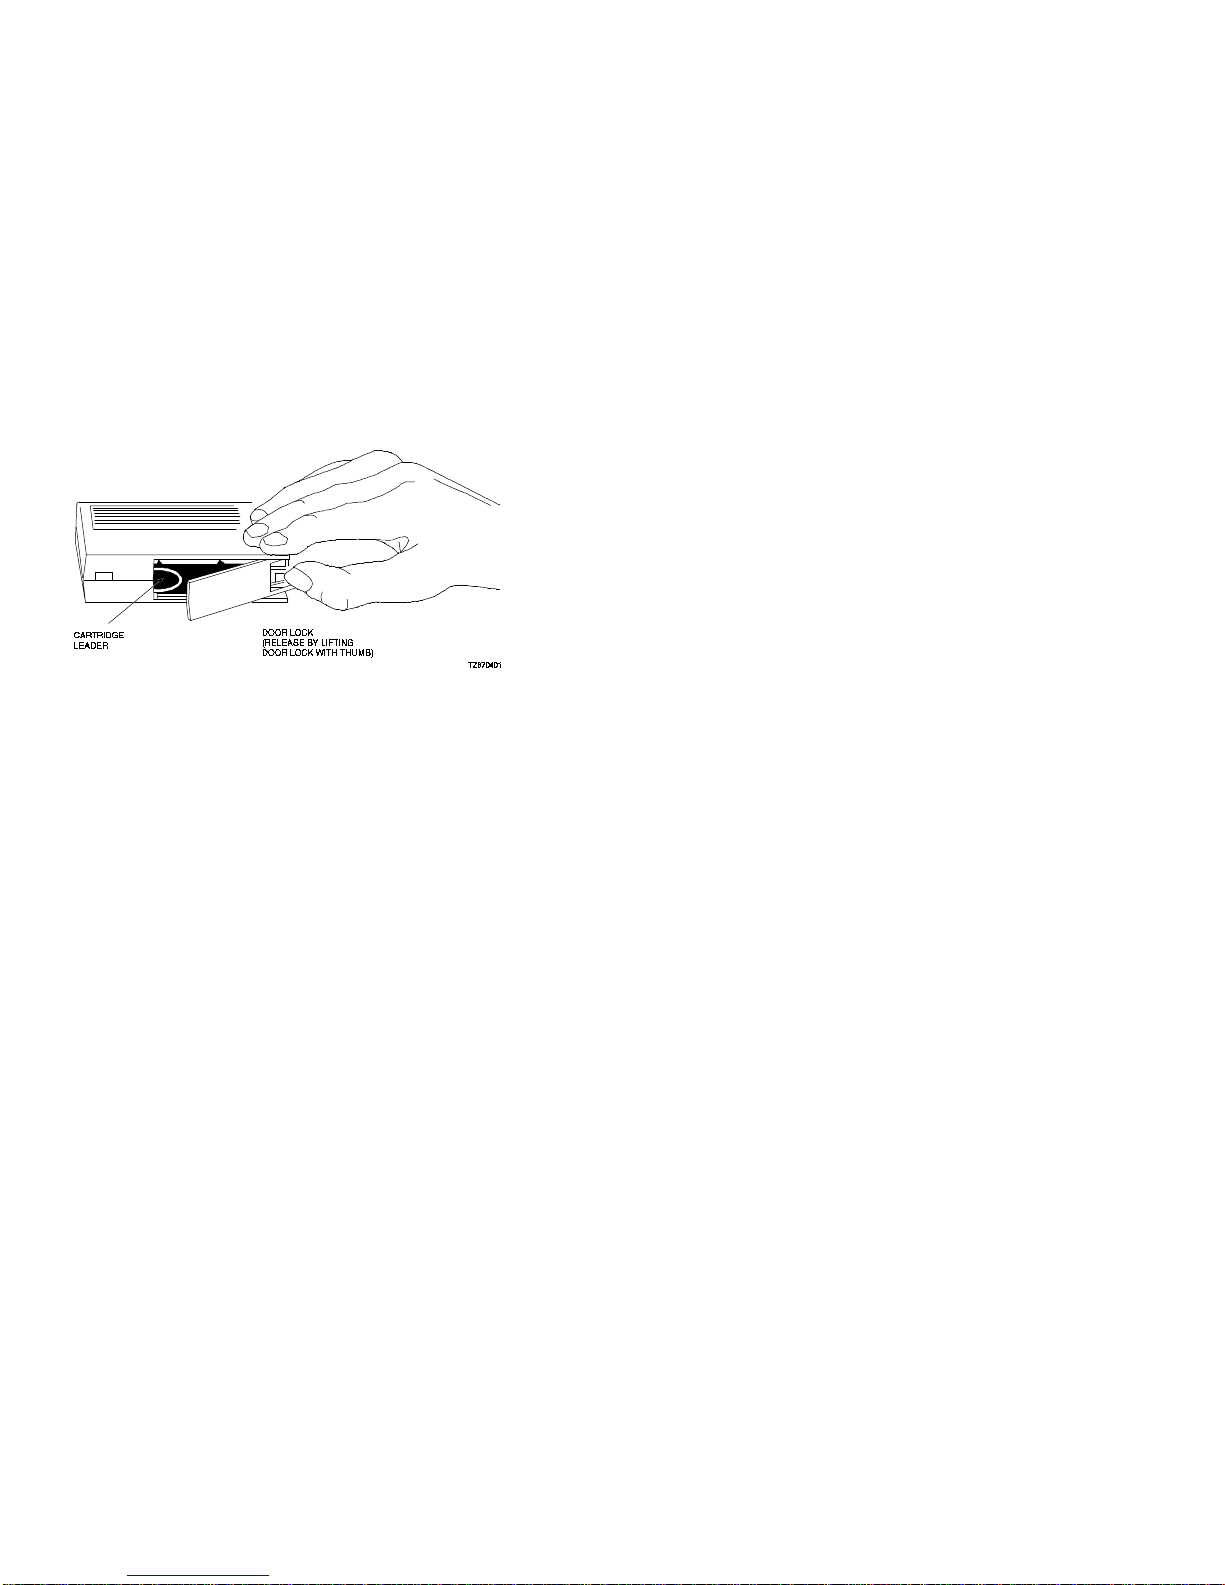
• If DLT tape drive behaves erratically with a
given tape cartridge, open inspection door at
rear of cartridge to make sure that cartridge
leader is in its correct position (see figure,
below).
• When mounting a tape cartridge, insert the tape
cartridge into the DLT tape drive with a slow,
steady motion.
• If the yellow Use Cleaning Tape indicator lights,
unload the data cartridge from the DLT tape
drive and then load a CleaningTape III cartridge
in its place. The cleaning cartridge automatically
cleans the read/write heads and then unloads
when cleaning is complete. Be sure to remove
the cleaning cartridge after cleaning is complete,
so as to avoid repeated operation, which would
cause unnecessary wear to the read/write
heads.

10
7Cartridge Compatibility
Cartridge Type/Format
(Capacity) Read/Write Ability in
the 10/20-GB DLT tape
drive
CompacTape III/TK85
(2.6 GBF) Read/write in 85 mode.
CompacTape III/TK86
(6.0 GBF) Read/write in 86 mode.
CompacTape III/TK87
(10.0 GBF,
uncompressed; 20.0
GBF with 2:1
compression)
Read/write in 87 mode.
CompacTape III/Blank Read/write in 85†, 86†
or 87 mode, as
selected.
†Read/write, backward compatible with DLT tape
drive of selected density.
The 10/20-GB DLT tape drive cannot write TK70,
TK50, or TZ30 format on any cartridge and cannot read
any of those formats.
First Edition, April 1994
The information on this reference card is subject to
change without notice and should not be construed as
being a comment by Digital Equipment Corporation.
Digital Equipment Corporation assumes no responsibility
for any errors that may appear in this document.
The following are trademarks of Digital Equipment
Corporation:
CleaningTape III, CompacTape III, TK, and the
Digital logo.
©Digital Equipment Corporation 1993. All rights
reserved.
Table of contents
Other StorageWorks Storage manuals


Popular Storage manuals by other brands

Fujitsu
Fujitsu ETERNUS DX Disk Configuration guide

Fujitsu
Fujitsu MBA3300 NP SERIES Technical manual

Dell
Dell PowerVault NX1950 installation guide

LaCie
LaCie Little Big Disk Thunderbolt™ Series Quick install guide

Western Digital
Western Digital MY PASSPORT WDBYFT0040BBK user manual

Microdia
Microdia RS-MMC overview


