StorageWorks SWXTL-BA User manual

DLT 10/20 GB Cartridge Tape Drive
– StorageWorks Building Block (SWXTL-BA & SWHTL-BA)
– Tabletop Tape Drive (SWXTL-BT)
User’s Guide
EK–SM1TB–UG. E01
Digital Equipment Corporation
Maynard, Massachusetts

Fourth Edition, November 1995
The information in this document is subject to change without notice and should not be construed as a com-
mitment by Digital Equipment Corporation. Digital Equipment Corporation assumes no responsibility for any
errors that may appear in this document.
Restricted Rights: Use, duplication, or disclosure by the U.S. Government is subject to restrictions as set forth
in subparagraph (c) (1) (ii) of the Rights in Technical Data and Computer Software clause at DFARS
252.227-7013.
Digital Equipment Corporation does not give a warranty of any kind regarding the fitness or applicability of
the information content for a particular purpose. The user assumes all responsibility for understanding the
interrelationships of this enclosed information with other affected software or system products.
The disclosure of this information does not grant to the user a license under any patents, pending patents,
trademarks, or copyrights or other rights of Digital Equipment Corporation, or of any third party.
FCC Notice: This equipment has been tested and found to comply with the limits for a Class B digital device,
pursuant to Part 15 of the FCC rules. These limits are designed to provide reasonable protection against
harmful interference in a residential installation. Any changes or modifications made to this equipment may
void the user’s authority to operate this equipment. The shielded interconnect cable, as supplied with the unit,
may not be substituted, nor altered or modified, in any way.
This equipment generates, uses, and can emit radio frequency energy and, if not installed and used in accor-
dance with the instructions, may cause harmful interferences to radio communications. However, there is no
guarantee that interference will not occur in a particular installation. If this equipment does cause harmful
interference to radio or television reception, which can be determined by turning the equipment off and on,
the user is encouraged to try to correct the interference by one or more of the following measures:
• Reorient or relocate the receiving antenna.
• Increase the separation between the equipment and receiver.
• Connect the equipment into an outlet on a circuit different from that to which the receiver is connected.
• Consult your reseller or an experienced radio/TV technician for help.
Copyright © Digital Equipment Corporation 1994, 1995
All Rights Reserved
Printed in U. S. A
The following are trademarks of Digital Equipment Corporation:
DEC
Digital
StorageWorks
VMS
and the Digital Logo:
All other trademarks and registered trademarks used in this publication are the property of their respective
owners.

Order Number: EK–SM1TB–UG. E01 iii
Contents
1 Introduction
1.1 Product Overview..................................................................................................................1–1
1.2 Design Features.....................................................................................................................1–1
1.2.1 Basic Components .............................................................................................................1–1
1.2.2 Performance Considerations...............................................................................................1–1
1.3 Data Tape..............................................................................................................................1–2
1.3.1 CompacTape III Description..............................................................................................1–2
1.3.2 Cartridge Packaging...........................................................................................................1–3
1.4 Reading and Writing Data.....................................................................................................1–3
1.4.1 Write-Protecting Data........................................................................................................1–3
1.5 Cleaning Tape.......................................................................................................................1–4
1.5.1 CleaningTape III Description.............................................................................................1–4
1.5.2 CleaningTape III Packaging...............................................................................................1–4
1.5.3 CleaningTape III Cartridge Expiration...............................................................................1–4
1.6 Supplies.................................................................................................................................1–5
1.6.1 Cartridges Provided ...........................................................................................................1–5
1.6.2 How To Order Replacement Cartridges..............................................................................1–5
2 Installation and Operation of the SWXTL-BA SBB
Tape Drive in a Storage Subsystem
2.1 Introduction...........................................................................................................................2–1
2.2 Unpacking.............................................................................................................................2–1
2.3 Preinstallation Procedures .....................................................................................................2–2
2.3.1 Setting the SCSI ID Address of the Tape Drive..................................................................2–2
2.4 Installing the SWXTL-BA SBB Tape Drive Into a StorageWorks Expansion
Storage Subsystem.................................................................................................................2–3
2.5 Power On Self Test (POST)...................................................................................................2–4
3 Installation and Operation of the SWXTL-BT Tabletop Tape Drive
3.1 Introduction...........................................................................................................................3–1
3.2 Unpacking.............................................................................................................................3–1
3.3 Preinstallation Procedures .....................................................................................................3–2
3.3.1 Enabling/Disabling Parity..................................................................................................3–2
3.3.2 Setting the SCSI ID Address of the Tape Drive..................................................................3–2
3.4 Installation of SWXTL-BT Tabletop DLT Tape Drive...........................................................3–4
3.4.1 SWXTL-BT Power On Self Test (POST)...........................................................................3–4

StorageWorks DLT 10/20-GB Cartridge Tape Drive
iv Order Number: EK–SM1TB–UG. E01
4 Front-Panel Controls & Indicators and Operation
of the 10/20-GB DLT Cartridge Tape Drive
4.1 General .................................................................................................................................4–1
4.2 Front-Panel Controls and Indicators......................................................................................4–1
4.2.1 Unload Push-Button...........................................................................................................4–2
4.2.2 Cartridge Insert/Release Handle.........................................................................................4–2
4.2.3 DENSITY SELECT Switch.....................................................................................................4–3
4.3 Power-On Self-Test (POST)..................................................................................................4–4
4.4 Status Indication of Tape Drive LEDs....................................................................................4–6
4.5 CompacType III DLT Tape Cassette......................................................................................4–7
4.6 Using and Handling CompacTape III Tape Cassettes.............................................................4–7
4.6.1 Write-Protect Switch..........................................................................................................4–8
4.6.2 Data Protection..................................................................................................................4–8
4.6.3 Loading A Cartridge..........................................................................................................4–9
4.6.4 Tape in Use...................................................................................................................... 4–11
4.6.5 Unloading A Cartridge.....................................................................................................4–11
4.6.6 Using the Tape Cleaning Cartridge..................................................................................4–12
4.6.7 Preserving Cartridges.......................................................................................................4–12
4.7 Selecting Density.................................................................................................................4–13
4.7.1 How To Select Density At The Front Panel...................................................................... 4–14
4.7.1.1 Selection of Compression Mode...................................................................................4–14
4.7.1.2 Density Select Example................................................................................................ 4–15
4.7.2 Density Selection Rules................................................................................................... 4–15
5 Maintenance
5.1 Introduction...........................................................................................................................5–1
5.2 Common Errors.....................................................................................................................5–1
5.2.1 Avoiding Basic Problems...................................................................................................5–1
5.2.2 Error Influences.................................................................................................................5–1
5.3 Cleaning the Heads................................................................................................................5–2
5.4 Inspections ............................................................................................................................5–3
5.4.1 Checking the Cartridge Leader...........................................................................................5–3
5.4.2 Checking the Drive Leader ................................................................................................5–3
5.5 Troubleshooting ....................................................................................................................5–6
Appendix A Specifications
Appendix B Product Notes for Novell and MS-DOS
B.1 Host SCSI Interface.............................................................................................................. B–1
Appendix C Product Notes for Sun™
C.1 General Information............................................................................................................. C–1
C.2 Modifications Required for SunOS 4.1.x............................................................................... C–1
C.2.1 Installation Procedure ....................................................................................................... C–1
C.2.1.1 System Modification ..................................................................................................... C–1
C.2.1.2 Rebuilding of Kernel.................................................................................................... C–2
C.2.1.3 Installation of Tape Drive.............................................................................................. C–2

Contents
Order Number: EK–SM1TB–UG. E01 v
C.2.1.4 Rebooting of System..................................................................................................... C–3
C.2.1.5 Testing the SWXTL SBB.............................................................................................. C–3
C.2.1.6 Verification................................................................................................................... C–3
C.2.2 Dump Parameters for the Tape Drive................................................................................ C–4
C.3 Modifications Required for Solaris™ 2.3 (or later) ............................................................... C–4
C.3.1 Installation Procedure ....................................................................................................... C–4
C.3.1.1 System Modification ..................................................................................................... C–4
C.3.1.2 System Shutdown.......................................................................................................... C–6
C.3.1.3 Installation of Tape Drive.............................................................................................. C–6
C.3.1.4 Rebooting of System..................................................................................................... C–6
C.3.1.5 Test............................................................................................................................... C–7
C.3.1.6 Verification................................................................................................................... C–7
C.3.2 Running SUN Diagnostics (Optional) ............................................................................... C–7
C.3.3 Dump Parameters for the Tape Drive................................................................................ C–8
Appendix D Product Notes for IBM™ RS/6000
D.1 Modifications Required to Operate the SWXTL-BA with AIX 3.2.5 (or later)......................D–1
D.1.1 Installing the SWXTL-BA Using the SMIT Command .....................................................D–1
D.1.2 Installing the SWXTL-BA Using Command-Line Interface..............................................D–2
Appendix E Product Notes for Hewlett Packard
E.1 General Information..............................................................................................................E–1
E.2 Modifications Required .........................................................................................................E–1
E.2.1 Installation Procedure ........................................................................................................E–1
E.2.1.1 Installation of Tape Drive...............................................................................................E–1
E.2.1.2 System Modification ......................................................................................................E–1
E.3 Series 700 System Device Files..........................................................................................E–2
E.3.1 HP-UX 9.05....................................................................................................................E–3
E.3.2 HP-UX 10.00..................................................................................................................E–4
E.4 Series 800 System Device Files..........................................................................................E–4
E.4.1 HP-UX 9.05....................................................................................................................E–5
E.4.2 HP-UX 10.00..................................................................................................................E–5
E.5 Testing the Tape Drive.......................................................................................................E–5
E.5.1 Verification....................................................................................................................E–6
E.6 Dump Parameters for the Tape Drive.................................................................................E–6
Figures
1–1 Front Panel of 10/20-GB DLT Cartridge Tape Drive .....................................................................1–2
1–2 CompacTape III Cartridge............................................................................................................1–3
1–3 CompacTape III Cleaning Tape.....................................................................................................1–4
2–1 SWXTL-BA Tape Drive SCSI ID Switches...................................................................................2–2
2–2 Installing the SWXTL-BA into an Expansion Storage Pedestal......................................................2–4
2–3 Tape Drive Front Panel Controls and Indicators.............................................................................2–5
3–1 SWXTL-BT Tape Drive SCSI ID Switch Settings .........................................................................3–3
3–2 SWXTL-BT Tape Drive Front Panel Controls and Indicators ........................................................3–4
4–1 Front Panel Layout of 10/20-GB DLT Cartridge Tape Drive..........................................................4–2
4–2 CompacTape III Data Tape Cartridge ............................................................................................4–9
4–3 Loading Cartridge Into Tape Drive..............................................................................................4–10

StorageWorks DLT 10/20-GB Cartridge Tape Drive
vi Order Number: EK–SM1TB–UG. E01
Figures (continued)
4–4 Unloading Cartridge From Tape Drive.........................................................................................4–12
5–1 Checking Out Cartridge Leader .....................................................................................................5–4
5–2 Correct Engagement of Take-Up Leader in Tape Drive .................................................................5–4
5–3 Correct and Incorrect Positions of Tape Drive Leader....................................................................5–5
Tables
1–1 Ordering Numbers for Cleaning Tape and Data Tapes...................................................................1–5
2–1 SWXTL-BA Tape Drive SCSI ID Switch Settings.........................................................................2–3
3–1 10/20-GB DLT Cartridge Tape Drive SCSI Interface Cables .........................................................3–2
4–1 Right-side Front Panel Indicators and Controls ..............................................................................4–3
4–2 Left-side Front Panel Indicators and Controls ................................................................................4–4
4–3 Operating States of 10/20-GB DLT Cartridge Tape Drive Unit
Following Initialization..................................................................................................................4–6
4–4 Tape Drive LED Status..................................................................................................................4–7
4–5 Moving Write-Protect switch Before Tape Drive Operation...........................................................4–9
4–6 Moving Write-Protect switch During A Read/Write Operation ......................................................4–9
4–7 What is Happening During Cartridge Use (Right-Side Indicators)................................................4–11
4–8 When To Use the Cleaning Cartridge........................................................................................... 4–13
4–9 Density Selections Available On 10/20-GB DLT Cartridge Tape Drive.......................................4–14
4–10 Results of Density Selection ........................................................................................................4–16
5–1 Possible Corrections for Common Error Situations ........................................................................5–2
5–2 Troubleshooting Table...................................................................................................................5–6
A–1 10/20-GB DLT Cartridge Tape Drive Specifications.....................................................................A–1

Order Number: EK–SM1TB–UG. E01 vii
Revision Record
This Revision Record provides a concise publication history of this guide. It lists the manual revision levels, re-
lease dates, and reasons for the revisions. It also describes how the changes to affected pages are marked in
the guide.
The following revision history lists all revisions of this publication and their effective dates. The publication part number
is included in the Revision Level column, with the last entry denoting the latest revision. This publication supports the
StorageWorks SWXTL-BA SBB and SWXTL-BT Tabletop Cartridge Tape Drives.
Revision Level Date Summary of Changes
EK–SM1TB–UG. A01 April 1994 Original release
EK–SM1TB–UG. B01 June 1994 Revised artwork and associated text in Chapter 2 to
agree with changed location of SCSI ID switch pack
and SCSI bus connector. Revised artwork and
associated text in Chapter 3 to agree with changed
SCSI ID switch. Revised Chapter 4 to clarify
selection of compression mode.
EK–SM1TB–UG. C01 September 1994 Added Appendix C, Product Notes for Sun™, to
provide application notes pertaining to use with
SunOS™ and Solaris™ systems.
EK–SM1TB–UG. D01 January 1995 Added Appendix D, Product Notes for IBM™
RS/6000 to provide application notes pertaining to
use with AIX™ 3.2.5 (or later) operating systems.
Added Appendix E, Product Notes for Hewlett
Packard 9000 series 700/800 systems to provide
application notes pertaining to use with HP-UX
operating systems.
EK-SM1TB-UG November 1995 Revised Appendix E, Product Notes for Hewlett
Packard™ (naming convention for the HP-UX 10.00
series). Revised Appendix D, Product Notes for
IBM™ RS/6000 (RS/6000 Density Code Tabel
corrections). Revised Appendix C, Product Notes for
Sun™.
Sun™, SunOS™ and Solaris™ are trademarks or registered trademarks of Sun Microsystems, Inc.
IBM™and AIX™are trademarks or registered trademarks of IBM, Inc.


Order Number: EK–SM1TB–UG. E01 ix
About This Guide
This section identifies the users of this guide and describes the contents and structure. In addition, it includes a
list of conventions used in this guide.
This guide provides a product overview, installation, operation, and maintenance information
for the StorageWorks SWXTL-BA SBB and/or SWXTL-BT Tabletop DLT Cartridge Tape
Subsystems, both of which contain a Model 10/20-GB DLT Cartridge Tape Drive.
Intended Audience
This guide is intended for people who will install, operate, and maintain the StorageWorks
SWXTL-BA SBB and/or SWXTL-BT Tabletop DLT Cartridge Tape Subsystems.
Document Structure
This guide contains the following chapters:
Chapter 1. Introduction
Chapter 1 gives an overview of the 10/20-GB DLT Cartridge Tape Drive, describes its com-
ponents, and discusses the drive features. This chapter provides a product overview of the
10/20-GB DLT Cartridge Tape Drive and identifies design features (including basic compo-
nents and performance considerations). The chapter also includes overview descriptions of
the data tape and cleaning tape cartridges used with this equipment, defining the basic func-
tions of each, and identifies what is supplied with the tape drive unit.
Chapter 2. Installation and Operation of the SWXTL-BA SBB Tape Drive in a
Storage Subsystem
Chapter 2 provides specific details pertaining to the SWXTL-BA SBB Tape Drive, which is
designed to be operated in a Digital StorageWorks Expansion Storage Pedestal subsystem.
This chapter describes how to unpack the received drive, how to prepare the drive for instal-
lation in the pedestal, how to set the SCSI ID of the tape drive, how to install the device into
a StorageWorks Expansion Storage Pedestal subsystem, and how to confirm operation in-
tegrity by performing the Power On Self Test (POST) exercise.
Chapter 3. Installation and Operation of the SWXTL-BT Tabletop Tape Drive
Chapter 3 provides specific details pertaining to the SWXTL-BT SBB Tape Drive, which is
designed to be operated as an independent standalone unit on the desktop, a convenient shelf,
or other flat surface. This chapter describes how to unpack the received SWXTL-BT tabletop
drive, how to prepare the drive for installation, how to set the SCSI ID of the tape drive, how
to perform the Power On Self Test (POST) procedure, and how to connect the tape drive to a
host computer.

StorageWorks DLT 10/20-GB Cartridge Tape Drive
x Order Number: EK–SM1TB–UG. E01
Chapter 4. Operation
Chapter 4 describes the tape drive’s LED indicators and how to use them to monitor tape
drive operation. This chapter identifies the switches and LED indicators on the front panel of
the 10/20-GB tape drive, describes how to use them (including operation of the power-on
self-test (POST), provides use rules for the CompacTape III DLT cartridge data and cleaning
tapes, gives detailed procedures for correct loading and unloading of the tape cartridges, and
explains how to select a desired density format for recording.
Chapter 5. Maintenance
Chapter 5 describes how to clean the heads of the tape drive, and provides a troubleshooting
table to help diagnose common problems. This chapter describes preventive maintenance and
general troubleshooting for the 10/20-GB DLT Cartridge Tape Drive.
Appendix A. Specifications
Appendix A lists the physical, electrical, cooling, environmental, and environmental stabili-
zation specifications for the tape drive.
Appendix B. Product Notes for Novell™ and MS-DOS™
Appendix B provides information for the system administrator about interfacing the 10/20-
GB DLT Cartridge Tape Drive with a host system operating under the Novell, MS-DOS, or
MS/DOS/WINDOWS operating systems.
Appendix C. Product Notes for Sun™ SunOS 4.1.x and Solaris™ 2.3 Systems
Appendix C provides information for the system administrator about interfacing the SWXTL
10/20-GB DLT Cartridge Tape Drive with a Sun SPARC system running SunOS 4.1.x or
Solaris 2.3 (or later). The information covers the installation of the SWXTL tape drive
hardware and configuring the system to communicate with the drive.
Appendix D. Product Notes for IBM™ AIX™ 3.2.5 (or later) Systems
Appendix D provides information for the system administrator about interfacing the SWXTL
10/20-GB DLT Cartridge Tape Drive with an IBM™ RS/6000 system running AIX™ 3.2.5
(or later). The information covers the installation of the SWXTL tape drive hardware and
configuring the system to communicate with the drive.
Appendix E Product Notes for Hewlett-Packard
Appendix E provides information for the system administrator about interfacing the
SWXTL10/20-GB DLT Cartridge Tape Drive with an HP 9000 Series 700 system running
HP-UX 9.05 (or later) or an HP 9000 Series 800 system running HP-UX 9.04 (or later). The
information covers the installation of the SWXTL tape drive hardware and configuring the
system to communicate with the drive.

Order Number: EK–SM1TB–UG. E01 xi
Conventions
This guide uses the following conventions:
Style Meaning
boldface type For emphasis
italic type For emphasis and manual titles
__________________________________________
Novell™ is a trademarks of Novell.
MS-DOS™ is a trademark of Micosoft Corporation
SunOS™ and Solaris™ are trademarks of Sun Microsystems, Inc.
IBM™ and AIX™ are tradaemarks of IBM Inc.


Order Number: EK–SM1TB–UG. E01 1–1
1
Introduction
This chapter provides a product overview of the Model 10/20-GB DLT Cartridge Tape Drive and identifies de-
sign features (including basic components and performance considerations). The chapter also includes over-
view descriptions of the data tape and cleaning tape cartridges, defining the basic functions of each, and identi-
fies what is supplied with the tape drive.
1.1 Product Overview
The StorageWorks Model 10/20-GB DLT Cartridge Tape Drive is a streaming tape drive
which connects to a SCSI bus. Assuming a 2:1 compression ratio on a CompacTape III car-
tridge, this device can store up to 20 GB of data with compression, or up to 10.0 GB of data
without compression. The primary uses for this drive are data backup, data archiving, and
loading software onto computer systems. The 10/20-GB DLT Cartridge Tape Drive comes
either embedded in a system enclosure, in which case it is identified as an SWXTL-BA Stor-
ageWorks Building Block (SBB), or else in an enclosure with a self-contained power supply,
in which case it is identified as an SWXTL-BT Tabletop DLT Tape Drive. This initial
section of this document discusses the generic information that is common to either version;
subsequent sections will provide details that are specific to either product.
1.2 Design Features
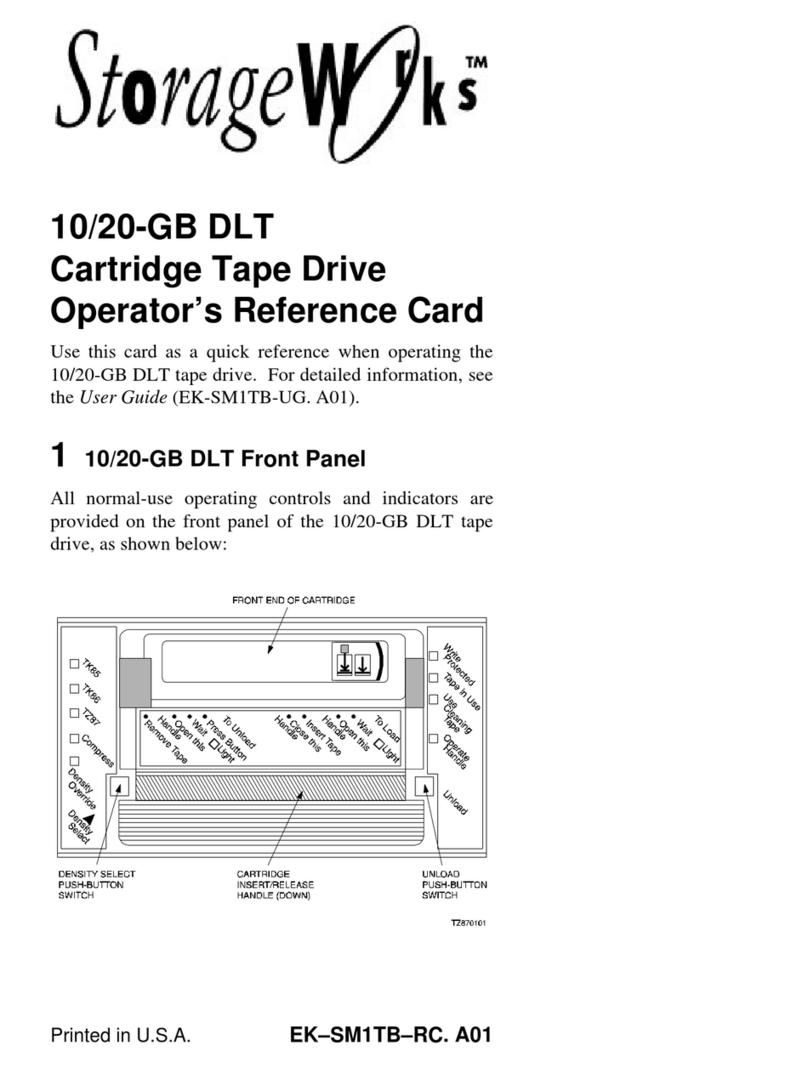
Figure 1–1 shows a view of the front panel, which provides status indicators for system op-
eration, along with an access door for inserting and removing the CompacTape III tape car-
tridge.
1.2.1 Basic Components
The 10/20-GB DLT Cartridge Tape Drive has an integrated SCSI controller module, which
connects to the associated computer system through a SCSI bus attached to that controller
module. The controller module is responsible for processing SCSI commands and for initiat-
ing tape drive operations. In the case of the SWXTL-BA SBB, the connection to the SCSI
bus is made through the StorageWorks Expansion Storage Pedestal, as discussed in Chapter
2. For the SWXTL-BT Tabletop device, however, the connection to the SCSI bus must be
made through an appropriate cable, depending on the type of controller that is used and/or
the desired physical length of cable, as explained in Chapter 3.
1.2.2 Performance Considerations
The performance you can achieve with the 10/20-GB DLT Cartridge Tape Drive can depend
on a number of considerations, including your system processor. When set to compressed
mode, this tape drive theoretically can back up 9 GB of data per hour (tape streaming at

StorageWorks DLT 10/20-GB Cartridge Tape Drive
1–2 Order Number: EK–SM1TB–UG. E01
maximum speed and recording highly compressible data). In a host-based configuration,
proper choice of system processor, cache, hard drive, adapters, and backup software can help
to approach this throughput rate. Host SCSI IO or other computer-intensive operations on the
host CPU will tend to reduce throughput to tape, however.
Figure 1–1 Front Panel of 10/20-GB DLT Cartridge Tape Drive
When data is being passed from or to client workstations in a client-server environment, ad-
ditional parameters having to do with reduced local area network bandwidth, network traffic,
or lower client workstation performance characteristics will also tend to reduce maximum
throughput to the tape drive.
1.3 Data Tape
1.3.1 CompacTape III Description
The CompacTape III cartridge is a 4-1/8-inch square, dark gray, plastic cartridge, containing
1200 feet of 1/2-inch magnetic, metal particle (MP) tape. A write-protect slide switch on the
front surface lets you select between two positions: WRITE-ENABLED (switch moved to the
right), which lets the tape drive write data on the tape, and WRITE-PROTECTED (switch moved
to the left), which prevents the tape drive from writing over data you want to preserve (See
Figure 1–2).

Chapter1. Introduction
Order Number: EK–SM1TB–UG. E01 1–3
Figure 1–2 CompacTape III Cartridge
1.3.2 Cartridge Packaging
Your CompacTape III cartridge comes supplied with:
1. A set of slide-in labels
2. A cartridge-handling information sheet
1.4 Reading and Writing Data
The 10/20-GB DLT Cartridge Tape Drive writes 64 pairs of tracks — 128 tracks total — on
the CompacTape III tape. The drive reads and writes data in a two-track parallel, serpentine
fashion, traveling the entire length of tape on two tracks (at about 110 inches per second).
The drive then steps the head, reverses tape direction, and continues to read/write on the next
two tracks, repeating this same process for a total of 64 times per tape.
1.4.1 Write-Protecting Data
The CompacTape III cartridge has a write-protect slide-bar switch on its front surface that
lets you prevent accidental erasure of data. When you move that switch to the left, so that a
small orange rectangle is visible in the aperture over the left arrow symbol on the switch (see
Figure 1–2), the tape is write-protected and data cannot be written to the tape. When you
move the switch to the right, so that no orange color shows in the rectangular aperture, the
tape is write-enabled, and the tape drive can write to the tape. The symbols on the slide-bar
switch indicate this function by depicting data flow as a downward-pointing arrow and the
tape medium as a horizontal line below the arrow’s point. The arrow on the left side of the
slide-bar switch depicts a barrier line between the data-flow arrow and the tape; this symbol-
izes that the data cannot reach the tape when the switch is moved to the left. No such barrier
line appears below the arrow on the right side of the switch, indicating that data can flow to
the tape when the switch is moved to the right.

StorageWorks DLT 10/20-GB Cartridge Tape Drive
1–4 Order Number: EK–SM1TB–UG. E01
1.5 Cleaning Tape
1.5.1 CleaningTape III Description
The CleaningTape III cartridge is a 4-1/8-inch square, light yellow, plastic cartridge contain-
ing 1200 feet of 1/2-inch cleaning tape (see Figure 1–3). For information on using the
CleaningTape III cartridge, refer to Section 4.6.5 and/or Table 4–8.
Figure 1–3 CompacTape III Cleaning Tape
1.5.2 CleaningTape III Packaging
Your CleaningTape III cartridge comes supplied with:
1. A slide-in label containing 20 boxes, to be checked off following each sequential use of
the CleaningTape III cartridge (refer to Section 1.5.3).
2. A cartridge-handling information sheet.
1.5.3 CleaningTape III Cartridge Expiration
Each use of the CleaningTape III cartridge uses up some of the cleaning area on the tape.
You can use the CleaningTape III cartridge approximately 20 times before the cleaning area
is used up. After that many uses, the cartridge will be ineffective and should be replaced with
a new cartridge.
To keep track of the number of times the tape has been used, mark a checkmark in one of the
20 boxes on the cartridge label after each cleaning. After all 20 boxes have been checked off,
the cartridge should be considered as expired, and you should discard that cartridge and re-
place it with a new one.

Chapter1. Introduction
Order Number: EK–SM1TB–UG. E01 1–5
1.6 Supplies
1.6.1 Cartridges Provided
One CompacTape III cartridge and one CleaningTape III cartridge come with each 10/20-GB
DLT Cartridge Tape Drive, in the shipping package.
1.6.2 How To Order Replacement Cartridges
You can order additional cartridges by contacting your Digital reseller or by calling Digital’s
DECdirect ordering service at 1-800-DIGITAL in the U.S.A.; in Canada, call 800-267-6215.
Table 1–1 lists ordering numbers for various quantities of cartridges for the 10/20-GB DLT
Cartridge Tape Drives:
Table 1–1 Ordering Numbers for Cleaning Tape and Data Tapes
Order Number Description
TK85-HC CleaningTape III Head Cleaning Cartridge
TK85K-01 CompacTape III Data Cartridge (quantity, 1)
TK85K-07 CompacTape III Data Cartridge (quantity, 7)
TK85K-A1 CompacTape III Data Cartridge (quantity, 945)


Order Number: EK–SM1TB–UG. E01 2–1
2
Installation and Operation of the
SWXTL-BA SBB Tape Drive
This chapter provides specific details pertaining to unpacking, preinstallation setup, installation, and POST op-
erational testing of the SWXTL-BA StorageWorks Building Block (SBB) Tape Drive, which is designed to be
operated in a Digital StorageWorks Expansion Storage Pedestal.
2.1 Introduction
The SWXTL-BA SBB Tape Drive is housed in an SBB storage carrier and is designed for
installation into a StorageWorks Storage Expansion Pedestal subsystem. The drive occupies
three adjacent slots in the storage subsystem and is configured as one of up to seven devices
on the SCSI bus. This chapter describes how to unpack the received drive, how to prepare the
drive for installation, how to set the SCSI ID of the tape drive, how to install the device into
a StorageWorks Expansion Storage Pedestal subsystem, and how to perform the Power On
Self Test (POST) procedure.
The information in this chapter is divided as follows:
• Unpacking
• Preinstallation setup of the drive (setting SCSI ID Address of the tape drive)
• Installation into the storage subsystem
• POST procedure
2.2 Unpacking
Unpack and inspect the contents of your shipment. It should contain the following items:
•This guide
•One Model 10/20-GB DLT Cartridge Tape Drive
•One blank CompacTape III data cassette tape cartridge
•One CleaningTape III head-cleaning cartridge
•One StorageWorks 10/20-GB DLT Cartridge Tape Drive Operator’s Reference Card
Also, check the contents for damaged components. Notify your vendor immediately if any
items are damaged. Keep all boxes and packing material for reshipment.

StorageWorks DLT 10/20 GB Cartridge Tape Drive
2–2 Order Number: EK–SM1TB–UG. E01
2.3 Preinstallation Procedures
Perform the following procedure before installing the 10/20-GB DLT Cartridge Tape Drive.
2.3.1 Setting the SCSI ID Address of the Tape Drive
The pedestal slots are numbered 0 through 7, from top to bottom, with the power supply oc-
cupying slot 7. The SCSI address switches on the rear of the SWXTL-BA SBB Tape Drive
(refer to Figure 2–1) are preset at the factory to automatic — SW-1, SW-2, and SW-3 set off
(to left); SW-4, SW-5, and SW-6 set on (to right). This setting means that the SBB tape drive
will have the address of whichever physical slot is connected. Because of the low position of
the unit’s backplane interface connector, this physical connection will be to the lower of the
three slots occupied by that unit. Physically, this means it will be one of slots 2 through 6, as
applicable. If you want a different specific logical address for any reason (i.e., if you wish to
use SCSI ID 0 or 6, or any specific value in between, regardless of physical location of the
unit), you can set the tape drive to any desired logical address by manually changing the set-
tings of switches SW-1, SW-2, and SW-3 on the SCSI switch pack, as delineated in Table 2–
1, before inserting the SBB into the pedestal.
Figure 2–1 SWXTL-BA Tape Drive SCSI ID Switches
This manual suits for next models
2
Table of contents
Other StorageWorks Storage manuals
Popular Storage manuals by other brands
Seagate
Seagate ST8000VX0002 product manual

Promise
Promise VSky A1100 product manual

morse
morse 400A-96-124 Operator's manual
Processor Technology
Processor Technology CUTS Assembly and Test Instructions
IBM
IBM Storwize V5000 Quick installation guide
Western Digital
Western Digital WD10EZRZ Quick install guide
