Storchenwiege BabyCarrier User manual
Instructions
for use
For newborns (3,5 kg / 7 lb 11 oz) to max. 15 kg / 33 lb 1 oz
Storchenwiege®
Kaul u. Dix GbR
Birkenstr. 31b
D-01328 Dresden
Tel.: +49 (0) 351/2 63 30 51
Fax: +49 (0) 351/2 63 30 53
www.storchenwiege.co.uk
y
Storchenwiege®
BabyCarrier
NOTE: Retain for later reference!

2
We are pleased that you have chosen the Storchenwiege® BabyCarrier and hope you
and your child will have a lovely time using it together.
With the Storchenwiege® BabyCarrier you can comfortably
carry your child from birth (about 3,5 kg) to about 15 kg
tummy to tummy and on your back. The Storchenwiege® Baby-
Carrier is made of 100% cotton using the Storchenwiege®
sling fabric, which has a diagonally elastic weave and has
stood the test of many years. As there is no padding in the
back section, it is ideal to bring out the supporting effect of
the diagonally elastic woven Storchenwiege® fabric. The bar
in the child’s leg area can be widened so that the child, what-
ever her age, always adopts the anatomically correct, splayed
“frog” position which is so important for the development of
young hips. The comfort of the Storchenwiege® BabyCarrier is
rounded off by an integrated head support and a hood. It is
even more comfortable to wear thanks to the padded shoulder
straps and a padded and adjustable belt, with a breakaway
clasp.
Storchenwiege®
BabyCarrier
These instructions include all the details necessary in our opinion and experience for using the carrier as intended. When carrying your
child in the Storchenwiege
®
Baby Carrier, always make sure that you are using the Storchenwiege
®
BabyCarrier properly in accordance
with the instructions. Storchenwiege
®
shall not be liable for any damage or injury caused by incorrect use of the product. If required
we recommend seeking advice from a midwife, babywearing consultant, physiotherapist or paediatrician.
Copyright by Storchenwiege
®
Reproduction, copying and processing on data mediums, even excerpts, permitted only with the consent of Storchenwiege
®
.
3
Before initial use
Before initial use, read these instructions carefully. Check all seams and clasps at regular inter-
vals. To gain confidence in putting on the Storchenwiege
®
BabyCarrier, start out by practising in
front of a mirror. With the help of another person you will soon become well practised in using
your Storchenwiege
®
BabyCarrier. Note that the breakaway clasp on the belt must always be
closed and must not be undone while the child is in the Storchenwiege
®
BabyCarrier.
Looking after your
Storchenwiege®
BabyCarrier
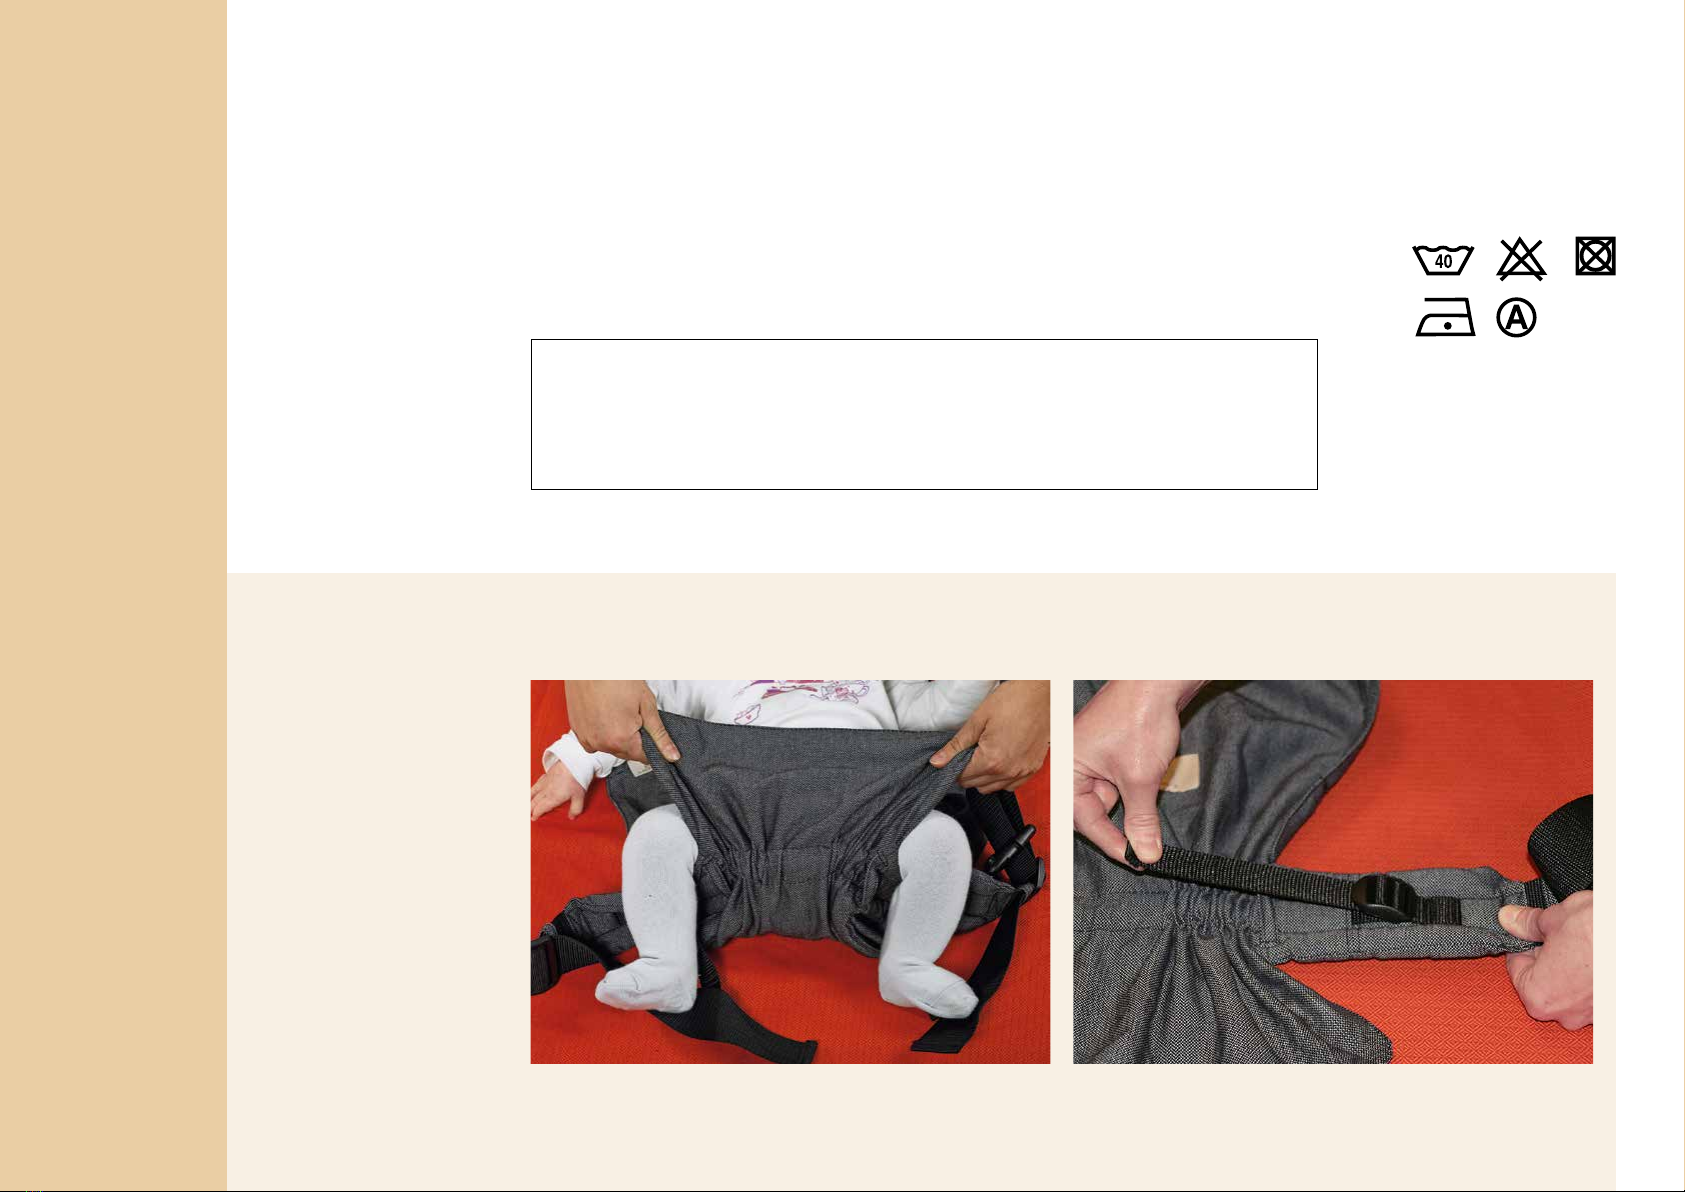
Adjusting the width of the bar to fit your child
To ensure that your child’s
legs are in the correct splayed
“frog” position, the width of
the bar must be adjusted to
fit your child before you put
on the Storchenwiege
®
Baby-
Carrier. Check at regular inter-
vals whether the width of the
bar still suits the size of your
child and widen it if necessary.
Adjust the width of the bar on your Storchenwiege
®
BabyCarrier
to this width using the waistband.
Place your child on the carrier and adjust the crotch support so
that the fabric stretches from the back of one knee to the other.
WARNING:
l Your movements and those of your child may bring you out of balance.
l Be careful when leaning forward or backward.
l This carrier is not suitable for use during sports activities.

4
Caution:
Never wear your child tummy to
tummy and facing outwards.
l The baby’s back is automatical-
ly pushed into a hollow shape.
l The “frog position” of the legs
is no longer possible.
l The baby is left exposed to
the busy outside world and
environmental factors.
3. With your free hand, reach beneath
the back panel, draping it over your
forearm …
2. Hold your child tummy-to-tummy
with one hand holding her diagonally
over her back from her shoulder to the
opposite thigh.
1. Put on the belt with the clasp behind
you, ensuring that the clasp clicks prop-
erly into place. IMPORTANT: With small
babies we recommend wearing the belt
higher up, and with bigger children
wearing it lower.
4. … and use your free hand to smooth the panel up
and over your child’s back. Shift the hand holding
your child to the outside.
5. Use your free hand to slip the first strap over your shoulder, then to hold your child while you move the
second strap over your other shoulder with your other hand.
3 2 1
5 4
Tummy
to
tummy
especially suitable
for newborns and
babies up to one
year of age

5
7. The straps are pulled firmly and evenly across your back, crossed over and
pulled round to the front, beneath child’s legs.
8. Holding the straps in one hand, reach up to the shoulder strap with your free
hand and push the fabric backwards. At the same time, the back panel is pulled
firm by tugging the straps forwards at the waist. Do the same on the other side.
6. Reach back with your free hand, take both straps and pull tight. Your child is now held firmly in the carrier.
7 8
6
Table of contents
Other Storchenwiege Baby Carrier manuals


