Storchenwiege Babysling User manual


1
Contents
These tying instructions were developed in cooperation with Petra Wilhelm at the ClauWi® sling school.
Copyright by Storchenwiege®, Birkenstraße 31b, 01328 Dresden, Germany, e-mail: [email protected], www.storchenwiege.de
Introduction
Page 2
Important techniques and information for all tying methods
Page 4
Tummy-to-tummy carries
Snuggle-hold carry
Page 6
Double cross carry
Page 8
Hip carry
Page 14
Rucksack carry
Page 18
Wrap cross rucksack
carry
Page 15
Wrap cross carry
Page 10
Snuggle-hold carry
on the hip
Page 12
Hip carries Back carries
•
Prof. Dr. med. J. Büschelberger, specialist in orthopaedics, postdoctoral thesis, Dresden (1961):
“Investigations into the characteristics of the hip in babies and its implications for the pathogenesis, prophylaxis and therapy of congenital hip dysplasia.”
• Bernhard Hassenstein, Evelin Kirkilionis: Der menschliche Säugling, Nesthocker oder Tragling? (Human babies: altricial or “clinging young”?)
In: Wissenschaft und Fortschritt 42/1992
• Evelin Kirkilionis: „Ein Baby will getragen sein“ (A baby wants to be carried), Kösel-Verlag GmbH & Co., Munich, 1999
• Renate Köhler: Die Kunst des Bindens – Das Buch zum Tragetuch (The art of tying – the book to go with your sling), Verlag Renate Köhler, Münster, 1995
Bibliography:

2
We are pleased to see you have chosen a Storchenwiege® sling and hope you and
your child will have a lovely time using it together. These instructions are designed
to give you some valuable information about carrying babies and toddlers before
going on to explain each carrying method step by step. With a little practice it will
not be long before you are expertly tying your Storchenwiege® sling, and soon it
might even become your constant companion.
But first let us take a look back through history. Human babies have always been
nursed and carried, even in our modern industrial countries, so you are not spoiling
your baby by carrying her. You are making your child strong. When you respond to
her needs, this confirms and builds up your child’s natural trust in you and boosts
her self-esteem.
In behavioural biology, babies fall into the class of “parent clinger”. The other two
types of young are altricial young and precocial young. Altricial young are born with
their eyes closed and unable to hear; they cannot move around and are only just able
to regulate their body temperature. They need the protection of the nest and can be
left there by their mother. They can go for long periods between feeds, and while the
mother is away they remain still. Precocial young, on the other hand, are a smaller
version of their parents; they can follow their mother around shortly after birth and
need her around at all times. Human babies fit into neither group. Until the class of
“clinging young” was introduced in 1970 by the biologist Prof. Bernhard Hassen-
stein, humans were considered altricial young and were treated accordingly. Clinging
young, such as the offspring of apes, koalas etc. can cling onto their mother’s fur
with their hands and feet. Human babies cannot do this; they need to be held and
supported. Leaving babies alone is the same as abandoning them. They perceive
being left alone as a life-threatening situation and suffer from extreme fear – it is no
wonder that babies start to cry when left alone in a room. Our clinging young are a
sign of our adaptation to a nomadic lifestyle. Human beings stopped roaming just
over 10,000 years ago, but this time is too short for biological or genetic adaptation
to our new living conditions (cf. Evelin Kirkilionis: „Ein Baby will getragen sein“ (A
baby wants to be carried), published by Kösel-Verlag GmbH & Co., Munich in 1999
and Bernhard Hassenstein, Evelin Kirkilionis: „Der menschliche Säugling, Nesthocker
oder Tragling?“ (Human babies: altricial or “clinging young”?), in: Wissenschaft und
Fortschritt 42/1992). Yet our anatomy shows that human babies are adapted to being
carried. The “spread squatting position” is the ideal posture for the young hip, which
is still cartilaginous, to mature (cf. Prof. Dr. med. J. Büschelberger: post-doctoral the-
sis, 1961). The development of the spine is also worth closer examination. Babies
are born with a rounded back, which is what causes them to take up the “spread
squatting position”. The spinal column develops over three stages during a period of
one year, stretching out from top to bottom. Well-developed muscles are required to
support the spine and keep it in shape. During the first few weeks of life, the cervical
spine undergoes initial straightening, moving forwards and upwards. Lying on her
tummy, the child can lift her head, move it independently, hold it up and turn it. Later
she can also do this lying on her back. The straightening of these seven cervical verte-
brae is known in the medical world as “cervical lordosis”. The baby now strengthens
the flexor and extensor muscles in her body (the flexor muscles are in the chest and
stomach area, the extensor muscles are at the back of the body). Gradually, the whole
central section of the spine with its twelve thoracic vertebrae can now straighten. In
orthopaedics this stretching is known as thoracic kyphosis. This second, backward
curve of the spinal column is complete once the baby can sit independently, on her
own. Children do not crawl until their spinal cartilage is strong and well-conditioned,
and their muscles are powerful enough. The muscles and spinal column are exercised
together. Now, the child pulls herself up into a standing position and tries out her first
steps. This takes strength and needs the five lumbar vertebrae to support her and
bear her weight. Gradually, the spinal column fully acquires its “S” shape and the last
phase is complete (lumbar lordosis) (cf. Renate Köhler: „Die Kunst das Bindens“ (The
art of tying), Renate Köhler publishing house, Münster 1995.) Some of the principles
of healthy baby carrying are derived from this process:
1. The sling must be somewhat elastic to support your baby firmly and safely at the
same time as allowing her back to take on a rounded shape. It becomes particularly
round when a child falls asleep and her muscles relax. However, your child must
not be allowed to slump down; she should be in a rounded, supported squatting
position in the sling. Your Storchenwiege® sling has a diagonal elastic weave, pro-
viding sufficient elasticity while at the same time giving your baby just the support
she needs.
2. The fabric needs to be tied so as to ensure baby’s legs are in a “spread squatting
position”. When your child is tied in properly and firmly, the sling should absorb
the movements and jolts from the wearer walking along, and transfer them away
from the child’s spine, back onto the wearer (a shock absorber effect). This pro-
tects the child’s delicate vertebrae and vertebral discs. At the same time, however,
the tying method should also support the wearer’s posture.
The tying methods described below will help you carry your child easily and smoothy.
If you follow the instructions correctly and carefully this will also help your pelvic
floor, which is subjected to huge stress during pregnancy and birth.
IMPORTANT
Always carry your baby facing you and never facing forwards. Other-
wise, her back will be pushed into a hollow shape, the “spread squatting
position” is no longer possible, and, not least, the child is constantly
exposed to environmental irritants.
This sling is not suitable for use during sports activities.
Closely connected, safe and sound … with your Storchenwiege® sling
!
!

3
What other advantages are there to baby-wearing?
• The sling makes it easier for baby to get used to life outside the womb. She is in
a familiar environment; her mother’s or father’s heartbeat, warmth and move-
ment make her feel happy and safe. The familiar womb-like feeling helps the
baby grow gradually into her new life. In the sling she can exercise her muscles
and spine, her sense of balance is stimulated and improved, her metabolism and
whole body are supported and boosted, and movements have a positive effect
on her digestive system (even a healing effect, e.g. in the case of colic).
• Baby’s natural sense of trust is strengthened and she gains self-esteem: she
never feels left alone, is never left to cry in desperation, and feels safe and
sound in the knowledge that she can rely unconditionally on her mother and
father. From this safe place, she can take in and learn to understand her envi-
ronment.
• It is easier to juggle everyday family life when you can simply take your happy
baby everywhere with you.
• Being physically close helps you get to know your child much faster and better,
and you learn to look after her more confidently.
• By carrying their child in a sling, fathers, too, have the chance to build up a
strong, firm relationship with their child, to form an emotional bond with their
baby or simply to catch up on some of the bodily contact which mothers get so
much of during pregnancy.
• You have your hands free for baby’s brothers and sisters. Young brothers and
sisters love being wrapped up in the sling again too, and older siblings can
develop a very special relationship to baby if they can carry their little brother or
sister in the sling.
• Stairs, buses and hiking paths are no longer an obstacle.
More tips:
• We recommend practising in front of a mirror at the start until you become
skilled at tying the Storchenwiege® sling. If you have someone else to help you,
you will become confident in using your Storchenwiege® sling even faster.
• Always be sure to tie the Storchenwiege sling firmly. The material’s diagonally
elastic weave means baby’s spine can easily take on a nicely rounded shape. Her
body weight is evenly distributed on the wearer’s body so there is no need to
adjust your posture. Tying the sling firmly stops you adopting an awkward pos-
ture. When baby is tied in, her bottom should be at your waist level; this is the
ideal height from the point of view of the wearer’s centre of gravity.
• The child should always be wrapped so that the top edge of the sling extends
above her ears by two finger widths. This way, even if her arms are later taken out
of the sling, or it is pulled down to her neck, it can always be pulled up again to
support her head when she falls asleep. If the sling extends above your child’s
head you will not be able to tie it firmly enough.
• Always remember the anatomically correct “spread squatting position” of the legs,
which is also created by the roundness of the spine and is vital for the hips to
develop healthily.
• If your baby has dysplasia or other problems with her hips, make sure to dis-
cuss the use of the sling with your pediatric orthopedic or family doctor.
• Some babies cry when they first use the sling; this is perfectly normal. Your
baby can feel how uncertain you are as you tie the sling, and, of course, she also
has to get used to the sling and this new feeling herself. The more you practise,
the faster your uncertainty will disappear, and the sooner your baby will stop
crying.
• As you tie baby in, talk to her, telling her what you are doing and why.
• If baby cries, do not take her out of the sling straight away: keep on tying it,
then walk around with your child for a while. You will be amazed how quickly
your baby calms down. Your heartbeat, breathing, smell, closeness, voice and
the rhythm of your steps make baby feel safe and secure.
• When the weather is cold, always carry your baby under your jacket. No warm
clothing can replace your body heat.
• Do not dress up your baby too warmly under the jacket: an appropriate hat for
the weather, a scarf around her neck and warm socks are usually enough. On
very cold days an extra jumper or cardigan will be fine.
• If you wear your child outside your jacket, she will need to wear a snow suit in
cold weather. (Shiny, specially coated or layered suits are not suitable, as the sling
will constantly slip).
• In summer, please also remember sun protection. We recommend putting long
thin cotton socks and a sun hat on your child so that she is well-protected from
the sun.
• Carry your baby for as long as you both enjoy it. This might just be for short peri-
ods at first, but even longer times can do no harm as long as you tie the sling
carefully.
• You can carry your child in the sling up to around age three, or longer if required.
When you are travelling, the sling is a useful, space-saving accessory.
• Before you first use the sling, wash it (without fabric softener), dry it then put it
on your favourite armchair where you can “wear it in” by sitting on it. This
makes it especially easy to tie.
• These tying instructions have been designed to be as simple to understand and
as detailed as possible. If you need any personal advice on wearing the sling,
we will be happy to find a local consultant to help you.
• Before you wear the sling the first time, read through the instructions carefully
and familiarise yourself with each step.
• In these instructions we refer to babies as “she” for the sake of simplicity; this
should be understood as including both baby boys and girls.

4
Head edge: the edge of the
cloth which goes behind the
child’s head or neck.
Nappy edge: the edge of the
cloth that goes behind the
child’s bottom.
Every Storchenwiege® sling has different-
coloured edges to help you tie it right. To
keep things simple these edges are described
in the instructions as the “head edge” and the
“nappy edge”.
The centre of the sling plays the central role in many tying
methods. That is why the centre of every Storchenwiege® sling is
marked with a stork.
(1) One end of the sling is crossed over the other and the two ends held in one hand, which keeps them tight. (2) Use your free hand
to pull the lower end over the other into the knot. (3) The two ends are pulled forward, keeping up the tension and bending your
knees slightly. As you straighten, the ends strips are pulled to the side, pulling the knot tightly against your body. (4) The end of the
sling extending from the top of the knot is placed over the other end. The lower end is pulled over the other into the knot (a reef
knot) and (5) pulled tight.
The final step in every tying method is a double knot. The double knot is tied as follows:
1 2 3 4 5

5
Grasp the sling below your chest when
pulling it tight. Your body is moving and
your shoulders are taking on the work;
this helps the sling slide across your
clothing more easily.
Grasp the sling from above in front of
the hand holding the first end, taking a
fold at a time and pulling each one tight.
To keep the sling tight, transfer each
tightly-pulled fold between the thumb
and forefinger of the hand holding the
first end (as when playing the guitar).
The sling is draped over your arm away
from your body like a waiter’s napkin.
Your body is moving and your shoulders
are taking on the work; this helps the sling
slide across your clothing more easily.
Grasp the sling from below in front of
the hand holding the first end, taking a
fold at a time and pulling each one tight.
To keep the sling tight, transfer each
tightly-pulled fold between the thumb
and forefinger of the hand holding the
first strip (as when playing the guitar).
With any tying method it is
important to pull tight each
fold of the sling one by one.
If the end of the sling comes
over your shoulder, grasp it with
your palm facing downwards.
If the end of the sling comes
from below, grasp it with your
palm facing upwards.
!

6
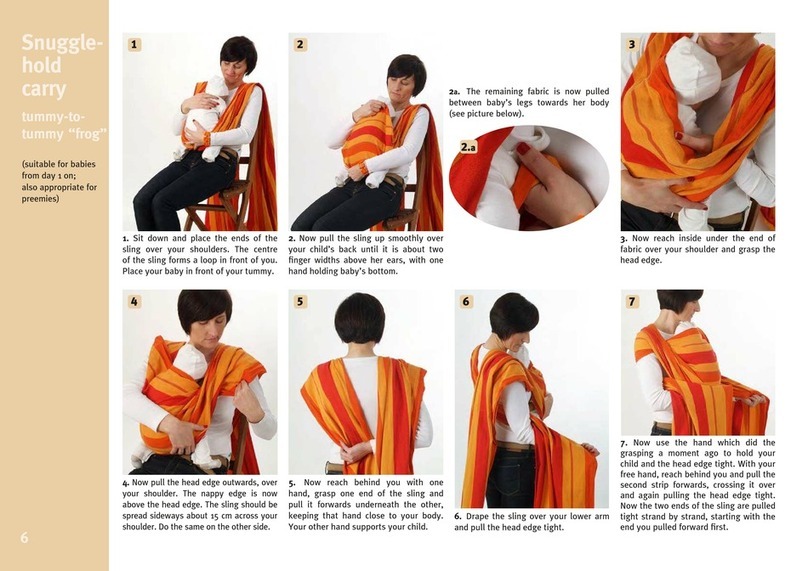
1. Sit down and place the ends of the
sling over your shoulders. The centre
of the sling forms a loop in front of you.
Place your baby in front of your tummy.
2. Now pull the sling up smoothly over
your child’s back until it is about two
finger widths above her ears, with one
hand holding baby’s bottom.
3. Now reach inside under the end of
fabric over your shoulder and grasp the
head edge.
6. Drape the sling over your lower arm
and pull the head edge tight.
4. Now pull the head edge outwards, over
your shoulder. The nappy edge is now
above the head edge. The sling should be
spread sideways about 15 cm across your
shoulder. Do the same on the other side.
5. Now reach behind you with one
hand, grasp one end of the sling and
pull it forwards underneath the other,
keeping that hand close to your body.
Your other hand supports your child.
2a. The remaining fabric is now pulled
between baby’s legs towards her body
(see picture below).
Snuggle-
hold
carry
tummy-to-
tummy “frog”
(suitable for babies
from day 1 on;
also appropriate for
pree mies)
7. Now use the hand which did the
grasping a moment ago to hold your
child and the head edge tight. With your
free hand, reach behind you and pull the
second strip forwards, crossing it over
and again pulling the head edge tight.
Now the two ends of the sling are pulled
tight strand by strand, starting with the
end you pulled forward first.
1
4 5 6 7
2
2.a
3

8. Next, knot the sling under your child’s bottom, the ends going over her legs.
8a. When the sling is tied on, move
your child’s legs into the “spread
squatting position”. Both her legs should
be at the same height, with her knees
about level with her belly button.
8b. To give you more freedom to move,
fold the sling upwards onto your shoul-
der, keeping the sling firmly tied around
your child to give her firm support.
1. With the centre of the sling forming a loop in front of your stomach, lower your
child into the pouch from your shoulder. Now, pull up the head edge of the sling
smoothly until it is two fingerbreadths above your child’s ears. The remaining fabric
is smoothed down under her bottom and folded up between her nappy and your
tummy. Now continue from Step 3 above.
2. Lift one leg and wrap your child in the centre of the sling, draping it over
your shoulders. Use one hand to support your child. Now continue from Step 2 above.
Two other methods
of placing the child
in the sling
8
1 2
8.a8.b
7

8
1. Wrap the sling around your torso. The
centre of the sling is in the middle of
your back. The ends of the sling are
draped over your lower arms.
2. Now pull both strips of the sling
tight, fold by fold.
6. Place your child on your left shoul-
der, reach your right hand through
under the right-hand side of the sling,
and slip your child’s left leg through
under that strip of fabric.
3. Cross the ends in front of your stomach. The end coming from behind you on
your left is closest to your body and is draped over your right shoulder. The end
coming from behind you on your right is draped over your left shoulder.
Double
cross
carry
(as soon as the child
can hold her head up
stabily)
4. Now cross the ends behind you,
pulling the end from your right shoulder
forwards first, over your hip. Pull the
end from your left shoulder forwards
over your right hip. The ends of the
sling are tied in a loose knot.
5. You have created a cross with your
wrap in which you can place your child.
1
4 5 6
2 3

9
8. Now spread out the lower side of the
sling across your child’s back. Grasp the
head edge of the lower side with your
left hand and pull it tightly across your
child’s back so that the sling stretches
from the back of one knee to the other. 9. Do the same with the upper side.
10. To pull the sling tight thoroughly, the loose knot is undone and both sides tightened fold by fold, starting with the left side. Next, tie a double knot. The ends of
the sling run beneath your child’s legs.
10
89
7. Now place your child on your right
shoulder, reach your left hand through
under the left side, and slip your child’s
right leg through under that strip of
fabric.
7
7.a The child is now snuggled on the
crossed sling tummy-to-tummy, still
supported by your hand.
7.a

10
1. Place the centre of the sling in front
of your chest.
2. Now guide the head edge of the
sling round behind you, holding the two
sides tight with one hand.
4. Laying your child gently on your shoul-
der, let her slide into the pouch, reaching
up to support her under the pouch.
6. Use your right hand to grasp the
head edge of the sling on your right
shoulder, then stretch out your arm, let-
ting the end slide backward down your
shoulder slightly. Pull the head edge
straight in a horizontal position, then
lift it onto the centre of your shoulder.
Pass the head edge into your left hand,
holding it tight. Pull the rest of that end
of the sling onto your shoulder.
3. Reach under the left side of the sling with your left hand and grasp the head
edge of the right-hand side. Lift the left-hand end over your right shoulder, and the
right-hand end over your left shoulder. Make sure not to twist the sling as you do
so.
5. Now pull the sling up smoothly over
your child’s back until it is about two
finger widths above her ears, with one
hand holding baby’s bottom. The remai-
ning fabric is smoothed down under her
bottom and folded up between her nappy
and your tummy.
Wrap
cross
carry
1
4 5 6
2 3

11
8. Transfer the tight end into your right hand, reach into
the roll of fabric at your child’s knee and push the loose
fabric toward your back.
9. Transfer the tight end back into your
left hand and use your right hand to
pull about 15 cm of fabric from your left
hand, again pulling it tight strand by
strand. This means that the fabric pushed
towards your back in Step 8 is pulled
tight and the child’s “spread squatting
position” is supported.
10. Adjust the second end as described
in Steps 6 to 9.
11. The two ends are now pulled firmly
downwards past either side of your
child, allowing her back to assume a
rounded shape.
12. Cross the two ends below your child’s bottom and guide them under her legs
and behind you, where you tie a double knot.
7. Pull the fabric
tight strand by
strand.
7
10 11 12
8 9

12
1. Take the centre of the sling in your
left hand, then use your right hand to
grasp the cloth about 50 cm further
along and drape it over your shoulder.
5. Pull the head edge of that side round
tightly and transfer it to the hand sup-
porting your child’s bottom.
3. Spread out the pouch of cloth now in
front of your tummy, place baby on your
left shoulder and slide her down into the
pouch, onto your hip. Her feet should be
outside the pouch.
4. Pull the sling smoothly over your
child’s back so that it reaches up two
finger widths above her ears; smooth
down the fabric towards her bottom,
tucking any remaining fabric in between
her nappy and your hip. Now take the
upper end from your right shoulder.
Snuggle-
hold
carry
“frog” on
the hip
(suitable for babies
from day 1)
2. Wrap the end in your left hand around
your waist, beneath the end hanging
down on your right, then drape it over
your right shoulder above the first end.
1
4 5
2 3

13
Final step:
Lift the child’s bottom up slightly
with your left hand and use your right
hand to grasp a fold of fabric from the
side near your neck, then pull it over
your shoulder.
8. Finally, tie the sling in a double knot under your child’s bottom. The two ends
go over your child’s legs to form the knot.
7. Transfer the end you were already
holding tight into your right hand. Reach
behind you with your left hand and
draw forward the end hanging over your
shoulder. Pull the head edge tight.
Now, first pull the end in your right hand
tight strand by strand, then do the same
with that in your left hand.
6. Now use your right hand to grasp the
head edge of the end on your shoulder
and pull it through under that side out-
ward, over your shoulder.
6
8
7

14
1. Drape the centre of the sling over one shoulder and tie the knot on your oppo-
site hip.
2. Shift the knot round to the back and
spread out the pouch in the sling in front
of your tummy.
3. Holding your child on your free shoul-
der, slide her into the pouch and onto
your hip. Pull the sling smoothly over
your child’s back and smooth down the
fabric towards her bottom, tucking any
remaining fabric in between her nappy
and your hip.
4. To get a firmer hold, pull the head
edge of the fabric under the side of the
sling to cover your shoulder.
Hip carry
(suitable when the
child is able to sit up)
1
3 4
2
4.a

15
1. Lift up your leg, lay the centre of the
sling over your thigh and sit the child
on it. Now pull the sling up smoothly
over your child’s back. Always use one
hand to support your child while the
other adjusts the pouch.
2. Lift baby up, using your left hand to
support her back and head. Your baby’s
legs are in front of your left upper arm.
Lift your child with her tummy against
you onto your upper arm and push her
bottom over your left shoulder.
3. Your child is now on your left shoul-
der. Both ends of the sling are still in
your right hand. Your left hand conti-
nues to support baby. Your child’s head
is against your cheek. Reach over your
right hand with your left hand and take
both ends of the sling. Now reach over
your left hand with your right hand and
grasp the right-hand end …
4. … and lift it over your head onto your
right shoulder, maintaining tension on
the sling. Transfer the two ends to one
hand.
Wrap
cross
rucksack
carry
“frog” on
your back
(suitable when baby
can sit up;
advanced tying
method)
5. Let your child slide into the proper
position on your back, supporting her
bottom with your free hand.
1
4 5
2 3
5.a

16
7. Pull each end of the sling forward
fold by fold until it is firm.
6. Reach through the two sides with your free hand, letting the fabric slide down
your shoulder. Keep up the tension on the two ends so that your child is safely
supported. Do the same on the other side.
8. Tie a single knot in front of your
chest, making sure not to lose any ten-
sion.
9. Pinch the lower end (here the left
one) between your knees. Grasp the
head edge of the upper end (here
the right one), pull it backwards over
your shoulder and pass it into your
other hand. Use your other hand to
gather the rest of the fabric on your
shoulder.
10. Pull the head edge of the sling
diagonally down your child’s back to
her knees. Now spread out the lower
end smoothly across your child’s
back, with much of the fabric remain-
ing on either side. Below your child’s
bottom the fabric is gathered together
into a strip again.
6
9
10
7 8
10
.a

17
12. Do the same on the other side as
described in Steps 9 to 11.
13. Pull the two ends tight strand by
strand, starting with the end you first
pulled over the child’s back (here the
right-hand side).
14. Tie a double knot. Push the knot at your chest into a position that is comfortable for you.
11. This strip of fabric is pulled for-
ward under your child’s leg and pinned
between your knees. Now take hold of
the other end.
11
14
12 13

18
1. Place your baby in the centre of the
sling, with the head edge of the fabric
about two finger widths above her ears.
Now gather the fabric firmly beneath
your child’s bottom, continuing upwards
to the left and right side of your child.
4. Lift baby up, using your left hand
to support her back and head. Your
baby’s legs are in front of your left upper
arm.
2. Take the gathered ends of the sling
in each hand at the level of your child’s
chin and …
3. … transfer the left end into your right
hand. The two ends are now draped
over to the right of your child, and you
can gently swing the child in the sling.
Rucksack
carry
“frog” on
your back
(suitable from the
third month)
1 2 3
4
5. Lift your child with her tummy against
you onto your upper arm and push her
bottom over your left shoulder.
5
6. Your child is now on your left shoulder.
Both ends of the sling are still in your
right hand. Your left hand continues to
support baby. Your child’s head is against
your cheek.
6
Table of contents
Other Storchenwiege Baby Carrier manuals

