Storex MediaZapper HD 2 User manual

MediaZapper HD 2 Page 1/20
QUICK INSTALLATION
GUIDE
MediaZapper HD 2

MediaZapper HD 2 Page 2/20

MediaZapper HD 2 Page 3/20
TABLE OF CONTENTS
INTRODUCTION .........................................................................................4
OPERATION...............................................................................................4
KEY FEATURES ..........................................................................................4
PRODUCT DETAILS.....................................................................................5
FRONT PANEL ............................................................................................5
REAR PANEL..............................................................................................5
REMOTE CONTROL BUTTONS .......................................................................6
CONNECTING THE MEDIAZAPPER HD 2 TO THETV ..........................................8
PLAYING A FILE .........................................................................................9
INSTALLING THE TNT CHANNELS ...............................................................11
FIRST USAGE OF THE TNT FUNCTION .........................................................11
VIEWING AND RECORDING DVB-T CHANNELS
....................................................12
VIEWING ................................................................................................12
LIVE RECORDING.....................................................................................12
SCHEDULED RECORDING ..........................................................................12
MEDIAZAPPER HD 2 PARAMETERS..............................................................13
STOREX WEB SITE ...................................................................................14
TECHNICAL SUPPORT ...............................................................................14
WARRANTY TERMS AND CONDITIONS.........................................................15
SAFETY INFORMATION..............................................................................16
GENERAL INFORMATION ...........................................................................16
SAFETY PRECAUTIONS..............................................................................16
ELECTRICAL POWER SUPPLY......................................................................16
PROPER PLACEMENT OF THE PRODUCT .......................................................16
CLEANING...............................................................................................17
REPAIRS .................................................................................................17
IMPORTANT NOTICE .................................................................................17
SAFETY– ENVIRONMENT ...........................................................................17

MediaZapper HD 2 Page 4/20
INTRODUCTION
Your "MediaZapper HD 2" is a TNT/HD TNT receiver integrating a live or delayed recording
function.
The"MediaZapper HD 2" also works as a multimedia gateway allowing you to look at
photos and watch videos on High Definition TV, or to listen to music.
OPERATION
Once connected to the TV, you can view media files in High Definition from a USB device
on your "MediaZapper HD 2".
KEY FEATURES
- USB Host Connection
- Video connection: Composite, YUV and HDMI
- Power INPUT: ~100V - 240V
50-60Hz 0.6A
OUTPUT: 5.0V 2000mA
- Supported formats -Video: AVI, Xvid HD, Ts, Vob, Mkv and MPEG 2/4 HD
- Audio: MP3, WMA, AC3
- Photo: BMP, JPEG and PNG

MediaZapper HD 2 Page 5/20
PRODUCT DETAILS
Front Panel
1. IR:For the remote control signal.
USB HOST: To connect to a USB device (USB key, external hard disk, etc.).
Rear Panel
1. ANT IN: To connect to a wall antenna outlet.
ANT OUT: To connect the "MediaZapper HD 2" antenna cable to your TV.
2. HDMI: To connectthe HDMI cable to the "MediaZapper HD 2" and your TV.
3. COAXIAL: Audio output (coaxial).
4. CVBS/AUDIO LR:Video output (Composite).
5. SCART: To connect the "MediaZapper HD 2" SCART to your TV.
6. POWER CORD:To connect the power cord to a wall electrical outlet.
1 2
3
4
5
6
1

MediaZapper HD 2 Page 6/20
REMOTE CONTROL BUTTONS
Remote control 1: Refers to the actual remote.
Remote control 2: Refers to the numbering of the buttons on the remote.
2
1

MediaZapper HD 2 Page 7/20
NO. BUTTON FUNCTION
1 STANDBY Turn On/Off (Standby) the MediaZapper HD 2.
2 VIDEO OUT Enables switching between different video display modes
3 MUTE Enables/Disables the sound (Mute).
4 NUMBERED
BUTTONS 0-9
5 GOTO Goes to a specific point (Time)
6 INFO
Displays the information from the selected file
7 AUDIO Enables selection of an audio track
8 TTX Enables/Disables Teletext
9 SUBTITLE Enables/Disables the display of subtitles
10 EPG Displays the EPG screen (Electronic Program Guide)
11
ARROW
BUTTONS
CONFIRM
Allows you to navigate between different files and folders
Allows you to confirm your selection
The button changes the channel (CH+)
The button changes the channel (CH-)
The button decrease volume
The button increases volume
12 HOME Enables direct access to the home page
13 BACK Exits/Returns to the previous page
14 TIMESHIFT Enables the TIMESHIFT function
15 REC Enables/Disables the Recording function
16
17 FR/FF Fast rewind of the media file with a playing speed of 2x, 4x, 8x, etc.
Fast-forward of the media file with a playing speed of 2x, 4x, 8x, etc.
18
19 PREV/NEXT To return to the previous file.
To jump to the following file.
20 STOP Stops the media file playback
21 REPEAT
Music and Video: Repeats the current file, repeats all files in the directory,
random repeat or cancels the repeat function
22 FAV Adds a TNT channel to the list of Favorites
23 SETUP Enables direct access to the Setup page
24 MOVIE Enables direct access to the "VIDEO" page
25 MUSIC Enables direct access to the "MUSIC" page
26 PHOTO Enables direct access to the "PHOTO" page
27 FILE Enables direct access to the file explorer
28 RED
Video page: Fullscreen/Overview
Photo page: Zoom
Programming page: Add a scheduled program.
29 GREEN
Video page: Repeat A - B.
Photo page: Rotation to the left.
Programming page: Edit the selected program.
30 YELLOW Photo page: Rotation to the right.
31 BLUE Allows to shows the programming page (only in the TV menu).
Programming page: Delete selected program.

MediaZapper HD 2 Page 8/20
CONNECTING THE MEDIAZAPPER HD 2TO THETV
1. Connect your MediaZapper HD 2 to the wall antenna socket to receive TNT and TNT HD
channels.
2. Connect the MediaZapper HD 2 to the television with the AV cable (depending upon your
configuration).
3. Connect the MediaZapper HD 2 to the television with the HDMI cable (depending upon
your configuration).
4. Connect the supplied power cord to your wall electrical outlet.
Rear TV panelWall antenna outlet
1 2 3
Antena cable AV cable HDMI cable
1 3
2
4

MediaZapper HD 2 Page 9/20
PLAYING A FILE
1. The home page (Home) displays 8 key icons, of which 4 are directly accessible from
the remote control(Video, Music, Photo and File). Select one of the 4 modesusing the
arrow buttons on the remote control and press "ENTER".To use the remote control,
please refer to the section on the remote control.
Home page
2. Select the folders and files with the arrow buttons and confirm the selection by
pressing “ENTER”.
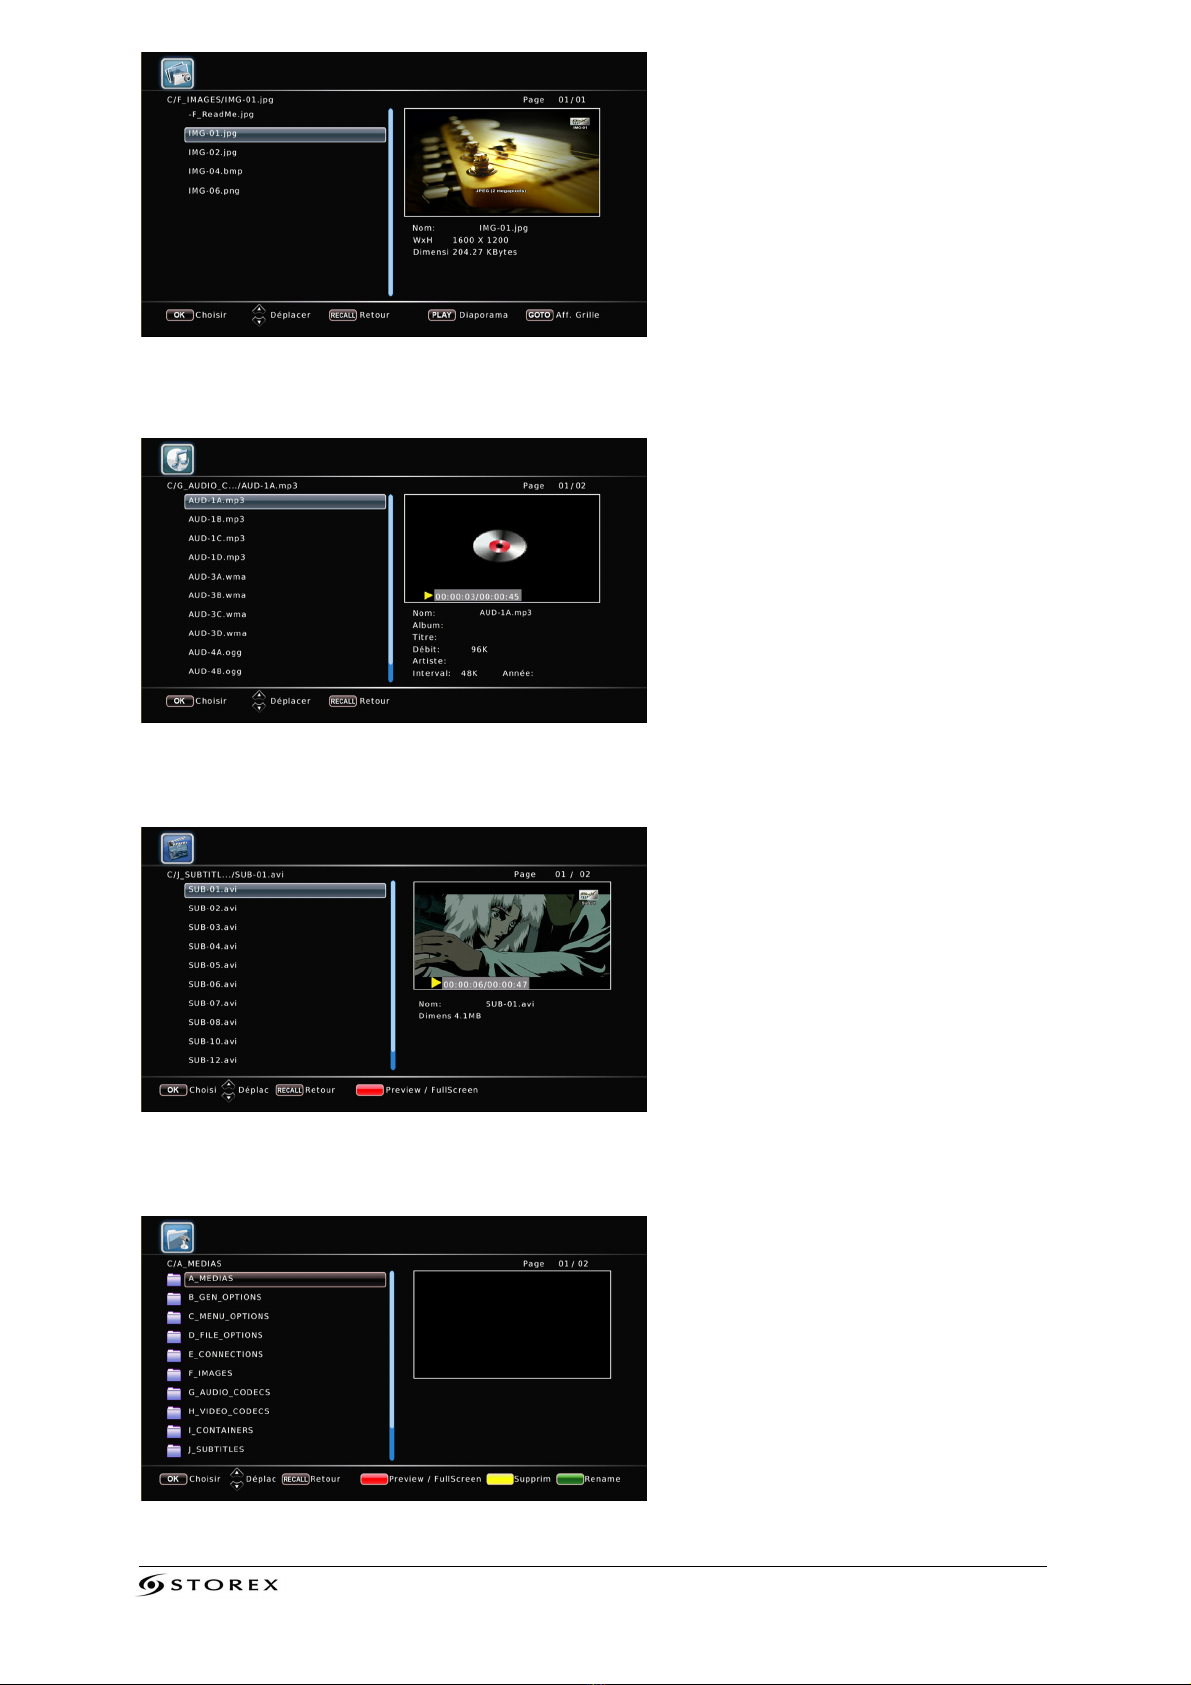
MediaZapper HD 2 Page 10/20
Photo page
Music page
Movie page
File page

MediaZapper HD 2 Page 11/20
INSTALLING THE TNT CHANNELS
Select the "Auto Search" menu by pressing the "ENTER" button.
FIRST USAGE OF THE TNT FUNCTION
1. Select the menu language. 2. Select your location (country).
3. To start the automatic channel scan, select "Scan for channels" and press "ENTER” on
your remote control.

MediaZapper HD 2 Page 12/20
V
IEWING AND
R
ECORDING
DVB-T
C
HANNELS
VIEWING
Select the "TV" menu by pressing the "ENTER" button.
LIVE RECORDING
To record TNT channels, you must have previously connected a USB device to the
MediaZapper HD 2.
Note: Recordings are stored directly at the root of the connected device (USB key,
external hard drive) in the "HBPVR" folder.
SCHEDULED RECORDING
To schedule a recording, press on the "BLUE" button of the remote control.
1. To add a new scheduled program, press on the "RED" button of the remote control.
2. Enter your timer recording settings and press the "ENTER" button on your remote
control.

MediaZapper HD 2 Page 13/20
MEDIAZAPPER HD 2PARAMETERS
On this page you can adjust several settings, including the language and display
resolution.
1. Press the “SETUP” button of the remote control to enter the “SETUP” menu.
2. Use the arrow buttons to select the setting and press “ENTER”.
On this page you can change the language.
On this page you can change the display resolution of MediaZapper HD 2.

MediaZapper HD 2 Page 14/20
STOREX WEB SITE
On the STOREX web site you will find a section dedicated to each STOREX product. Visit
http://www.storex.eu, select "DVB-T Recorder" then "MediaZapper HD 2". You can
download the latest full version of the manual and software updates.
TECHNICAL SUPPORT
If repairs are necessary, please contact your distributor to repair your "MediaZapper HD
2"under warranty coverage, or send your request by e-mail to one of the following
addresses:
Or telephone the following offices
France: 01 55 85 82 00 (Price of a local call to Paris)
Monday to Thursday from 9:30 a.m. to 7:30 p.m.
Friday from 9:30 a.m. to 6:30 p.m.
For further information, please read the full version of the user manual (available on our
website):
www.storex.eu

MediaZapper HD 2 Page 15/20
WARRANTY TERMS AND CONDITIONS
STOREX provides a warranty of 1 year for the "MediaZapper HD 2" and 3 months for
accessories (remote, AV cables, power adapter, etc.).
STOREX guarantees your product against any defects in manufacturing or assembly. This
guarantee applies only to a first purchase of the "MediaZapper HD 2"by the end user, and
is not transferable if the unit is resold. This warranty does not cover any incompatibilities
detected by the end user outside of the use recommendations printed on the package, or
any incompatibility arising from other hardware or software on the computer connected
to the "MediaZapper HD 2".
Proof of purchase must be provided to us to begin STOREX warranty coverage.
The warranty does not apply to any breakdowns or defects due to improper use that does
not comply with the recommendations contained in this notice, neglect, alteration,
improper installation or maintenance, improper repairs or modifications not authorized by
STOREX, inappropriate testing, accidents or external factors such as, without limitation,
exposure to heat or excessive moisture, a power failure or incorrect
installation/uninstallation of the "MediaZapper HD 2".
The only contractual obligation of STOREX involves the repair or replacement of a
defective product. In no case may STOREX be held liable for any loss of data, or its
consequences, resulting from a malfunction or failure of the product. In any event, the
financial responsibility of STOREX will not be incurred for any amount greater than the
end customer’s product purchase price.
The guarantee is well defined in this document and may not be modified, reduced or
enlarged without written consent from STOREX. Also, STOREX cannot be held responsible
for any technical advice or services provided in connection with your "MediaZapper HD
2".
You are not the assignee of this warranty.
This warranty covers only your "MediaZapper HD 2" and is governed by French law.
For any claim beyond the warranty, please contact STOREX customer support. Log on to
www.e-storex.com to order any accessories.
Note:
STOREX™ reserves the right to modify the user manual without notice according to
changes made to the product. Find the latest version of the manual on our website:
http://www.storex.eu

MediaZapper HD 2 Page 16/20
SAFETY INFORMATION
This device was designed and manufactured to ensure your safety. The safety
mechanisms built into the product offer adequate protection if you observe the following
procedures for installing, using and repairs:
- Carefully read and follow the instructions below before handling and installing
your hardware.
- Keep these instructions on hand so you may refer to them later.
GENERAL INFORMATION
-Do not shake the player at the risk of damaging the product.
-Use only parts and accessories (power adapter, etc.) recommended by the
manufacturer.
-Do not move the appliance while it is operating.
SAFETY PRECAUTIONS
-To avoid the risk of fire or electrical shock, do not place the device near objects
filled with liquids.
-If a heavy object falls or liquid spills onto the device, unplug it immediately and
have it checked by qualified personnel before re-use.
-While operating, the housing unit gives off heat, therefore, place the product on a
flat and rigid surface and avoid covering or placing any item on top of it.
ELECTRICAL POWER SUPPLY
-In the event of prolonged disuse of the product, or during a lightning storm,
unplug the unit from the wall outlet by grasping the plug itself, without pulling on
the cable.
-The power adapter provided is specific to the product. The use of another adapter
could damage the product or lead to accidents.
PROPER PLACEMENT OF THE PRODUCT
-Install the appliance far away from any equipment with a strong attraction such as
microwave ovens, large speakers and so forth.
-Place your product in a location with adequate ventilation and on a flat and rigid
surface to disperse the heat emitted by the device.

MediaZapper HD 2 Page 17/20
CLEANING
-Never open the product for cleaning purposes under risk of voiding the warranty.
-Unplug the product from the wall outlet before cleaning.
-Clean the outside of the product and the remote control using a soft, dry cloth.
-Never use an abrasive pad, scouring powder or solvent such as alcohol or
gasoline.
REPAIRS
Refer all servicing to qualified personnel. Repairs are necessary if the device has been
damaged in any manner whatsoever: damaged plug or power cord, liquid spilled on the
product, introduction of small objects in the product, exposure to rain or moisture,
malfunctions, product being dropped, etc.
IMPORTANT NOTICE
Warning: This product allows maintaining a still video image or a picture screen on your
television screen indefinitely. If you leave a still video image or picture screen displayed
on your TV screen for an extended period, you risk damaging the screen of your
television. Plasma TVs and projection televisions also are vulnerable to damage.
SAFETY– ENVIRONMENT
YourSTOREX product has been laboratory tested and is in compliance with
European directives related to EC marking in force at the time of its sale.
Traceability of the components of your STOREX product was performed, which
demonstrated that the product complies with the environmental directive
(RoHS) in force at the time of its sale.
At the end of life, do not throw the product in the garbage but return it to the
distributor or your local waste disposal site, which will transfer the product to
a recycling plant for electrical, electromechanical and electronic equipment
waste (DEEE).
Your STOREX product has been prepared, tested and packaged in
a French company certified ISO9001: 2000 by an annual audit
performed by a qualified person from the VERITAS Certification
office.

MediaZapper HD 2 Page 18/20
H
HI
IN
NT
TS
S:
:
_
__
__
__
__
__
__
__
__
__
__
__
__
__
__
__
__
__
__
__
__
__
__
__
__
__
_
_
__
__
__
__
__
__
__
__
__
__
__
__
__
__
__
__
__
__
__
__
__
__
__
__
__
_
_
__
__
__
__
__
__
__
__
__
__
__
__
__
__
__
__
__
__
__
__
__
__
__
__
__
_
_
__
__
__
__
__
__
__
__
__
__
__
__
__
__
__
__
__
__
__
__
__
__
__
__
__
_
_
__
__
__
__
__
__
__
__
__
__
__
__
__
__
__
__
__
__
__
__
__
__
__
__
__
_
_
__
__
__
__
__
__
__
__
__
__
__
__
__
__
__
__
__
__
__
__
__
__
__
__
__
_
_
__
__
__
__
__
__
__
__
__
__
__
__
__
__
__
__
__
__
__
__
__
__
__
__
__
_
_
__
__
__
__
__
__
__
__
__
__
__
__
__
__
__
__
__
__
__
__
__
__
__
__
__
_
_
__
__
__
__
__
__
__
__
__
__
__
__
__
__
__
__
__
__
__
__
__
__
__
__
__
_
_
__
__
__
__
__
__
__
__
__
__
__
__
__
__
__
__
__
__
__
__
__
__
__
__
__
_
_
__
__
__
__
__
__
__
__
__
__
__
__
__
__
__
__
__
__
__
__
__
__
__
__
__
_
_
__
__
__
__
__
__
__
__
__
__
__
__
__
__
__
__
__
__
__
__
__
__
__
__
__
_

MediaZapper HD 2 Page 19/20

MediaZapper HD 2 Page 20/20
M
ME
ED
DI
IA
AZ
ZA
AP
PP
PE
ER
R
H
HD
D
2
2
Is a product line of
www.storex.eu
© STOREX –2011
All trademarks cited are trademarks of their respective owners.
This manual suits for next models
1
Table of contents
Other Storex Measuring Instrument manuals

Popular Measuring Instrument manuals by other brands


Panametrics
Panametrics DewPro MMR31 Installation & operation manual

Sylvac
Sylvac Hi Cal instructions

Invacare
Invacare CHECK O2 PLUS Assembly, installation and operating instructions

Bushnell
Bushnell neo 368050 user manual

Agilent Technologies
Agilent Technologies 8702D installation guide

Hanna Instruments
Hanna Instruments HI 83742 instruction manual


