PROF PROFS7-60M User manual

GB Instruction manual pg 02-19
Original instructions
FI Käyttöohje s. 20-37
Alkuperäisten ohjeiden käännös
SE Bruksanvisning s. 38-55
Översättning av originalinstruktionerna
NO Bruksanvisning s. 56-73
Oversettelse av de opprinnelige
instruksjonene
EE Kasutusjuhend l. 74-91
Tõlgitud originaaljuhendist
LV Instrukcijas l. 92-109
Tulkojums no oriģinālvalodas
LT Naudojimo instrukcija p. 110-127
Vertimas originali instrukcija
PL Instrukcja obsługi s. 128-146
oryginalna instrukcja
Digital Laser Measure PROFS7-60M- 502129307
0.2-60m, 630-670nm

2
INTRODUCTION
Thank you for purchasing this product which has passed through our extensive
quality assurance process. Every care has been taken to ensure that it reaches
you in perfect condition.
SAFETY FIRST
Before attempting to operate this power tool the following basic safety
precautions should always be taken to reduce the risk of fire, electric shock
and personal injury. It is important to read the instruction manual to understand
the application, limitations and potential hazards associated with this tool.
CERTIFICATE OF GUARANTEE
This product is guaranteed for a period of 2 Years, with effect from the date of
purchase and applies only to the original purchaser. This guarantee only
applies to defects arising from, defective materials and or faulty workmanship
that become evident during the guarantee period only and does not include
consumable items. The manufacturer will repair or replace the product at their
discretion subject to the following. That the product has been used in
accordance with the guide lines as detailed in the product manual and that it
has not been subjected to misuse, abuse or used for a purpose for which it
was not intended. That it has not been taken apart or tampered with in any
way whatsoever or has been serviced by unauthorised persons or has been
used for hire purposes. Transit damage is excluded from this guarantee, for
such damage the transport company is responsible. Claims made under this
guarantee must be made in the first instance, directly to the retailer within the
guarantee period. Only under exceptional circumstances should the product be
returned to the manufacturer. In these case it shall be the consumer’s
responsibility to return the product at their cost ensuring that the product is
adequately packed to prevent transit damage and must be accompanied with a
brief description of the fault and a copy of the receipt or other proof of
purchase. The manufacturer shall not be liable for any special, exemplary,
direct, indirect, incidental, or consequential loss or damage under this
guarantee. This guarantee is in addition to and does not affect any rights,
which the consumer may have by virtue of the Sale of Goods Act 1973 as
amended 1975 and 1999.

3
The power tool is intended for domestic use only. The power tool is not
suitable and is not intended for commercial or professional use.
The warranty does not cover defects and damage to power tools
resulting from use for purposes other than domestic use, in particular as
a result of pushing through and abuse.
”Warranty is voided in case the tool is damaged due to one of the conditions
below:
1. Misuse of product or negligence of proper maintenance of product,
2. Commercial, professional or rental use of product,
3. Repair done by an unauthorized service company.
4. Damages caused by external objects or substances.”
STATUTORY RIGHTS
This guarantee is in addition to and in no way affects your statutory rights.
PRODUCT DISPOSA
When this product reaches the end of it’s life or is disposed of for any other
reason, it must not be disposed of in household waste. In order to preserve
natural resources, and to minimise adverse environmental impact, please
recycle or dispose of this product in an environmentally friendly way. It should
be taken to your local waste recycling centre or other authorised collection and
disposal facility.
If in doubt consult your local waste authority for information regarding
available recycling and / or disposal options.
4
INTENDED USE
Your PRO laser distance measurer
has been designed for domestic use
only. it may be used for measuring
distances, lengths and heights.The
laser distance measurer can be used
indoors and outdoors.
WARNING
To reduce the risk of injury, the user
must read and understand the
operator’s manual.
SAFETY INSTRUCTIONS
WARNING!
ASER RADIATION.
AVOID DIRECT
EYE EXPOSURE
DO NOT stare into the laser source.
Never aim light at another person or
object other than the workpiece.
The laser light can damage your
eyes.
Read all instructions. ailure to
follow all instructions listed below
may result in electric shock, fire
and/or serious injury.
Do not direct the laser beam at
persons or animals and do not stare
into the laser beam yourself.
This laser complies with class 2
according to IEC 60825-1: 2014. Do
not replace the laser diode with a
different type. If damaged, have the
laser repaired by an authorised
repair agent.
Do not use the laser for any purpose
other than projecting laser lines.
SPECIFIC SAFETY INSTRUCTIONS
WARNING! Working safely with the
laser measurer is possible only
when the operating and safety
information are read completely and
the instructions contained therein
are strictly followed. Never make
warning labels on the product
unrecognizable.
Never aim the beam at a workpiece
with a reflective surface. Bright
shiny reflective sheet steel or similar
reflective surfaces are not
recommended for laser use.
Reflective surfaces could direct the
beam back toward the operator.
Take care to recognize the accuracy
and range of the device.
Measurement may not be accurate if
used beyond the rated range of the
device.
Use of controls or adjustments or
performance of procedures other
than those specified herein may
result in hazardous radiation
exposure.
The use of optical instruments with
this product will increase eye
hazards.
Do not allow children to use the
laser measurer without supervision.
They could unintentionally blind
other persons.

5
Have the laser measurer repaired
only through a qualified specialist
using original spare parts. This
ensures that the safety of the laser
measurer is maintained.
Do not point the laser beam at
persons or animals and do not look
into the laser beam yourself, not
even from a large distance.
Do not use laser viewing glasses as
safety goggles. Laser viewing
glasses are used for improved
visualization of the laser beam, but
they do not protect against laser
radiation.
SAFE OPERATING PROCEDURES
ALWAYS: Make sure that any
bystanders in the vicinity of use are
made aware of the dangers of
looking directly into the laser
measurer.
DO NOT remove or deface any
warning or caution labels. Removing
labels increases the risk of exposure
to laser radiation.
DO NOT stare directly at the laser
beam or project the laser beam
directly into the eyes of others.
Serious eye injury could result.
DO NOT place the laser measurer in
a position that may cause anyone to
stare into the laser beam
intentionally or unintentionally.
Serious eye injury could result.
DO NOT use any optical tools such
as, but not limited to, telescopes or
transits to view the laser beam.
Serious eye injury could result.
ALWAYS remove the batteries when
cleaning the laser light aperture to
laser lens.
DO NOT operate the laser measurer
around children or allow children to
operate the laser measurer. Serious
eye injury could result.
ALWAYS turn the laser measurer
“O ” when not in use. Leaving the
laser measurer “ON” increases the
risk of someone inadvertently
staring into the laser beam.
DO NOT operate the laser measurer
in combustible areas such as in the
presence of flammable liquids,
gases or dust.
ALWAYS position the laser measurer
securely. Damage to the laser
measurer and/or serious injury to
the user could result if the laser
measurer falls.
ALWAYS use only the accessories
that are recommended by the
manufacturer of your laser
measurer. Use of accessories that
have been designed for use with
other laser measurer could result in
serious injury.
DO NOT leave laser measurer “on”
unattended in any operation mode.

6
ALWAYS repair and servicing must
be performed by a qualified repair
facility. Repairs performed by
unqualified personnel could result in
serious injury.
DO NOT use this laser measurer for
any purpose other than those
outlined in this manual. This could
result in serious injury.
DO NOT disassemble the laser
measurer.There are no user
serviceable parts inside.
Disassembling the laser will void all
warranties on the product. Do not
modify the product in any way.
Modifying the laser measurer may
result in hazardous laser radiation
exposure.
E ECTRICA SAFETY WARNINGS
WARNING! Batteries can explode or
leak, and can cause injury or fire. To
reduce this risk:
ALWAYS follow all instructions and
warnings on the battery label and
package.
DO NOT short any battery terminals.
DO NOT charge alkaline batteries.
DO NOT mix old and new batteries.
Replace all of them at the same time
with new batteries of the same
brand and type.
DO NOT mix battery chemistries.
DISPOSE of batteries per local code.
DO NOT dispose of batteries in fire.
KEEP batteries out of reach of
children.
REMOVE batteries if the device will
not be used for several months.
IMPORTANT NOTE
During daylight or if the target has
poor reflection properties, please
use a target plate.
In favourable conditions (good target
surface properties, room
temperature), the device can reach
up to rated measuring range.
In unfavourable conditions, such as
intense sunshine, poorly reflecting
target surface (black surface) or high
temperature variations, the deviation
over 10m of distance may increase.

7
BUTTON FUNCTIONS
1
2
3
4
5
6
1. Measure Button
Activate the measuring mode,
short press to measure, long
press for continuous
measurement
2. Menu Button
Press to change measuring
mode: Area / Volume /
Pythagoras / Auto Level/
Auto Height
3. Measuring Reference / Unit
Button
Short press to change the
reference point ( ront / Tripod /
Rear). Long press to change the
measuring unit (m/ft/in/ft+in)
4. Memory Button
Press to recall memory values.
5. Add(+) / Subtract(-) Button
Press the mode of Distance, Area
and Volume measurement, short
press to add values, long press to
subtract.
6. Mute Button
Press to De-/activate the Beep.
7. ON/OFF/Clear/Return Button
Long press to switch ON/O .
Short press to clear the previous
operation or return to main
menu.
7

8
CD DISP AY
1
2
3
8
9
10
1. Battery Status
2. Distance / Continuous
measurement
3. Laser on
4. Reference ( ront)
5. Reference (Tripod)
6. Reference (Rear)
7. Measuring mode indication
8. Angle indicator
9. Historical values
10. Value 1
11. Value 2 / Min. value
12. Value 3 / Max. value
13. Summary line / Latest value /
Calculation result
11
4
5
6
7
12
13
9
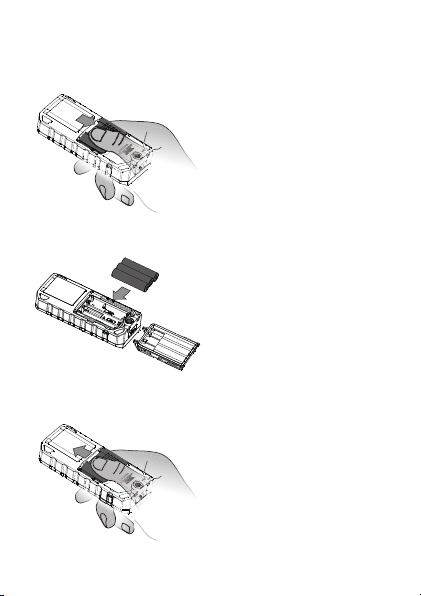
INSTA ING THE BATTERIES
Press and slide the cover towards
the rear of the body to open the
battery door.
Insert 3 x 1.5V AAA batteries ,
observing the correct polarity.
After the batteries are placed, cover
and hold the battery door, press and
slide to the top to seal in place.
Please take out the batteries when
not in use. This will avoid battery
corrosion to the unit.
BATTERY SAFETY REMINDERS
Please dispose of batteries
responsibly; always observe local,
state, and federal regulations with
regard to battery disposal.
Never dispose of batteries in a fire.
Batteries may explode or leak.
Never mix battery types. Always
install new batteries of the same
type.
During the charging process the
device may heat up. This is normal
and will not affect the products
performance or lifespan.

10
BATTERY REP ACEMENT
If the instrument does not switch on
or the battery symbol has no bars,
replace the batteries as previously
stated above.
BATTERY DISPOSA
You, as the end user,
are legally bound to
return all used
batteries, disposal in
the household garbage
is prohibited! You can
hand over your used batteries /
accumulators at collection points in
your community or wherever
batteries / accumulators are sold.
ollow the valid legal stipulations in
respect of the disposal of the device
at the end of its lifecycle.
OPERATION
TURNING THE UNIT ON AND OFF
Long press ON/O /CLEAR/
RETURN BUTTON to turn on the unit.
Long press ON/O /CLEAR/
RETURN BUTTON to turn the unit off.
The unit will automatically power off
after three minutes of inactivity.
RETURN/C EAR FUNCTION
When measuring, short press the
ON/O /CLEAR/RETURN BUTTON to
undo the last action or clear the
measured value.
ADJUSTING THE MEASURING
REFERENCE
Press MEASURING RE ERENCE /
UNIT BUTTON to switch the
measuring reference point between
the front, tripod and the rear of the
instrument.
ront
Tripod
Rear
11
DISTANCE MEASUREMENT
SING E DISTANCE MEASUREMENT
Aim the laser at the target and press
the MEASURE BUTTON.
The measured value is displayed
immediately on the summary line.
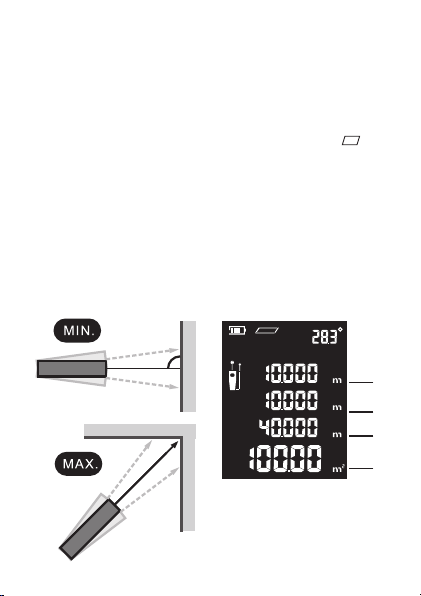
CONTINUOUS MEASUREMENT
Long press the MEASURE BUTTON to
activate continuous measurement.
Slowly sweep the laser back and
forth and up and down over the
desired target from a fixed
measuring point. Press the
MEASURE BUTTON to stop. The
maximum and minimum distances
are displayed on the screen as well
as the last measured value marked
on the summary line.
You can choose max. or min. values
according to your needs.
The unction will automatically stop
after five minutes of inactivity.
AREA MEASUREMENT
Press the MENU BUTTON to select
Area measurement mode ( ).
Press the MEASURE BUTTON to take
the first distance measurement
(length).
Press the MEASURE BUTTON again
to take the second distance
measurement (width).
The results of length, width,
circumference and area are
displayed in the screen as shown
below.
1. Length
2. Width
3. Circumference
4. Area
1
2
3
4

12
VO UME MEASUREMENT
Press the MENU BUTTON to select
Volume measurement mode ( ).
Press the MEASURE BUTTON to take
the first distance measurement
(length).
Press the MEASURE BUTTON again
to take the second distance
measurement (width).
Press the MEASURE BUTTON again
to take the third distance
measurement (height).
The results of length, width, height
and volume are displayed in the
screen as shown below.
The results of length, width,
circumference and area are
displayed in the screen as shown
below.
1. Length
2. Width
3. Height
4. Area
PYTHAGOREAN METHOD - TWO
POINTS
Press the MENU BUTTON to select
Pythagoras measure mode ( ).
Press the MEASURE BUTTON to take
the first distance measurement
(Point 1 in above diagram).
Press the MEASURE BUTTON again
to take the second distance
measurement (Point 2 in above
diagram).
The height of the object will be
calculated automatically and
displayed on the screen as shown
below.
1
2
3
41
2
3
13
1. irst measurement (Point 1)
2. Second measurement (Point 2)
3. Calculation result (Height)
PYTHAGOREAN METHOD - THREE
POINTS (METHOD 1)
Press the MENU BUTTON to select
Pythagoras measure mode ( ).
Press the MEASURE BUTTON to take
the first distance measurement
(Point 1 in above diagram).
Press the MEASURE BUTTON again
to take the second distance
measurement (Point 2 in above
diagram).
Press the MEASURE BUTTON again
to take the third distance
measurement (Point 3 in above
diagram).
The height of the object will be
calculated automatically and
displayed on the screen.
1. irst measurement (Point 1)
2. Second measurement (Point 2)
3. Third measurement (Point 3)
4. Calculation result (Height)
PYTHAGOREAN METHOD - THREE
POINTS (METHOD 2)
Press the MENU BUTTON to select
Pythagoras measure mode ( ).
Press the MEASURE BUTTON to take
the first distance measurement
(Point 1 in above diagram).
Press the MEASURE BUTTON again
to take the second distance
measurement (Point 2 in above
diagram).
1
2
3
4
14
Press the MEASURE BUTTON again
to take the third distance
measurement (Point 3 in above
diagram).
The result will be calculated
automatically and displayed on the
screen.
1. irst measurement (Point 1)
2. Second measurement (Point 2)
3. Third measurement (Point 3)
4. Calculation result
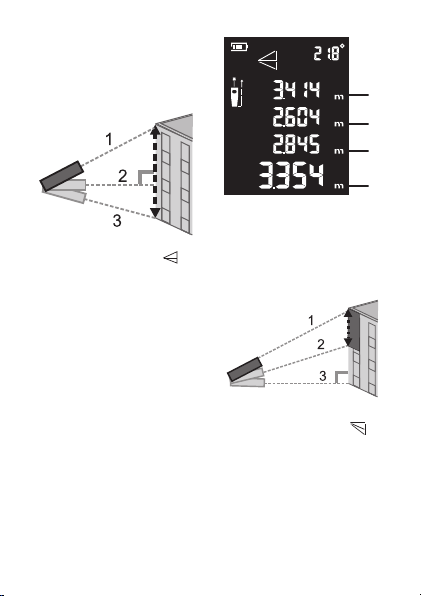
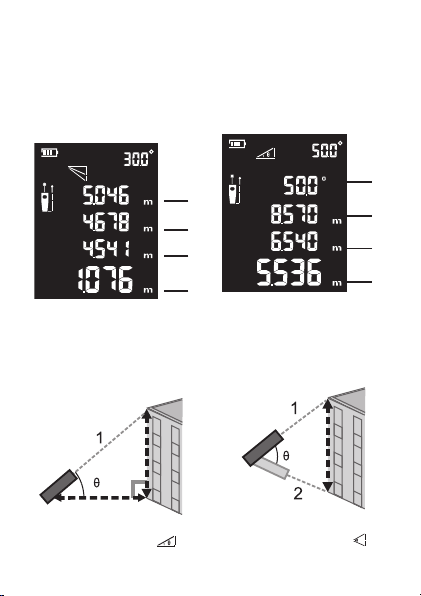
AUTO EVE MEASUREMENT
Press the MENU BUTTON to select
Auto Level measure mode ( ).
Press the MEASURE BUTTON to get
the distance of hypotenuse, vertical
and horizontal lines.
The result will be calculated
automatically and displayed on the
screen.
1. Angle
2. 1st distance
3. Vertical distance
4. Horizontal distance
AUTO HEIGHT MEASUREMENT
Press the MENU BUTTON to select
Auto Height measure mode ( ).
1
2
3
4
1
2
3
4
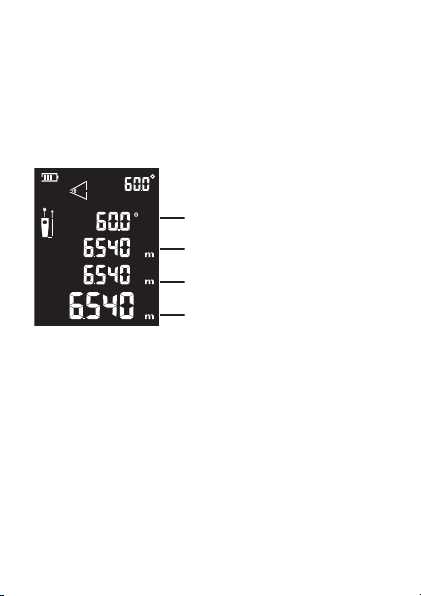
15
Press the MEASURE BUTTON to get
the distance of the first line.
Press the MEASURE BUTTON again
to get the distance of the second
line.
The vertical result will be calculated
automatically and displayed on the
screen.
1. Angle
2. 1st distance
3. 2nd distance
4. Vertical result
ADDITION/SUBTRACTION
Addition: Short press ADD(+)/
SUBTRACT(-) BUTTON.
Subtraction: Long press ADD(+)/
SUBTRACT(-) BUTTON.
Take a measurement, then press the
ADD(+)/SUBTRACT(-) BUTTON. The
addition/subtraction symbol will
appear on the LCD display.
Press the MEASURE BUTTON to take
the second measurement. The
second value will be automatically
added/ subtracted from the first
measurement.
Note: This process can be repeated
as required.
TROUB ESHOOTING
CODE CAUSE & CORRECTIVE
ACTION
204 Calculation error.
Refer to user manual,
repeat the procedures.
208 Excessive current.
Please contact your
distributor.
220 Low battery.
Replace batteries or
charge the batteries.
255 Received signal is too
weak or measurement
time is too long. Use a
target plate or a good
reflective surface.
256 Received signal is too
strong. The target is too
reflective. Use a target
plate or do not aim at a
strong light objective.
1
2
3
4

16
CODE CAUSE & CORRECTIVE
ACTION
261 Outside of the range of
measurement. Select the
measurement distance
within the range of
measurement.
500 Hardware error. Switch the
device On/Off several
times. If the code still
appears contact your
distributor.
RECYC ING AND DISPOSA
Recycle unwanted materials instead
of disposing of them as waste. All
tools, hoses and packaging should
be sorted, taken to the local
recycling centre and disposed of in
an environmentally safe way.
Recycle rather than dispose of
unwanted material in landfill
whenever possible. The machine
must be delivered in rigid packaging
to avoid damage during
transportation. The packaging and
the machine itself are manufactured
from recyclable materials and
should be disposed of accordingly.
Only dispose of electrical/
electronic/battery terms in separate
collection schemes, which cater for
the recovery and recycling of
materials contained within. Your
cooperation is vital to ensure the
success of these schemes and for
the protection of the environment.
Recycle packaging where facilities
exist.
This symbol is known
as the Crossed out
Wheelie Bin Symbol.
When this symbol is
marked on a product or
battery, it means that it
should not be disposed of with your
general household waste. Some
chemicals contained within
electrical/electronic products or
batteries can be harmful to health.
SERVICE
Now that you have purchased your
tool, should a need ever exist of
repair or service, simply contact
your nearest PRO Authorised
Service Centre or other qualified
service organisation. Be sure to
provide all pertinent facts when you
call or visit.
17
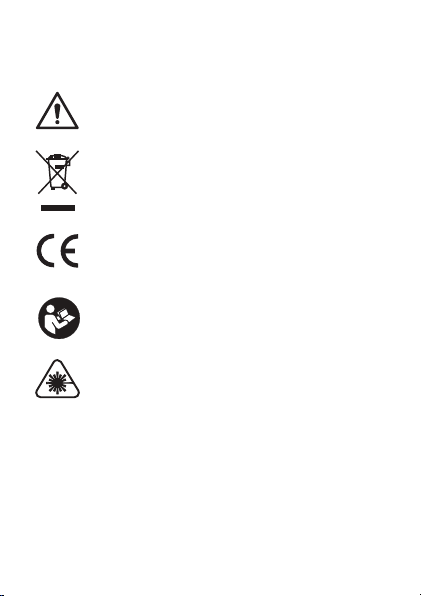
SYMBO S
Some of the following symbols may be used on this product. Please study
them and learn their meaning. Proper interpretation of these symbols will allow
you to operate the product better and safer.
Safety Alert Symbol. Indicates danger, warning or caution. It
means attention! Your safety is involved.
Recycle Symbol.Waste electrical products should not be disposed
of with household waste. Please recycle where facilities exist.
Check with your Local Authority or retailer for recycling advice.
CE Marking. Conforms to relevant safety standards.
Read the Instruction Manual. Your manual contains special
messages to bring attention to potential safety concerns as well
as operating and servicing information. Please read all the
information carefully to ensure satisfaction and safe use.
Warning! Laser radiation.

18
EU DECLARATION OF CONFORMITY
1. Product model: PROFS7-60M
2. Name and address of the manufacturer or his authorised representative:
NAP BRANDS LTD. Office 20, Fleming Court Business Centre, Leigh Road,
Eastleigh, Hampshire SO50 9YN
3. This declaration of conformity is issued under the sole responsibility
of the manufacturer.
4. Object of the declaration:
Equipment: Laser Distance Measurer
Brand name: PROF
Model/type: S7-60M
5. The object of the declaration described above is in conformity with the
relevant Union harmonisation legislation:
2014/35/EU, 2014/30/EU, 2011/65/EU & (EU)2015/863
6. References to the relevant harmonised standards used or references
to the other technical specifications in relation to which conformity is
declared:
EN60825-1, EN61326-1, EN61326-2-2
7. The person authorized to compile the technical file:
Name: Robert Redfern
Address: NAP BRANDS LTD. Office 20, Fleming Court Business Centre,
Leigh Road, Eastleigh, Hampshire SO50 9YN
Signed for and on behalf of
Authorised Representative
Robert Redfern, Technical Manager
01/10/2019
19

19
TECHNICAL SPECIFICATION
Max. measuring range 0.2~60m
Measuring accuracy (2.0 mm +5x10⁻⁵ D)
Tilt measuring accuracy (0.3º+0.1º+0.01* D)
Memory 20 values
Measuring reference Front/Tripod/Rear
Measuring units m/ft+in
Laser class Class 2
Protection class IP65
Laser type 630-670nm, <1mW
Operating temperature 0ºC~40ºC
Storage temperature -10ºC~60ºC
Battery type 3 x AAA batteries
Auto laser off 30 seconds
Auto switch off 180 seconds
Product size 115 x 49 x 26mm
±

20
ESITTE Y
Kiitos, että ostit tämän tuotteen, joka on läpäissyt kattavan
laatutarkastusprosessimme. Kaikki on tehty sen varmistamiseksi, että saat sen
täydellisessä toimintakunnossa.
TURVA ISUUS ENSIN
Seuraavat perusvarotoimet on tehtävä ennen sähkötyökalun käyttämistä
tulipalojen, sähköiskujen ja henkilövahinkojen estämiseksi. On tärkeää lukea
nämä käyttöohjeet, jotta ymmärrät tämän työkalun käytön, siihen liittyvät
rajoitukset ja potentiaaliset vaarat.
TAKUUTODISTUS
Tällä tuotteella on 2 vuoden takuu kuluttajakäytössä, joka alkaa ostopäivästä ja
koskee vain ensimmäistä ostajaa. Ammattikäytössä takuuta ei myönnetä. Tämä
takuu kattaa vain virheet, jotka aiheutuvat raaka-aine- ja valmistusvioista, ja
jotka tulevat esille takuuaikana. Takuu ei korvaa kuluvia osia.Valmistaja korjaa
tai vaihtaa tuotteen harkintansa mukaan edellyttäen seuraavassa mainittuja
asioita. Tuotetta on käytetty käsikirjan ohjeiden mukaisesti, ja sitä ei ole
käytetty väärin tai huolimattomasti tai tarkoitukseen, johon sitä ei ole
tarkoitettu käytettäväksi. Laitetta ei ole purettu osiin tai peukaloitu millään
tavalla, sitä ei ole huollatettu valtuuttamattomilla henkilöillä tai käytetty
vuokrauksen kohteena. Kuljetusvauriot eivät kuulu tämän takuun piiriin. Niistä
on vastuussa kuljetusliike. Takuuvaateet on esitettävä ensisijaisesti suoraan
jälleenmyyjälle takuukauden aikana. Tuote tulee palauttaa valmistajalle vain
poikkeuksellisissa tapauksissa. Näissä tapauksissa ostajan vastuulla on
tuotteen palauttaminen omalla kustannuksellaan ja varmistaen, että se on
asianmukaisesti pakattu kuljetusvaurioiden estämiseksi. Mukaan tulee liittää
lyhyt kuvaus viasta ja kopio kuitista tai muusta ostotodistuksesta. Valmistaja ei
ole vastuussa mistään erityisistä, esimerkillisistä, suorista, välillisistä,
satunnaisista tai epäsuorista menetyksistä tai vahingoista takuun aikana. Tämä
takuu tulee lisänä, eikä vaikuta oikeuksiin, joita kuluttajalla saattaa olla vuoden
1973 Tavaranmyyntilain ja siihen vuonna 1975 ja 1999 tehtyjen muutosten
mukaisesti.
Table of contents
Languages:
Other PROF Measuring Instrument manuals


