Streetwize SWREC13 Specification sheet
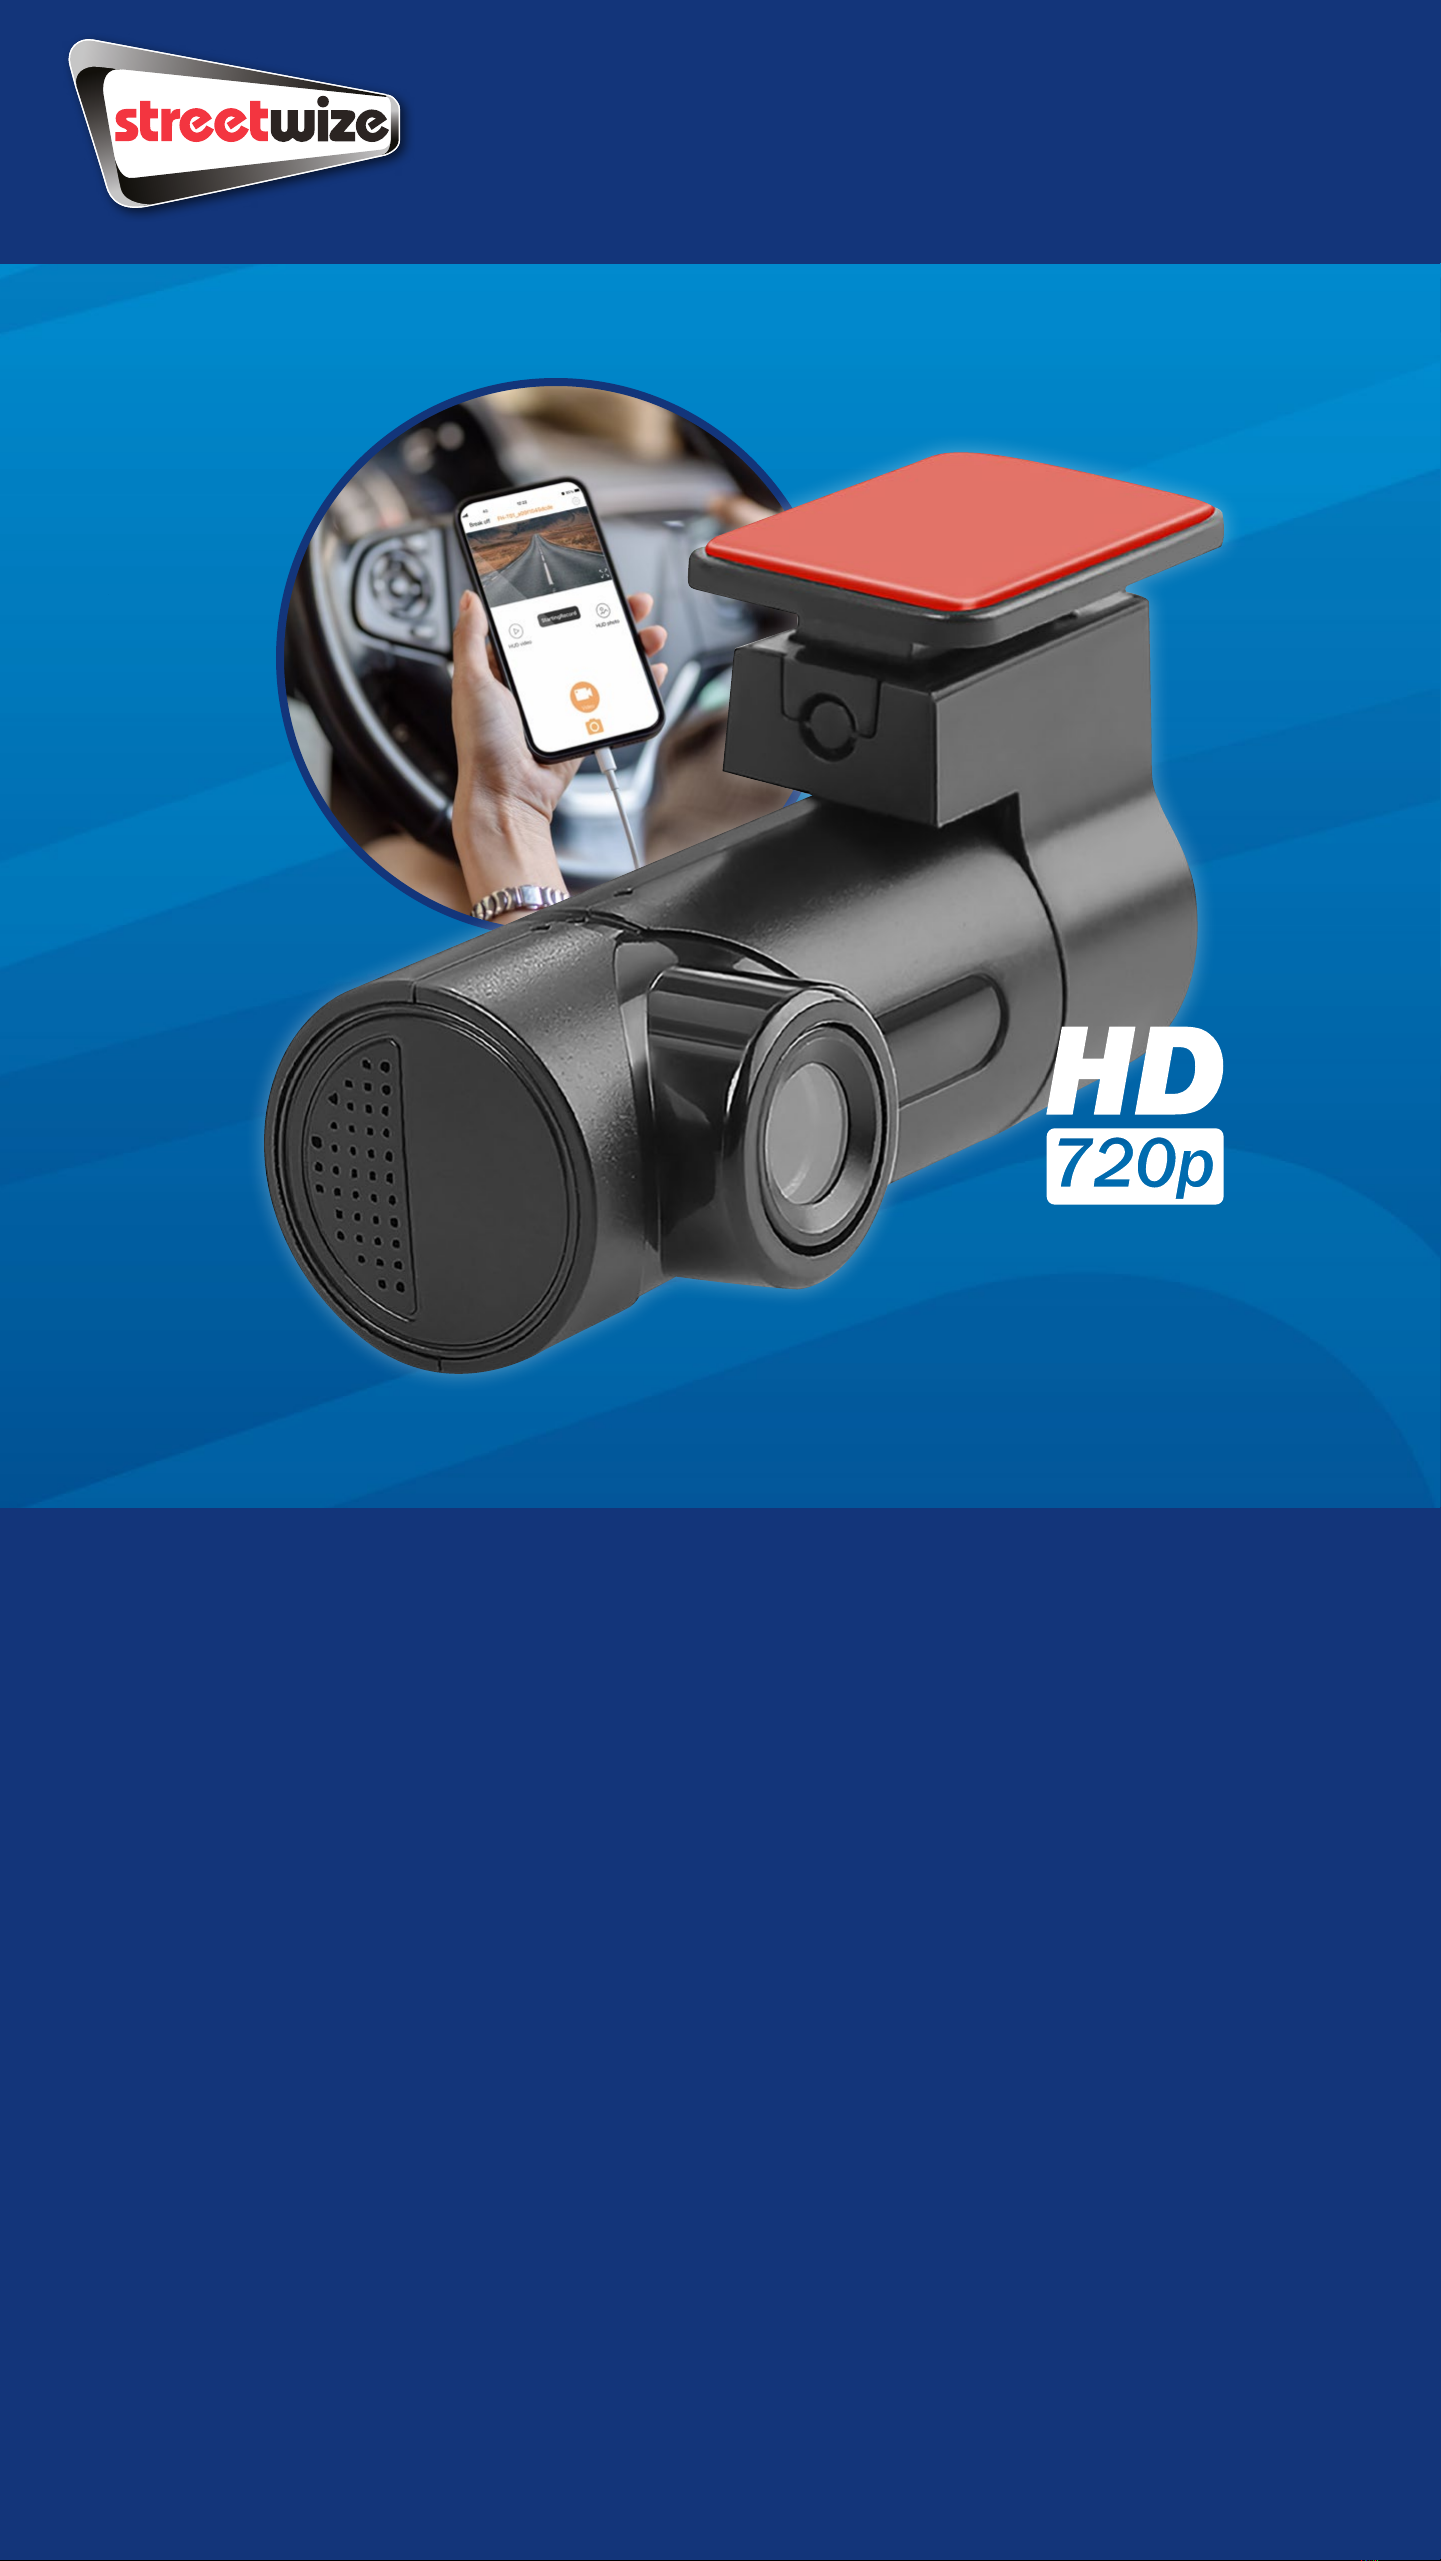
Slimline WiFi Dash Cam
SWREC13 Information for use
Intention For Use
Thank you for purchasing this Slimline WiFi HD Dash Cam
from Streetwize. This product is intended to be used by
motorists who want to record their journey in case of an
accident or incident so that it can be used as evidence.
This dash cam connects directly to your smartphone
through WiFi connectivity so you can control the dash cam
via the CARREC app.
It is suitable for use by drivers of cars, estates, saloons,
4x4s, SUVs, caravans, motorhomes and campervans. It is
not suitable for use by motorcyclists or cyclists.
Before using this product, we highly recommend that you
read through all the information in this document.

Table of Contents
Product Elements
Operating Instructions
Connecting the Dash Cam to Your Smartphone/Tablet
Recording Footage & Taking Pictures On The Dash Cam
Viewing Recorded Footage/Photos
Loop Recording
Night Vision Mode
Settings
Fitting the Dash Cam In Your Vehicle
Troubleshooting
Health & Safety
Technical Support & Spare Parts
Technical Specifications
03
03-07
03-04
05-06
07
07
07
08
09
10
10
11
11

Product Elements
1. Streetwize Slimline WiFi HD Dash Cam
2. 12V power cable
Operating Instructions
Connecting the Dash Cam to Your Smartphone/Tablet
IMPORTANT: Before attaching the dash cam to your windscreen, please
follow the instructions below for connecting the dash cam to your
device through WiFi connectivity.
1. With your smartphone or tablet device, open up your camera to scan the
QR below or, in the AppStore or Google Play Store search for CARREC
2. Download and install the CARREC
app onto your device.
3. Plug in the dash cam into your
vehicle’s 12V socket to power up
the dash cam.
PLEASE NOTE: To operate the dash cam,
you will need to make sure that the dash
cam is connected to a 12V power supply.
The unit does come with a small built-in
battery unit, but this only operates for a
very limited amount of time.
3M® Adhesive Pad
LEDReset Mic USB
TF/Micro SD
Card Slot
Camera

Connecting the Dash Cam to Your Smartphone/Tablet
4. Enable your WiFi on your smartphone/tablet, then search for a device
that starts with “FH-T01”.
5. Select the device, and then enter the default password: 88888888.
This will connect your device to the dash cam through WiFi connectivity.
PLEASE NOTE: You can connect the dash cam to your device via WiFi connectivity, even
when your smartphone or tablet is using mobile data.
IMPORTANT: When you close the app, you may need to reconnect your smartphone/
tablet to the dash cam through your WiFi settings.
6. Then open up the CARREC app on your device
to see the screen below (Figure 1) where it will
prompt you to connect to the camera.
Figure 1

Connecting the Dash Cam to Your Smartphone/Tablet
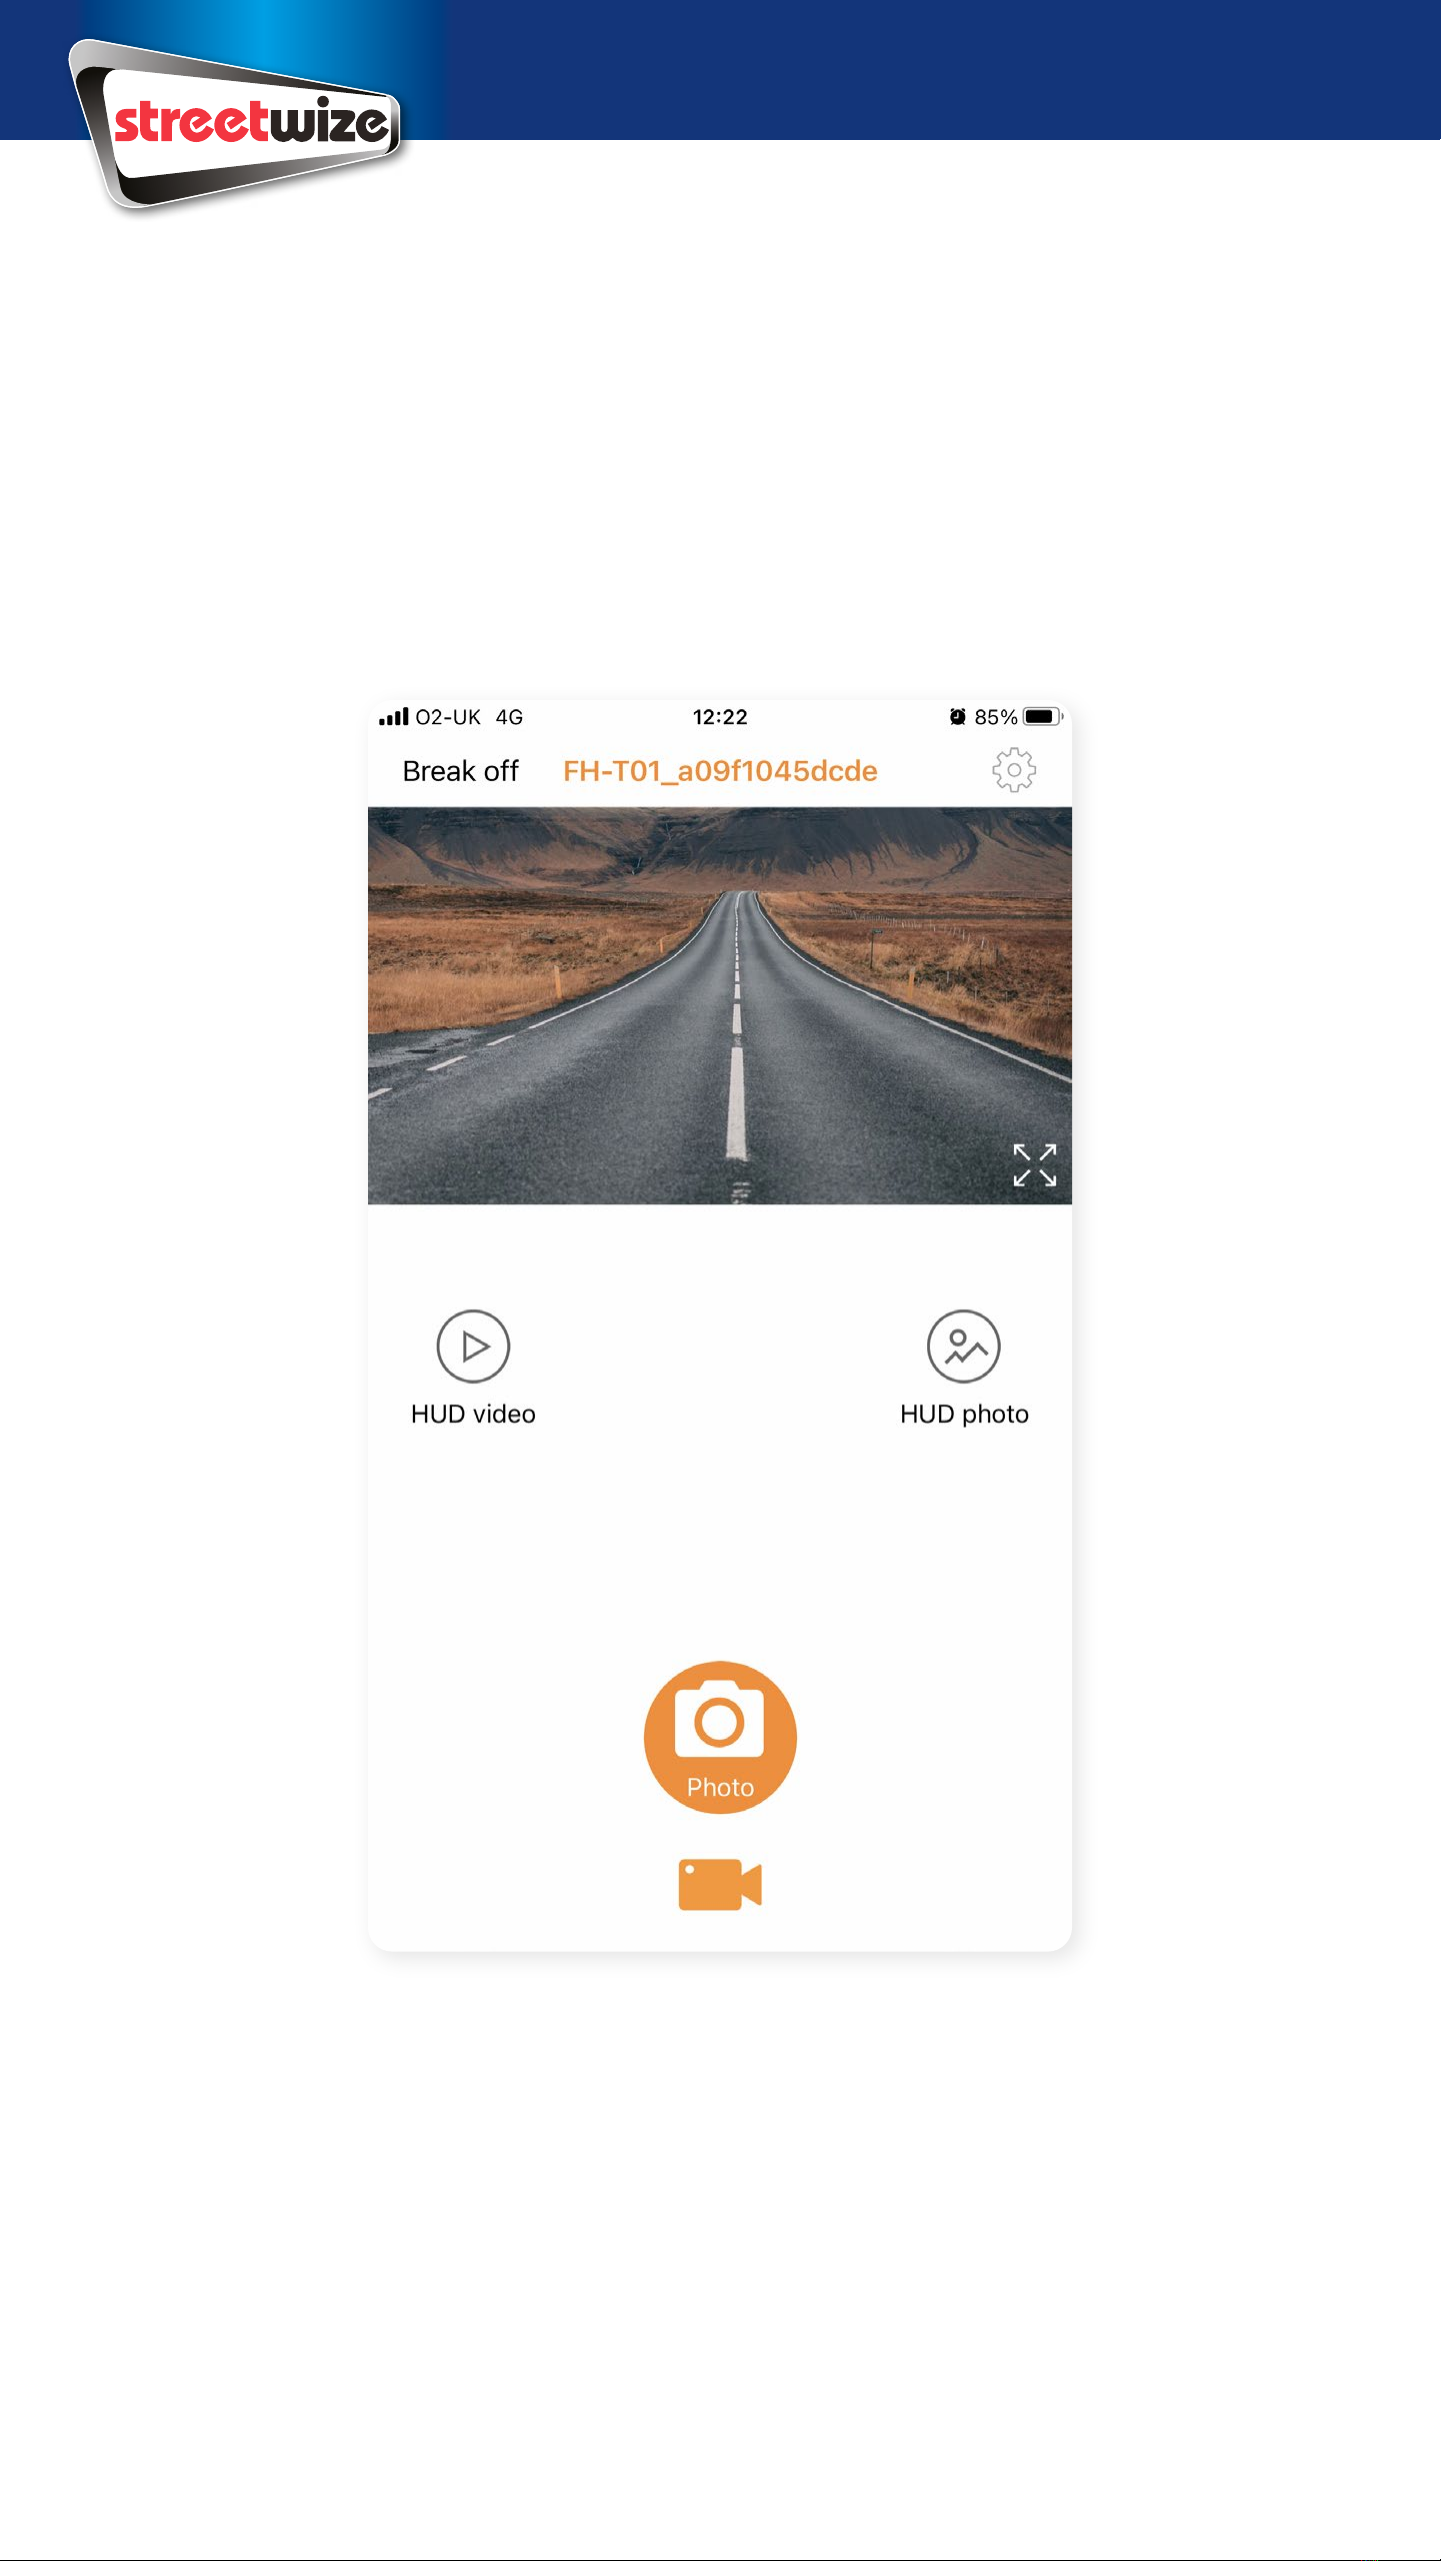
7. Once connected, you will see a live feed from the dash cam on the
CARREC app, as shown in the screenshot below (Figure 2). This means
that your dash is now connected to your dash cam.
Recording Footage & Taking Pictures On The Dash Cam
Please note: To record footage/take photos, you will need to insert a TF/Micro SD card (not
included) into the dash cam.
Recording Footage
To start recording footage on the dash cam, on the CARREC app, go to
screen with the dash cam’s live feed (Figure 2), and you’ll notice that the
CARREC app is already set to video recording mode.
To record, simply press the video record button. To stop recording, press
the same button or you can disconnect the 12V power supply (by turning
off your vehicle).
Figure 2
DISCLAIMER: Please note, it is illegal to use your smartphone whilst driving in the UK. It
is recommended that you commence recording before you set off to drive. For taking any
photos, we advise to only take photos when the vehicle is parked up.
Recording Footage & Taking Pictures On The Dash Cam
Taking Pictures on the Dash Cam
On the CARREC app’s live feed screen, select the photo mode, which is
below the video recording button. This will switch to the photo mode, as
shown below (Figure 3). To take a photo via the app, simply press the
Photo button.
Figure 3

Viewing Recorded Footage/Photos
To playback footage or view photos that you
have taken on the dash cam, go to the CARREC
app live feed page (Figure 2), you will see two
options: HUD video and HUD photo. The former
takes you to the video gallery and the latter
takes you to the photo gallery. Both galleries are
stored on your Micro SD (TF) card.
To transfer the files onto your PC/laptop, you will
need to remove the memory card from the dash
cam and then insert into your PC/laptop.
Loop Recording
This dash cam comes with loop recording, which allows you to record
footage in a continuous loop when the memory card reaches full
capacity. The footage can be recorded in short fragmented video files,
and when the memory card reaches full capacity, it will automatically
overwrite older footage files.
You record loop videos that are up to either 1 minute, 3 minute or 5
minutes in length (default to 1 minute). Or you can turn the loop feature
off completely.
Night Vision Mode
This dash cam comes with Night Vision which automatically comes on at
night and in low light conditions. Night Vision mode allows the dash cam
to continue recording clear footage regardless of lighting conditions.
Figure 2

Settings
Tap the icon on the top right corner of the CARREC app to access
the settings menu. Here you can adjust the following settings shown in
table 1 below.
To return to the main menu press the back button.
Setting Explanation
Change Password Here you can change the WiFi password for
connecting the dash cam to your smartphone/tablet
Video Sound For enabling or disabling the mic when recording
video footage. (Default is on)
Date and Time Tag For displaying the date and time on the footage.
(Default is on)
Looping Video For setting length of the loop video fragments.
Choose from off, 1 minute, 3 minutes & 5 minutes.
(Default is 1 minute)
Light Source Frequency Choose between 50Hz to 60Hz (Default set to 50Hz)
Exposure Controls the gradations of brightness you can see
on the screen. Choose between -2, -1, 0, +1, +2.
(Default is 0)
Image Quality
Image Quality Here, you can choose between HD or SD image
quality. (Default is HD)
Preview Resolution Preview images in real time in either SD or HD
(Default is HD)
Recorder format Format the memory card
Firmware Version Displays the current software version number of the
machine.

Fitting the Dash Cam In Your Vehicle
Thanks to the dash cam’s discreet design, the dash cam has be fitted
onto the windscreen just behind the rearview mirror so that it doesn’t
obstruct the driver’s view.
To fit the dash cam into your vehicle, please see the instructions below:
1. Peel off the film from the adhesive pad.
2. The dash cam needs to be placed on the windscreen, so please ensure
the surface is cleaned before sticking the dashcam. Once the surface
is cleaned, proceed to stick the dash cam onto your windscreen via the
adhesive pad.
IMPORTANT: The dash cam can be stuck onto your
windscreen with the camera lens on either the right
or the left, from the perspective of the driver’s seat.
However, since you need to connect the 12V cable to
the dash cam, we advise that the camera lens, from the
driver’s seat perspective, is on the right, and the adhesive
pad is on the left (as shown in Figure 4). This allows the
camera’s 12V cable to lead towards the passenger side,
ensuring the cable does not obstruct the driver.
3. Once the dash cam is in place, connect the provided 12V cable to the
dash cam. And the thread the cable as shown in Figure 5.
To thread the wiring securely and discreetly, you will need to remove the
vehicle’s interior panels. Please refer to your vehicle’s manual or speak to a
qualified professional to assist with this.
THIS WAY ROUND
Figure 5

Troubleshooting
Issue Cause & Solution
Dash cam does not
record video
• Check if the Micro SD card (TF card) is properly
inserted
• Check if the Micro SD card (TF card) has been
damaged. If so, it will need replacing
• Check to see if the Micro SD card (TF card) has
been properly formatted
The dash cam stops
recording
• Check if there is a large amount of HD video files
• Ensure you use a high-speed TF card. High-speed
TF cards will be marked with a C10 logo
An error occurs when
playing back video or
viewing images
• A video/image file may be corrupted. Delete the
corrupted file via the CARREC app.
• Reformat the TF card
Images are blurry • Check the lens for dirt or finger marks and wipe
clean using a suitable lens wipe
Dash cam crashes/
freezes
• If the dash cam crashes, disconnect 12V power to
turn off. Then reconnect the 12V power supply, and
reconnect the dash cam to your smartphone/tablet
through WiFi.
• If the dash cam repeatedly crashes or is frozen,
press the reset button with a pointed object to
reboot the machine.
Health & Safety
1. Never use your smartphone whilst driving to operate the dash cam.
Always set the dash cam before setting for your journey.
2. This product is not a toy. Always ensure children are fully supervised
when they are near the product.
3. Keep the dash cam and 12V plug away from liquid. Electrical hazard.
Table of contents
Other Streetwize Dashcam manuals


