Strong SRT 7807TIVU User manual

Manuale d’utilizzo
User Guide


28 Dec 2021 16:48
Supplied by STRONG AUSTRIA
Represented by STRONG Ges.m.b.H
Teinfaltstraße 8/4.Stock
A-1010 Vienna, Austria
Email: support_at@strong.tv

Licenses
THIS PRODUCT IS LICENSED UNDER THE AVC PATENT PORTFOLIO LICENSE FOR THE PERSONAL AND
NONCOMMERCIAL USE OF A CONSUMER TO (i) ENCODE VIDEO IN COMPLIANCE WITH THE AVC
STANDARD (“AVC VIDEO”) AND/OR (ii) DECODE AVC VIDEO THAT WAS ENCODED BY A CONSUMER
ENGAGED IN A PERSONAL AND NON-COMMERCIAL ACTIVITY AND/OR WAS OBTAINED FROM A
VIDEO PROVIDER LICENSED TO PROVIDE AVC VIDEO. NO LICENSE IS GRANTED OR SHALL BE IMPLIED
FOR ANY OTHER USE. ADDITIONAL INFORMATION MAY BE OBTAINED FROM MPEG LA, L.L.C. SEE
HTTP://WWW.MPEGLA.COM
This product contains one or more programmes protected under international and U.S. copyright laws
as unpublished works. They are confidential and proprietary to Dolby Laboratories. Their reproduction
or disclosure, in whole or in part, or the production of derivative works therefrom without the express
permission of Dolby Laboratories is prohibited. Copyright 2003-2009 by Dolby Laboratories. All rights
reserved.
28 Dec 2021 16:45
SIMPLIFIED EU DECLARATION OF CONFORMITY
Hereby, STRONG declares that the radio equipment type DVB-S2 receiver is in compliance with Directive 2014/53/EU.
The full text of the EU declaration of conformity is available at the following internet address: https://www.strong.tv/en/doc
Subject to alterations. In consequence of continuous research and development technical specifications, design and appearance of
products may change. ASTRA is a registered trademark of SES ASTRA. NagraVision is a trademark of Kudelski SA. Manufactured under
license from Dolby Laboratories. Dolby Audio, Dolby Digital, Dolby Digital Plus and the double-D symbol are trademarks of Dolby
Laboratories. The terms HDMI and HDMI High-Definition Multimedia Interface, and the HDMI logo are trademarks or registered trademarks
of HDMI Licensing Administrator, Inc in the United States and other countries. Covered by one or more claims of the HEVC patents listed at
patentlist.accessadvance.com. All product names are trademarks or registered trademarks of their respective owners.
© STRONG 2021. All rights reserved.
1

TABLE OF CONTENTS
1.0 INTRODUCTION 3
1.1 Introduction 3
1.2 Storage 4
1.3 Equipment Set-up 4
1.4 Accessories 4
1.5 Usage of external USB devices 4
2.0 YOUR RECEIVER 5
2.1 PIN-CODE 5
2.2 Front Panel 5
2.3 Side Panel 5
2.4 Rear Panel 5
2.5 Remote Control 5
2.6 Installing the batteries 6
2.7 Using the remote control 6
3.0 CONNECTIONS 6
3.1 Connecting the antenna and LNB (Low Noise Block) to the receiver 6
3.2 Connecting to a digital audio amplifier 7
3.3 Basic connection using an HDMI cable 7
3.4 Basic connection using a SCART cable 7
3.5 Connecting to the Internet 7
3.6 Connection to main power supply 7
4.0 STARTING UP FOR THE FIRSTTIME 7
4.1 Language, audio and video 8
4.2 PIN code creation 8
4.3 Satellite System 8
4.4 Search Channel 8
4.5 End of installation 8
5.0 QUICK GUIDE FOR USINGYOUR RECEIVER 8
6.0 OPERATION 9
6.1 Selecting channels 9
6.2 Volume Control 9
6.3 Programme Information (Info banner) 10
6.4 Selecting audio language 10
6.5 Selecting subtitle language 10
6.6 Viewing the teletext 10
6.7 Electronic Programme Guide (EPG)* 11
6.8 Favourite channels 11
7.0 MAIN MENU 11
7.1 Installation 11
7.2 Channel Manager 13
7.3 User Setting 14
7.4 Tools 17
7.5 SMARTCARD TIVÙSAT 19
8.0 MEDIA 19
8.1 Movie 20
8.2 Music 20
8.3 Picture 21
9.0 NETWORK 21
9.1 IP Setting 21
9.2 Software Update 21
10.0 TROUBLESHOOTING 21
11.0 SPECIFICATIONS 23
2

1.0 INTRODUCTION
1.1 Introduction
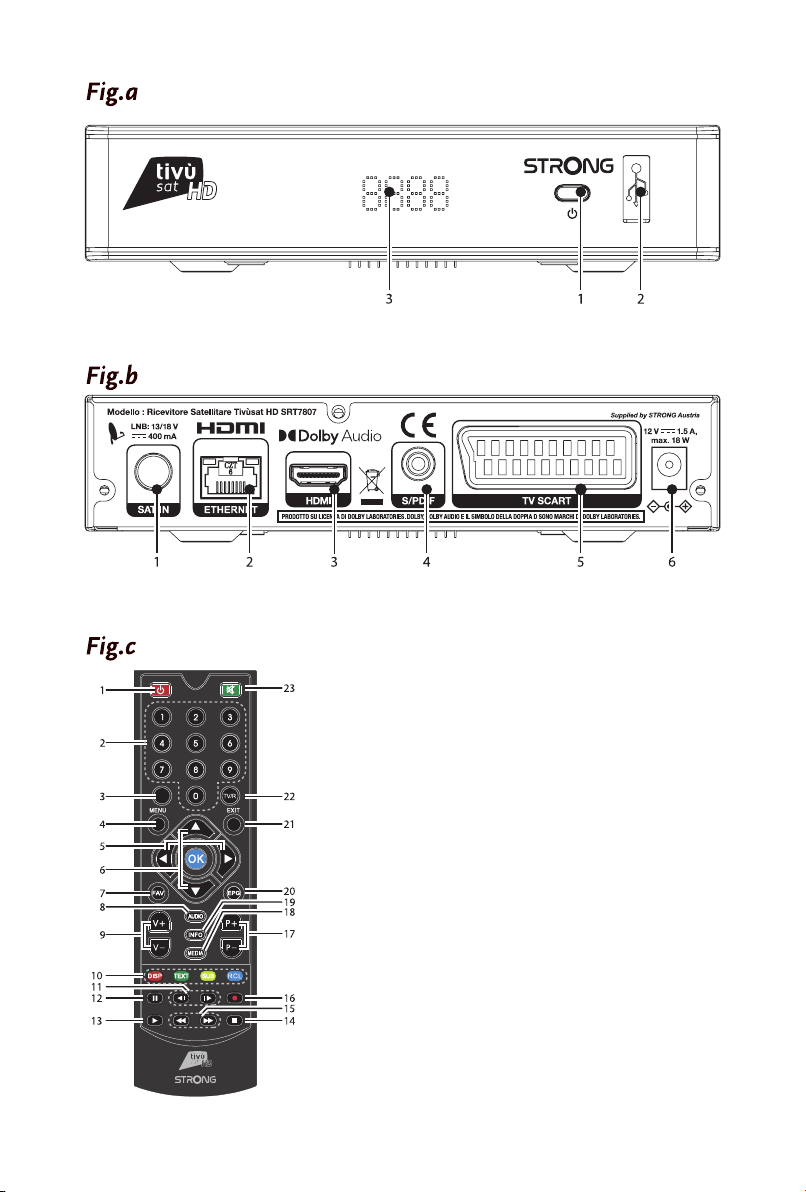
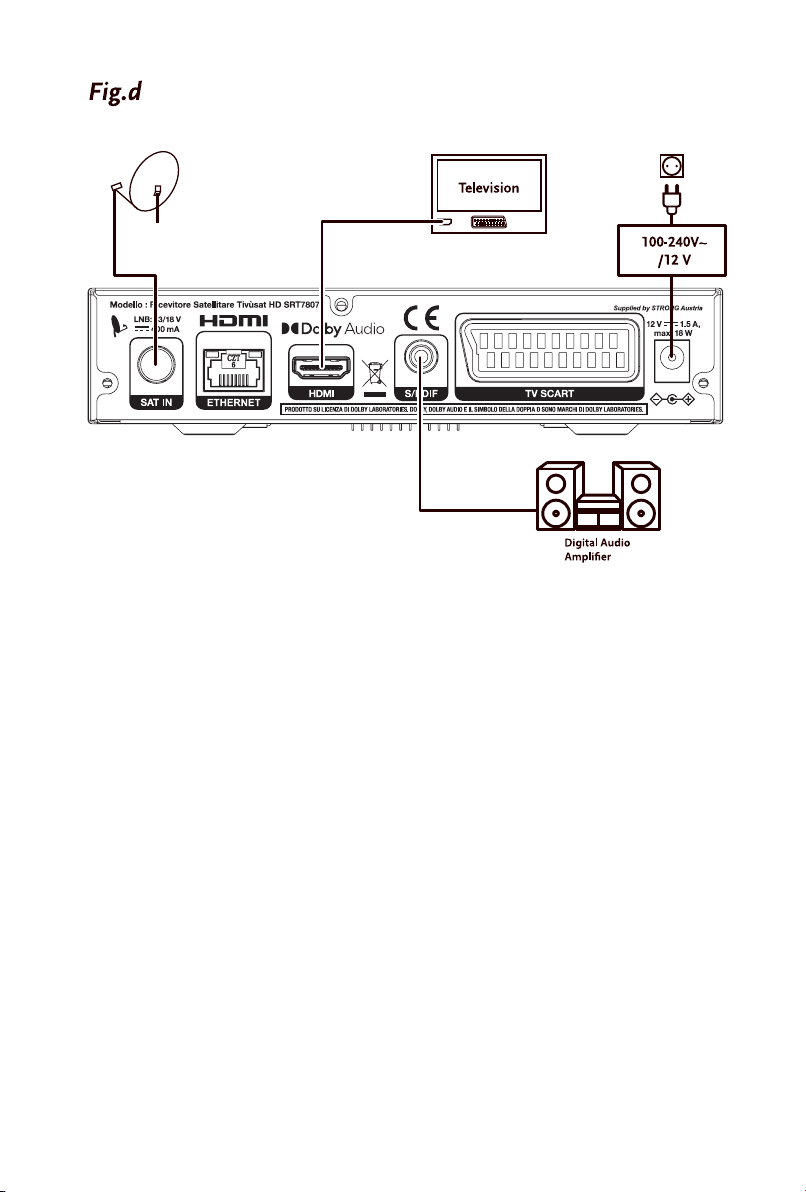
The user manual will guide you through the operations of the Model SRT7807
(DTS is the acronym for Digital SatelliteTelevision).
This product is a high-performance and cost-effective satellite receiver. It fully complies with DVB-S/
S2 Over The Air Download. It provides users/subscribers access to digital satellite television and radio
broadcast signals.
This product provides the following functions and features:
n Fully compatible with DVB-S/S2 digital satellite television standards
n Fully compatible with MPEG-2/H.264/H.265 HD & SD output
n Fully compatible with MPEG-1
n A maximum of 500 channels
n Support for the Electronic Program Guide (EPG)
n Automatic and manual search
n Parental control for channels
n 576p/720p/1080i/1080p video resolution
n 4:3 and 16:9 aspect ratios
n Various channel editing functions (lock, and skip)
n Software upgrade by using over-the-air
n High sensitivity and low power consumption
Precautions
n Never try to open the device. It is dangerous to touch the inside of the device due to high
voltages and possible electrical hazards. Opening the device will void the warranty of the
product. Refer all maintenance or servicing to suitably qualified personnel.
n When you are connecting cables, be sure that the device is disconnected from the mains
supply voltage. Wait a few seconds after switching off the device before you move the device
or disconnect any equipment.
n It is a necessity that you only use an approved extension and compatible wiring that is
suitable for the electrical power consumption of the installed equipment. Please ensure that
the electrical power supply corresponds with the voltage on the electrical identification plate
at the back of the device.
Operating Environment
n Do not install this equipment in a confined space such as a bookcase or similar unit.
n Do not use the set near damp, and cold areas, protect the set from overheating.
n Keep away from direct sunlight.
n Do not use the set near dust place.
n Do not place candles near the opening area, to avoid flammable foreign material from
entering the device.,
WEEE Directive
Correct Disposal of this product. This marking indicates that this product should not be
disposed with other household wastes throughout the EU. To prevent possible harm to the
environment or human health from uncontrolled waste disposal, recycle it responsibly to
promote the sustainable reuse of material resources. To return your used device, please use the
return and collection systems or contact the retailer where the product was purchased. They can take
this product for environmental safe recycling.
3

1.2 Storage
Your device has been carefully checked and packed before shipping. When unpacking it, make sure that
all the parts are included and keep the packaging away from children. We recommend that you keep
the carton during the warranty period, to keep your device perfectly protected in the event of repair or
warranty.
1.3 Equipment Set-up
We recommend you to consult a professional installer to set up your equipment. Otherwise, please
follow the instructions below:
Refer to the user manual of your TV and your antenna.
Make sure that the HDMI cable and outdoor components are in a good condition and the HDMI
connections are well shielded and from good quality.
This user manual provides complete instructions for installing and using this receiver. The symbols serve
as follows.
WARNING Indicates warning information.
NOTE Indicates any other additional important or helpful information.
MENU Represents a button on the remote control or the receiver. (BOLD CHARACTERS)
Move to Represents a menu item within a screen. (Italic characters)
1.4 Accessories
n 1x user manual
n 1x remote control
n 2x 1.5 V batteries
n 1x power adapter 12 V, 1.5 A
n 1x tivùsat smartcard
WARNING: The batteries should not be recharged, disassembled, electrically short-
circuited, be mixed or used with other types of batteries. If rechargeable
accumulators instead of batteries are going to be used, we recommend
using (e.g. NiMH) types with low self-discharge to ensure long time
operation of remote control.
NOTE: For the appropriate usage with this device, use only power adapters as
listed below (in case of a necessary exchange):
Model: CH-GSCV2000S012V24V; Manufacturer: HUNAN GIANTSUN POWER
ELECTRONICS CO.,LTD
The usage of other power adapters may cause damage to the device. Such damage is not covered under
warranty.
1.5 Usage of external USB devices
n It is recommended to use USB 2.0 storage devices. If your device is not compatible to USB 2.0
specifications, the playback with your receiver might not work properly.
n If you are going to use external USB HDD (Hard Disk Drive) please consider that the power
specifications might exceed the supported output of your receiver (5 V/800 mA). If so, please
connect your USB HDD to an according external power adapter.
4

n STRONG cannot guarantee compatibility with all types of USB storage devices.
n It is advised not to store important information on USB storage devices used with the
receiver. Always make backups of data on your USB storage device before using it with this
receiver. STRONG will not take responsibility for any loss of information or circumstances
caused by loss of information.
n Please ensure that either the USB device is already formatted to NTFS
n STRONG cannot guarantee the playback of all files although extensions are listed, as it
depends on file size, codec, bit rate and resolution.
2.0 YOUR RECEIVER
2.1 PIN-CODE
The PIN code is set during the first installation, each user is free to choose their own code. In case there is
need to modify it see the chapter 4.2
2.2 Front Panel
Fig. a
1. LED Display Displays channel number, time, videotext page or recording modes
2. ON/OFF Switch on/Switch off
3. USB To connect your USB storage device
2.3 Side Panel
1. Smart card slot To insert your Tivùsat smart card with the golden chip facing down.
2.4 Rear Panel
Fig. b
1. SAT IN To connect to the LNB of your satellite antenna for reception of satellite
broadcast signal
2. ETHERNET To connect to a network switch, router or modem
3. HDMI To connect to the HDMI input of your TV set using a good quality HDMI cable
4. S/PDIF (optical) To connect to a digital amplifier or home theatre using a optical cable
5. TV SCART To connect to TV using a SCART cable
6. DC POWER To connect to the original included main power adapter (Input ~230 V 50~60
Hz/ Output 12 V, 2 A DC )
2.5 Remote Control
Fig. c
1. q Switch the decoder status between working and standby.
2. 0~9 Enters a number or selects a channel number
3. \
4. MENU Enter to mainmenu
5. tu Moves the cursor left/right
6. pqMoves the cursor up/down.
7. FAV Select your favorite channel
8. AUDIO Select audio language.
9. + VOL - Increase or decrease the volume
10. Display resolution switch/Display teletext / Subtitle selection/Recall
11. 7 8 Previous Key/Next Key
12. 2 Pause Key
5

13. 1 Play Key
14. 3 Stop Key
15. 5 6 Fast Rewind Key/Fast forward Key
16. 4 \
17. P+/P- Chanel up/down
18. MEDIA Gives access to Media menu
19. INFO Display Current/Next Event name,and Event Information
20. EPG Display information about the Program Guide
21. EXIT Returns to the previous menu or exits the whole menu
22. TV/R Switch TV and radio channels
23. Mute/ Unmute the sound
2.6 Installing the batteries
Fig. c
Remove the battery cover from the remote control and put 2x AAA size batteries inside the
compartment.
The diagram inside the battery compartment shows the correct way to install the batteries.
1. Open the cover
2. Install batteries
3. Close the cover
NOTE: The batteries should not be recharged, disassembled, electrically short-
circuited, be mixed or used with other types of batteries.
2.7 Using the remote control
Fig. 7
To use the remote control, point it towards the front of the digital receiver. The remote control has a
range of up to 7 metres from the receiver, if properly aligned towards the IR eye on the front panel.
The remote control will not operate if its path is blocked.
NOTE: Sunlight or very bright light might decrease the sensitivity of the remote
control.
3.0 CONNECTIONS
This section explains the most important functions to ensure that you can directly watch television with
your new receiver. Please note additional adjustments may be required.
NOTE: Do not connect the receiver to the main power yet.
3.1 Connecting the antenna and LNB (Low Noise Block) to the
receiver
Fig. 8
Connect the LNB of your satellite antenna to the SAT IN connector of your receiver using a good quality
coaxial cable and suitable ‘F-connector' plugs.
6

3.1.1 Connection of multiple xed antennas via DiSEqC 1.0
Fig. d
A) Connect the LNBs of your fixed antenna to the inputs of a DiSEqC 1.0 switch using a good
quality coaxial cable and suitable ‘F-connectors'.
B) Connect the output or “to receiver” of the DiSEqC 1.0 switch to the SAT IN connector on your
receiver. Use good quality coaxial cable and suitable “F-connectors”.
C) Plug the power adapter jack to the receiver and the other end to a suitable wall outlet.
3.2 Connecting to a digital audio amplier
Fig. d
Connect one end of a good quality coaxial audio cable to the S/PDIF output of your receiver and the
other end to the coaxial audio input of your home theatre, amplifier or any other device supporting
digital audio.
3.3 Basic connection using an HDMI cable
Fig. d
A) Connect the LNB of your satellite antenna to the SAT IN connector of your receiver using a
good quality coaxial cable and suitable ‘F-connector' plugs.
B) Connect one end of a good quality HDMI cable to the HDMI output on your receiver and the
other end to the HDMI input of your TV.
C) Plug the power adapter to a suitable wall outlet.
3.4 Basic connection using a SCART cable
Fig. d
A) Connect the LNB of your satellite antenna to the SAT IN connector of your receiver using a
good quality coax cable and suitable ‘F-connector' plugs.
B) Connect one end of a good quality Scart cable to the TV SCART connector on your receiver
and the other end to the SCART input of your TV.
C) Plug the power adapter to a suitable wall outlet.
3.5 Connecting to the Internet
The receiver connects to the Internet through the Internet router or DSL/cable modem in your home
network. It connects to the home network over its Ethernet port or Wi-Fi.
Fig. d
Connect one end of the Ethernet cable to the receiver and the other end to the LAN port at the router or
DSL/cable modem.
3.6 Connection to main power supply
Fig. d
After all the connections are done you can connect your receiver to power using the supplied external
AC/DC adapter. Now plug the adapter into the wall socket.
4.0 STARTING UP FOR THE FIRST TIME
Once you properly installed and connected all cables of the receiver, setup your receiver step by step by
following the installation wizard.
It will guide you through the basic installation and channel searching process.
7

4.1 Language, audio and video
The receiver turns on displaying the Welcome message, press OK to go to the next step. In this page it
is possible to set Language, Resolution, Aspect Ratio and Audio Format. Press OK to select the option you
need to change then pq to change selection. To confirm and exit press OK.
Select NEXT and confirm with OK to continue the installation.
4.2 PIN code creation
Create and confirm the PIN code, then select NEXT to continue.
4.3 Satellite System
In this page it is possible to set the LNB, Antenna type and LNB Power. The default settings are for a system
with universal LNB, in case you want to change the default settings please check the 8.1.1 Antenna
Setting chapter.
To go to the next step select NEXT and confirm with OK to continue the installation.
4.4 Search Channel
On Transponder select All (default setting) to search on all available frequencies or select a single TP for
a targeted search. On Type of search please set the search type choosing between Tivùsat+FTA, to store
the FTA (free to air) and Tivùsat channels, All to store all the channels and FTA Only to store only the FTA
programmes.
To start the channel search, select NEXT and confirm with OK.
NOTE: If you see the messages No list found or {No channels found, please check
the antenna connections and signal levels of the satellite dish.
4.5 End of installation
At the end of the installation wizard, the last two steps concern the information regarding smartcard
activation and the instructions for downloading the Tivùsat program guide.
To go to the next step confirm with OK.
5.0 QUICK GUIDE FOR USING YOUR RECEIVER
We at STRONG understand that you can't wait to enjoy your new tivùsat receiver.
However, we advise you to read this manual to get the best performance from your STRONG tivùsat
receiver. To turn your receiver ON or to go to Standby mode, press qon the remote control. Choose
channels with CH+/. Alternatively, you can also enter the channel number with the 0~9 buttons on the
remote control or press OK in viewing mode to display the channel list. The volume can be adjusted with
VOL+/ or with tu.
The keys with relative functions available in viewing mode, are listed here below:
n INFO key: show infobar
n FAV key: show favorite group (to create new favorite channel lists see chapter 8.2.2).
n OK key: show current channels list.
n SUB key: show subtitle list.
n AUDIO key: show audio list.
n RED key: show Video Output.
n MEDIA key: for direct acces to media menu.
8

n RCL key: to back to previous program.
n TEXT key: to access teletext (if available).
n EPG key: to access the EPG (more information on chapter 7.7).
n MUTE key: to disable the audio.
n TV/R key: to switch between video and radio channels.
6.0 OPERATION
In viewing mode, several features are available to make watching TV a true pleasure. This paragraph
describes these features. Please also read chapter 8to get familiar with the menu of your new tivùsat
receiver.
6.1 Selecting channels
There are different ways to change channels with your receiver.
n Via direct access
n Via the channel list
n Via the CH+/ buttons
6.1.1 Direct access
To gain direct access to a certain channel simply enter its number with the 0~9 keys on the remote
control. Channel numbers can be up to 4 digits long. Entering numbers and values with less than 4 digits
is possible. Just wait a few seconds and your receiver will switch to the selected channel.
6.1.2 Channel list
Press OK button in viewing mode to display the channel list.
Use pq to highlight your channel of choice and press OK to select the highlighted channel for preview.
Use the FAV button to get access to a group of favourite lists. Press OK to select only channels from a
particular list. Refer to chapter 8.2.2 TV Channel Manager to organize channels into favourite lists.
The channel list is also equipped with three additional functions accessible by pressing the colored
function keys. Their functions are described below:
FAV List: Green button – To select one of the 8 Favourite lists (to set these favourite
channels see chapter X).
Edit: Yellow button – To lock the displayed channel or to add it to one of the
favourite lists.
Satellite: Blue button – To select a source other than Hotbird (only if more than one
satellite has been scanned).
NOTE: In green, on the top row of the channel list, is provided the technical
information of the selected channel (frequency, symbol rate, polarization
and satellite).
6.2 Volume Control
The volume control allows you to adjust the audio volume. Press VOL+/ or tubutton to adjust the
audio volume. Press the !button to temporarily mute audio. To restore the sound press the !button
again or select VOL+/
NOTE: The !function remains set while you switch channels.
9

6.3 Programme Information (Info banner)
Programme information is always displayed for a certain period of time whenever you switch channels.
You can also view the programme information by pressing the INFO button while watching a
programme, or consult the information of the other channels by pressing pq buttons.
Press EXIT to hide the info banner.
Info banner:
n Indicates channel number and name
n Indicates current time
n Informs about current programme name
n Indicates name of the next programme
n Provides video and audio parameters for broadcasted programme
6.3.1 Extended information panel
To access the extended information, press INFO button:
n once during presence of the information banner on screen
n twice in viewing mode.
The details of the current programme information (name and description of the current programme)
will be provided in an additional window*. If the programme description does not fit in the display area,
you can use pq to scroll through this information. It is also possible to see the info regarding the next
program scheduled by pressing tu. Press EXIT to close extended information panel.
NOTE: You can change the on-screen duration of the info banner in the User
Setting > Display menu. Please refer to section 8.3.2 for more details.
* Information will be displayed if available. Availability depends on the broadcaster.
6.4 Selecting audio language
Some channels support a choice of audio formats and/or languages.
Press AUDIO in viewing mode to display a list of available audio languages.
Use pq to highlight the language of choice and press OK to confirm.
In the same menu it is also possible select with Teletext subtitle and DVB subtitles as well as DVB audio. To
change selection use the tubuttons.
6.5 Selecting subtitle language
Press SUB in viewing mode to display a list of available subtitle languages. Use pq to select the subtitle
language and press OK to confirm. Additionally you can adjust your preferred subtitle language as
described in chapter 8.3.1.
NOTE: Please consider that this function supports DVB and TXT subtitles and this
selection only displays them temporarily. Subtitles may not be supported
by every channel or broadcaster.
6.6 Viewing the teletext
To access the teletext, press the TEXT button in viewing mode. Use 0~9 or pq buttons to select the
number of the page you wish to see. Press EXIT to go back to viewing mode.
10

6.7 Electronic Programme Guide (EPG)*
The Electronic Programme Guide is a very useful function that allows you to watch programme
schedules and information on screen and not to miss any important event by setting Timer for it.
Press EPG button to activate this guide. The receiver will take a few seconds to collect all the
informations of all channels. Use pq to select a channel. Use tuto scroll through programmes on
selected channel to display programme information on the screen or to book timer for it. Press BLUE
or YELLOW buttons to scroll through programmes to display programme information for the next/
previous day. Press INFO button to display detailed information for selected programme. Press EXIT to
go back to viewing mode.
* Availability of EPG data depends on broadcaster.
6.7.1 Booking a programme from EPG
Select a programme as described above. Press GREEN button. A menu with three selections will appear:
Play to book the program selected that it will be automatically tuned to the set time, Sleep to put the
receiver in standby at the set time and NULL to cancel the program selection. Press OK to confirm one
the the three options or EXIT to quit the nemu. Once you have chosen one of the two options Play or
Sleep, the chosen program will be highlighted in blue and the event will be added in the Timer list. To
consult the complete list press MENU, User Setting and finally Timer.
6.8 Favourite channels
Use the FAV button to access your favourite channel groups. Using pq select created earlier one of
available favourite groups and press OK to switch to channel list within selected group. Use pq to
select channel and press OK to start viewing it. Now you will navigate (switch channels with CH+/
buttons) only within this group. Please refer to section 8.2.2 for details on how to manage favourite lists.
NOTE: The channel list will display only the channels contained in the favourite list
selected. To back to the complete list select All
7.0 MAIN MENU
The main menu gives you access to Installation, Channel Manager, User Setting, Tools and Smartcard
Tivùsat functions. To access the main menu, press MENU in viewing mode. Throughout the main menu,
use MENU and BACK to get back to the previous screen and EXIT to quit. Throughout the Menu, use
pq to select the main menu item and OK or uto highlight the submenu of choice.
7.1 Installation
This section contains information of how to add or modify your satellite parameters, to search for
channels and programmes list. To access this section of the menu it is necessary to enter the PIN code.
7.1.1 Auto Search
All settings and changes will be saved at exitting the menu. Confirm the pop-up.
The Signal Strength and Signal Quality of the signal are displayed for your convenience while setting up,
at the top of the screen. These indicators also have the function of providing help in the alignment of the
dish during installation. If settings are correct, and satellite dish is aligned, some level should appear.
All the options in the menu are listed below:
Satellite: Select a satellite to be configured. If using the DiSEqC function, press the OK
button to access the satellite list, then press BLUE button to select two or
more satellites.
11

Transponder: This option allows you to select a TP of your choice by using tubuttons,
or press OK to view the entire list. Within the list it is also possible to add
or delete TPs or modify their parameters. For changes refer to the colored
buttons shown at the bottom of the screen.
LNB Type: Select the LNB type. The Universal LNB (09750/10600 MHz) is supported and
is the most common on the market for European Ku-band use. User allows
manual entry of the parameter. The other options must be selected only if
special LNBs are used by specialized personnel.
DiSEqC: Set the DiSEqC type or the SCR/dCSS LNB.
DiSEqC Port: If DiSEqC 1.0 or 1.1 is selected in the DiSEqC option, here it is possible to set the
port to be used for the selected satellite.
Motor Position: If DiSEqC 1.2 is selected in the DiSEqC option, here it is possible to set the
motor dish parameters. Press OK button to access the submenu.
Unicable Channel: If SCR or dCSS is selected in the DiSEqC option, here it is possible to set the
port up to 16 output.
Frequency SCR or dCSS: The frequencies are set to default value. To modify them select DiSEqC, set
SCR or dCSS and press OK button. In the menu set User in the Unicable Mode.
22KHz: Switch the 22 KHz oscillator signal to ON (22K) or OFF (0). Only for C-Band LNB
use. Refer to manual of LNB.
LNB Power: To turn the power on or off of the LNB.
Type of search: Set Tivu + FTA to store the Tivùsat together to other unencrypted channels,
FTA only to store unencrypted channels only, or All to store all the channels
available.
Once all options have been set correctly, press the BLUE button to start scanning for channels.
NOTE: If an SCR or dCSS LNB is used, please refer to the manual of the respective
LNB to obtain technical data on user bands numbers and corresponding
frequencies. SCR/dCSS cannot be combined with any other DiSEqC
function. SCR/dCSS can only work in combination with an optional multi-
output (max. 16) satellite splitter and an SCR/dCSS LNB. SCR/dCSS systems
are mainly installed by professional experts, who then assign the User Band
and Frequencies. If such a system is readily installed in your apartment
block, refer to the original installer or the maintenance department of the
housing block.
7.1.2 Manual Search
Satellite: Select a satellite to be configured
Frequency: Use the number keys 0~9 to enter a frequency, or press OK button to access
the TP list and select one existing TP.
Symbol Rate: Use the number keys 0~9 to enter che symbol rate.
Polarization: Use the tubutton to set the polarization.
Transponder Spec: Default value.
FEC: Default value.
Network Search: Use the tubutton to set the search.
12

FTA Only: Use the tubutton to change the parameter. Select Yes to enable the search
of unencrypted channels only, select No to store all channels available on the
TP.
Once all options have been set correctly, press the BLUE button to start scanning for channels.
7.2 Channel Manager
This menu allows you to create favourite lists, lock channels with PIN protection, skip channels, change
the order of the channel in the list or check the information regarding the displayed channel.
7.2.1 Edit Channel
In this menu it is possible to lock or skip a channel. It also allows you to change the order of the channels
on the list.
First select the desired channel using the pq buttons. To lock the channel press RED button, in
this case the channel will be protected with the PIN code. To enable viewing of the channel it will be
necessary to enter the code. To skip the channel press GREEN button, in this case the channel will be
skipped and it will no longer be selectable.
The YELLOW button also allows you to change the order of the channels contained in the channel list.
Select one of the 4 modes and confirm with OK.
To enable the changes made in the menu it is necessary to confirm them when exiting the menu by
selecting Ok. By selecting Cancel the changes will not be saved.
7.2.2 Edit Favorite
Channels from the TV list can be added to up to 8 different favourite groups which are: HD, Bambini,
Sport, Serie, Lista 1, Lista 2, Lista 3 and Lista 4.
To create or edit the favorite list, press MENU and select Channel Manager > Edit Favorite. Press FAV to
display the list where to add the channels and use OK to make your select. Now use pq to select the
channels to be add and confirm with OK. In the case you want to delete one channel just press OK on
the channel to remove.
It is also possible to rename the list name. Press ubutton to move the cursor to the right of the menu
and press YELLOW button to enable editing. Use pq and tuto compose the new name, RED to
delete and GREEN to confirm.
To use the newly created Favourite list, press FAV in normal viewing mode and select with pq the
preferred list.
NOTE: The channel list will display only the channels contained in the favourite list
selected. To back to the complete list select All
7.2.3 Channel Information
In this menu you will find all the information regarding the selected channel. Information regarding
frequency, polarity, symbol rate and much more. It can also be used to view the signal strength.
7.2.4 Channel Update Setting
The menu allows you to set up the channel list update. By setting Automatic search for new channels to
On and adjusting time and frequency, the channel list will be constantly updated. Select Off to disable
the update.
The following settings are available:
13

Automatic search for new channels:
Set On to enable periodic updating of the channel list.
Time: Use the 0~9 buttons to set the time to search for any new channels.
Frequency: Use tubuttons to set the frequency of the search. There are two options:
Daily and Weekly.
Weekly: If the frequency is set to Weekly, this option allows you to set the day of the
weekUse tubuttons to set the day to search.
NOTE: In the event that the Automatic search for new channels is active (On) and
the receiver is switched on when the search for new channels is activated,
a pop-up banner will appear to inform about the imminent start of the
search. At this point it will not be possible to interrupt the process.
7.3 User Setting
7.3.1 Language
This menu allows you to set up your language preferences.
Menu: This setting allows you to select the language to be used in the menu. Press
OK button to open the pop-up menu and use pq buttons to select the
language to be used on screen. Confirm with OK.
Primary Audio: This setting determines the main audio that the receiver will choose in each
channel. Press OK button to open the pop-up menu and use pq to select
the audio language you like to have as first priority, if available. Confirm with
OK.
Secondary Audio: Press OK button to open the pop-up menu and use pq to select a language
that will be played when the language selected at Primary Audio isn't
available. Confirm with OK.
Primary Subtitle: Press OK button to open the pop-up menu and use pq to select the first
preferred subtitle language. Confirm with OK.
Secondary Subtitle: Press OK button to open the pop-up menu and use pq to select the second
preferred subtitle language, to be shown if the Primary Subtitle isn't available.
Confirm with OK.
Audio Description: Press OK button to open the pop-up menu and select On to enable or Off to
disable the audio description.
NOTE: Availability of Audio tracks, Audio description and Subtitles data depends
on broadcaster. The options set in this menu are for the sole purpose
of indicating preference. The tracks offered by the broadcaster may be
different from those set.
7.3.2 Display
This option allows you to adapt various parameters related to the display of information banners to your
needs. Here below are the parameters to be set:
Infobar Hide-Out Time: This setting allows you to set the display time of the info banner in viewing
mode. The options range start from 1 sec to 10 sec. The option Keep keeps the
14

info banner displayed. Press OK button to open the pop-up menu and use
pq to make your selection. Confirm with OK.
OSD Transparency: This setting allows you to set the transparency of the menu and the info
banner. The options range start from 20% (minimal transparency) up to 80%
(maximum transparency). The option Off disable the transparency. Press
OK button to open the pop-up menu and use pq to make your selection.
Confirm with OK.
Load Default: This setting returns the Display settings to the preset parameters. Press OK
button to open the pop-up menu and use pq to make your selection.
Confirm with OK.
7.3.3 A/V Output
This menu allows you to to modify the various parameters concerning audio and video.
The available settings are shown below:
Screen Mode: Options are: 16:9, 4:3. Press OK button to open the pop-up menu and use
pq to make your selection. Confirm with OK.
TV Aspect Ratio: Options are: Letter Box to fit 16:9 video content to 4:3 TV screen, in this case
the screen will display black bars above and below the image. Pan-Scan to fit
16:9 video content to 4:3 TV screen, but the content will have the extreme left
and right portions of the image cuted off and presented in full screen, other
options are Combined and Ignore. Press OK button to open the pop-up menu
and use pq to make your selection. Confirm with OK.
TV Type: Options are: PAL-G and NTSC. Press OK button to open the pop-up menu and
use pq to make your selection. Confirm with OK.
Audio Mode: This setting allows you to manage the S/PDIF output signal if you use an
external audio amplifier. Options are: PCM and By Pass. Press OK button to
open the pop-up menu and use pq to make your selection. Confirm with
OK.
Sync Mode: This setting allows you to synchronize the audio with the video in case of
offset. Options are: PTS Sync, Audio Sync and Video Sync. Press OK button to
open the pop-up menu and use pq to make your selection. Confirm with
OK.
7.3.4 Time
Set up your time zone for clock/time in your menu and system.
GMT Usage: Set to Auto for broadcaster defined time depending of country selection
you've made in the first Installation. Normally, the clock/time will be correct
and also follow up the summer time changes automatically. In this case select
the option Local System to set up time manually in the next step below. Press
OK button to open the pop-up menu and use pq to make your selection.
Confirm with OK.
Time: In the case you have selected Local System in the previous option, here you
can manually enter the date and time. Press OK button to open the pop-up
menu and use 0~9 buttons to set the date and time. Confirm with OK.
Summer Time: Daylight Saving Time. Select Off or On to add one hour extra for summer
time. Press OK button to open the pop-up menu and use pq to make your
selection. Confirm with OK.
15

Time Offset: This setting allows you to change the time zone (or GMT) if necessary. Press
OK button to open the pop-up menu and use pq to make your selection.
Confirm with OK.
Region: This setting allows you to change the Country. Consider that this will also
affect the time if you select a country with a different GMT. Press OK button
to open the pop-up menu and use pq to make your selection. Confirm with
OK.
Time format: This setting allows you to view the time in 24H or 12H format. Press OK
button to open the pop-up menu and use pq to make your selection.
Confirm with OK.
7.3.5 Timer
This menu allows you to set the timers according to your needs, without being tied to the times set by
the EPG function. In this menu you can set 3 different types of timers: Channel Change, Power On and
Power Off. To create a new event press GREEN button. The available settings are listed below:
Mode: This option allows you to set the type of timer to activate. Use tubutton
to choose from the following options: Channel Change to tune the receiver
to the channel and time set in the following settings, Power Off to put the
receiver on standby at the set time and Power On to switch on the receiver at
the time and on the set channel.
Channel: Here you can set the channel to be displayed. Use tubuttons to set the
channel or press OK button to display the entire channel list, use pq to
select the channel and confirm with OK.
Start Date: Use 0~9 buttons to set the time to activate the timer.
Reminder: Here you can set the advance in which to signal the start of the timer. Use
tubutton to set the time.
Cycle: This option allows you to establish the repetition of the event. The options
are: Every Day to repeat the operation every day, Every Week to repeat the
operation every week, One Time to activate the event are the day and date
set. Press tuto make your selection.
The set data will be saved when you exit the menu. Press EXIT button and select OK. Selecting Cancel the
timer will not be activated.
To delete a timer press the RED button, to delete one or more timers press the YELLOW button. For both
operations, confirm the operation by selecting OK or reject by selecting Cancel.
7.3.6 Lock
Access to this menu requires the insertion of the PIN code as it allows the modification of privacy
settings. In fact here it is possible to change the PIN code and set the Parental Rating level.
The available settings are shown below:
Parental Rating: This setting allows you to enable (or disable) the Parental Rating function.
Whenever a channel reports a rating higher than the one set, the receiver will
block the content and will request the PIN code to be entered. Entering the
correct code will unlock the channel. Available settings are: PG-18, PG14, PG7
and None to disable the lock. Press tuto make your selection.
New Password: Use 0~9 buttons to set the new PIN code.
Confirm Password: Use 0~9 buttons to confirm the new PIN code.
16
This manual suits for next models
1
Table of contents
Other Strong Media Converter manuals