Stuart CP300 User manual

This product meets the applicable EC harmonised standards for
radio frequency interference and may be expected not to interfere
with, or be affected by, other equipment with similar qualifications.
We cannot be sure that other equipment used in its vicinity will meet
these standards and so we cannot guarantee that interference will
not occur in practise. Where there is a possibility that injury, damage
or loss might occur if equipment malfunctions due to radio frequency
interference, or for general advice before use, please contact the
Technical Department of Bibby Sterilin.
Version 1.1
Instructions for use
PTFE HOTPLATE
CP300
2
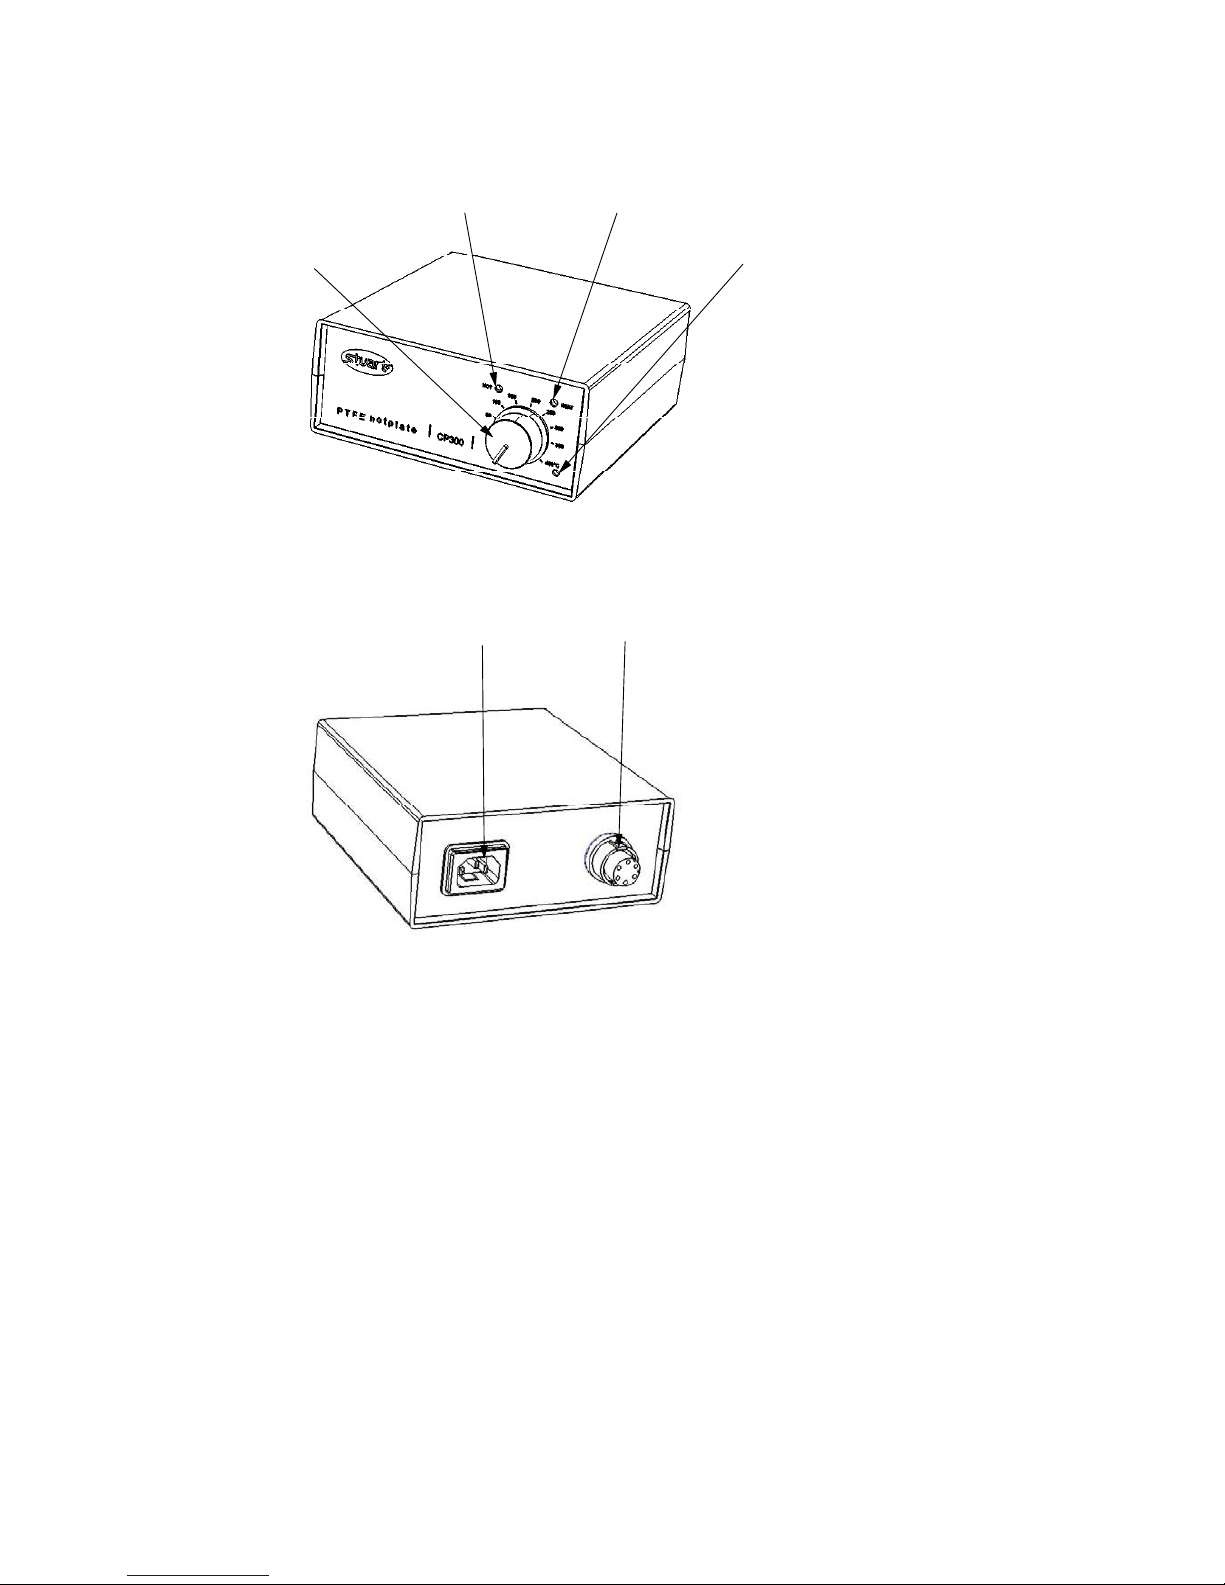
Temperature
control knob
Hot warning lightHot warning light
Mains indicator light
Heater on light
Main IEC inlet
socket
Hotplate inlet
socket

ENGLISH
Thank you for purchasing this piece of
Stuart equipment. To get the best
performance from the equipment, and for
your own safety, please read these
instructions carefully before use.
This equipment is designed to operate under
the following conditions:-
For indoor use only
Use in a well ventilated area
Ambient temperature range +5°C to +40°C
Altitude to 2000m
Relative humidity not exceeding 80%
Mains supply fluctuations not exceeding
10%
Overvoltage category II IEC60364-4-443
Pollution degree 2 IEC664
Use with a minimum distance all around of
200mm from walls or other items
If the equipment is not used in the manner
described in this manual the protection
provided by the equipment may be impaired.
Electrical Installation
THIS EQUIPMENT MUST BE EARTHED
Before connection please ensure that the line
supply corresponds to that shown on the rating
plate. This equipment requires a supply rated
at:
230V, 50 or 60Hz, ~, single phase.
The unit is supplied with two mains leads fitted
with IEC plugs for connection to the control box.
One has a UK 3 pin plug and the other has a 2
pin ‘Shuko’ plug for connection to the mains.
Choose the lead appropriate for your electrical
installation and discard the other.
Should neither lead be suitable, take the lead
with the UK plug and replace the plug with a
suitable alternative. This involves cutting off the
moulded plug, preparing the cable and
connecting to the rewireable plug in accordance
with its instructions.
IT IS IMPORTANT THAT THIS OPERATION SHOULD BE
UNDERTAKEN BY A QUALIFIED ELECTRICIAN
The wires in the mains cable are coloured as
follows:
BROWN - LIVE
BLUE - NEUTRAL
GREEN / YELLOW - EARTH
The control unit is fitted with an IEC socket at
the rear for connection to the mains supply.
The appropriate mains lead should be
connected BEFORE connection to the mains
supply.
Should this lead require replacing, a cable of
1mm2of harmonised code H05W-F connected
to an IEC 320 plug should be used.
N.B. The UK mains lead is protected by a 10A
fuse mounted in the plug top.
Model Power Fuse
CP300 900W T5A
Fuse fitted in both live and neutral lines.
IF IN DOUBT CONSULT A QUALIFIED
ELECTRICIAN
General Description
WARNING: Top surface may be hot.
The PTFE Hotplate consists of a ceramic tile
and heater assembly embedded in a block of
high grade fluropolymer. The hotplate is
controlled via a separate control box which is
connected via a 2 meter lead (partly covered
with a fluoropolymer sleeve).
Safety Advice Before Use
Do not use to heat flammable materials.
Position the instrument on a firm level
surface away from any heat sensitive or
flammable material.
Never move or carry the instrument until it
has been switched off and allowed to
cool for at least 30 minutes.
The unit should be carried using both
hands with fingers under each side frame.
Never move the unit while it is connected
to the mains electricity supply.
In the case of mains interuption, a fault or
failure, the unit WILL continue to operate
on removal of fault.
Operation
See page 2 for identification of controls.
Position the hotplate unit on a firm level surface
away from any heat sensitive or flammable
material. Plug the hotplate into the control unit
and then connect the control box to the mains
(the green mains on light will illuminate).
3

Position the control unit in the area it is to be
used (e.g. outside the fume hood).
Turn the unit ON using the temperature control
knob and select the temperature of the hotplate
by using the printed scale around the knob.
When the plate surface is hot (>50°C) a red
warning light on the control box facia will begin
to flash. This will continue to flash while the
plate temperature is above 50°C even after the
hotplate has been switch off (the control unit
must remain connected to the mains supply).
Cleaning and care
Before attempting to clean, please ensure that
the top is cool and that the control unit is
disconnected from the mains electricity supply.
The control unit should be cleaned using a
damp cloth and a mild detergent.
The hotplate body can be cleaned with almost
any cleaning agent. Must be compatible with
PTFE.
A damp cloth will normally remove most types
of contamination. For more difficult stains a
domestic cream cleanser is recommended.
Cleaning is made easier if spillages are
attended to promptly. In any case, spillages of
alkali, phosphoric acid and hydrofluoric acid
MUST be removed immediately as these
chemicals can attack and damage the glass
ceramic. Ensure that the appropriate safety
precautions are observed.
WARNING: A ceramic top which is scratched,
chipped, chemically etched or damaged must
not be used.
Servicing & repair
This product does not require any routine
servicing.
NOTE: There are no internal user replaceable
parts.
In the event of product failure it is
recommended that any repair is only
undertaken by suitably qualified personnel. For
advice or to receive a service manual please
contact the Technical Service Department of
Bibby Sterilin Ltd.
Only spare parts supplied or specified by Bibby
Sterilin Ltd. or its agents should be used.
Fitting of non-approved parts may affect the
performance and safety features designed into
the instrument.
If in any doubt, please contact the Technical
Service Department of Bibby Sterilin Ltd. or the
point of sale.
Bibby Sterilin Ltd
Stone
Staffordshire ST15 0SA
United Kingdom
Tel: +44 (0) 1785 812121
Fax: +44 (0) 1785 813748
Warranty
Bibby Sterilin Ltd warrants this instrument to be
free from defects in material and workmanship,
when used under normal laboratory conditions,
for a period of two (2) years. In the event of a
justified claim Bibby Sterilin will replace any
defective component or replace the unit free of
charge.
This warranty does NOT apply if damage is
caused by fire, accident, misuse, neglect,
incorrect adjustment or repair, damage caused
by installation, adaptation, modification, fitting
of non approved parts or repair by unauthorised
personnel.
This warranty does NOT apply if the ceramic
top has broken due to mechanical impact,
scratching, chipping or chemical etching.
Bibby Sterilin Ltd
Stone
Staffordshire ST15 0SA
United Kingdom
Tel: +44 (0) 1785 812121
Fax: +44 (0) 1785 813748
www.bibby-sterilin.com
Technical specification
230V, 50-60HzElectricity supply
11Net weight, kg
1700Lead length, mm
150 x 160 x 65Control unit dimensions, mm,
(w x d x h)
320 x 360 x 60Hotplate dimensions, mm,
(w x d x h)
400Max. plate temperature, °C
900Heater power, W
200 x 200Heated area, mm
300 x 300Plate dimensions, mm
Glass ceramicPlate material
4
Other Stuart Cooktop manuals


Popular Cooktop manuals by other brands

Omega
Omega OG70XA Installation and operating instructions

GE
GE JP256BMBB Dimensions and specifications

Smeg
Smeg SIMU524 Instructions for use

IAG
IAG ICS6SE3 manual

Bertazzoni
Bertazzoni V24 4 00 X Installation, service and user instructions

Dacor
Dacor Preference Renaissance RGC304 installation instructions


