Studio Designs Vision Craft Station 10053 User manual

Rev. 01.21.2014


INCHES
MILLIMETERS
1
10 20 30 40 50 60 70 80 90 100 110 120 130 140 150 160 170
2 3 456 7
17
14
14
1
3
1
22
22
22
22
17
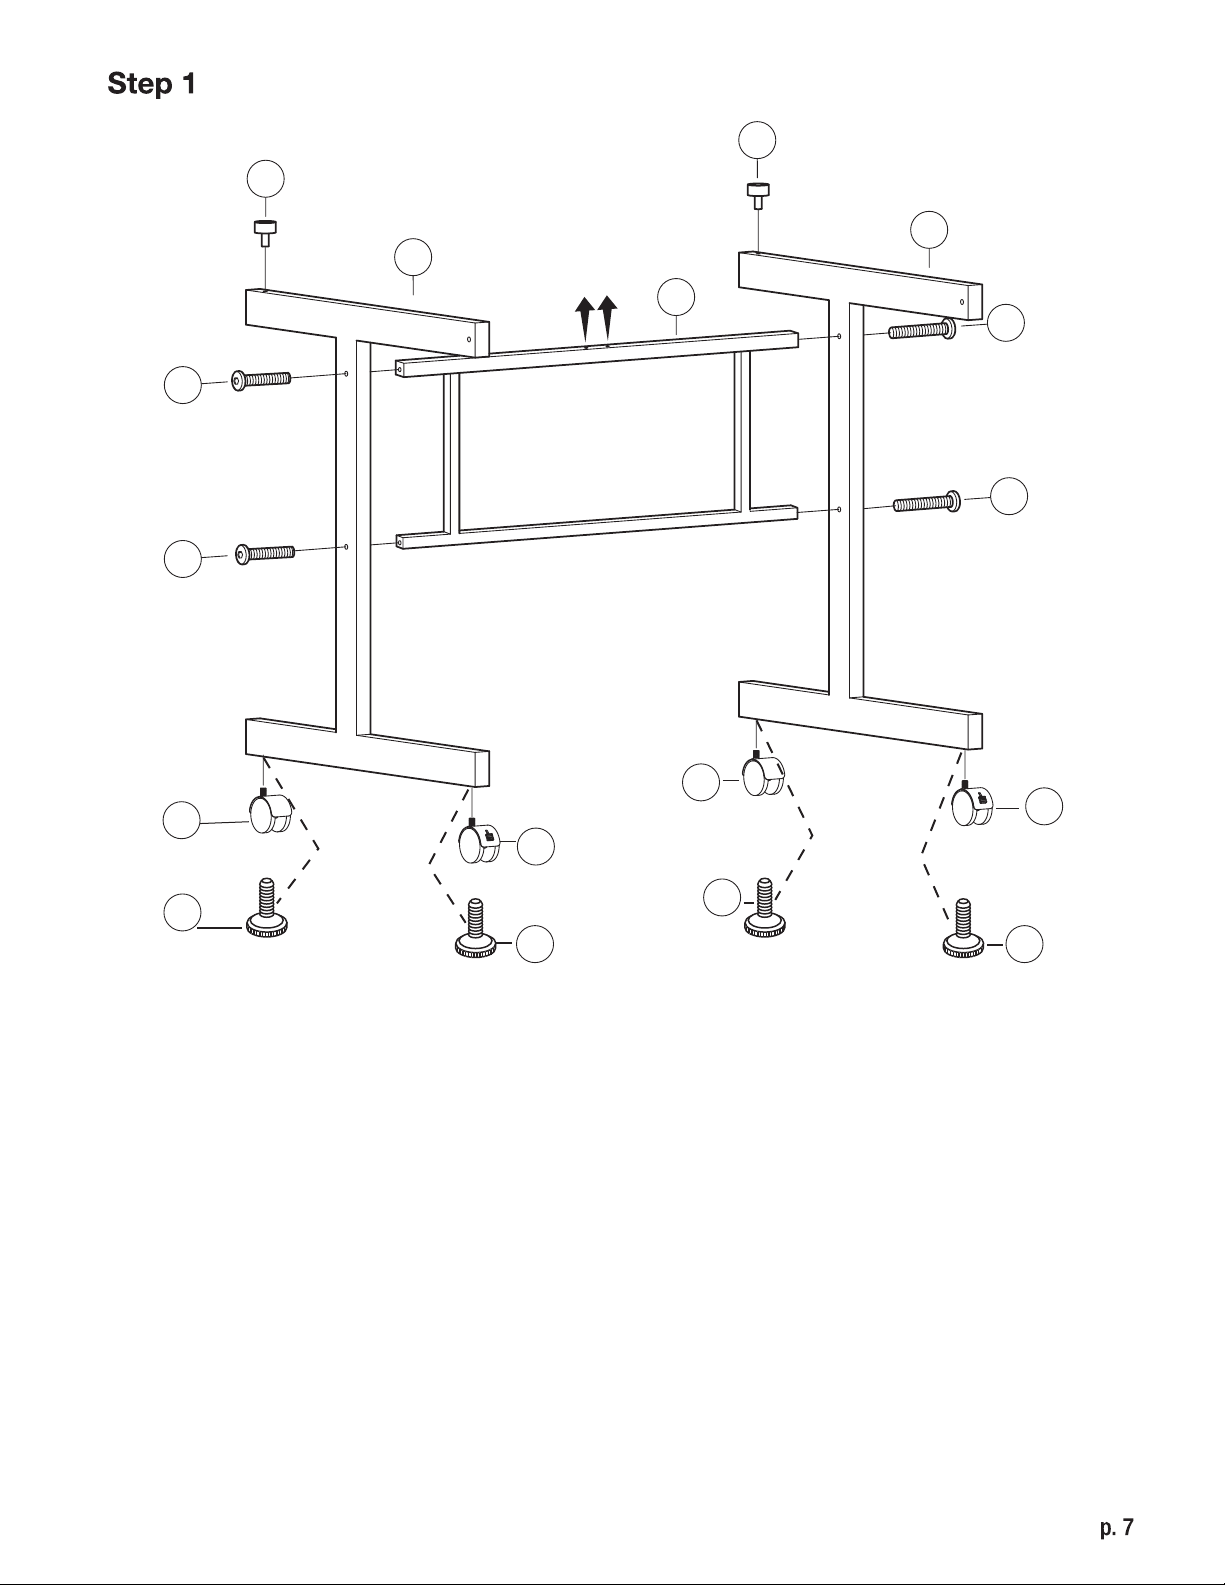
1. Screw two Locking Casters (14) into holes in Legs (1).
2. Screw two Non-Locking Casters (15a) into holes in Legs (1).
3. For use on uneven floors and for increased stability, install Leg Levelers (15b) instead of Casters (14 &15a).
4. Attach Bottom Frame (3) to Legs using four Allen Bolts (22) (two holes face up - see arrows).
5. Insert two Spacers (17) into holes in Legs.
1. Vissez deux Roulettes Bloquantes (14) dans trous dans Jambes (1).
2. Vissez deux Roulettes Non-Bloquantes (15a) dans trous dans Jambes (1).
4. Attachez Bâti Inférieure (3) aux Jambes à l’aide des quatre Boulons Allen (22) (deux trous vers l’haut - voir flèches).
3. Pour la surface irrégulière et pour augmenter la stabilité, installer les Niveleur de pattes (15b) au lieu
des Roulettess (14 et 15 bis).
5. Inserez deux Coussins (17) dans trous dans Jambes.
1. Atornille dos Ruedas con Traba (14) en los agujeros de las Patas (1).
2. Atornille dos Ruedas sin Traba (15a) en los agujeros de las Patas (1).
4. Fije Marco Inferior (3) a las Patas usando cuatro Pernos Allen (22) (dos agujeros hacia arriba - vea flechas).
3. Para superficie irregulares y para aumentar la estabilidad, instale los niveladores de patas (15b)
en lugar de las Ruedas (14 y 15a)
5. Inserte cuatro Espaciadores (17) en los agujeros de las Patas.
15b
15a
15a
15b
15b 15b

28
2
28
28
28
28
28
28
28
28
16
16
9
9
8
8
5
28
28
1. Attach eight Brackets (16) to Top Frame (2) using eight Phillips Screws (28).
2. Attach Paint Trays (8) and Pencil Trays (9) to Brackets.
3. Attach Pencil Ledge (5) to Frame using three Phillips Screws (28).
1. Attachez huit Supports (16) au Bâti Supérieure (2) à l’aide des huit Vis Cruciformes (28).
2. Attachez les Plateaux pour Peinture (8) et les Plateaux pour Crayon (9) aux Supports.
3. Attachez Bordde Crayon (5) au Bâti àl’aide des trois Vis Cruciformes (28).
1. Fije ocho Soportes (16) al Marco Superior (2) usando ocho Tornillos de Cruz (28).
2. Fije las Bandejas de Pintura (8) y las Bandejas de Lápiz (9) a los Soportes.
3. Fije el Borde de Lápiz (5) al Marco usando tres Tornillos de Cruz (28).

18
18
24
7
21
21
26
2
3
6
23 20 19
20
23
27
27
6
18 18
1. Place Top Frame (2) onto Legs and attach using Washers (21), Nuts (20) and Allen Bolts (23).
2. Attach Lift Mechanism (7) to Bottom Frame (3) using two Phillips Bolts (26) and two Flanged Nuts (19).
3. Attach Lift Mechanism (7) to Top Frame (2) using two Allen Bolts (24).
4. Insert four Glass Spacers (18) into holes in Top Frame (2).
5. Attach two Drawer Brackets (6) to Right Leg using two Phillips Screws (27).
1. Placez Bâti Supérieure (2) sur Jambes et l'attache à l’aide des Rondelles (21), Écrous (20) et Boulons Allen (23).
2. Attachez Mécanisme pour Élever (7) au Bâti Inférieure (3) à l’aide des deux Boulons Cruciformes (26) et deux Écrous (19).
3. Attachez Mécanisme pour Élever (7) au Bâti supérieure (2) à l’aide des deux Boulons Allen (24).
4. Insérez quatre Coussins (18) dans des trous dans la Bâti Supérieure (2).
5. Attachez deux Supports de Tiroir (6) à la Jambe Droite à l’aide des deux Vis Cruciformes (27).
1. Coloque el Marco Superior (2) sobre las Patas y fije usando Arandelas (21), Tuercas (20) y Pernos Allen (23).
2. Fije el Mecanismo de Elevación (7) al Marco Inferior (3) usando dos Pernos de Cruz (26) y dos Tuercas (19).
3. Fije el Mecanismo de Elevación (7) al Marco Superior (2) usando dos Pernos Allen (24).
4. Inserte cuatro Espaciadores (18) en los agujeros en el Marco Superior (2).
5. Fije dos Soportes de Cajón (6) a la Pata Derecha usando dos Tornillos de Cruz (27).

10
11
12
13
1. Attach Top Drawer Frame (10) to Center Drawer Frame (11).
2. Attach Center Drawer Frame (11) to Bottom Drawer Frame (12).
3. Slide three Drawers (13) into Drawer Frame.
1. Attachez la Bâti Supérieure du Tiroir (10) à la Bâti Centrale du Tiroir (11).
2. Attachez la Bâti Centrale du Tiroir (11) à la Bâti Inférieure du Tiroir (12).
3. Glissez trois Tiroirs (13) dans Bâti.
1. Fije el Marco Superior de Cajón (10) al Marco Central de Cajón (11).
2. Fije el Marco Central de Cajón (11) al Marco Inferior de Cajón (12).
3. Deslice tres Cajónes (13) dentro del Marco.

1. Attach Drawer Assembly to Drawer Brackets using four Phillips Screws (28).
2. Carefully place Glass Top (4) onto Top Frame and attach using two Allen Bolts (25)
Please use care and good judgement when placing objects on top and shelves.
DO NOT exceed the weight limits shown.
1. Attachez l'Assemblée de Tiroir aux Supports deTiroir à l’aide des quatre Vis Cruciformes (28).
2. Placez soigneusement la Table en Verre (4) sur Bâti Supérieure et l'attachez à l’aide des deux Boulons Allen (25).
Précaution est de rigueur lorsque vous placez objets sur la table et l’étagères.
NE DEPASSEZ pas les limites montrées.
1. Fije la Asamblea del Cajón a los Soportes del Cajón usando cuatro Tornillos de Cruz (28).
2. Cuidadosamente coloque la Mesa de Vidrio (4) sobre Marco Superior y fijela usando dos Pernos Allen (25).
Use cuidado y buen juicio antes de colocar objetos sobre la mesa y estantes.
NO EXCEDA los limites mostrados.
25 lbs. / 11,34 kg.
28 28
28
28
25
25
4

Other Studio Designs Power Tools manuals


Popular Power Tools manuals by other brands

NKO MACHINES
NKO MACHINES UZ 18 Hardworker Operating and maintenance instructions

Milwaukee
Milwaukee M12 FUEL FHIR38 Operator's manual

BGS technic
BGS technic 8856 instruction manual

Chicago Pneumatic
Chicago Pneumatic MS 595 Safety and operating instructions

Powerfix Profi
Powerfix Profi 275402 Instructions for use

Bosch
Bosch GGS 16 Professional Original instructions


