Stumpfl VARIO CURVE User manual

23EV
VARIO CURVE
MANUAL

AV Stump GmbH | Mitterweg 46 | 4702 Wallern
AVstump@AVstump.com | www.AVstump.com | +43 7249 42811
We reserve the right to make modications in the interest of technical progress.
INDEX
GENERAL ............................................................................................................ 3
STANDARDS, REGULATIONS AND TECHNICAL SPECIFICATION ........... 3
SAFETY ................................................................................................................ 3
OPERATION, MAINTENANCE AND SERVICE .............................................. 6
WARRANTY ........................................................................................................ 7
FRAME SET UP .................................................................................................. 8
CENTRE SUPPORT ........................................................................................... 9
SURFACE MOUNTING ...................................................................................10
3
BACK
AV Stump GmbH | Mitterweg 46 | 4702 Wallern
AVstump@AVstump.com | www.AVstump.com | +43 7249 42811
We reserve the right to make modications in the interest of technical progress.
GENERAL
STANDARDS, REGULATIONS AND
TECHNICAL SPECIFICATION
This projection screen is in accordance with the safety regulations in DIN standard 19045 and
DIN 56950. The screen fabric is comply with DIN 4102 part 1 and the specications of the according
data sheet. For the technical details and projection-specic material parameters please refer to the
corresponding product data sheet: www.AVstump.com/projectionmaterials
Detailed data of frame components, legs and projection surface can be found on the type labels on
each component and on the labeled soft bags, roller bags or ight cases.
SAFETY
GENERAL INFORMATION FOR THE MANUAL AND SAFETY
This operating manual forms part of the projection screen system and enables a safe and ecient
operation. The safety section provides information about important safety aspects for the protection
of persons, frame and projection materials. Task-related warnings/notes are also contained in the
individual chapters. Read instructions through completely before proceeding and keep for future
reference. You can nd manuals electronically on our website: www.AVstump.com/downloads
PACKAGING MATERIAL
WARNING
Danger of suocation!
• Keep packaging material and foils away from children.
• Do not let children play with packaging material.
Unpack without cutter or any other sharp tool to avoid
damaging of the projection screen. Remove packaging materials
by hand. Unpack projection surface after assembling of the frame.

4
BACK
SET UP-ASSEMBLY
MECHANICAL HAZARDS
Projection surface damage in case of faulty assembly or set up.
Make sure all frame parts assembled correctly and all hinges and joints are locked before one unfold and
attach the projection surface.
FRAME AND LEG COMPONENTS
Please be careful
not to pinch
your ngers!
FALLING OVER
WARNING
Falling over of a projection screen can cause severe injury or death!
To avoid falling over:
• Make sure that the projection screen is in level.
• Mind the maximum set-up height of the legs
• Prevent air draft
• Use additional weights on the base prole of the leg to gain higher stability.
• Do not put additional load on the screen frame!
• Do not use outdoors!
Foldable snap joints, corner hinges and plug-in connections can
lead to injury to the hands (body parts). Please be careful not to
pinch your ngers!
Danger of injury due to improper assembly.
Make sure all frame parts assembled correctly and all hinges
and joints are locked before raising screen to standing
position. Falling parts can cause severe injury or death!

5
BACK
WARNING
Vario Curve systems are developed for indoor use only.
Failure to follow warning may result in personal injury due to unforeseen acts of nature.
Any damage and consequential damage caused by outdoor use is not covered by warranty.
BASIC SAFETY REQUIREMENTS
Basic safety requirements for „ying“ projection screens and wall- or ceiling mounting!
If persons are able to stand under the loads, fastening points and slings must not be loaded more than
half the value of the load bearing capacity stated by the manufacturer.
When planning the event or production, not only dead loads but also dynamic forces, potential
breakdown loads and additional loads during operation, as well as during assembly and dismantling
must be taken into account.
Observe the local safety regulations!
FLYING SCREEN
If a modular projection screen is used as a “ying” (free hanging) screen, then all plug-in and clamp
connections must be secured against becoming loose and falling.
It is not allowed to use the projection surface holding the frame parts in position!
Falling parts can cause severe injury or death!
Please make sure that all components are secured safely before raising screen to standing position
and lifting. Use the necessary number of suspension points (e.g.: EasyFly) according to the overall
system weight. A second/auxiliary safeguarding system is mandatory (e.g. steel rope catch)
Please follow the detailed instruction in the manual.
WALL MOUNTING
Before mounting, make sure that the wall, as well as the xing points meet the safety requirements of
the local standards and the required load can be beared.
Danger of injury
due to improper
disassembly.
Falling parts can
cause severe injury
or death!
Beware of
pinch points.
It is not allowed to use the projection surface holding the frame
parts in position! Falling projection screens or parts can cause
severe injury or death!
Please be careful
not to pinch
your ngers!
6
BACK
DISASSEMBLY
For disassembly the same safety instructions apply as for assembly and set up. Bring down a projection
screen with the appropriate number of people to avoid falling over of the screen.
OPERATION, MAINTENANCE AND SERVICE
FRAME ELEMENTS, LEGS AND ACCESSORIES
The frame elements, legs and additional elements are maintenance-free.
PROJECTION SURFACE
PACKAGING AND STORAGE
The projection surface is rolled on a tube with foam intermediate layer and depending on size
packed in a cardboard box or transport tube, to avoid any damage by the frame parts,
bleaching and discoloration. After use, the projection surface must be rolled up, identical to the delivery
condition, with the foam intermediate layer and with the projection side inwards in order to avoid soiling
and damage to the surface. The surface must be rolled up in such a way that the reinforced black border
with the caps and hooks never gets in contact with the projection area. Insert the enclosed foamed
plastic foil between the caps and hooks and the projection area to avoid permanent marks. Incorrect
storage can damage and discolor the surface and is not covered by the guarantee.
Additionally, following instructions have to be adhered to:
• Do not allow the projection surface to get in contact with sharp objects!
• Do not bring printed and coloring objects (instructions, magazines, etc.) in contact with the surface!
• Do not write on the projection surface!
• Colors penetrate the projection surface and cannot be cleaned anymore!
• Store the projection surface cleaned and dry at room temperature only!
COLD BREAK
A projection foil must never be stored or transported below 5° C. There is a risk of a cold break!
The lm becomes very brittle and splinters like glass! When transporting the projection surface at low
temperatures do not unroll the surface unless it has reached its full elasticity at room temperature.
Otherwise there is the risk of cold break of the projection screen.
The ideal temperature range to prevent damaging the surface during surface attachment is 54°-82° F
(12°-28° C). Assembling below recommended temperatures may damage surface and void warranty.
CLEANING OF THE PROJECTION SURFACE
Use a white clean cotton cloth saturated with clear water (optionally mild soap water) and gently
wipe the area in one direction (no circular motion). Wipe dry with another cotton cloth.
To clean a stubborn stain, use methylated spirit and follow the same procedure.
Clean rear projection surfaces in case of imperative only!
Danger of injury
due to improper
disassembly.
Falling parts can
cause severe injury
or death!
Beware of
pinch points.
Please be careful
not to pinch
your ngers!

7
BACK
WARRANTY
The warranty period for production deciencies is 5 years for the frame elements and 24 months
for the projection surface.
Mobile projection screens are developed for indoor use only.
Any damage and consequential damage caused by outdoor use is not covered by warranty.
The general terms and conditions are available at www.AVstump.com/agb
LIMITATION OF LIABILITY
All the details in this manual were compiled in consideration of the standards and legal regulations
applicable at this time, as well as the experience of the manufacturer and qualied sta. The
manufacturer accepts no liability for damage to persons or things (projection screen, other devices,
goods, etc.) resulting from:
• Non-observance of the manual and the regulations/safety instructions contained therein.
• Failure to comply with the local safety regulations.
• Inappropriate use (misuse).
• Use of unauthorized and non-trained sta.
• Unauthorized equipment conversions and technical modications by the operator himself.
• Use of spare parts not approved by the manufacturer.
• Typesetting and print errors.
Failure to observe the above points will invalidate the warranty claims.
Technical specications are subject to change without notice.
The local regulations and safety regulations and the essential safety requirements apply for the use of
this projection screen.
DISPOSAL
At the end of its lifetime this product must not be disposed of with normal household waste but needs
to be taken to a collection site for recycling.
Separate disposal of the product makes an important contribution towards environmental protection.
Frame components and legs are made of aluminum and steel.
The projection material is PVC vinyl.
Contact your local disposal company for the address of a collection center.
SUBJECT TO MODIFICATIONS, ERRORS EXPECTED !

8
21
43
BACK
FRAME SET UP
1-2 Assemble the upper and lower horizontal elements according to the numbering and fasten
them (1 Nm).
3-4 Unfold the lateral vertical elements and plug them with the lower horizontal corner elements
according to the labeling and tighten the thread bolts with the allen key.
Beware of pinch points!
Required tools:
• 3-5 ladders
• 4mm Allen key

9
65
8
7
9
BACK
CENTRE SUPPORT
5-7 Unfold the center support and bolt them to
the lower horizontal frame section according to
the labeling with the enclosed wing screws.
Beware of pinch points!
8-9 Attach the upper frame section to the top end of the vertical frame sections with at least 3 people.
WARNING
Falling parts!
10
13
10 11
12
BACK
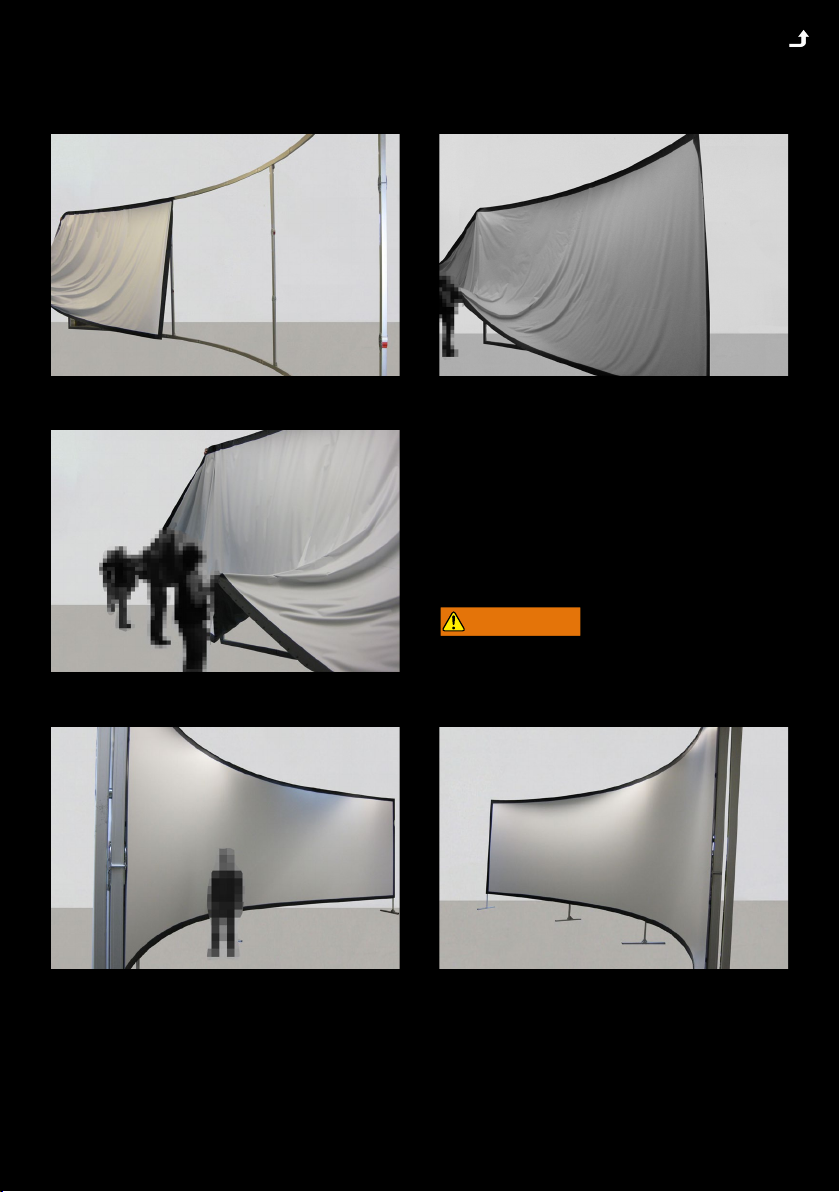
10-12 Unroll the projection surface with,
according to the screen size appropriate
number of people and hook it onto the rail of
the upper horizontal frame section and slide
it with several people gently till the opposite
corner.
WARNING
Falling parts!
13 Now attach the snap fasteners on the lateral sides. To attach the hooks to the lower frame bar
easily, it is recommended to set up the projection screen on T-Legs, or at least to raise the screen a bit
with squared timbers.
SURFACE MOUNTING
Table of contents
Other Stumpfl Projection Screen manuals


Popular Projection Screen manuals by other brands


Displays2go
Displays2go DGSNCKNT32 user manual

Elite Screens
Elite Screens Electric100H Specifications

Draper
Draper Clarion Assembly/mounting instructions

Screen Innovations
Screen Innovations Solo 3 installation instructions

Kimex
Kimex 041-3 Series installation manual

Elite Screens
Elite Screens AEON series user guide