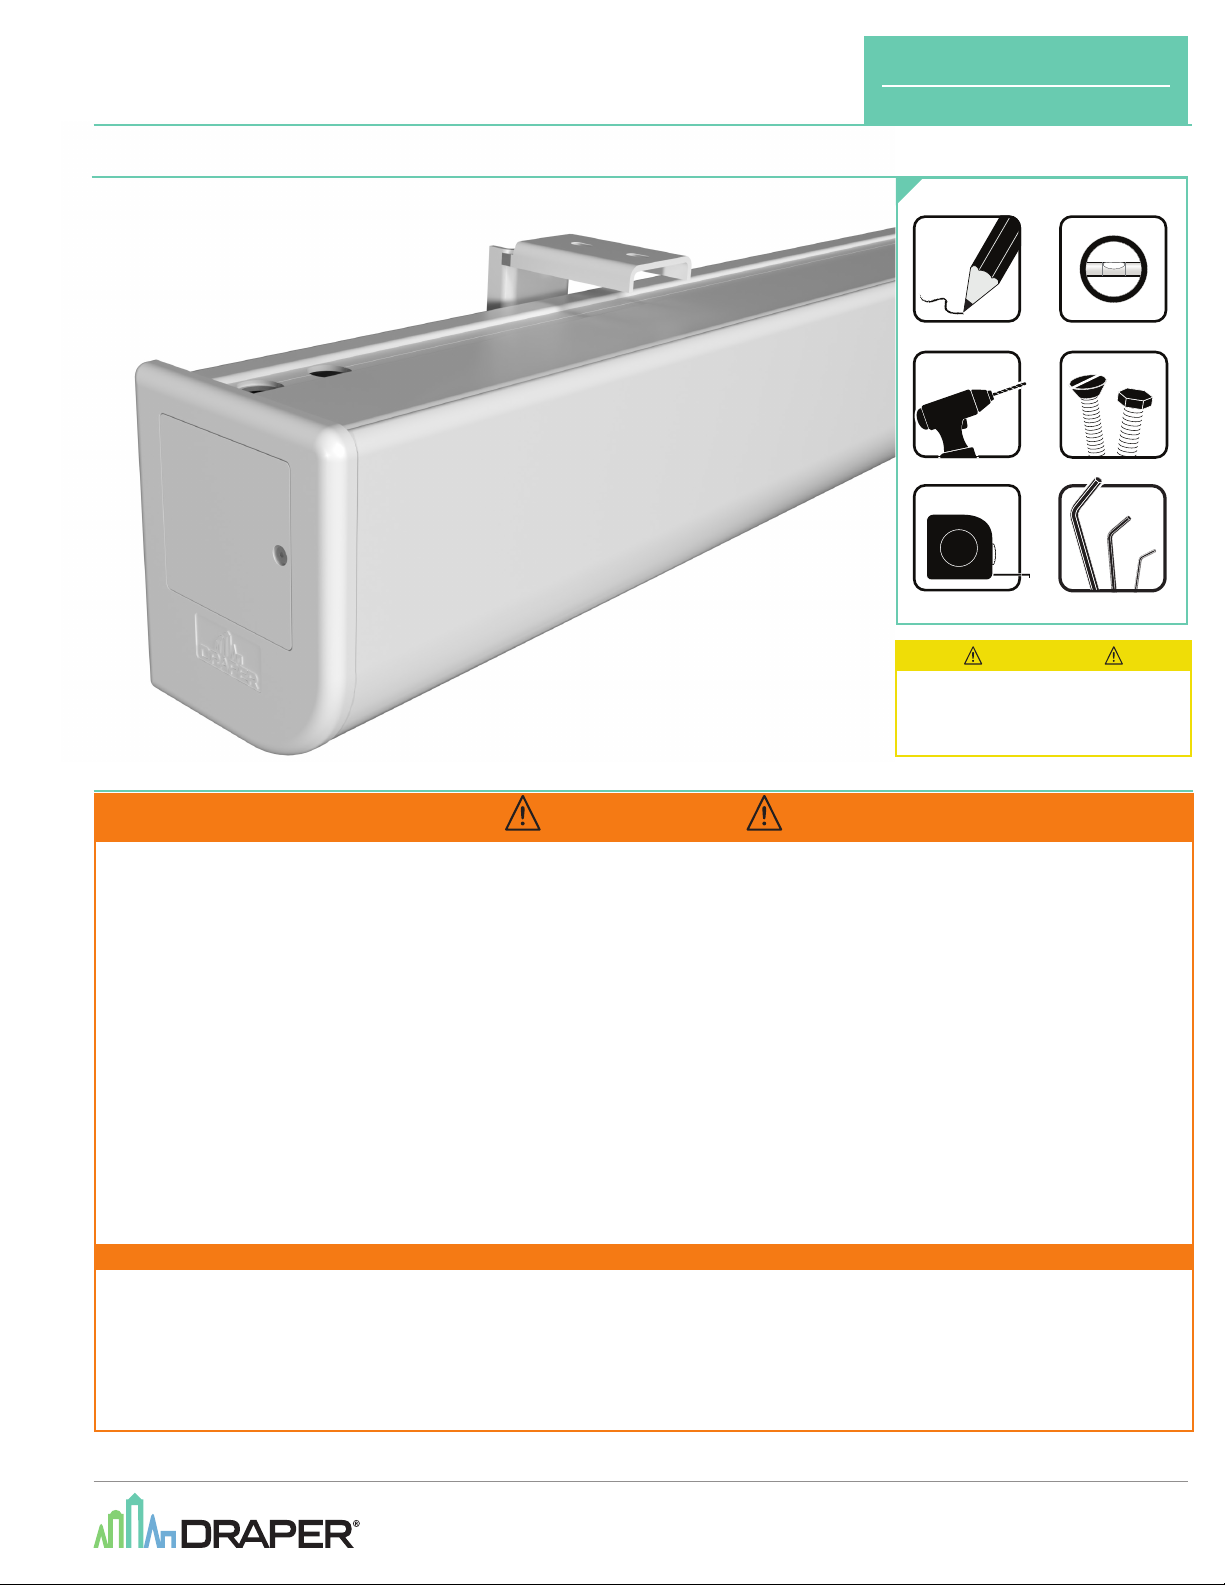
manuals.online logo
Brands
  1. Home
  2. •
  3. Brands
  4. •
  5. Draper
  6. •
  7. Projection Screen
  8. •
  9. Draper Acumen M XT1000E User manual

Draper Acumen M XT1000E User manual

Wall / Ceiling
Mounting
Brackets
Extruded
Aluminum
Case
Removable Fascia
TOOLS REQUIRED
Overview - Components
CAUTION
Read and understand
all warnings before
beginning installation.
PLEASE READ - Safety Information
WARNING
Improper installation and use of the Acumen screen can result in serious injury or death. Primarily, injuries can occur if the unit falls due to imprecise
installation, mishandling of the unit during installation, or installation on an insufficient wall or ceiling structure. Please use extreme care.
1. Please read the following installation guidelines thoroughly and follow them carefully.
Failure to do so may cause product to fall or otherwise fail, and could result in serious injury.
2. Installation and calibration of the unit should only be performed by an authorized, qualified,
and experienced professional.
3. Do not affix the unit to walls or ceilings that have inadequate strength to permanently hold
the unit during use. It is the owner’s and installer’s responsibility to confirm the wall or
ceiling to which the unit attaches is sufficient to permanently hold the weight and stress
loads of the unit at all times. Draper, Inc., is not responsible for improper installation,
application, testing, or workmanship related to the product at place of installation.
4. It is the installer’s responsibility to make sure appropriate fasteners are used for mounting.
5. All hardware must be installed level. Unit must be level and square.
6. Never leave the area while operating the unit during installation, maintenance, or normal
operation, unless it is secure and safe.
7. Before testing or operation, carefully inspect the entire area and path
(especially
underneath)
of unit to be sure no persons or objects are in the area.
8. During testing or operation, carefully watch the surrounding area for any potential safety
concerns including nearby persons or objects.
9. After installation, the entire system, including all sensors, should be carefully tested to
ensure safe and normal operation. Extreme care should be taken during testing to remain
clear of moving parts to avoid possible injury.
10. Operation of unit should be performed only by authorized and qualified personnel, who have
been trained in its safe and effective operation and understand its safety features.
11. The safety features of the unit should never be disabled, bypassed, or overridden. The
system should not be operated until all safety features are properly and completely
installed, calibrated, and tested.
12. Unit may need to comply with local, state, or district rules and regulations, in particular
when installed in schools. All applicable rules and regulations should be reviewed before
installation and use.
13. Failure to precisely follow installation guidelines invalidates all warranties.
14. Custom products/installations may not be reflected in this manual. Call Draper, Inc., if
you have questions about the installation of custom products or any questions about your
installation.
Before Beginning Installation
1.
Look for any job site conditions that could interfere with installation or operation of
the system.
2.
Read carefully and be sure to understand all installation instructions and all
related operations manuals. These instructions are intended to serve as a guide
for the installer and owner. They should be followed closely and combined with the
expertise of experienced qualified installers. Draper, Inc., is not responsible for
improper installation, application, testing, or workmanship related to the product at
place of installation. Please retain all instructions for future use.
3.
Open cartons lengthwise.
4.
Locate and lay out all pieces.
5.
Inspect all boxes to make sure you have received the proper unit and parts.
Controls may be shipped separately, or in same carton as unit.
6.
If you have any difficulties with installing, servicing, or operating your unit, call your
dealer or Draper, Inc., 765-987-7999.
Important Safety Information Important Safety Information
POWER DRILL
PENCIL
TAPEMEASURE
HARDWARE
(by others)
LEVEL
HEX WRENCH
3
/32"
Draper, Inc. | 411 S. Pearl St. Spiceland, IN 47385
draperinc.com | 765.987.7999 | 800.238.7999
© 2020 All Rights Reserved | FORM: Acumen_M_Inst20
Acumen™ M
Manual projection screen
INSTRUCTIONS
INSTALLATION & OPERATION
If you have any difficulties installing or servicing your
Acumen, call your dealer or Draper, Inc.
Section 1 - Hanging Screen
Section 1.1 - General:
1.
Wall Mounting Brackets (minimum of 2) must be attached to the case regardless of mounting method.
2.
Screen should be lifted into position only by case end caps. Keep case level by lifting case end caps
simultaneously to prevent surface damage. Never attempt to lift screen along its length.
3.
When locating viewing surface and checking clearance for screen’s operation, remember surface is
centered in case. Handle case carefully to protect its finish.
4.
Regardless of mounting method, screen should be positively and securely supported so that vibration
or even abusive pulling on viewing surface will not cause case to loosen or fall. Installer must ensure that
fasteners used are of adequate strength and suitable for mounting surface chosen.
REFER TO DIAGRAM ON LAST PAGE OF MANUAL FOR WALL BRACKET DIMENSIONS
Section 1.2 - Wall Installation:
1.
Secure the Mounting Brackets (minimum of 2) to the wall using appropriate hardware
(by others)
.
CAUTION: Product is very heavy: Installer must provide adequate attachment hardware and anchors as
required. Installer must also ensure that structure is of adequate strength.
2.
Ensure that mounting brackets are level.
3.
Slide all Bracket Locks to the center of case.
4.
Holding the case by the endcaps, lift it up and over the cleats on the mounting brackets
(see Fig. 3)
. Wall Bracket Mounting Channels are shown in Fig. 4 below.
5.
Once the case is settled on the mounting brackets, slide the Bracket Locks to the center of each mounting bracket
(see Fig. 4)
and secure set screw on the lock.
Ceiling Mounted
Appropriate
hardware
provided by
installer.
Wall Mounted
Appropriate hardware
provided by installer.
Figure 3-A
SIDE VIEW
Wall
Mounting
Bracket
SIDE VIEW
ACUMEN
Figure 3-B
Mounting Hardware (by others)
NOTE: It is the responsibility of the installer
to select mounting hardware appropriate
for the mounting surface
WALL
STUDS
16” (406mm) on center shown
MOUNTING BRACKET
Figure 2
Figure 1
Figure 4
Slide to lock case to BracketSlide to lock case to Bracket Wall Bracket Channels
for Case Mounting
12"
(305mm)
Max. Distance
Optional
Center Bracket
One Wall Bracket
Centered
Figure 4
page 2 of 4
Acumen™ M
Section 1.3 - Ceiling Installation:
1.
Attach Ceiling Brackets to Mounting Brackets using the provided hardware
(see figure at right)
.
2.
Secure the Ceiling Brackets to the ceiling using appropriate hardware
(by others)
.
CAUTION: Product is very heavy:
Installer must provide adequate attachment hardware and anchors as required.
Installer must also ensure that structure is of adequate strength
3.
Ensure that mounting brackets are level.
4.
Slide all Bracket Locks to the center of the case.
5.
Holding the case by the endcaps, lift it up and over the cleats on the mounting brackets
(see Fig. 5)
. Wall Bracket Mounting Channels are shown in Fig. 6 below.
6.
Once the case is settled on the mounting brackets, slide the Bracket Locks to the center of each mounting bracket
(see Fig. 6)
and secure set screw on the lock.
Ceiling Brackets
Secured to Ceiling
Mounting Hardware (by others)
NOTE: It is the responsibility of the installer
to select mounting hardware appropriate
for the mounting surface
SIDE VIEW
ACUMEN
Ceiling
Mounting
Bracket
CEILING
Figure 5-BFigure 5-A
Slide to lock case to BracketSlide to lock case to Bracket Wall Bracket Channels
for Case Mounting
18" (457mm)
Max. Distance
Optional
Center Bracket
One Ceiling Bracket
Centered
Figure 6
Carriage Bolt
Washer
½” Hex Nut
ACUMEN
Ceiling Bracket Assembly
Section 3- Fascia Removal
To remove fascia:
1.
Remove the screws from bottom from lip at each end of the fascia using
⁄
” hex wrench.
2.
Lift fascia off of the top lip of the case spine extrusion.
To install fascia:
1.
Hook the top lip of fascia over the top lip of spine extrusion.
2.
Push bottom edge of fascia towards the case spine.
3.
Align holes in fascia with end cap holes and screw in the attachment screw using
⁄
” hex wrench.
1
2
3
Figure 7-B
Figure 1-A
1
2
Figure 7-A
Section 2- Operation
To lower screen: pull screen down to desired position. Hesitate—then allow screen to slightly retract very slowly until it locks in place.
To raise screen: pull down on the pull bail, then raise quickly, as a window shade. Keep control of the picture surface. Do not allow it to roll uncontrolled into
the case, or damage is sure to result.
page 3 of 4
Acumen™ M
Section 4 - Dimensions
18"
(457mm)
Max.
18"
(457mm)
Max.
Case Length Varies
6
11
/
16
"
170mm
8
1
/
4
"
210mm
3
/
4
"
19mm
7
1
/
8
"
181mm
4
1
/
2
"
114mm
5
15
/
16
"
151mm
Centered Ceiling Bracket
ACUMEN
7
1
/
8
"
(181 mm)
5
7
/
8
"
(149 mm)
18"
(457mm)
Max.
18"
(457mm)
Max.
Case Length Varies
6 11/16"
170mm
8 1/4
"
210mm
3/4
"
19mm
7 1/8
"
181mm
4 1/2
"
114mm
5 15/16"
151mm
Centered Ceiling Bracket
ACUMEN
End of Case Dimensions - Shown with Ceiling Bracket
1¾”
(44mm)
20”
(507mm)
4”
(102mm)
16”
(406mm)
16”
(406mm)
24”
(610mm)
12”
(305mm)
8”
(203mm)
4”
(102mm)
6 ¾”
(171mm)
4
7
/
16
”
(113mm)
¾”
(19mm)
3 ½”
(89mm)
3
9
/
16
”
(90mm)
2 ¾”
(70mm)
4
15
/
16
”
(125mm)
Mounting Hardware
(by others)
NOTE: It is the responsibility of the installer to select mounting hardware appropriate for the mounting surface.
page 4 of 4
Acumen™ M

This manual suits for next models

51

Other Draper Projection Screen manuals

Draper Cinefold Portable Folding Projection Screen User manual

Draper

Draper Cinefold Portable Folding Projection Screen User manual

Draper Silhouette C Series Manual

Draper

Draper Silhouette C Series Manual

Draper 220V Access User manual

Draper

Draper 220V Access User manual

Draper Access Fit Manual

Draper

Draper Access Fit Manual

Draper Envoy Manual

Draper

Draper Envoy Manual

Draper nocturne+ c Programming manual

Draper

Draper nocturne+ c Programming manual

Draper Series E Manual

Draper

Draper Series E Manual

Draper FocalPoint User manual

Draper

Draper FocalPoint User manual

Draper Salara/Hardwire User manual

Draper

Draper Salara/Hardwire User manual

Draper Premier XL 220 User manual

Draper

Draper Premier XL 220 User manual

Draper Targa Manual

Draper

Draper Targa Manual

Draper Nocturne User manual

Draper

Draper Nocturne User manual

Draper Clarion User manual

Draper

Draper Clarion User manual

Draper VCB Silhouette E series User manual

Draper

Draper VCB Silhouette E series User manual

Draper Premier User manual

Draper

Draper Premier User manual

Draper Ultimate Access XL V User manual

Draper

Draper Ultimate Access XL V User manual

Draper Tabletop Projection Screen MicroScreen User manual

Draper

Draper Tabletop Projection Screen MicroScreen User manual

Draper Paragon Series Manual

Draper

Draper Paragon Series Manual

Draper Premier Series User manual

Draper

Draper Premier Series User manual

Draper E series User manual

Draper

Draper E series User manual

Draper Signature E Series Manual

Draper

Draper Signature E Series Manual

Draper Targa Manual

Draper

Draper Targa Manual

Draper 116015 Manual

Draper

Draper 116015 Manual

Draper Envoy Manual

Draper

Draper Envoy Manual

Popular Projection Screen manuals by other brands

Philips BDL4230E/00 Service manual

Philips

Philips BDL4230E/00 Service manual

Kimex 042-3 Series installation manual

Kimex

Kimex 042-3 Series installation manual

LUMENE Eden user guide

LUMENE

LUMENE Eden user guide

Kodak Large Inflatable Screen user manual

Kodak

Kodak Large Inflatable Screen user manual

iGGUAL PSIMS200 user guide

iGGUAL

iGGUAL PSIMS200 user guide

R. Lang Company Roll Away R6500 Series installation instructions

R. Lang Company

R. Lang Company Roll Away R6500 Series installation instructions

Enwork Skyline Compression Topper Screen installation guide

Enwork

Enwork Skyline Compression Topper Screen installation guide

DNP Supernova Flex installation manual

DNP

DNP Supernova Flex installation manual

Elite Screens Starling Series user guide

Elite Screens

Elite Screens Starling Series user guide

Qeedji SLATE Series user manual

Qeedji

Qeedji SLATE Series user manual

BCP SKY1186 instruction manual

BCP

BCP SKY1186 instruction manual

Da-Lite C with CSR operating instructions

Da-Lite

Da-Lite C with CSR operating instructions

MEDIUM RollFix Premium PRO Mounting instruction

MEDIUM

MEDIUM RollFix Premium PRO Mounting instruction

Da-Lite TENSIONED LARGE COSMOPOLITAN ELECTROL Instruction book

Da-Lite

Da-Lite TENSIONED LARGE COSMOPOLITAN ELECTROL Instruction book

Elite Screens Yard Master Pro B Series user guide

Elite Screens

Elite Screens Yard Master Pro B Series user guide

KwickScreen Kin V1 Assembly manual

KwickScreen

KwickScreen Kin V1 Assembly manual

Screen Research XLR3 installation manual

Screen Research

Screen Research XLR3 installation manual

2C Displays Frame IT installation manual

2C Displays

2C Displays Frame IT installation manual

manuals.online logo
manuals.online logoBrands
  • About & Mission
  • Contact us
  • Privacy Policy
  • Terms and Conditions

Copyright 2025 Manuals.Online. All Rights Reserved.