STX International TURBO FORCE CADET User manual

STX Turboforce Cadet
Electric Meat Grinder
Instructions
URBO FORCE
ELECTRIC MEAT GRINDER
CADET
by


- 1 -
SAFETY PRECAUTIONS
1. Please read all instructions prior to operating this appliance.
Please keep this manual for future reference. Failure to comply with
the safety instructions and/or operating instructions contained in this
manual will void any warranty. The manufacturer/seller accepts no
liability for damages caused by failure to comply with the owner’s
manual or negligent use of this product.
2. The gears of this grinder are greased at the factory. The unit will be
somewhat loud initially until the gears and motor have had time to
mesh or “break in”. This break in period could take 5 to 10 operating
hours.
3. This meat grinder is designed for indoor household use only.
4. Keep out of the reach of children. Never leave this device
unattended.
5. Unplug this appliance from the power source when assembling,
disassembling, and when storing in-between uses.
6. Do NOT immerse the main unit in water.
7. DO NOT WASH ANY OF THE PARTS FOR THIS GRINDER IN A
DISHWASHER. (See washing instructions)
8. Do not operate this unit near an open flame or any hot surface.
9. Do not unplug the unit by pulling on the electrical cord itself. Never
unplug the unit with wet hands.
10. Always use 110/120 Volt power sources. DO NOT USE POWER
CONVERTERS (210/220V).
11. Never add meat products by hand. ALWAYS use the meat pusher
provided. Do NOT use knives, forks, spoons, etc. to push meat down
the grinding head chute.
12. Never carry the unit by the grinding head or meat pan. ALWAYS
carry this grinder by the body of the main unit.
13. Always monitor the grinder during use. Do NOT leave unattended. It
is recommended that after 10-15 minutes of continual use, the unit
should be allowed to cool for a few minutes to prevent overheating.
14. Do not jam (referred to as “Hogging”) meat into the grinder with
excessive force.

- 2 -
15. Allow Auger to completely stop before changing the grinder settings
from ON to Reverse (and vice versa). Rapid changes in auger
direction could damage the motor.
16. Do not plug another high wattage appliance into the same outlet as
this product.
17. Wash all components before using. Refer to: Washing Instructions
section. Do not wash any grinder parts in the dishwasher!
18. Meat preparation and temperature are very important for optimal
performance and results. Read the Meat Preparation section before
using.
19. CHECK THAT THE GRINDING BLADE IS INSERTED CORRECTLY
prior to use. See CORRECT/INCORRECT BLADE ASSEMBLY
photos for proper placement.
20. Always check the condition of the power cord prior to use. If there is
any evidence of damage or fraying of the power cord discontinue use
and contact STX International for OEM replacement. (See Contact
Information on the back of this manual) STX International will use
only original OEM parts when/if replacement is necessary.
21. Any alteration of this meat grinder’s components, substitution of
other manufacturer’s components to this unit, or any repairs to
this grinder not completed or authorized by STX International will
immediately void all guarantees/warranties.

- 3 -
SPECIFICATIONS
Model STX-1200-TFC
Power Supply 110/120 V, 60 Hz
Net/Gross Weight 7.6 lbs. / 9.7 lbs.
Overall Dimensions (L x W x H) 13.7” x 8.4” x 14.6”
PARTS LIST AND PLACEMENT
1. Front Grinding Head Locking Cap (Screw Cap)
2. Grinding Plate (3 included) Hole sizes: 4mm, 5mm, and 8mm and
a Sausage Stuffing Plate
3. Tempered Steel Cutting Blade (3 included)
4. Auger
5. Grinding Head
6. Meat Pan (Meat Hopper or Top Tray)
7. Meat Pusher
8. Main Unit
9. Head Locking Side Knob
*Foot Pedal - comes with some models (not pictured)

- 4 -
GRINDING HEAD ASSEMBLY
1. Loosen the head locking/side knob enough to insert the grinding
head onto the main unit (see Parts & Placement on page 3).
Tighten the head locking/side knob to stabilize the grinding head.
2. Insert the auger into the front of the grinding head with the short
tip of the auger facing out (Figure 1). When you insert the auger,
you may have to twist it just a little until you feel it set into the
motor housing.
3. Mount the cutting blade on the front of the auger (Figure 2).
Note: The flat, sharpened end of the cutting blade MUST be
facing OUT, otherwise IT WILL NOT GRIND PROPERLY, WILL
ruin the grinding head and possibly the main unit! (See Correct/
Incorrect Cutting Blade Assembly photos on pg 3).
4. Mount the grinding plate in front of the cutting blade and make
sure the notch on the side of the grinding plate fits into the slot on
the side of the grinding head (Figure 3). The grinding plate will not
sit flush with the front of the grinding head – it will stick out about
1/16”. This is the correct position of the grinding plate.
5. Screw the front grinding head screw cap onto the front of the
grinding head – DO NOT OVER-TIGHTEN (Figure 4).
Figure 1 Figure 2
Figure 3 Figure 4
Grinding Head Assembly

- 5 -
INCORRECT
CORRECT
YES! NO!
Correct/Incorrect Cutting Blade Assembly
MEAT PREPARATION
The temperature of the meat is VERY IMPORTANT. Your meat should
be as COLD AS POSSIBLE without being frozen solid. Most professional
butchers grind their meat at 34°F. The consistency should be crunchy
to the touch – NOT frozen solid. If your meat is not cold enough when
you grind, it may ball-up in the front of the grinding head and may result
in charring of the meat and meat by-products (fat, blood, etc.). The
resulting black char or sludge will need to be cleaned from the grinding
head, cutting blade, and grinding plate. This charring, while unsightly, is
harmless.
Before you begin grinding meat, we suggest that you cube or strip your
meat. To cube your meat, cut it into cubes approximately 1” x 1” x 1” To
strip your meat, cut it into pieces that are 1” x 1” and as long as you like.
If you strip your meat, you will not need to use the meat pusher as much.
GRINDING PLATES
There are 3 sizes of Tempered Steel Grinding Plates and a Sausage
Stuffing Plate. The plate with the largest openings (2 large openings) is
the Sausage Stuffing Plate and it is used when stuffing sausages. The
3 grinding plates differ by hole diameter and produce finer grinds of
meat as the hole diameter decreases. These 3 grinding plates have hole
diameters of 4mm, 5mm and 8mm, respectively.

- 6 -
HOW TO GRIND MEAT
1. Choose which grinding plate you wish to use and install it into the
grinding head (see Grinding Head Assembly on page 2).
2. Cube or strip your chilled meat and put the meat into the meat
hopper on the top of the assembled grinder.
3. Turn on the grinder. The switch on top should be ON and the
bottom switch will be switched to ON.
4. Use the meat pusher to direct the meat into the feed chute of
the grinding head. DO NOT apply excessive force with the meat
pusher (referred to as Hogging the grinder). Once the meat
engages the auger, it will be carried forward to the cutting blade/
grinding plate and the ground meat will extrude from the front
of the grinder. The cut of meat that you are grinding often will
determine how much pressure you will need to apply with the
meat pusher.
Reverse Function - If there is a jam, you can reverse to clear it.
1. Set the bottom switch to O (middle) to stop power.
2. Change the top switch to R (down)
3. Set the bottom switch to R (down) to start the reverse motion.
TIPS:
• Attempting to grind to a very fine level or excessive grinding may
produce a mushy textured result.
• Many consumers Double Grind for a better mix of lean and fatter
meat. For example, if you want to make hamburger out of chuck
roast, you might want to grind the meat initially with the 8mm
plate, then regrind using one of the smaller diameter plates
(4mm or 7mm).
• REMEMBER TO KEEP THE TEMPERATURE OF THE MEAT AS
CLOSE TO 34°F AS POSSIBLE DURING THESE PROCESSES.
• It may be necessary to re-chill meat prior to an additional grind.
• Typically an 80 – 20 mix (80% lean - 20% fat) or an 85 - 15 mix
(85% lean – 15% fat) are the two best mixes for grilling
hamburger on your outdoor grill. When you are grilling at high
temperatures, you will normally lose between 5 - 10% of the fat
content of your meat.
• If you are grinding your meat for something like chili where you
are not cooking all of the fat out, then you might wish to increase
the lean meat content and not add as much fat to your mix.

- 7 -
STUFFING SAUSAGE ASSEMBLY
1. Insert the auger into the front part of the grinding head with the
short tip of the auger facing out (Figure 5). When you insert the
auger, you may have to twist it just a little until you feel it set into
the motor housing.
2. Mount the sausage stuffing plate onto the auger (Figure 6).
Note: DO NOT use the cutting blade in the grinding head when
using the grinder for stuffing sausage.
3. Choose the stuffing tube of your choice, insert it into and through
the back of the adapter ring and push it in until it is snug. This
unit comes with 3 Stuffing Tubes (4” Long x 1/2”, 5/8” & 3/4”) and
1 Adapter Ring. Hold this assembled section to the front of the
grinding head
(Figure 7).
4. Screw the head locking screw cap onto the grinding head as
shown (Figure 8). You are now ready to stuff sausage.
NOTE: The stuffing tube assembly may appear loose initially. It will
tighten up once meat begins to protrude from the assembly.
Figure 5 Figure 6
Figure 7 Figure 8
Sausage Stuffing Tube Assembly

- 8 -
HOW TO STUFF SAUSAGE
1. Grind the meat to the proper consistency you desire for your
sausage (See How to Grind Meat on page 4).
2. Add water and the spices of your choice to the mixture. Mix
thoroughly and chill overnight in the refrigerator.
Note that you do not have to refrigerate the mix prior to stuffing,
however, it will stuff better and easier if you let it set and chill
overnight.
3. Choose the proper sized casing for your sausage. Bunch it up
onto the sausage stuffing tube.
4. Put your sausage mixture into the meat pan and stuff it into the
running grinder using the meat pusher.
5. When the sausage starts filling up the casings, twist the casings
off to your desired length.
NOTE: Meat must be prepped beforehand. You cannot grind
unprocessed meat directly into sausage casings.
TIPS:
• Water content in a sausage mixture is very important. The correct
amount of water for each blend of meats and spices differs
tremendously. Some trial and error may be necessary.
• The amount of salt added to your mixture MAY affect how dry your
mixture becomes if left standing or chilling because salt absorbs
moisture. This may affect how well your mixture will stuff. Adding salt
too soon (for example: letting your mixture set overnight with the salt
added) will make your mixture too thick and will NOT extrude very
well - if at all.
• There are many “How To” books, websites, and YouTube videos on
sausage stuffing for beginners. Some of these sources offer free
recipes and advice. Applying the techniques of professionals learned
through these informative resources will decrease the trial and error
needed and produce a mixture that will satisfy.
• When stuffing, it is a good idea to spray all parts of the grinding head
(wherever the sausage mixture comes in contact) with a cooking
spray like PAM or Food Grade Silicone. This will make your sausage
extrude a lot faster and makes the stuffing process easier.

- 9 -
WHAT IS KUBBE?
Kubbe is a traditional Middle Eastern appetizer comprised of a small
football shaped shell filled with meat (usually bulgur wheat and lamb).
The center section is often stuffed with spiced minced lamb filling and the
ends are sealed. Kubbe is usually deep fried resulting in a crispy outside
with a delicious filling. It is time consuming to make, but well worth the
effort. This delicious treat can be frozen raw and fried straight from the
freezer.
HOW TO MAKE KUBBE
1. Feed the mixture into the meat hopper and let the mixture extrude.
2. Cut or pinch off to your desired length leaving one end open. You
now have the finished outer shell for the kubbe.
3. Stuff the interior of the shell with your choice of meat filling.
4. Seal the open end.
HOW TO USE THE FOOT PEDAL
Some models include the foot pedal accessory. If your unit didn’t include
one and you’d like to purchase one, they are available on our website:
STXInternational.com.
The foot pedal works as an interrupt switch, so when the foot pedal is not
pressed the unit has no power.
1. Plug the unit into the foot pedal.
2. Plug the foot pedal into the wall outlet.
3. When you are ready to use the grinder, press the “ON/1” or
“ON/2” speed and it will stay engaged on the unit.
4. Press the foot pedal to send power to the unit and the unit will
being to run.
5. When you need to stop the unit, release the foot pedal and the
unit will stop.
Note: If at some point the unit gets stuck and you need to use the reverse
function, you will need to press the foot pedal and the reverse
button at the same time. The reverse button is only for short,
quick use, it does not stay activated when pushed.

- 10 -
KUBBE ATTACHMENT ASSEMBLY
When using the Kubbe Attachment:
• Do not use a cutting blade or a grinding plate.
• The meat must be prepared beforehand, prior to using the Kubbe
Attachment (See How to Grind Meat on page 4).
• You CANNOT grind unprocessed meat directly into the Kubbe
Attachment.
1. Insert the auger into the front part of the grinding head with the
short end of the auger facing out (Figure 9).When you insert the
auger, you may have to twist just a little until you feel it set into the
motor housing.
2. Insert the 1st part of the kubbe maker attachment on the front of
the grinding head (Figure 10).
3. Then insert the 2nd part of the kubbe maker attachment over the
1st part (Figure 11).
4. Screw the head locking cap onto the front of the grinding head
snuggly (do not over-tighten) to hold the kubbe maker attachment
firmly in place (Figure 12).
Figure 9 Figure 10
Figure 11 Figure 12
Kubbe Attachment Assembly
- 11 -
SLICER / SHREDDER / GRATER
ATTACHMENT
When using the Slicer / Shredder / Grater Attachment:
• Only use the parts that come with this attachment shown below.
• Do NOT try to use the pusher that goes with the meat grinding
assembly with this slicer / shredder / grater attachment.
• Be CAUTIOUS when shredding cheese, always make sure
to stop frequently and empty the device. Shredding too much
cheese without emptying will just force the cheese into a large ball
that is difficult to remove from the unit.
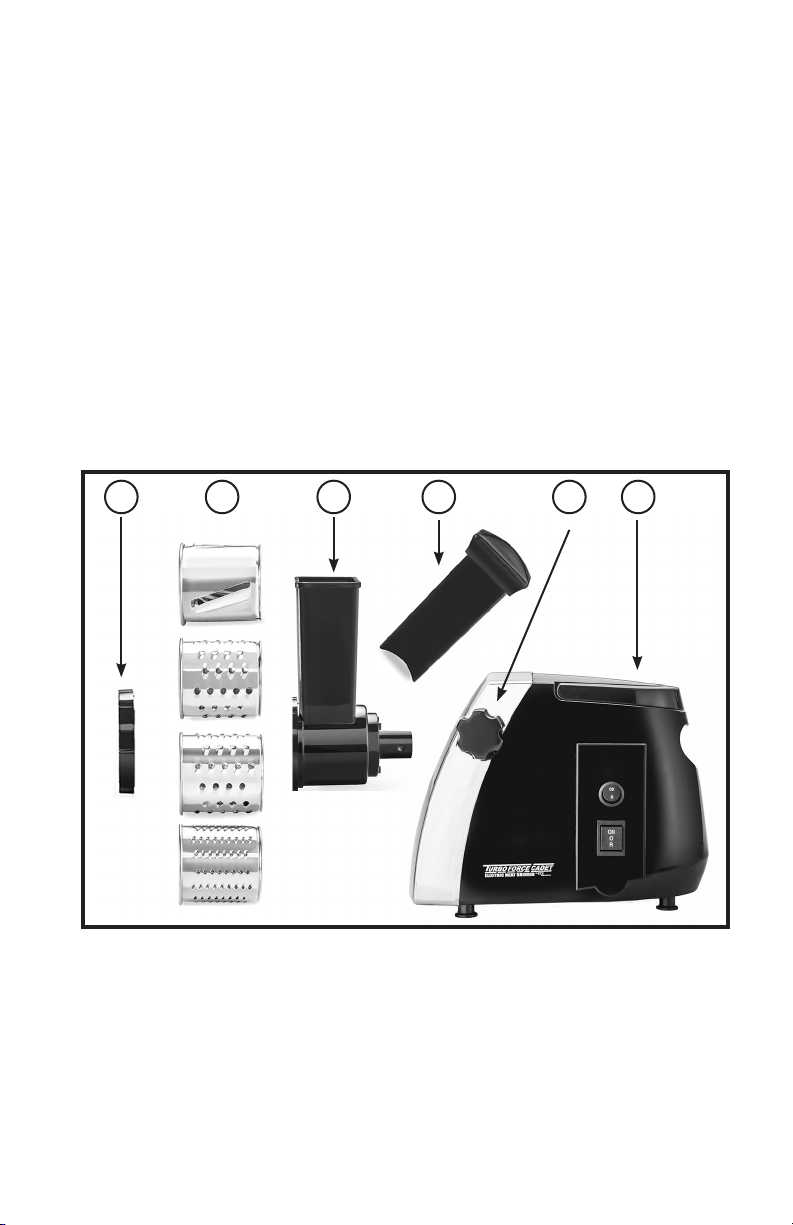
SLICER / SHREDDER / GRATER PARTS AND PLACEMENT
1 2 3 4 5
Choose One
6
1. Screw Cap
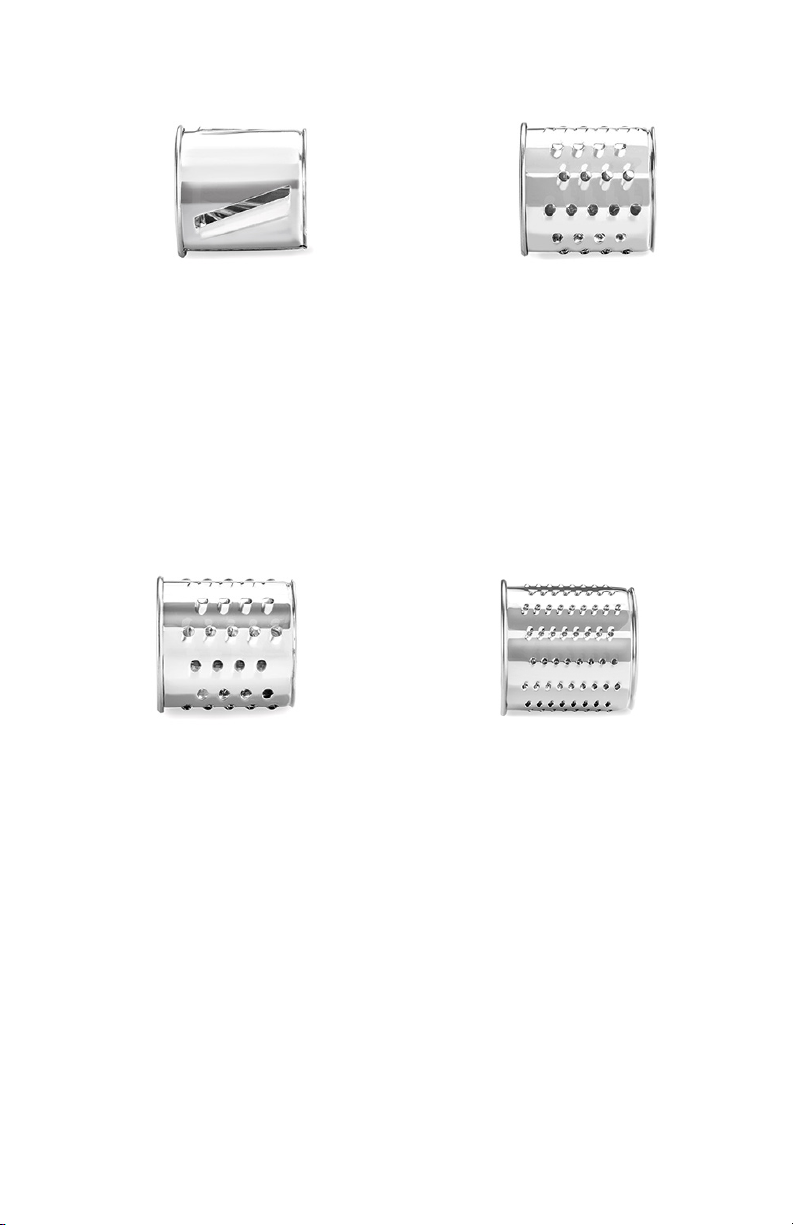
2. Slicing/Shredding Blades (4 - 5mm Slicer, 5mm Shredder, 3mm
Shredder, and 2mm Grater)
3. Slicer Head
4. Slicer Pusher
5. Head Locking Side Knob
6. Main Unit
- 12 -
BLADE OPTIONS
5mm Shredder
This 5mm shredding blade is
probably the most commonly used
when shredding. Hard (cheddar) or
soft (mozzarella) cheeses are both
possibilities. This blade is useful
for shredding apples for oatmeal or
muffins. Carrots and zucchini destined
for muffins or cakes also work well.
5mm Slicer
This blade can be used to evenly slice
zucchini, carrots, cucumber, etc. These
are nice to put on a salad to provide
some color. Anything too firm or too
soft will probably not always cut evenly
through.
3MM Slicer
Smaller shredding holes. Use this
side for finely grating hard cheeses
that you still want to be in separate
but thin pieces, such as Parmigiano-
Reggiano to sprinkle on top of pizza or
pasta. Finely grated Parm is also great
for using in breading for chicken and
eggplant, as well as a baked topping
for bread. For an easy, attractive
dessert garnish, pull out a chunk of
chocolate to grate. You can also make
bread crumbs using hardened stale or
toasted bread.
2mm Grater
This blade has rough, raspy holes. For
when you really need to chew through
something, the teeth-like edges of
these small holes are ideal. Think citrus
zest, garlic, nutmeg and hardened
brown sugar. For cheese “dust” that will
really melt into a sauce or soup, grate
it here. To get potatoes pulpy for latkes,
this is the best choice.

- 13 -
SLICER ASSEMBLY
1. Loosen the head locking/side knob enough to insert the slicer
head onto the main unit (see Parts & Placement on page 9).
Tighten the head locking/side knob to stabilize the slicer head.
Be careful to not over-tighten.
2. Insert the blade into the front of the slicer head with the opening
facing out.
3. Screw the front slicer screw cap onto the front of the grinding
head – Be careful to not over-tighten.
Tips
For optimal results, please use these tips when using the slicer
attachment:
• Freeze the cheese briefly to make it easier to grate and to ensure
it doesn’t stick together when slicing, shredding or grating.
• Hard cheeses will work best with the unit.
• Chocolate should be frozen when shredding to ensure it doesn’t
stick together or to the unit.
• Lightly spritz the blade with cooking oil spray for smoother
shredding and easier cleanup.
• Do NOT use any of the blades with peanuts, as they are very
hard and will break the slicer attachment.

- 14 -
WASHING INSTRUCTIONS
GENERAL WARNINGS:
• Any type of bleaching solutions containing chlorine will
discolor the aluminum surfaces.
• Thinners and benzenes will crack or change the color of the unit
and should never be used to clean this meat grinder.
• Leaving any parts of this product to air dry after cleaning may
cause corrosion.
• Always wipe off the parts thoroughly with a dry cloth after
cleaning.
MAIN UNIT
1. Wash with a damp towel, liquid dish washing detergent (like Dawn
dish washing liquid) and hot water.
Note: Do NOT submerge main unit in water to clean.
GRINDING HEAD
(includes head locking cap, auger, grinding head, and meat pan)
The 4 parts of the grinding head assembly (head locking cap, auger,
grinding head, and meat pan) are made of 100% cast aluminum.
1. Wash these in liquid dish washing detergent and hot water.
2. Towel dry IMMEDIATELY AND THOROUGHLY.
3. Store for the next use.
Warnings:
• Do NOT soak parts in water. They WILL discolor.
• Do NOT wash parts and lay them flat to air dry. They WILL
discolor.
• Do NOT leave parts to "clean later". They WILL discolor.
• Even the smallest amounts of moisture on the parts will
cause discoloring or rusting.
DO NOT WASH ANY PARTS OF THIS GRINDER
IN THE DISHWASHER!

- 15 -
GRINDING PLATES & SAUSAGE STUFFING PLATE
The grinding plates and sausage stuffing plate are made of tempered
steel.
1. Wash these in liquid dish washing detergent and hot water.
2. Towel dry IMMEDIATELY and THOROUGHLY.
3. Rub them with some cooking oil (or spray).
4. Store them SEPARATELY in plastic bags until the next use to
prevent rusting.
CUTTING BLADES
The cutting blades are tempered steel.
1. Wash these in liquid dish washing detergent and hot water.
2. Towel dry IMMEDIATELY and THOROUGHLY.
3. Store for next use.
TIP: Many consumers use paper towels to dry these parts as paper
towels are the most absorbent.
DO NOT WASH ANY PARTS OF THIS GRINDER
IN THE DISHWASHER!

- 16 -
THIS LIMITED WARRANTY GIVES YOU SPECIFIC LEGAL RIGHTS. YOU
MAY ALSO HAVE OTHER RIGHTS, AS THEY VARY FROM STATE TO STATE.
THIS LIMITED WARRANTY CAN ALSO BE FOUND ON OUR WEBSITE AT
WWW.STXINTERNATIONAL.COM/SUPPORT/WARRANTY.
WE WARRANT THAT DURING THE WARRANTY PERIOD, THE PRODUCT
WILL BE FREE FROM DEFECTS IN MATERIALS AND WORKMANSHIP.
WE LIMIT THE DURATION AND REMEDIES OF ALL IMPLIED
WARRANTIES, INCLUDING WITHOUT LIMITATION THE WARRANTIES OF
MERCHANTABILITY AND FITNESS FOR A PARTICULAR PURPOSE TO THE
DURATION OF THIS EXPRESS LIMITED WARRANTY.
SOME STATES HAVE DIFFERENT LIMITATIONS ON HOW LONG AN
IMPLIED WARRANTY LASTS, SO THE ABOVE LIMITATION MAY NOT APPLY
TO YOU.
OUR RESPONSIBILITY FOR DEFECTIVE GOODS IS LIMITED TO REPAIR,
REPLACEMENT OR REFUND AS DESCRIBED BELOW IN THIS WARRANTY
STATEMENT.
WHO MAY USE THIS WARRANTY?
STX International a/k/a Mercantile Station 2, Ltd. and Paradigm Alley USA
located at 2159 Magnum Circle, Lincoln, Nebraska 68522 (“we”) extend this
limited warranty only to the consumer who originally purchased the product in
the United States, the District of Columbia or Canada (“you”). It does not extend
to (a) any subsequent owner or other transferee of the product, (b) any product
shipped outside of the United States, the District of Columbia or Canada, or (c)
anyone who may have purchased it from someone other than STX International.
Proof of purchase is required for in-warranty service. We recommend you
promptly register this product on our website (www.STXInternational.com)
to facilitate verification of the date of the original purchase. Keep the product
manual and your sales receipt together for future reference.
WHAT DOES THIS WARRANTY COVER?
This limited warranty covers defects in materials and workmanship of the product
for the Warranty Period as defined below. In addition, during the Initial Warranty
Period, this limited warranty also covers defects occurring in the initial shipment
of the product to you.
3-YEAR LIMITED
WARRANTY

- 17 -
WHAT DOES THIS WARRANTY NOT COVER?
This limited warranty during the Warranty Period does not cover any damage due
to: (a) improper use; (b) failure to follow the product instructions or to perform any
preventive maintenance; (c) modifications; (d) unauthorized repair; (e) normal
wear and tear that comes with household use; or (f) external causes such as
accidents, abuse, or other actions or events beyond our reasonable control. It
also does not cover consumable parts.
WHAT IS THE PERIOD OF COVERAGE?
This limited warranty starts on the date of your purchase and lasts for 3 years
(“The Warranty Period”), which shall be divided into two periods: (1) the first
30 days from the date of your purchase (“Initial Warranty Period”); and (2) the
remainder of the 3 year period after the Initial Warranty Period has expired (the
“Remainder Warranty Period”. The Warranty Period is not extended if we repair
or replace the product. We may change the availability of this limited warranty at
our discretion, but any changes will not be retroactive.
WHAT ARE YOUR REMEDIES UNDER THIS WARRANTY?
With respect to any defective product during the Initial Warranty Period, we will,
in our sole discretion either (a) replace such product (or the defective part) free of
charge, or (b) refund the purchase price of such product.
With respect to any defective product during the Remaining Warranty Period,
we will repair such product free of charge and provide a full-service inspection
of your product. You will be responsible for all shipping and handling fees to and
from our facility.
HOW DO YOU OBTAIN WARRANTY SERVICE?
To obtain warranty service, you must call 844-861-4762 or email us at Info@
STXInternational.com during the Warranty Period to open a service request.
Proof of purchase will be required to open a service request.
LIMITATION OF LIABILITY
THE REMEDIES DESCRIBED ABOVE ARE YOUR SOLE AND EXCLUSIVE
REMEDIES AND OUR ENTIRE LIABILITY FOR ANY BREACH OF THIS
LIMITED WARRANTY. OUR LIABILITY SHALL UNDER NO CIRCUMSTANCES
EXCEED THE ACTUAL AMOUNT PAID BY YOU FOR THE DEFECTIVE
PRODUCT, NOR SHALL WE UNDER ANY CIRCUMSTANCES BE LIABLE FOR
ANY CONSEQUENTIAL, INCIDENTAL, SPECIAL OR PUNITIVE DAMAGES OR
LOSSES, WHETHER DIRECT OR INDIRECT.
SOME STATES HAVE DIFFERENT LIMITATIONS OF LIABILITY AND
EXCLUSIONS, SO THE ABOVE LIMITATION OR EXCLUSION MAY NOT
APPLY TO YOU.
STX International Product
Mercantile Station 2, LTD (a/k/a Paradigm Alley USA)
2159 Magnum Circle, Lincoln, NE 68522

QUESTIONS, PROBLEMS
OR COMPLIMENTS?
Thank You for purchasing this
STX International Product!
We are grateful for your business!
All of our STX International Products are inspected then
sealed with our NEW Product Seal prior to shipment.
Our goal is to ensure Quality, Completeness, and
Satisfaction for your order.
For Any Questions, Problems, or
Compliments please call or email us.
If you would like to shop for other STX International Products
Please visit our website
www.STXInternational.com
Toll Free: 844-861-4762
Our Business Hours are:
Monday - Thursday: 8am - 4pm CST
Friday: 8am - Noon CST
Mercantile Station 2, LTD (a/k/a Paradigm Alley USA)
2159 Magnum Circle, Lincoln, NE 68522
This manual suits for next models
1
Table of contents
Other STX International Meat Grinder manuals


