Suck UK LED Mirror User manual

1
INSTRUCTIONS
REMOTE CONTROL OPERATION
for convenience
PC OPERATION
for faster control
save and recall unlimited number of messages
MADE IN THE UK
www.suck.uk.com

2
Hanging Your Mirror
Make sure that the cable will reach to a suitable power supply.
Fix to the wall using the Screws and Wall Plugs supplied: Hang the unit from the “keyhole”
slots on the metal bracket. The wall fixings must be 415mm apart.
Turning a sign on and off
When you plug in the sign’s power supply, the sign starts up automatically.
Unplugging the power supply turns the sign off.
For indoor use only.
You can operate the sign in two ways:
zBy using personal computer
zBy using personal computer (for faster control and unlimited number of messages)
REMOTE CONTROL
The Remote must be used close up to the mirror – not for long range programming.
Point this end of the remote control
at the front of the mirror
Use SPA to insert a
blank space between
characters
Press PREV or NEXT
to move from mode to
mode
Hold down ALT and then
press ON/OFF to turn the
sign off and on
-Press PROG to enter into
text editing mode
-Type in your password
(default =”000”), then press
ENTER
-Type in: “OPEN: 01”, then
ENTER (ENT)
-… Start programming
To type a special
characters or symbol
Press RUN to exit
programming mode
Hold down ALT and then press
the key to select character or
symbol above it
In text editing mode:
Hold down ALT and then press
GRA to put the sign into one of
these modes: (Use PREV or
NEXT to move from mode to
mode and ENT to select a mode.)
-GET GRAPH – to get
GRAPHIC A - P
-MAKE GRAPH – to make
GRAPHIC A -H
-EDIT GRAPH – to edit
GRAPHIC A-P
3
KEY GUIDE TO REMOTE CONTROL FUNCTIONS
Item Key Description
1 ON/OFF Power On / Off. If there are no messages saved in 01 to 99, it will run file 00.
If there are files in 01 to 99 the last saved file will be displayed.
2 PROG Enter the Edit Program Mode. Select 01 to 99 to enter message.
Use to edit or reset password
3 CPW
Use PREV and NEXT to select (a) to (d)
(a) UNUSE PASS Turn off password security.
(b) USE PASS Turn on password security.
(c) RES PASS Reset to factory default password “000”.
(d) CHANGE PASS Change to new password.
4 MET To select the display modes. There are 24 different modes,
press PREV and NEXT to select (1) to (24) method. See Appendix A.
5 PREV Select Previous option.
6 NEXT Select Next option.
7 CAP Toggle between CAPITAL and lower case characters.
8 TIME To select time option. See Appendix B.
9 SPE Select the display speed of the message. (Use PREV and NEXT to select the
different speeds.)
10 FONT Select the font size of the display message. (Use PREV and NEXT to select
the different font sizes.)
11 SYM Select 30 built-in symbols. (Use PREV and NEXT to select the different
symbols.)
12 CLR Erase option.
13 GRA Refer to p18 for making and editing graphics.
Select graphic option. (Use PREV and NEXT to select the following options :)
(a) GET
GRAPH
Place the graphic in the message. Use PREV and NEXT to
select GRAPH A to GRAPH P
(b) MAKE
GRAPH Create new graphics in location NUMBER A to NUMBER H.
(c) EDIT
GRAPH
Edit GRAPH A to GRAPH P and store in one of the locations
Ato H.
14 <= Moving the message and command to the right.
15 => Moving the message and command to the left.
Note:
IF YOU WANT TO DELETE A MESSAGE OR COMMAND IN THE EDIT
PROGRAM MODE. USE THESE KEYS TO MOVE THAT MESSAGE OR
COMMAND TO THE LEFT-MOST POSITION AND PRESS DEL.
IF YOU WANT TO INSERT A MESSAGE OR COMMAND IN THE EDIT
PROGRAM MODE. PLEASE USE ABOVE KEYS TO MOVE THAT MESSAGE
OR COMMAND TO THE LEFT-MOST POSITION
(1) PRESS INS TO INSERT.
(2) TYPE IN YOUR MESSAGE OR PRESS COMMAND KEY, TO INSERT
AUTOMATICALLY.
(3) PRESS INS AGAIN TO OVERWRITE.
16 ALT Hold down while pressing another key use the alternative symbol on the
keyboard.

4
17 PAU Generate a pause within the programmed message. (Use PREV and NEXT to
select PAUSE 1 to PAUSE 8)
18 PHR Select a programmed animation in the message. (Use PREV and NEXT to
select ANIM 1 to ANIM 8)
19 BEEP Select beep sound in the message. (Use PREV and NEXT to select BEEP 1 to
BEEP 3)
20 ENT Press to confirm the selected option.
21 ESC Return to the upper manual in the edit program mode.
22 INS Refer to 15 and 16
23 DEL Refer to 15 and 16
24 SPA Insert space in message.
25 RUN
(1) In edit program mode, press RUN to save and run the current message.
(2) In display mode, press RUN and enter 01 to 99 to select other message for
display.
26 S Programming a sequence file. Please refer to Section 3.5: Programming a
sequence file.

5
QUICK START REMOTE CONTROL TEXT MESSAGING
The sign can store up to 100 messages in numbered data files.
These files are numbered from 00 to 99.
File 00 is a default message and is not reprogrammable.
•In these instructions underlined text denotes words or numbers to type.
•BOXED TEXT denotes key names.
•The display indicates special effects and display methods in [square brackets].
•To correct a mistake, press the DEL key to remove it.
•You can toggle between lower case and capitals by pressing the key CAP
•Hold down ALT while pressing another key to display the symbols on keypad.
•You have the option at the end of your programming to save your message.
•To confirm that the button you pressed has been received an audible beep is heard
when the unit receives input from the remote.
•The Remote is designed to be used close up to the mirror – not for long range
programming.
•The display may be password protected - you may need the password to
enter programming mode: Default Password: “000” followed by ENT.
Suppose the password protection is disabled through the rest of this manual.
A Simple Example
Step Keys to press Explanation Display
1. PROG Enter the edit program mode OPEN: ??
2. 01 ENT
Open message 01.
Two digit file numbers (01-99) are used for
naming message files.
[CYCLIC] is the default method of display
(this cycles through effects at random)
[CYCLIC]
3. HELLO Type the message text. HELLO
4. RUN End the edit program mode SAVE? (Y/N)
5. YSave the message as file number 01 The message is displayed!
You have just created your first message!
•A new message always starts with the default method of display as [CYCLIC], this
cycles through all the available display effects at random.
•You can store up to 99 different messages on the display itself (you can also store
message files on your PC – see PC Operation Instructions) and there is a maximum
memory of 7000 characters.
•A message can be as simple or as complex as you like, you decide the message
and how to display it. In the above example the message was only two words, but it
could have been a complex set of instructions with graphics, the time and special
effects...

6
Running a saved message
Normally, the sign will display the message which was last modified, but you can choose
any message to display at any time.
Step Keys to press Explanation Display
1. RUN Run a saved message RUN : ??
2. 01 ENT Select message file 01 The message is displayed!
Editing a saved message
To recall a previously saved message press the PROG key, input the two-digit file number
and press ENT.
If there is a previously stored message under that file number, the display will show the
content of the message. Use <and >to scroll and view the complete message.
A Simple Example
Step Keys to press Explanation Display
1. PROG Program edit mode OPEN : ??
2. 01 ENT The file number for the stored message
file (see previous example) OLDFILE [CYCLIC]
3. RUN End the edit program mode SAVE ? (Y/N)
4. NThere is no need to re-save the data file
if you have not changed it. The message is displayed!
To recall a saved message follow these steps substituting in the appropriate file number.
Deleting a message file
Enter the Edit Mode, press CLR once.
Cycle through the different delete functions by pressing PREV or NEXT.
Delete Functions:
•DEL ALL Clear all message files
•DEL FILE ?? Delete the specified file
•DEL MSG Delete the message of the current opening file
•DEL ON/OFF Disable the Auto Turn on /Turn off timer function
•DEL ALARM Disable the alarm function

7
ADVANCED TEXT MESSAGING
Adding animation and varying the shape of the letters is easy! It takes a little more time to
program more complex messages but they add sparkle and increase readability.
There is no single method or pattern that you should start each message with - be creative
in your message and experiment with different display methods!
Full control is available through the remote control but programming advanced messages
is simplified if you use a PC (see the separate PC Operation Instruction booklet)
A More Complex Example
Program a message that is eye-catching and appealing about our new Sporting Goods
Department: “VISIT OUR NEW SPORTING GOODS DEPARTMENT TODAY”
Step Keys to press Explanation Display
1. PROG Program edit mode OPEN : ??
2. 02 ENT The file number for this new message file [CYCLIC]
3. NEXT NEXT
NEXT NEXT
Change the method of display to an Open
From Center [OPEN <>]
4. GOOD Message text GOOD
5. MET NEXT NEXT
NEXT NEXT NEXT
NEXT NEXT
Change the method of display to cover old text
from Right [COVER←]
6. MORNING Message text MORNING
7. PAU NEXT Pause for 2 second delay at end of message
before re-displaying it [PAUSE 2]
8. RUN Exit out of edit message mode SAVE ? (Y/N)
9. YSave the data file as 02 The message is displayed!
There is an unlimited number designs for your message, just by changing the methods of
display, and the character sizes and shapes.
Note: If one part of your message message is longer than one screen (approximatly 12
characters); the only display method is slide in from the right. You may want to shorten
your lines and try different display methods.
Appendix A has more information about the functionality of the display and how best to
use your sign to gain maximum benefits!
Using the international character set
As you program your message, key in the English equivalent for the character and use the
NEXT and PREV buttons to scroll through the international characters that correspond to
the English character (i. e. key in ″£″and use the NEXT button until the ″$″character
appears). If there is no corresponding English character key in a SPACE and then use the
NEXT and PREV buttons to scroll through the list of available characters.
See Appendix D for the more information.
Using graphics in a message
To insert a graphic into a message at the desired location, press GRA, cycle through the
functions and press ENT when the display shows ″GET GRAPH″. All preset graphics will
cycle through with the key PREV or NEXT pressed. Press ENT to select.

8
Password protection Default Password: “000”
Password protection is built into the display. By default this is turned off. If the password
protection is switched on in order to program a message or turn off the display you must
key in the correct password. You must enter edit mode when you want to change, reset, or
disable password security.
Steps to change the password
Step Keys to press Explanation Display
1. PROG Enter Edit mode OPEN : ??
2. 00 ENT Enter file 00 OLDFIL [CYCLIC]
3. Press →and ALT
together Fast shift
4.
Repeat step 3 a few times until you
reach to the end of the file, this is to
make sure you will not modify the
content of the file while changing the
password
5. CPW Enter password mode UNUSE PASS
6. NEXT USE PASS
7. NEXT RES PASS
8. NEXT Change password CHANGE: ***
9. AAA ENT Change the password to AAA AGAIN: ***
10. AAA ENT Confirm the password You have changed the password to
AAA.
-UNUSE PASS Turn off password security
-USE PASS Turn on password security
-RES PASS Reset to factory default password ″000″
-CHANGE PASS Change to new password
DO NOT FORGET YOUR PASSWORD OR YOU WILL NOT BE ABLE TO PROGRAM THE DISPLAY!

9
TIMER OPTIONS WITH REMOTE CONTROL
You may only set the timer functions while in the EDIT program mode.
Select the timer function while in edit mode at the end of a message:
Press TIME. Press NEXT and PREV to cycle through the functions and ENT to select.
To input times, press the Left and Right Arrow Keys to move through the digits and use the
NEXT or PREV keys to increase or decrease the values for the digits.
Function Description
SET TIME Adjust the Real Time Clock
SET DATE Adjust the Date
ALARM HOUR Set alarm times and interval
ALARM Set the hourly alarm On/Off
12H MODE If selected, the time will be displayed in 12-hour format
(Note: while programming, always enter the time in 24-hour format)
24H MODE If selected, the time will be displayed in 24-hour format
ADD TIME Add a time display screen in the data file
ADD DATE Add a date display screen in the data file
OFF TIME Tums off at the programmed time of day
ON TIME Tums on at the programmed time of day
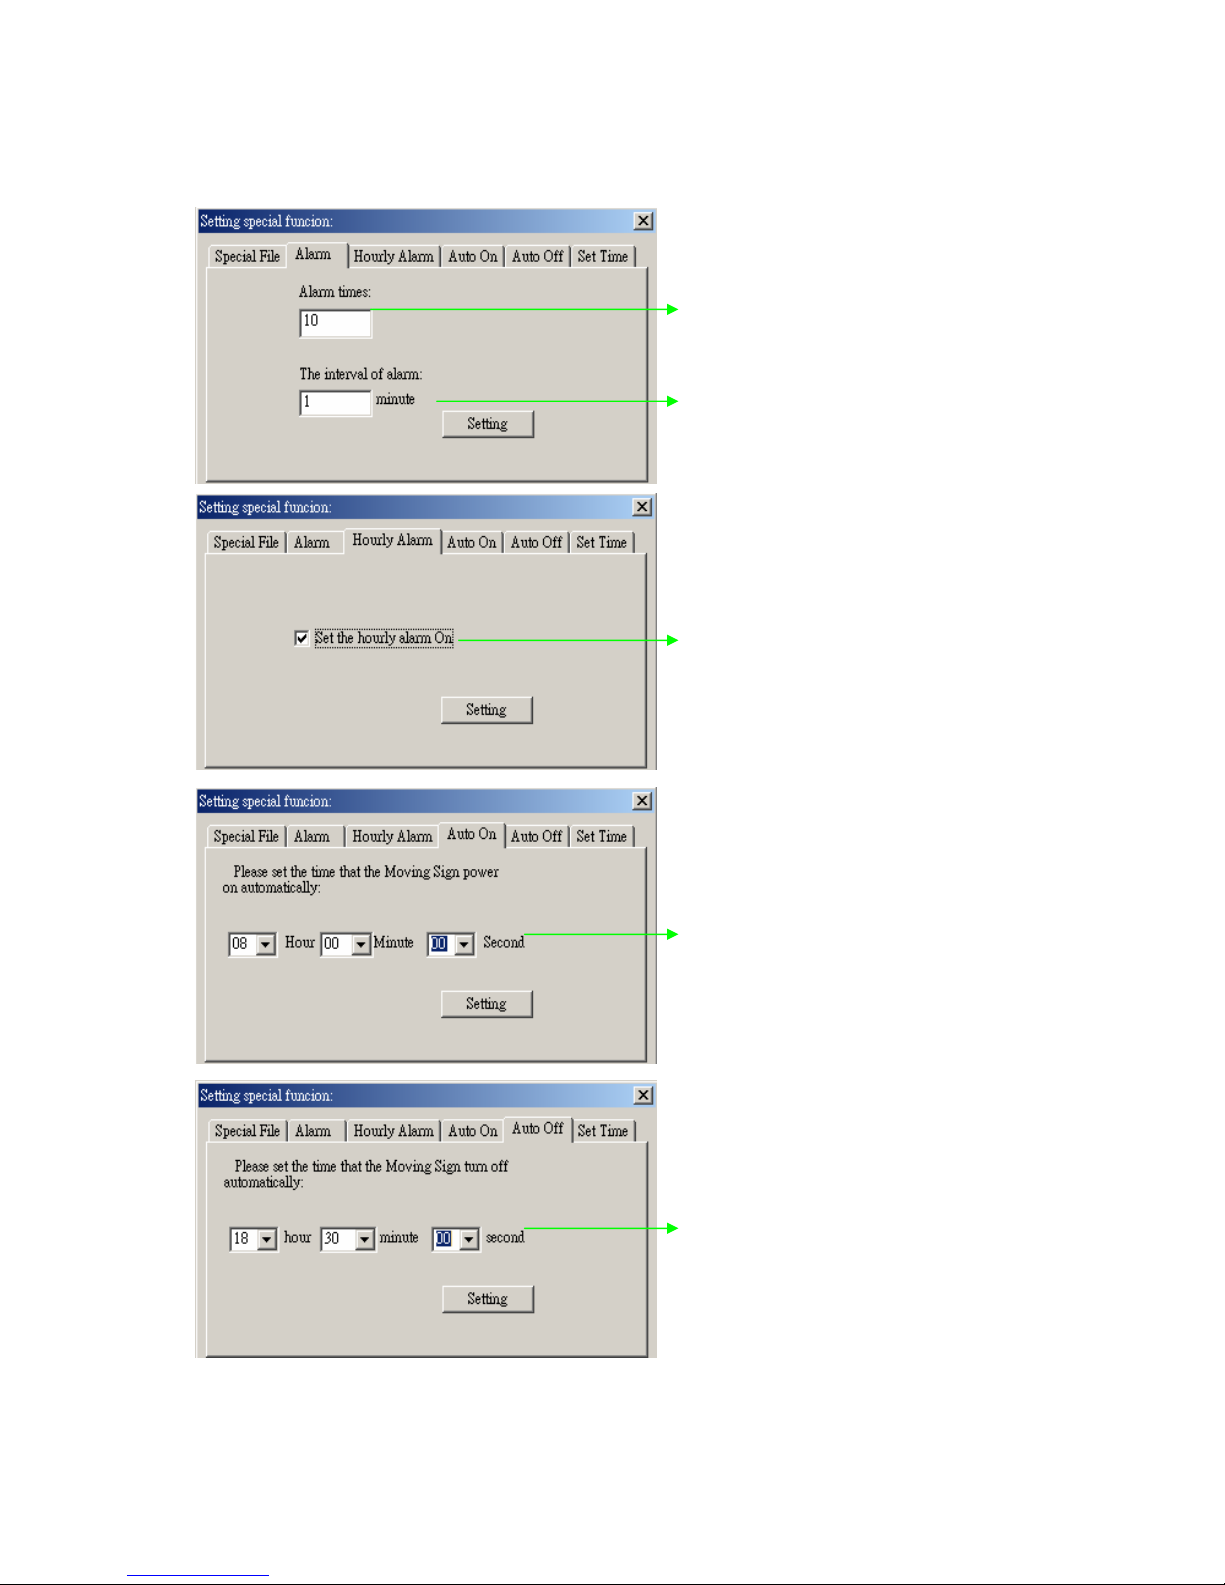
Alarm Setting
When you select the Alarm option, the sign will indicate C: XXXM: XXX.
Where XXX is a number from 000 to 255.
Cis the total times of the alarm to be activated, and Mis the time interval between two
activations.
Example
C: 123M: 001 - this means that the alarm will sound 123 times, and the time interval
between each alarm signals will be 1 minute.

10
PC OPERATION
Using a computer
You will need the special connectors and computer software supplied.
Updated software and sample messages can be downloaded from www.suck.uk.com
System requirement
Your PC will need to have 500kb of free hard disk space and a spare serial port. The
connectors supplied are for the serial port found on nearly all PC computers and laptops. If
your computer does not have a serial port USB adaptors are reaily available from all good
computer stores.
Software operation
Messaging Software allows you to send messages to your sign using a computer.
Follow the following steps to activate your software:
zTurn on your computer and start Windows.
zInsert the software disk into the Drive, or you can copy the software into your PC for
easy operation.
zDouble click the icon to activate the programming software, this is what should
appear on your computer screen:
zChoose these settings and select OK to continue:

11
Screen layout and overview
Item Name Sub-menu Description
Clear Clears all the contents in text edit area
Open… Open message files (.sdv files)
Save Save the current message file to your PC
Save as… Save the current message as a new file to your PC
Menu File
Exit Exit the messaging software
Send - Send Edit Area’s Content:
Updates the display with the new message in the text edit area.
- Send Disk File…:
Update the sign with stored .sdv file
Execution
lattice
Create custom 7x80 (height x width) pixels graphics.
8 custom graphics can be created and stored.
Special
function
Schedule messages, set on/off times, to set alarms, to set time.
Moving Sign
option
Change the model of your display (not required).
Menu Moving
Sign
Test Send a test signal to the sign.
Menu About About the version of this software.
Send Updates the display with the new message in the text edit area.
New Clear all the contents in the text edit area.
Open Open message files (.sdv files)
Save Save the current message file to your PC
Edit Graphic Create custom 7x80 (height x width) pixels graphics.
8 custom graphics can be created and stored.
Menu Font 7 different fonts
Menu Color (not used for this product)
Window Text edit area Type your messages here!

12
QUICK START TEXT PC MESSAGING
1. Type a message in the main window
2. Click Send to update the LED Display
3. Input the address (default=0)
4. Select a COM port (the port you attached the cable to, if you are not sure try
both!)
5. Click OK to send the message to the LED display. The sign will beep and display
the new message automatically.
13
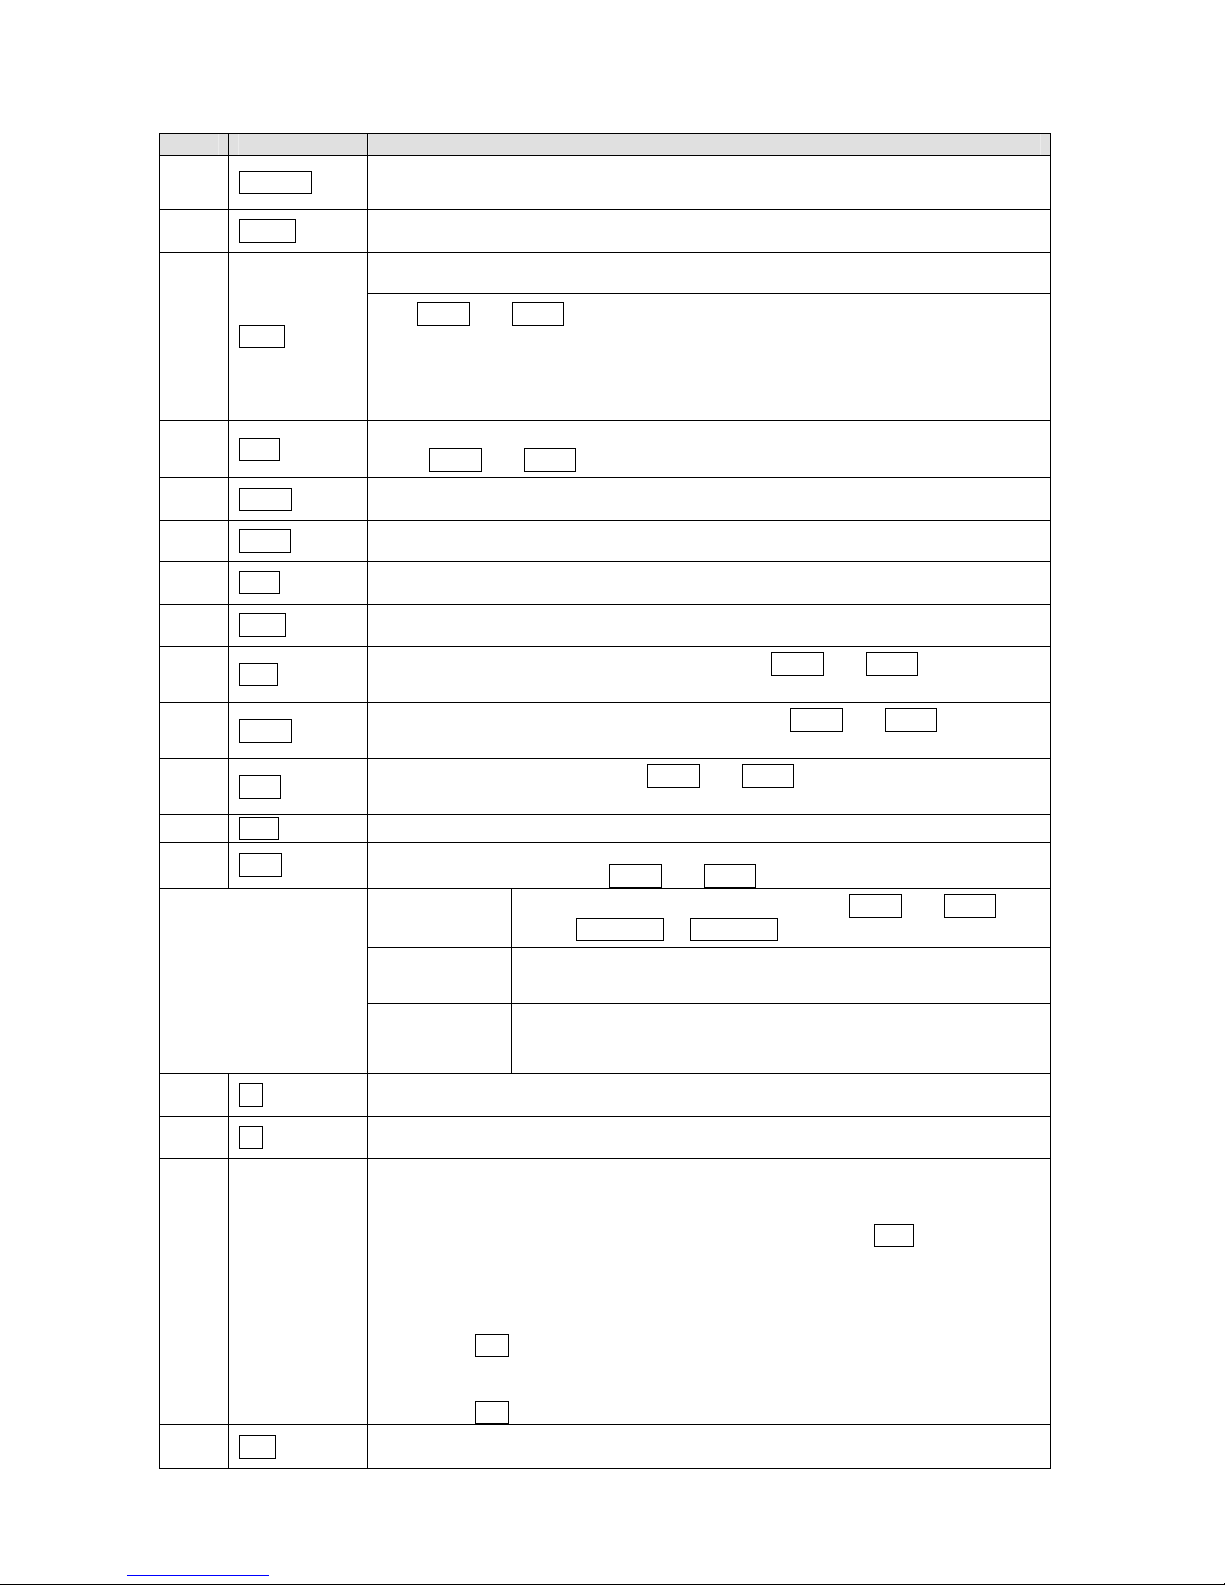
Storing messages into different file numbers
You can store different messages into different FILE Numbers at the same time.
3 Click Send to update FILE01, FILE02,FILE03
1 Press CTRL + ENTER
to create FILE 02.
2 Press CTRL + ENTER
to create FILE 03.
You can create files
from 01 to 99
14
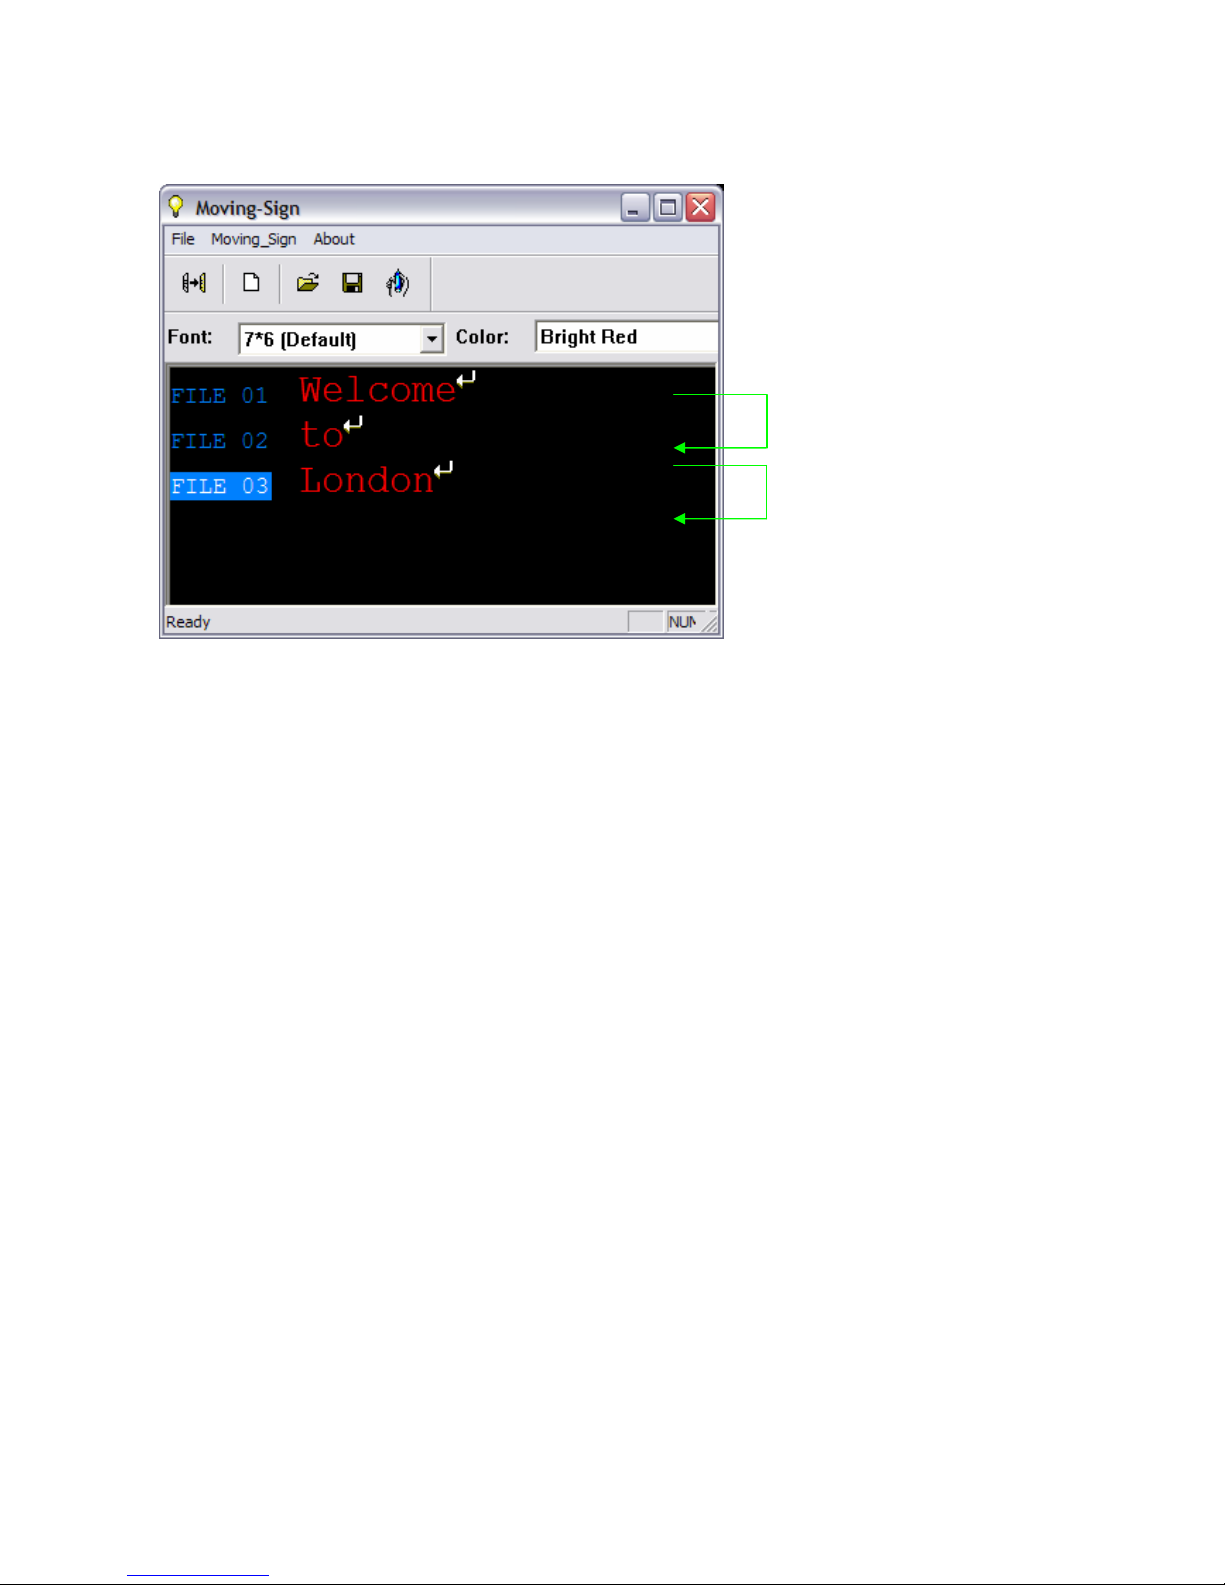
Setting the time and date
Once set, the sign will remember the time and date.
The correct time and date is set from the internal clock on your computer.
1. Select Special Function
2. Select the Set Time tab
3. Choose 12 Hour or 24 Hour clock
4. Click Setting to update the clock of the LED Display
5. Click OK to return to the main screen

15
Displaying messages by file number / in time order
Once you’ve stored messages into the sign as different files you can set the sequence in
which messages appear.
1. Select Special Function
2. Select the Special File tab
3. Choose Special File Name (there are ten programs 0 to 9).
4. Choose program Start Time and End Time.
5. Select the Run Date (days of the week to show the messages).
6. Select the files to show in the program.
7. Click settings to update the changes to the special file.
16
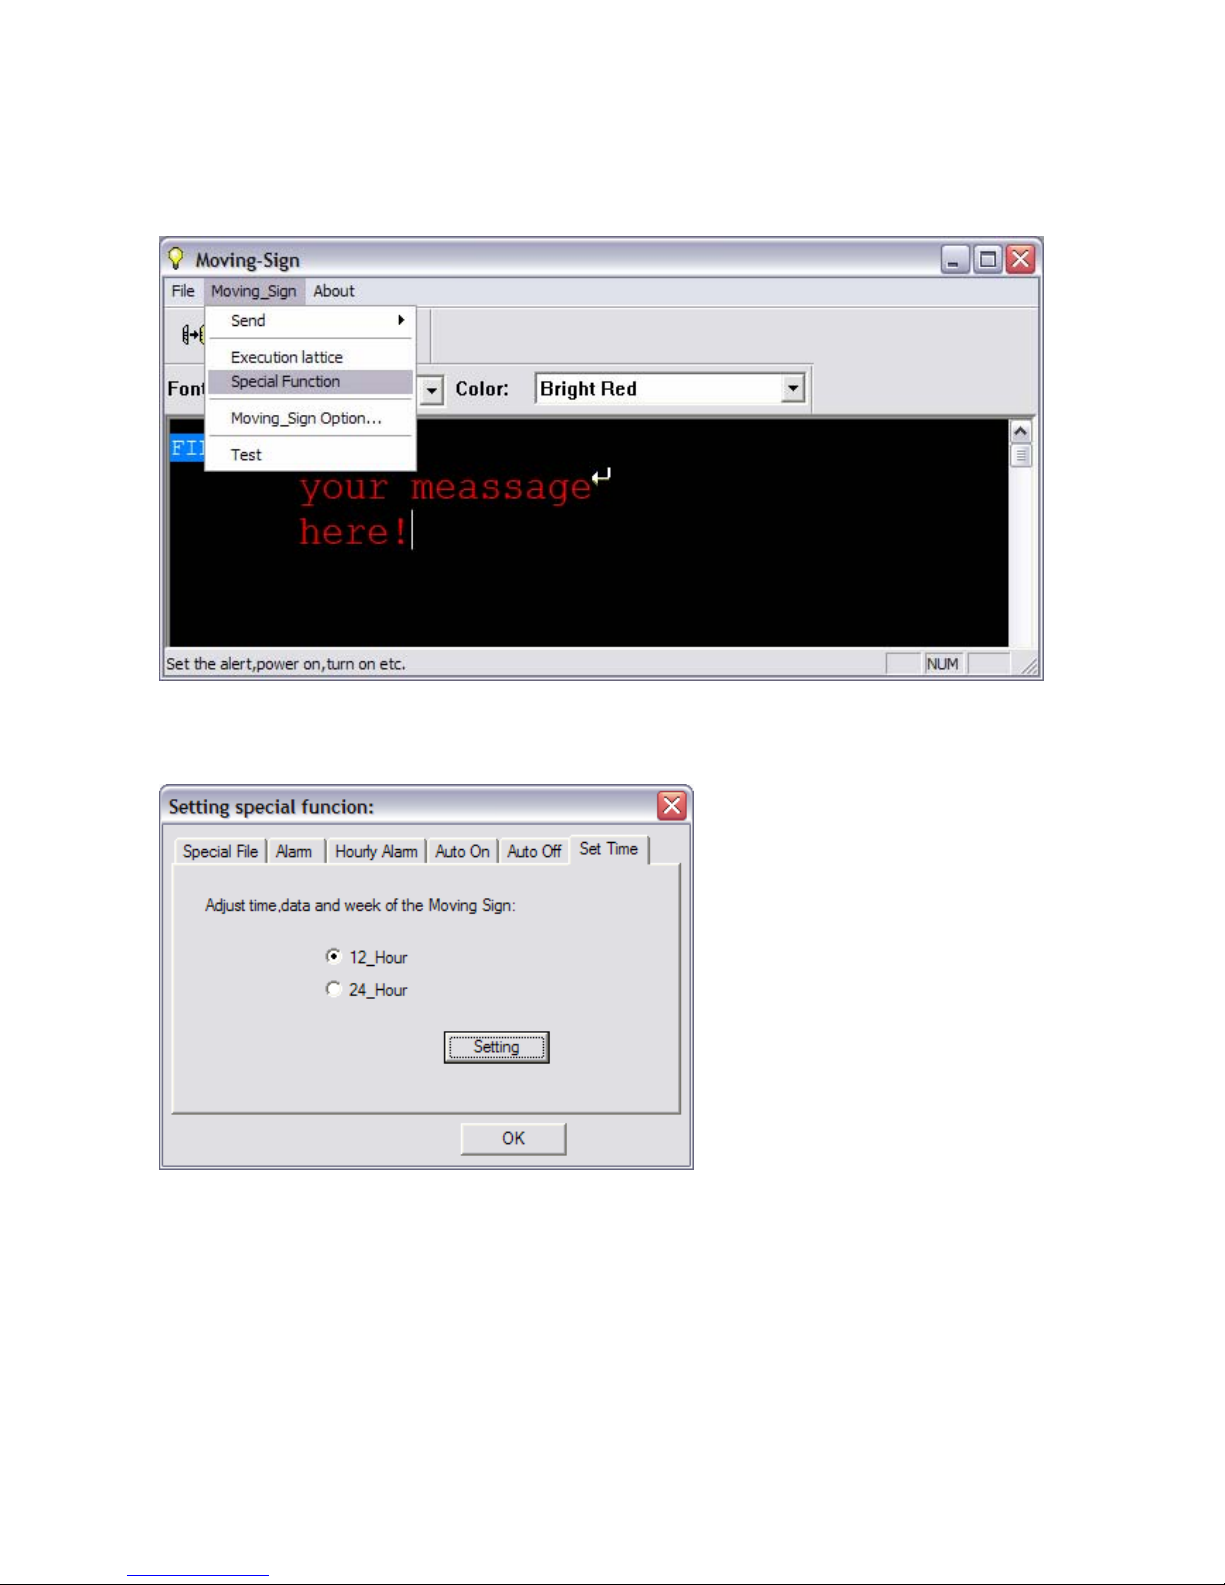
ADVANCED TEXT MESSAGING
Using fonts, graphics, cartoons, date, time, speeds
The different character styles available for your sign are shown in the Appendix.
You can also add time, special characters, user defined graphics and beeps to your
messages as described above.
Changing the Speed
Once you pick a moving method, like [OPEN←], a speed can be selected by right clicking
with the mouse, selecting Speed and picking from the list: Speed1=Fastest, 8=Slowest
1. Right click the mouse
2. Select Insert Moving
method*
3. Select Immediate
4. Select Font=5*6 Short
5. Type in “WELCOME”
*if a line of text is longer than the
screen itself, the moving method
defaults to scroll left for readability.
Text lines are broken by pressing
Return.
6. Select Font=7*6 (this also
returns to the default moving
method, Cyclic again)
7. Type in “LONDON”
8. Right click the mouse, and
select Insert pre-defined
symbol. Pick one.
9. Right click the mouse, and
select Insert Cartoon. Pick
one.
10.Right click the mouse, and
select Add Date.
17
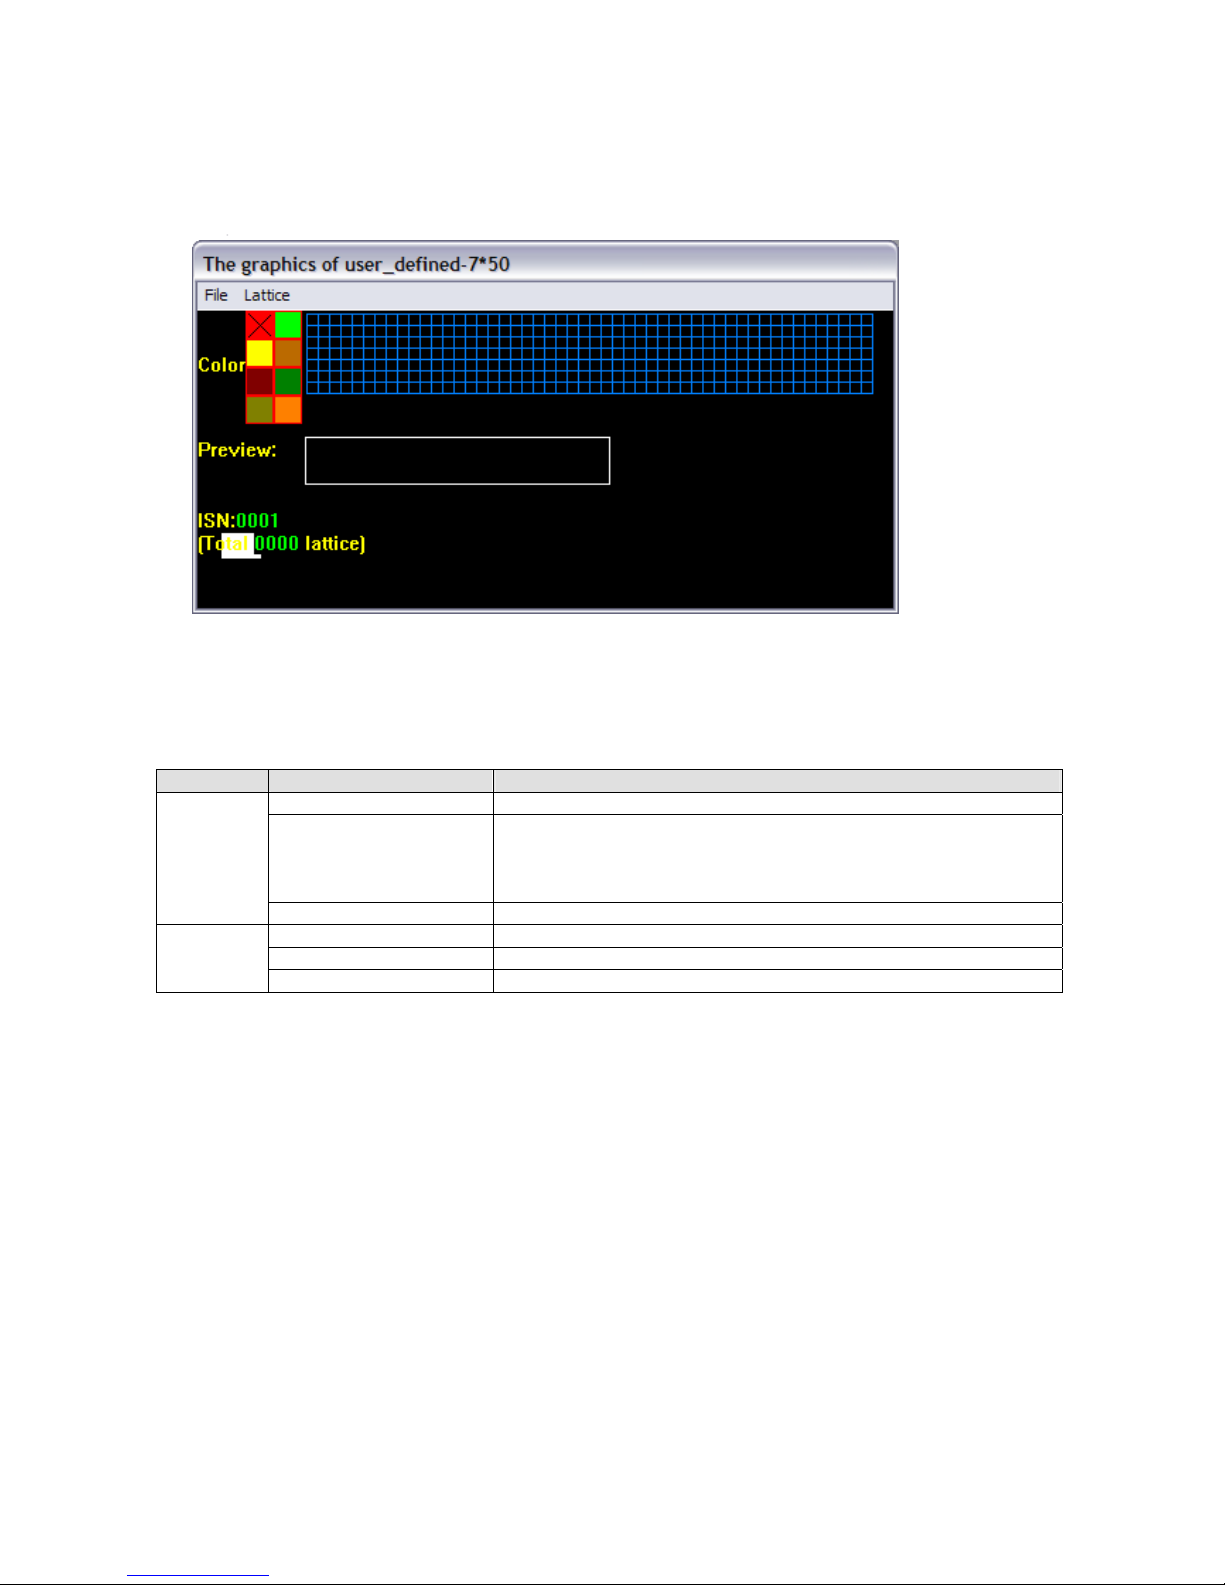
CREATING YOUR OWN GRAPHICS & LOGOS
(The maximum number of user defined graphics that can be saved in the display memory
is 8, graphic A- graphic H)
1. Click Lattice to edit your graphic or logo
2. Note: Colours are not available with this product
3. Create your graphic in the grid area:
4. Draw a dot by clicking the left mouse button
5. Delete a dot by clicking the right mouse button
Name Sub-menu Description
Save as… Save as another ISN number
Create Sending List zSave all the custom graphics as a “lst” file.
zSend the graphic list to the sign.
The maximum number of user defined graphics that can be
saved in the display memory is 8, from Graphic A- Graphic H
File
Exit Close the graphic editing window
Create a new lattice Create another graphic
Editing old lattice Open an old lattice for the editing
Lattice
Clear current lattice Clear the current graphic
6. Select Create Sending List to create your own graphic list.
7. Double click the graphic in the left window to add into the current graphic list on the
right.
8. The maximum number of user defined graphics that can be saved on to the display
is 8, from Graphic A-H.
9. Click Save to store the current graphic list as “lst” file.
10.Click Send… to upload the current graphic list into the sign.
18
TIMER OPTIONS
1. Select Special Function
2. Select the function tab you want to use
The sign will alarm will repeat
10 times.
The interval between repeats
alarms is 1 minute.
Set the hourly alarm on.
To power on the sign at 08:00
automatically.
To power off the sign at 18:30
automatically.

19
APPENDIX
APPENDIX OF ADDITIONAL PROGRAMMING TIPS
Function Code Definition Possibilities Control
Cyclic [CYCLIC]
Immediate [IMMED]
Open from Right [OPEN←]
Open from Left [OPEN→]
Open from center [OPEN<>]
Open to Center [OPEN><]
Cover from Center [COVER<>]
Cover from Right [COVER←]
Cover to Left [COVER→]
Cover to Center [COVER><]
Scroll Up [SCROLL↑]
Scroll Down [SCROLL↓]
Interlace to Center [INTER><]
Interlace Cover [INCOVER><]
Cover Up [COVER↑]
Cover Down [COVER↓]
Scan Line [SCANLN]
Explode [EXPLODE]
Pac Man [PACMAN]
Fall & Stack [FALL]
Shoot [SHOOT]
Flash [FLASH]
Random [RANDOM]
METHOD Display Option
Slide in [SLIDE IN]
5×6 Short [5×6]
5×11 Short & Wide [5×11]
7×6 (Default) [7×6]
7×11 Wide [7×11]
7×9 [7×9]
7×17 Extra Wide [7×17]
FONT Changes the shape and size of
characters
Small Fonts [Small]
Speed 1 (Fastest) [SPEED 1]
Speed 2 [SPEED 2]
Speed 3 [SPEED 3]
Speed 4 [SPEED 4]
Speed 5 [SPEED 5]
Speed 6 [SPEED 6]
Speed 7 [SPEED 7]
SPEED Change the scrolling speed of
the display
Speed 8 (Slowest) [SPEED 8]
[GRAPH A]
[GRAPH B]
[GRAPH C]
[GRAPH D]
[GRAPH E]
[GRAPH F]
[GRAPH G]
GRAPHICS Editable by user
[GRAPH H]
City [GRAPH I]
Car [GRAPH J]
Vessel [GRAPH K]
Tel [GRAPH L]
Nature [GRAPH M]
Ship [GRAPH N]
Swim [GRAPH O]
GRAPHICS Non-editable by user
Cat [GRAPH P]
Continued…
20
Function Code Definition Possibilities Control
MERRY X`MAS [ANIM 1]
HAPPY NEW YEAR [ANIM 2]
4TH JULY [ANIM 3]
HAPPY EASTER [ANIM 4]
HAPPY HALLOWEEN [ANIM 5]
DON`T DRINK & DRIVE [ANIM 6]
NO SMOKING [ANIM 7]
PHRASE Generate an animated
pre-programmed display
WELCOME [ANIM 8]
Pauses for 2 second delay [PAUSE 1]
Pauses for 3 second delay [PAUSE 2]
Pauses for 4 second delay [PAUSE 3]
Pauses for 6 second delay [PAUSE 4]
Pauses for 10 second delay [PAUSE 5]
Pauses for 20 second delay [PAUSE 6]
Pauses for 30 second delay [PAUSE 7]
PAUSE Generate a pause within the
programmed message
Pauses for 60 second delay [PAUSE 8]
APPENDIX LIST OF INTERNATIONAL CHARACTERS
English Character International Characters
A Ä Å Æ
C Ç Ć
E É
N Ñ
O Ö Ó
S Ś
U Ü
Z ŻŹ
a â ä à å æ á
c Ç
e é ê ë è
i ï î ì í
n ñ ń
o ô ö ò ó
t
u ü û ù ú
y Ÿ
Space αβΓπΣσµ τΦθΩ∞δφ
? ¿
$ ¢ £ ¥ Pt
ƒ
€
APPENDIX LIST OF SYMBOL CHARACTERS The symbol appear in brackets (“[ ]”) in the programming mode
Sunny Cloudy Rainy Clock
Phone Glasses Faucet Rocket
Alien Key Sweater Helicopter
Car Tank House Teapot
Trees Duck Motorcycle Bike
Crown Hearts Right Arrow Left Arrow
Lower Left Arrow Upper Left Arrow Mug Chair
Shoe Martini Glass
TROUBLESHOOTING
No display -Check if the power socket located at the back of the sign is connected.
-Check if the AC power plug is plugged into the wall outlet.
-Check if the main power of the AC outlet is normal.
-Check if the auto on/auto off time setting is correct.
Not response to
remote control
-Check if the batteries of the remote control still have enough energy. If user is not sure, please
replace all the batteries.
-Check if the batteries of the remote control are placed at right polarity. Please follow the
markings in the battery compartment.
-Check if there is anything between the remote and the sign blocking the remote signal.
No display but
response to the
remote control
-Check if the auto on/auto off time setting is correct.
-Check if the data in the files are valid.
-If you are not sure, you can enter the edit mode and press ‘CLR’ key of the remote control,
select ‘DEL ALL’ to erase all data, this will reset the sign to display the default demo messages.
If the above procedures do not work, please contact your dealer.
Table of contents


