manuals.online logo
Brands
  1. Home
  2. •
  3. Brands
  4. •
  5. SUGATSUNE
  6. •
  7. Industrial Equipment
  8. •
  9. SUGATSUNE LAMP AK-60 User manual

SUGATSUNE LAMP AK-60 User manual

安全金具シリーズ
スライド ラッチ
AK-60
,
AK-C60 
取付説明書
このたびは弊社製品をお買い上げいただき誠にありがとうございます。
取付け作業にあたっては本書をよくお読みのうえ、正しく取り付けてご使用されますよう
お願いいたします。取り付け後は、お使いになる方が本書を保管してください。
使用上の注意
本品は吊り戸棚等の扉が地震などの揺れで開放するのを防止するスライド式のラッチですが、
予想を越える衝撃が加わると扉が開放してしまう場合がありますので、重量物等の収納は避け
てください。
適応扉厚:18mm以上
標準天板厚または地板厚:25mm、(20mm、15mmの場合はスペーサーを使用)
推奨扉サイズ:高さ700 mm以下× 幅500mm以下
適応キャビネット:手順4の図のようなキャビ ネット(かぶせ仕様)
部品一覧
取付手順
使用中の調整、メンテナンス
手順 1(AK-60の場合) 手順 1(AK-C60の場合)
扉端面を基準とし、下図にしたがって扉裏面に
堀込み加工をします。
扉端面を基準とし、下図にしたがって扉裏面に
堀込み加工をします。
※扉の上下どちらにも取り付けることができます。
(図は扉上部取り付けの場合、下部取り付けの場
合は上下対称となります。)
※扉の上下どちらにも取り付けることができます。
(図は扉上部取付けの場合、下部取り付けの場合
は上下対称となります。)
手順 2(AK-60の場合)
手順 3
(共通) 手順 4(共通)
扉の開閉操作方法
下図を参考に付属の取付ねじでラッチ 本体を扉
裏面の所定の位置に仮止めします。
付属の取付ねじで受座をキャビ ネットの所定の位置
に仮止めします。
パッキンが付いている場合は※寸法からパッキン厚
み分を引いてください。
(パッキン厚5mm以下)
天板厚、または地板厚が20mm、15mmの
場合はスペーサーを使用します。
扉を開閉してラッチ の掛り具合をチェックし、ラッチと
受座の掛り代とすき間が下図の適正値になるよう、ラ
ッチ本体と受座の取付位置を調整し、最後に全ての
取付ねじをしっかり締め込みます。
吊元丁番で扉の目地調整などを行った場合は、
再度、調整をし直してください。
手順 2(AK-C60の場合)
下図を参考に付属の取付ねじでラッチ本体、
カバーを扉裏面の所定の位置に仮止めします。
●扉を閉めれば自動的にラッチ が掛止します。
●扉を開ける時はレバーを押しながら扉を開け
てください。
長期間の使用で扉が反ったり、垂れ下がったりすると正常に作動しなくなることがありますが、その
場合は、扉の建て付けを調整するか、本品の取付位置を調整してください。
天板厚
地板厚
20mm
15mm
スペーサー枚数
1枚
2枚
 ラッチ本体 1個
受座 1個スペーサー 2個ラッチ本体取付ねじ
ねじサイズ
:4×15
カバー 1個(別売)(AK-C60)カバー取付ねじ
ねじサイズ:
3×10
受座取付ねじ
ねじサイズ:
3.5×15
受座取付ねじ
(スペーサー使用時)
ねじサイズ:
3.5
×
20
レバー
平行に
レバー
カバー
裏扉面 裏扉面
取付ねじ
肩端面
からの寸法 肩端面
からの寸法
平行に
受座
取付ねじ
ラッチ本体中心に合わせる
※
19
14
平行に
取付ねじ
取付ねじ
扉裏面 扉裏面
本製品について
80
60以上
44
36
0.5
R12 R12
R12
R3 R3
26.50.2
60.50.2
180.2
12.5+0.3
 0
140.2
80
R3 R3
R6 R6
26.50.2
60.50.2
12.5+0.3
 0
+0.5
 0
天板
25
44
36
TOP BOARD
0.5〜1(すき間)
6(掛り代 )
DOOR
天板
操作方法
ラッチ本体
扉
受座
60以上 扉端面
扉端面
60
JAPAN
PAT
18+0.5
0
2014.01 PRINTEDINJAPAN 0398-3 
AK-60/AK-C60 SLIDE LATCH
INSTALLATION INSTRUCTION
PARTS LIST:
This slide latch has been especially designed with earthquake safety
in mind. The unique simple design makes it possible to be used
without
a handle or knob. This product can prevent cabinet doors
from opening during an earthquake.
Recommended door size
Height: 700 mm (27󱐮) MAX.
Width: 500 mm (20󱐮) MAX.
Thickness: 18 mm (3/4󱐮) MIN.
Cabinet top/bottom wall thickness
15 mm (19/32󱐮)
20 mm (25/32󱐮)
25 mm (63/64󱐮)       
This unit is designed to be used on an overlay door.
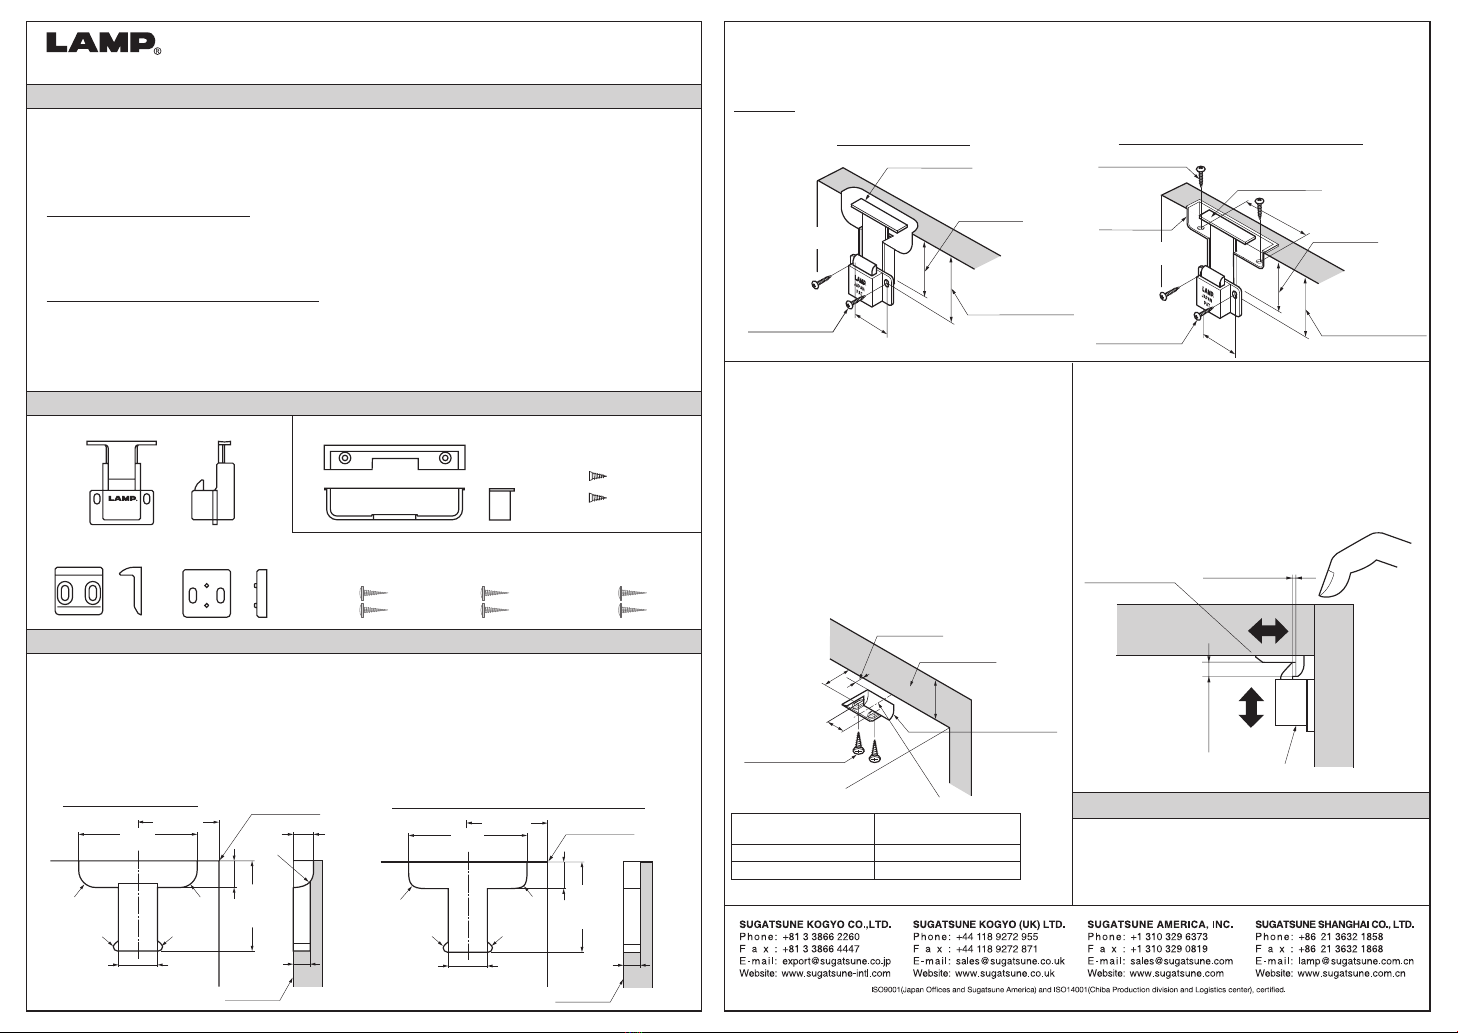
INSTALLATION INSTRUCTION:
Make a router cut into the cabinet door using the dimensions shown
in the diagram.
*Please note that the diagram shows mounting instructions for a top edge mount.
 To mount the unit on the bottom edge of the cabinet door, use the given
 dimensions in reverse.
STEP-1
STEP-2
STEP-3
Warning:
STEP-4
In case of AK-60
In case of AK-60
In case of AK-C60 (with cover)
After making the necessary cuts into the cabinet door, mount the latch body to
the cabinet door as shown in the diagram using the measurements provided.
Do not tighten the mounting screws at this time.(for adjustment purpose)
Attach the strike plate to the cabinet using
the dimension provided in the diagram. Note
that you may need to use the distance plate
provided due to the thickness of the
top/bottom board. Mount the strike plate
but do not tighten the mounting screws.
If a cushion or bumper is attached between
the cabinet and cabinet door, subtract
projection of the cushion or bumper from
the 19 mm (*) distance given for the location
of the strike plate.
(The maximum projection of the cushion or
bumper must not exceed 5 mm.)
Test the function of the unit by opening and
closing the cabinet door. Making the proper
adjustments on the position of the latch
and the strike as shown in the diagram,
then tighten all mounting screws.
To operate: Push latch and pull cabinet door.
During an extremely strong earthquake,
the doors may open due to the contents
inside the cabinet shifting.
LATCH BODY1 COVER1 ●Following parts are
added in case of AK-C60
STRIKE PLATE1 DISTANCE PLATE1M415 SCREWS
(FOR BODY)
3.515 SCREWS
(FOR STRIKE PLATE)
3.520 SCREWS
(FOR STRIKE PLATE
WITH DISTANCE PLATE)
LATCHLEVER
LATCH LEVER
PARALLEL
PARALLEL
MEASUREMENT
FROM DOOR EDGE
MEASUREMENT
FROM DOOR EDGE
PARALLEL
3.515 SCREW
415 SCREW
415 SCREW
COVER
FRONT OF
TOP BOARD
ALIGE THE CENTER OF SLIDE LATCH
Top (bottom) board
thickness (mm)
Required
distance plate (pcs)
1
2
20
15
BACK SIDE OF DOOR
BACK SIDE
OF DOOR
BACK SIDE
OF DOOR
DOOR EDGE
DOOR EDGE
BACK SIDE OF DOOR
310 SCREW
ABOUT THIS PRODUCT:
※
19
14
25
STRIKE PLATE
OVERLAYED
DISTANCE 6
GAP (0.5〜1)
DOOR
STRIKE PLATE
LATCH BODY
80
60(min.)60(min.)
0.5
R12R12
R12
R3 R3
26.50.2
60.50.2
180.2
12.5 +0.3
 0
140.2
80
R6 R6
R3 R3
26.50.2
60.50.2
12.5+0.3
 0
+0.5
 0
44
36
44
36
60
BACK SIDE
OF DOOR BACK SIDE
OF DOOR
TOP BOARD
DOOR
JAPAN
PAT
18+0.5
0

This manual suits for next models

1

Other SUGATSUNE Industrial Equipment manuals

SUGATSUNE LAMP S-ATJ User manual

SUGATSUNE

SUGATSUNE LAMP S-ATJ User manual

SUGATSUNE LAMP DPL-RO User manual

SUGATSUNE

SUGATSUNE LAMP DPL-RO User manual

SUGATSUNE ZweiL Series User manual

SUGATSUNE

SUGATSUNE ZweiL Series User manual

Popular Industrial Equipment manuals by other brands

Rittal 300 ENH Assembly and operating instructions

Rittal

Rittal 300 ENH Assembly and operating instructions

Vahle LSV Maintenance instructions

Vahle

Vahle LSV Maintenance instructions

Stober K38-03 operating manual

Stober

Stober K38-03 operating manual

Global Industrial HEPA 641754 user manual

Global Industrial

Global Industrial HEPA 641754 user manual

Festo DGEA Series operating instructions

Festo

Festo DGEA Series operating instructions

Emerson Fisher 114PL instruction manual

Emerson

Emerson Fisher 114PL instruction manual

IECHO BK3 instructions

IECHO

IECHO BK3 instructions

nosted Igland GR 20 owner's manual

nosted

nosted Igland GR 20 owner's manual

PROMETHEUS The Big Boy user manual

PROMETHEUS

PROMETHEUS The Big Boy user manual

DIEBOLD JetSleeve 2.0 user manual

DIEBOLD

DIEBOLD JetSleeve 2.0 user manual

schmersal AZM190 RK Series operating instructions

schmersal

schmersal AZM190 RK Series operating instructions

Kässbohrer TIPPER Series user manual

Kässbohrer

Kässbohrer TIPPER Series user manual

WilTec 61910 Operation manual

WilTec

WilTec 61910 Operation manual

Eaton NZM1-XA Series Instruction leaflet

Eaton

Eaton NZM1-XA Series Instruction leaflet

Festo HGDS B Series operating instructions

Festo

Festo HGDS B Series operating instructions

CPI EuroMix Silo operating instructions

CPI

CPI EuroMix Silo operating instructions

Virutex FR129 VB operating instructions

Virutex

Virutex FR129 VB operating instructions

Robar Industries 7400 Series installation instructions

Robar Industries

Robar Industries 7400 Series installation instructions

manuals.online logo
manuals.online logoBrands
  • About & Mission
  • Contact us
  • Privacy Policy
  • Terms and Conditions

Copyright 2025 Manuals.Online. All Rights Reserved.