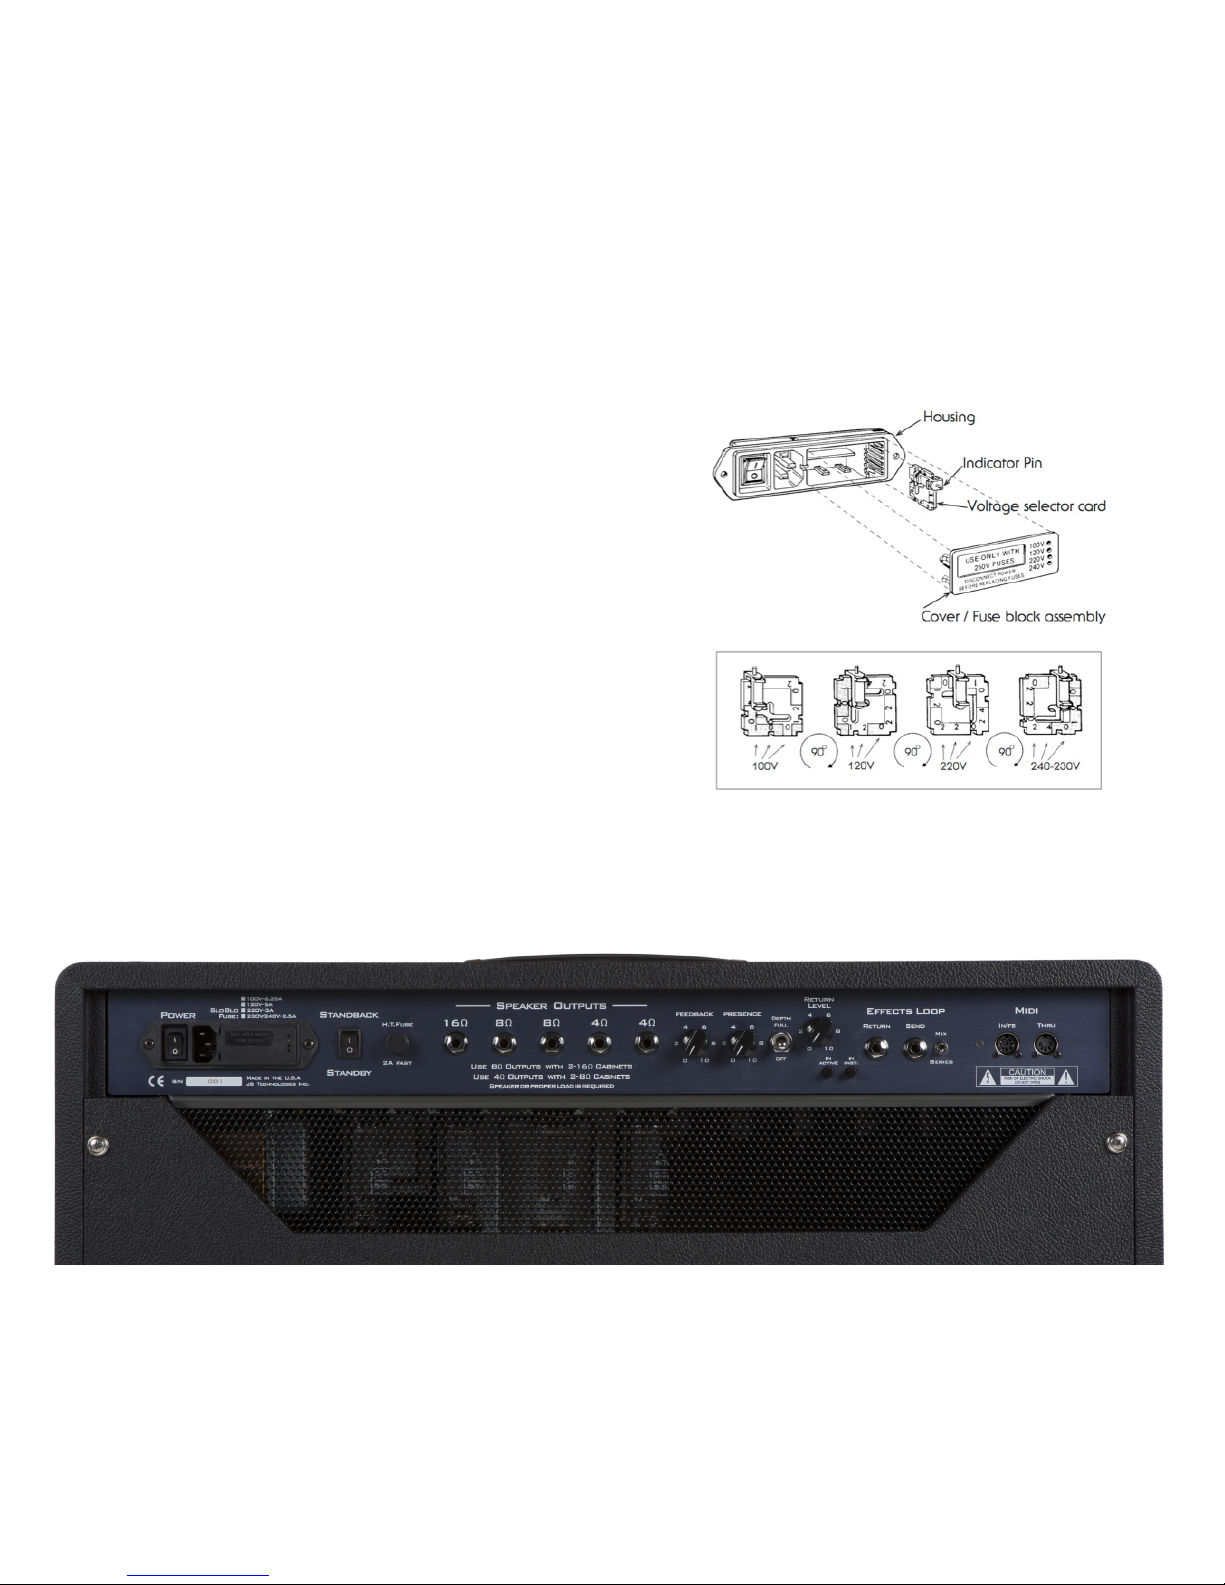
Suhr PT-100 SIGNATURE EDITION User manual

USER GUIDE
PT-100 SIGNATURE EDITION™

2
IMPORTANT SAFETY INSTRUCTIONS
1. Read these instructions
2. Keep these instructions
3. Heed all warnings
4. Follow all instructions
5. Do not use this apparatus near water
6. Clean only with dry cloth
7. Do not block any ventilation openings. Install in accordance with the manufacturer's
instructions
8. Do not install near any heat sources such as radiators, heat registers, stoves, or
other apparatus (including ampliers) that produce heat
9. Protect the power cord from being walked on or pinched particularly at plugs and the
point where they exit from the apparatus
10. Unplug this apparatus during lightning storms or when unused for long periods of
time
11. Refer all servicing to qualied service personnel. Servicing is required when
the apparatus has been damaged in any way, such as power-supply cord or plug
is damaged, liquid has been spilled on, objects have fallen into the apparatus, the
apparatus has been exposed to rain or moisture, does not operate normally, or has
been dropped.
12. CAUTION: To disconnect the unit completely from the MAINS, unplug the unit.
Turning the power switch off does not disconnect the unit completely from the MAINS.

3
Thank you for purchasing the all new, completely redesigned,
Suhr PT-100 Signature Edition amplier.
OVERVIEW
World renown guitarist Peter Thorn, is not only known for his touring/session work with
legendary artists such as Chris Cornell and Melissa Etheridge, but he is also considered
by the guitarist community to be one of the foremost authorities on tone.
After ve years of extensive road testing and countless hours spent modifying his
original PT-100 amplier, we have created the ultimate, no compromise, multi-channel
amp - now MIDI switchable.
The PT-100 Signature Edition is available in a classic black tolex and appointed with
black knobs and a rich midnight anodized aluminium faceplate.
The Suhr PT-100 Signature Edition is a 100 watt, three-channel tube amplier head
lthat features a custom “Plexi-style” output transformer, four EL-34 power tubes, six
12AX7 preamp tubes, a hybrid/solid-state series/parallel effects loop, and a 4-button
programmable footswitch.

4
OPERATING INSTRUCTIONS
POWERING INSTRUCTIONS
With the power switch (located on Back) in the O (OFF) position and the Standback/Standby switch in the Standby position O, ip the power switch to the I (ON) position.
Wait sixty seconds, then ip the Standby switch to the Standback I position.
To power down, simply switch the amplier from Standback to Standby, then ip the power switch to the O (OFF) position.
POWER SELECT SWITCH (located on Back)
I: ON, normal operation
O: Power is switched OFF
STAND BACK / STANDBY: (located on Back)
I: ON, normal operation
O: OFF, standby operation
CONNECTING YOUR INSTRUMENT
INPUT
Use this input to connect your guitar to the amplier

5
CHANNEL 1 (Clean)
CRUNCH Engaging this switch changes the character of Channel 1 from pristine clean to a thicker classic tone that breaks up when Gain 1 is set at higher settings.
BRIGHT 1 Adds brightness and sparkle.
GAIN 1 Adjusts the overall gain of Channel 1.
BASS Adjusts the amount of bass. Turning it clockwise increases the amount of bottom-end, giving you a fuller tone. Turning it counter clockwise will reduce the
bottom-end, which is useful when performing at louder volumes.
MIDDLE Adjusts the midrange. Turning it clockwise increases the amount of mids. Turning it counter clockwise will reduce the mids and produce a mid-scooped
sound.
TREBLE Adjusts the treble. Turning it clockwise increases the amount of top-end, giving your tone clarity and brightness. Turning it counter clockwise will produce
a warmer sound, ideal for dialing in smoother Jazz-like tones.
LEVEL 1 Adjusts the overall output (Master Volume) of Channel 1.
NOTE: When engaging the effects loop while in Channel 1, Level 1 becomes your send level for that channel.

6
CHANNEL 2 / 3 (Overdrive)
BRIGHT 2 / 3 Adds brightness to Channels 2 and 3.
GAIN 2 Adjusts the overall gain of Channel 2.
GAIN 3 Adjusts the overall gain of Channel 3.
BASS Adjusts the amount of bass. Turning it clockwise increases the amount of bottom-end, giving you a fuller tone. Turning it counter clockwise will reduce the
bottom-end, which is useful when performing at louder volumes.
MIDDLE Adjusts the midrange. Turning it clockwise increases the amount of mids. Turning it counter clockwise will reduce the mids and produce a mid-scooped
sound.
TREBLE Adjusts the treble. Turning it clockwise increases the amount of top-end, giving your tone clarity and brightness. Turning it counter clockwise will produce
a warmer sound, excellent for dialing in smooth uid-like lead tones.
LEVEL 2 Adjusts the overall level (Master Volume) of Channel 2.
NOTE: When engaging the effects loop while in Channel 2, Level 2 becomes your send level for that channel.
LEVEL 3 Adjusts the overall level (Master Volume) of Channel 3.
NOTE: When engaging the effects loop while in Channel 3, Level 3 becomes your send level for that channel.

7
SPEAKER OUTPUTS
The PT-100 Signature Edition has individual speaker outputs. Therefore you must
choose the appropriate speaker output jack(s) depending on the impedance (Ω) of
your cabinet(s).
NOTE: Do not use more than one of the speaker impedance groups when connecting
to more than one speaker. For example: 1-16Ω and 1-8Ω or 1-8Ω and 1-4Ω.
One 16 Ω cabinet, use the 16 Ω output jack.
Two 16 Ω cabinets, use both 8 Ω output jacks.
One 8 Ω cabinet, use one 8 Ω output jack.
Two 8 Ω cabinets, use both 4 Ω output jacks.
One 4 Ω cabinet, use one 4 Ω output jack.
IMPORTANT:
• To avoid damage to your amplier, do not operate without connecting it a speaker
or a suitable load device.
FEEDBACK
This control has a center detent and adjusts the overall feel of the power amp section
from smooth and spongy, (at lower settings) to tight and aggressive (at higher settings).
PRESENCE
Adjusts the amount of high frequencies added to your tone. Turning it clockwise will
add more sparkle.
DEPTH (3-Position Switch)
Selects the amount of low-end boost added to the PT-100’s power section, this will
provide more bottom end while retaining clarity.
Full: + 4dB
Half: + 2dB
Off: Bypassed
EFFECTS LOOP
The PT-100 Signature Edition is equipped with a bypassable (via the In/Active button),
a hybrid/solid-state series/parallel effects loop, which performs well with pedals and
line-level rack gear (selected via the In/Inst.button).
NOTE: When the effects loop is engaged the return level control acts as the amp’s
overall master volume, and the individual channel level controls become your send
levels.

8
MIDI
IN/FS
Use this port to connect the included four button footswitch or other MIDI enabled
devices.
THRU
This port emits a copy of everything received at the Midi input port, allowing data to
be forwarded to another device in a “daisy chain arrangement”.
FOOTSWITCH
The PT-100 is equipped with an anodized aluminum, four button footswitch which
enables remote channel selection, and toggles the boost feature.
PROGRAMMING THE FOOTSWITCH
1. First select the desired channel on the footswitch
2. Select the Boost function (if desired)
3. Finally, hold down the selected channel on the footswitch until the LED light
ashes

9
(CONTROLLER ASSIGNMENTS)
CONTROLLER
NUMBER
AMP
CHANNEL BOOST MIDI CH
105 MUTE - 14
106 CH2 / CH1 - 14
107 CH3 / CH1 - 14
108 CH1 / CH2 / CH3 - 14
109 CH2 / CH3 - 14
110 -On / Off 14
111 CH1 -14
112 CH2 -14
113 CH3 - 14
114 CH1 Off 14
115 CH2 Off 14
116 CH3 Off 14
117 CH1 On 14
118 CH2 On 14
119 CH3 On 14
(PROGRAM ASSIGNMENTS)
PROGRAM
NUMBER
AMP
CHANNEL BOOST MIDI CH
0 CH1 - 14
1 CH2 - 14
2 CH3 - 14
3 CH1 Off 14
4 CH2 Off 14
5 CH3 Off 14
6 CH1 On 14
7 CH2 On 14
8 CH3 On 14
PT-100 SIGNATURE EDITION MIDI IMPLEMENTATION CHART
MIDI IMPLEMENTATION
The PT-100 ships from the factory receiving data on MIDI channel 14. It easily integrates with your favorite MIDI footswitch/system, utilizing Program/Controller messages. For
detailed information, please refer to the chart below.

10
EX.1TUBES
The PT-100 tube complement consists of four EL-34 power tubes and six 12AX7
preamp tubes.
PREAMP TUBE POSITION LIST
V1 (closest to the input jack) First gain stage for Channel 1 and 2
V2 Additional gain stages for Channel 1
V3 Additional gain stage for Channel 2 / 3
V4 Additional gain stage for Channel 2 / 3 and it’s tone stack
V5 Effects loop
V6 Phase inverter
FUSE AND VOLTAGE SELECTION
Voltage selection is made externally at the Power Entry Module. See diagram EX. 1
Open cover using small blade screwdriver or similar tool. Set aside cover/fuse block
assembly. Pull voltage selector card straight out of housing using an indicator pin,
orient selector card so that the desired voltage is readable at the bottom (see below).
Fix indicator pin into notch at opposite side. Insert voltage selector card into housing,
printed side of card facing towards on/off switch and edge containing the desired
voltage rst. Replace cover and verify that the indicator pin shows the desired voltage
on the cover assembly.
Troubleshooting Notes:
• If the ampliers lights operate but there is no sound, we recommend checking/
replacing the HT fuse.
• If there are no lights, or sound, we recommend checking/replacing the Mains fuse
which can be found behind the Fuse Block Assembly Plate.

11
PETE THORN'S SAMPLE SETTINGS
WARM CLEAN (CHANNEL 1)
CRUNCHY CLEAN (CHANNEL 1)
HI-GAIN LEAD (CHANNEL 3)
RHYTHM CRUNCH (CHANNEL 2)
FRONT PANEL
FRONT PANEL
FRONT PANEL
FRONT PANEL
BACK PANEL
BACK PANEL
BACK PANEL
BACK PANEL

WARRANTY FOR SUHR AMPLIFIERS AND ELECTRONIC PRODUCTS
JST warrants for lifetime from date of purchase by the initial retail purchaser that this product shall be free from defects in workmanship. Electronic components such as capacitors,
resistors, lters, transformers, jacks, and pots are covered for 5 years. Any parts determined defective by JST within the ve (5) year term shall be repaired or replaced by JST without
charge for parts and labor provided the unit is returned, transportation costs prepaid, to JS Technologies, Inc., 601 Crane Street, Unit A & B, Lake Elsinore, CA 92530, or to such facility
authorized by JST. JST will pay shipping costs to return the unit to its owner. Defects in workmanship will be determined by JST for limited lifetime coverage.
This warranty does not cover damage caused by accident, misuse, abuse, neglect, unauthorized or improperly performed repairs, alterations, and/or wear and tear occasioned by use
of the product, and does not include any expense for inconvenience or loss of use while the product is being repaired or replaced. JST expressly disclaims any liability for consequential
damaged arising from the sale, use, or inability to use the product. Any warranty implied by law, including any warranty of merchantability or tness, is expressly limited to the one (5)
year warranty term for the parts on our ampliers and electronic products. The foregoing statements of warranty are exclusive and in lieu of all other remedies. Workmanship lifetime
warranty is limited strictly to the original retailer purchaser of the instrument registered with JST within 10 days of purchase from an authorized JST dealer or distributor. JST will pay
shipping costs to return the unit to its owner within the mainland U.S.
The above warranty policy only applies to customers in USA. If you are an international customer, please check with your distributor and the dealer in your country for warranty
matters. Warranty issues must be handled through your dealer or distributor. If you are an international customer who purchased (or plan to purchase) from a US dealer, we can handle
warranty matters direct but you will be responsible for shipping both ways. We encourage international customers to purchase through your local distributor or dealer for this reason.
Our international distributors are set up to handle warranty issues in their respective countries. If you do not have an authorized Suhr dealer in your country, please contact us direct
for further details.
Rev:031615
SPECIFICATIONS*
Output: 100 Watts RMS
Tubes: 4xEL34 & 6x12AX7
Mains Fuse:
6.25A/100V (Slo Blo)
5A/120V (Slo Blo)
3A/220V (Slo Blo)
2.5A/230V/240V (Slo Blo)
H.T. Fuse:
2A/250V (Fast Blo)
Front Panel: Input, (CH1) Crunch Switch, Bright Switch, Gain 1, Bass, Middle, Treble, Level 1, (CH 2/3): Bright 2/3 Switch,
Gain 2, Gain 3, Bass, Middle, Treble, Level 2, Level 3, Boost Switch, Channel Select Switch
Back Panel: Power Select Switch, Fuse / Power Entry Module, Standback/Standby Switch, H.T. Fuse, Speaker Outputs,
(16Ω, 8Ω, & 4Ω), Feedback, Presence, Depth Switch, Effects Loop Return Level, In/Active Switch, In Inst. Switch, Send and
Return Jacks, Series/Mix Switch, MIDI IN, MIDI THRU
Head Dimensions: 28.5” (L) x 9.375” (D) x 11.25” (H)
Weight: 55 lbs.
Footswitch Dimensions: 11.5” (L) x 3.26” (D) x 1.72” (H)
ROHS Compliant: Yes
*All specications subject to change without prior notice.
SUHR.COM
Table of contents
Other Suhr Amplifier manuals

Suhr
Suhr DUAL BOOST User manual

Suhr
Suhr Badger 18 User manual

Suhr
Suhr SL-67 MkII HAND WIRED User manual

Suhr
Suhr PT-15 I.R. User manual

Suhr
Suhr SL-68 User manual

Suhr
Suhr SL-67 User manual

Suhr
Suhr CORSO User manual

Suhr
Suhr Badger 18 User manual

Suhr
Suhr HEDGEHOG 50 User manual

Suhr
Suhr Hombre User manual