Sunbeam 7621 User manual

Model
7621
Instruction
Manual
1

Dear Consumer,
Thank you for your recent purchase. Sunbeam Blood Pressure Monitors
are marketed by the Hanson Division of Sunbeam Corporation, which has
brought you quality products for over 100 years.
This
product was designed
and manufactured to provide years of accurate measurements for you and
your family.
Each monitor is manufactured and calibrated for accuracy using
state-
of-the-art equipment. Additionally, our Quality Control Department audits
monitor performance using the latest innovations in test equipment
tech-
nology These procedures are utilized to insure that we provide our cus-
tomers with the most accurate and thoroughly tested product which can
be produced.
As with any new product, if is important that you read the instructions com-
pletely and familiarize yourself with the product’s operation before using
it. If you experience any difficulty in the use of this monitor, please call
our toll-free
customer service help
line
1-800-527-1228
for
assistance.Our
courteous, well-trained customer service representatives are prepared to
answer your questions and help you get the best possible service from
your monitor.
In the unlikely event that your monifor ma/functions, this product is backed
by the warranty as explained later:
Yours truly,
George
Manager Quality Control
trol
Department

Tableof
Contents
identification of Parts . . . . . . . . . . . . . . . . . . . , .
6
Notes for Proper Measurements . . .
..
. . . . 8
Description
of Display Marks . . . . . . . ,
10
Preparation for Measurements , , . . . . . . 12
Measurements . . .
14,16
Exhaust Velocity
. . . . . . . . .
..
,
..
.
..
.
..
, .
.
. .
.
. .
.
. .
..
.
..
. .
1
8
More about Blood Pressure Measurements . . . . .
20,22,24
Precautions
.......
............................... 26
Specifications.. . , . . . . . . . . . . . . , , . . . . . . . . . . . . . . , , . . . . . . .
26

Identification of
Parts

Notesfor
Proper
Measurements
1. Attach the arm cuff at the proper position of the arm as high as the
level of the heart.
2. Do not bump or move the instrument while taking your blood pres-
sure, or proper measurement will not be achieved,
3. Blood pressure should not be taken for at least 5 to
10
minutes after
any exertional activities and you should remain
posture while your blood pressure is being in a quite relaxed
measured.
4. Do not wind the arm cuff over, jacket or sweater sleeve, or measure-
ment cannot be done. Also, if the
upperarm
is squeezed by the shirt
sleeve rolled up to the upper arm, proper measurement results will
not be obtained.
5. There are normal fluctuations of your blood pressure during the course
of a day. The blood pressure is usually lowest upon arising-in the
morning, before beginning daily activities. It will gradually fall again
during the sleeping hours.
6.
Although such cases are rare, for subjects having an extremely weak
pulse or irregular pulse, errors may result which prevent proper meas-
urement. If such abnormal variations are noticed, consult your
physician or the sales representative from which you purchased
this instrument.
7. This device is intended for adult use. Please consult your physician
should you wish to use the device on children.
NO MEDICATION CHANGES SHOULD BE MADE ON THE BASIS OF
HOME BLOOD PRESSURE MONITORING WITHOUT CONSULTING
YOUR PHYSICIAN. YOUR ISTHEONLY PERSON QUALIFIED
TO INTERPRET YOUR BLOOD PRESSURE READING
AND NO DEVICE
CAN REPLACE REGULAR MEDICAL EXAMINATIONS BY YOUR
DOCTOR.

‘Description of Display
Marks
Display mark
w
Measurement in
progress
T
,.
,\p
Exhaust
insufficient
pressure
Replace batteries
E r r
Measurement
error
PUL
Err
Pulse error
Exhaust speed
flashing (exhaust
speed error)
.’
Condition/Cause
OMark
appears in the
measurement condi-
tion and flashes when
pulse is detected.
OMark flashes when
paver is applied and
there is air remaining in
the cuff.
OMark flashes at the
completion of
the
measurement until ex-
haust is complete
0 Measurement was
be-
gun but pressure was
insufficient
OAppears
when the bat-
tery voltage is ex-
cessively
low
0 Appears w h e n the
blood pressure could
not be measured ac-
curately.
Appears
when
the
pulse
could
not
ac-
curately be measured.
0 Flashing when exhaust
speed is above 8 mm
Hgls.
I
i
I
j
Corrective action
Measurement in progress
-remain quiet.
Press the exhaust button
lo
exhaust the air.
Increase pressurization
level by 30 to 40mmHg
and measure once again.
Replace
all four batteries
with
new ones
First
exhaust air from the
Cuff
reapply the cuff
pro-
perly
and remeasure.
Adjust
exhaust speed to 2
.o
5mmHg/s.
Preparation for ‘Measurements
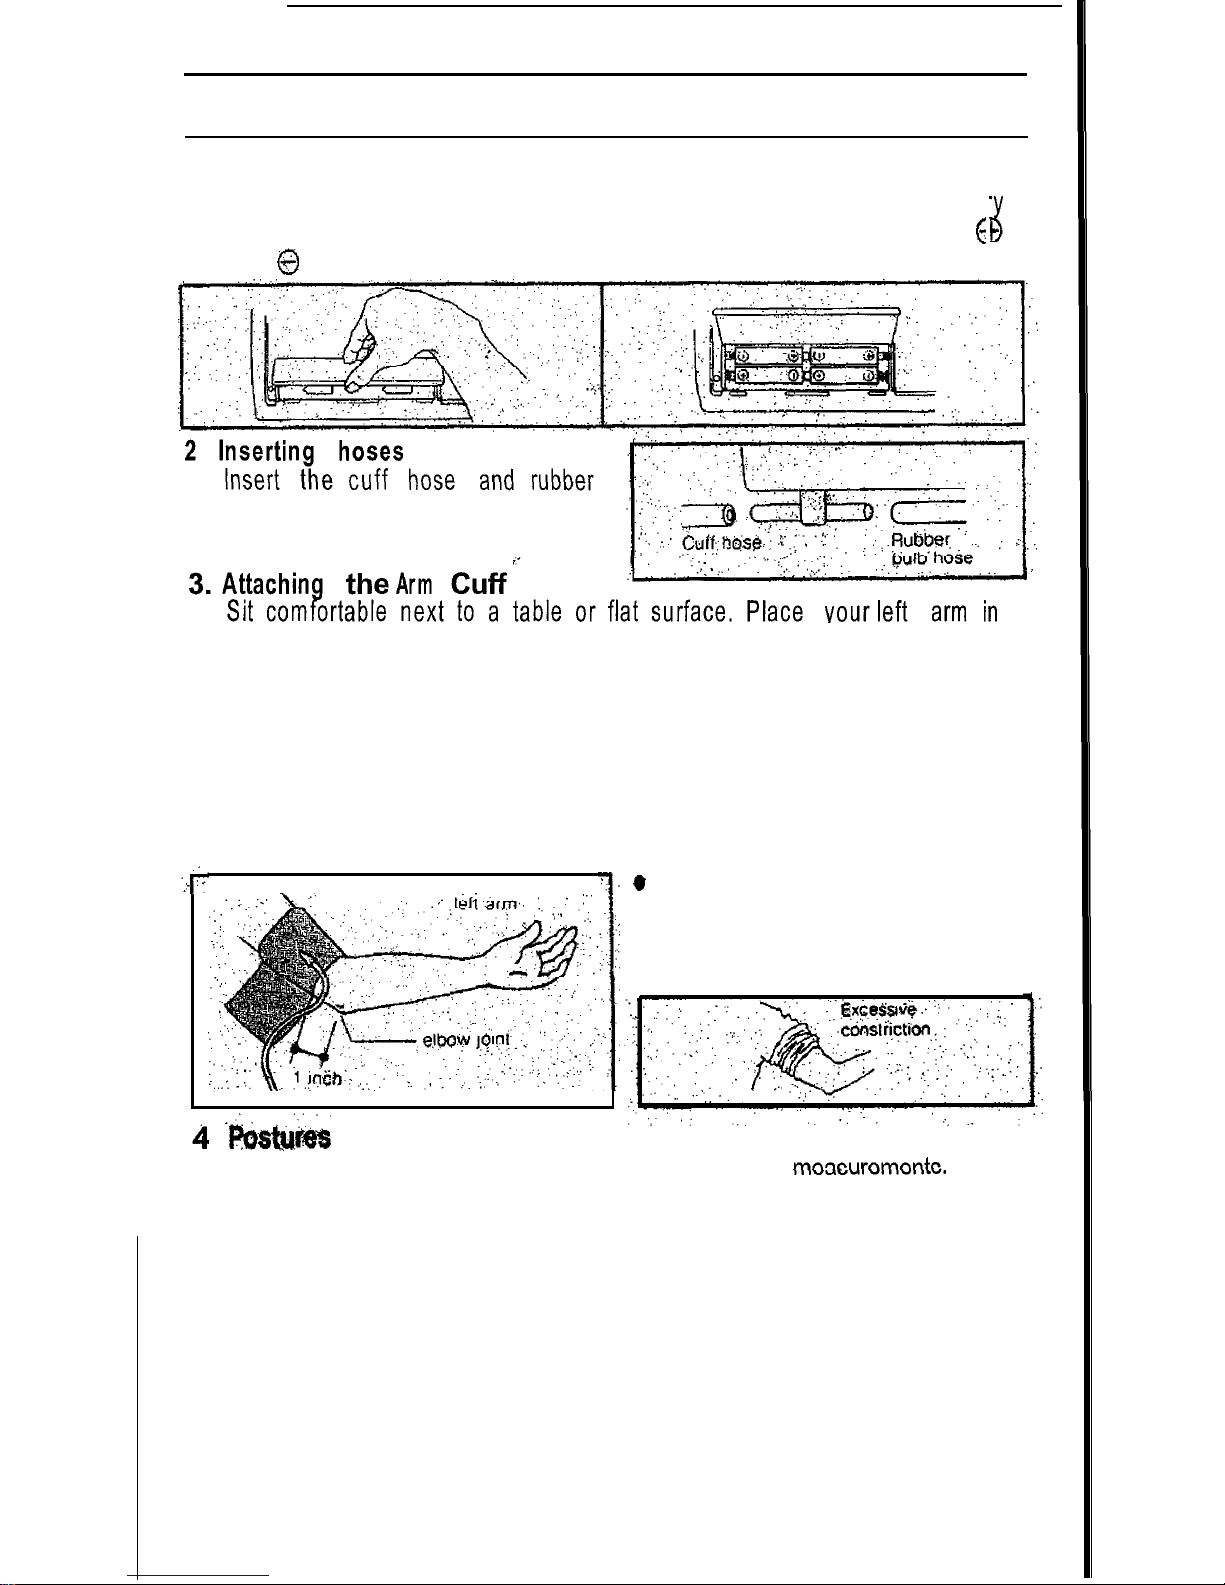
1.
Installing Batteries
Remove the battery cover and insert batteries into the batter
compartment as shown, taking extreme care that the
polarities
(
6
and @are observed.
bulb hose into the sockets.
:
.
j+
an outstretched position at the same level with the heart, with your
palm facing upward. Slip the cuff up over the arm and wind the cuff
back around the upper arm smoothly and snugly. Place the cuff so
that the inflatable bag is centered over the
brachial
artery which is
located approximately midway on the arm’in the bend of the elbow
when the palm is facing upward. The bottom edge of the cuff should
be positioned from 1 to 2 inches above the elbow. Fasten the cuff
securely.
. . .
#
Rolling up a shirt
or
jacket sleeve to
allow the arm cuff to be fitted may
couse
constriction
of the upper
arm
preventing accurate readings.
. . . .
.
Postures
during Measurements
Remain in a seated or reclining posture during
moacuromontc.
Measurements
1.
Attach the arm cuff to the left arm as described in Na 2 on page 12.
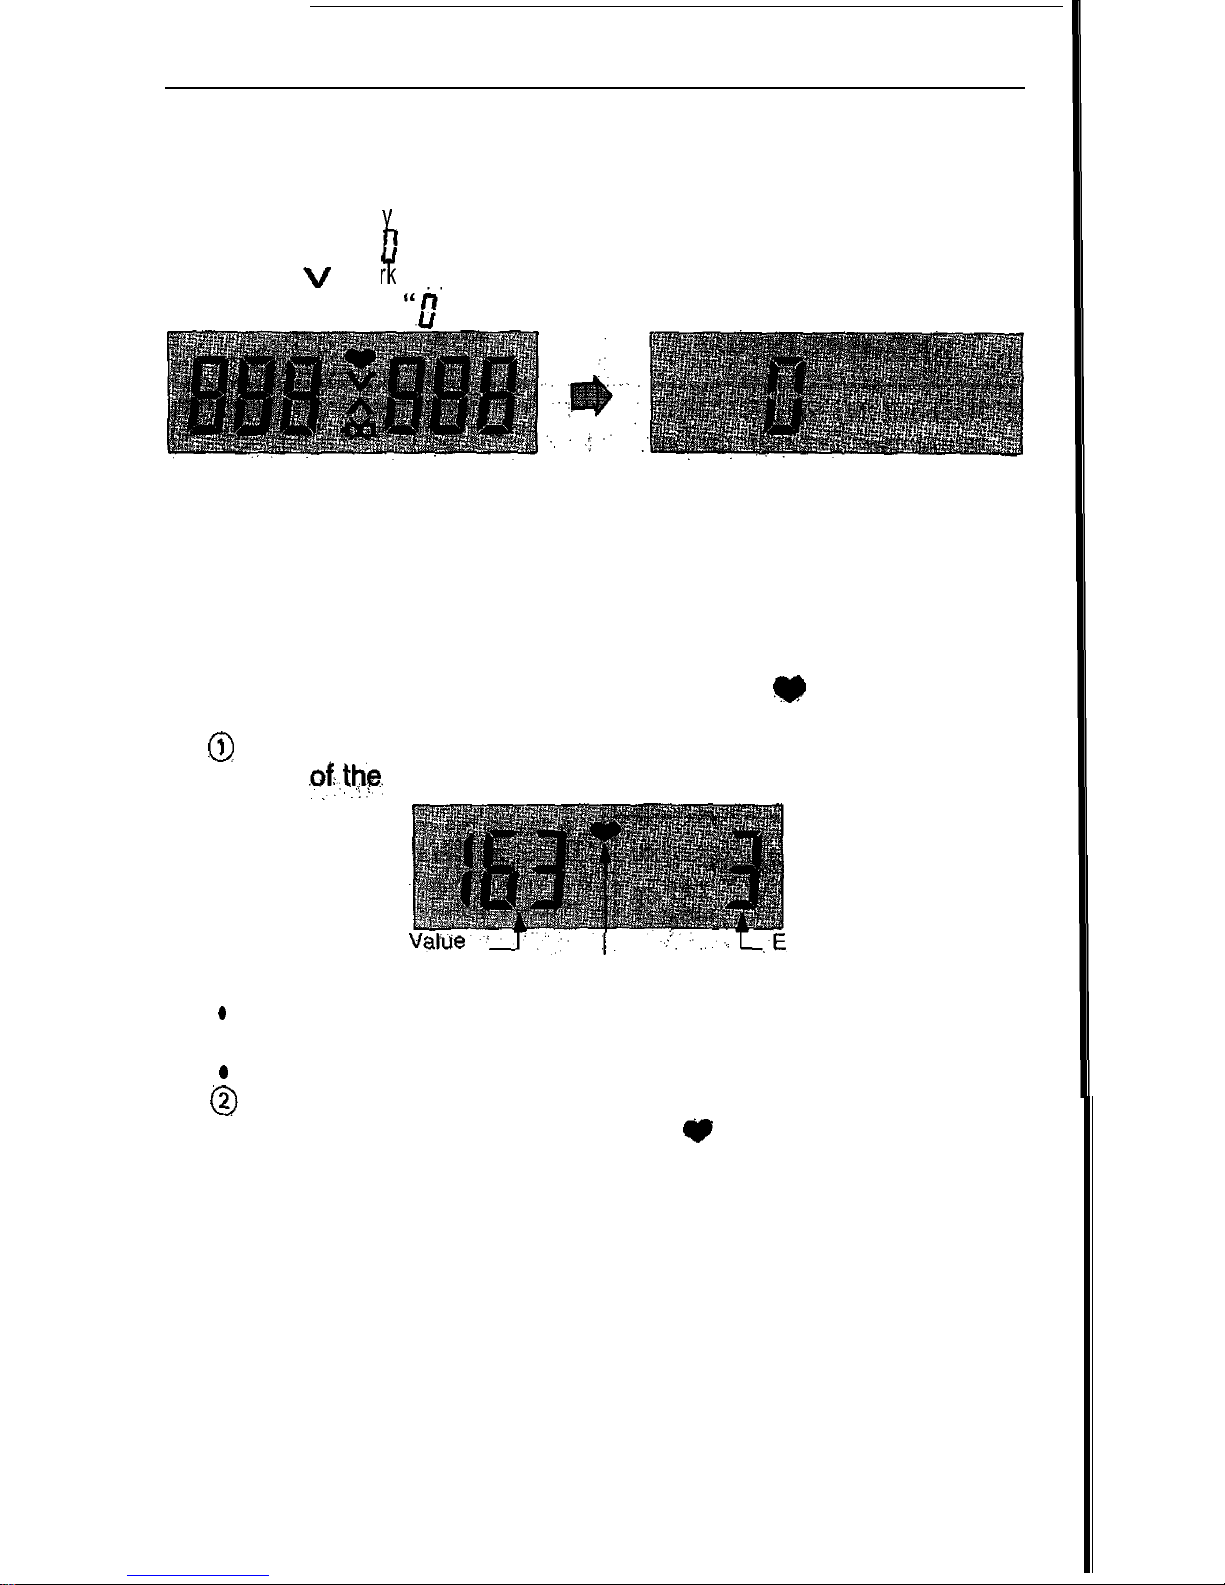
2. Turn Power ON
lWhen power is turned ON, all display marks appear for
approximate1 1 second.
When the
“
Ii
the
v
Y
"
is displayed the unit is ready for measurement, If
mar appears, release air with the exhaust valve pushbut-
ton until the
“0’
"
appears,
Approx. 1 second
3, Pressurize the arm cuff by pumping the bulb until you have a read-
ing of approximately 30 to 40
mmHg
higher than your usual blood
pressure
range. NOTE: Cuff may become slightly tighter than the cuff
used in a Doctor’s office. A beeper will sound when pressure reaches
160,200, 240 and 280
mmHg.
4, When pressurization is completed, the automatic exhaust mechanism
will gradually reduce arm cuff pressure,
and the
@
mark will appear
on the display indicating that measurement
@Pressure value appearson is in progress.
the, left, and,
exhaustspeed
on the right
side
ofthe
display.
. .
i
.,.:,
. . . .
. .
Current
Pressure xhaus’t
Speed
(gradually being reduced)
Measurement Mark
e
Accurate measurement cannot be taken when exhaust speed is
outside the 2-5
mmHg
range See page 13.
o
Remain still during measurement.
@
When a pulse is detected, the pressure value moves to the right
side of the display. At this time the
w
mark flashes at the same
14
rate as pulse rate, and the beeper sounds.

Exhaust
Velocity
1.
The exhaust velocity is Me rate of gradual pressure drop from the pres-
sure applied manually using the rubber bulb.
2, The exhaust condition is displayed in the right portion of the display
from the time of pressurization until the measurement mark starts
flashing.
3.
This unit is adjusted so that the exhaust velocity is 2-5
mmHg
per
second at 150 mmHg.
.
Note: IF
EXHAUST VELOCITY
IS NOT PROPER,
CORRECT
MEASUREMENTS ARE NOT POSSIBLE.
Exhaust Velocity Adjustment
. Perform this adjustment procedure if the exhaust velocity is not within the
proper
range as described above.
l Before exhaust cover
must be removed. velocity adjustment can be made, small plastic screw
To do this, hold area @in the figure, use a small pm
or
nee-
dle, insert into tiny hole on top and flip off screw cover, then proceed to Step 1
1. Apply the arm Cuff to the left arm and
pressurize to the pressure
60
mmHg
above your suspected systolic
pressure Hold the area @in
and insert a screwdriver into groove
2,
If the exhaust
velocity is too fast,
justing
screw
one fraction of a turn to the
left- and if it is too slow, turn adjusting
screw one fraction of a turn to the right,
so that the valve
shown
in the right por-
tion of the display is in the range
2-5
mmHg/s.
3. When the adjustment is completed.
yjusmt
.I
reduce
the pressure and recheck. If the
adjustment is not proper after one
try,
repeat several times
I
nT
NOTE: ADJUSTMENT MUST BE
MADE
1
5
f
u
WHILE THE CUFF IS EXHAUSTING.
J
ii; Exhaust velocity will differ slightly
de-
pending upon the size of the arm and Ad’ust fl;;ue-reasurement
ma
h
.
the method of winding the cuff.

More
Abou
Blood
Pressure
Measurements
How Is A Proper Measurement Made?
Blood pressure varies according to the conditions prevailing at the
time of measurement, so be sure to consider the following in order to
obtain the most accurate measurements.
1. In preparation for blood pressure measurement, the subject
should urinate and should remain relatively still for 10 to 15
minutes prior to measurement.
2.
Shirts or other garments which fit tightly on the upper arm should
be removed prior to fitting the arm cuff.
3. Exercise, eating and drinking, smoking,
etc., prior to measurement can affect the
results.
4. The blood pressure varies constantly
throughout the day. Measurement
should be made regularly at the same
time each day.
5.
Do not be too impressed by the results of
one measurement. Keep a record of
blood pressure variations. Many readings
tell a story.
6. When making repeated measurement,
the arm becomes heavy with blood,
resulting in wide variations in measure-
ment values. For this reason, repeated’
measurements should be made after a
rest period of approximately 5 to 10
minutes or after raising the arm to relieve
the engorged condition.
7. In general, the blood pressure is lower
in summer. (when it is hot) and higher in
winter (when it is cold).
8. Emotional stresses may tend to cause
blood pressure to rise.

More about
Blood
Pressure Measurements
What is Pressure?
Blood pressure is measurement of the rate of pressure exerted by the
blood upon the walls of the blood vessels. The heart contracts and then
relaxes, producing the two levels of blood pressure. As your heart con-
tracts, a higher
level
of pressuet is produced. This rate of pressure is
termed “Systolic’! As your heart relaxes, taking the blood back in, the pres-
sure is termed “Diastolic’: These measurements are usually measured
in terms of the height of a mercury volume and referred to as MM Hg or
millimeters of mercury. These measurements are written one over the
other. Example:
“120
mmHg
(Systolic)
80
mmHg
(Distolic)".
Blood pressure varies constantly and may change according to
different activities Your blood pressure may change suddenly due to phys-
ical or mental anxieties, smoking, exercise, eating, stress or a number
of other conditions. Only a qualified Physician can determine whether
your blood pressure is normal.
Hypertension
(or
blood
pressure),
which
is most common among adults
and the old; if left unattended, can cause health problems such as stroke,
heart attack, etc. Therefore, it is important to monitor blood pressure on
a continued and timely basis. Under the supervision of your physician
excellent life saving procedures exist.
IMPORTANT:
Your physician is the only qualified person to interpret your
blood pressure measurements and no device can replace
regular
medical
examinations
by your physician. It is
recom-
mended that your
physician review
your procedure
for using
this blood
pressure
monitor.
_,
22.
.. . . . . . . .
..
. .
.L_ .- ...L
.;‘.&<a
More About Blood
Pressure
Measurements
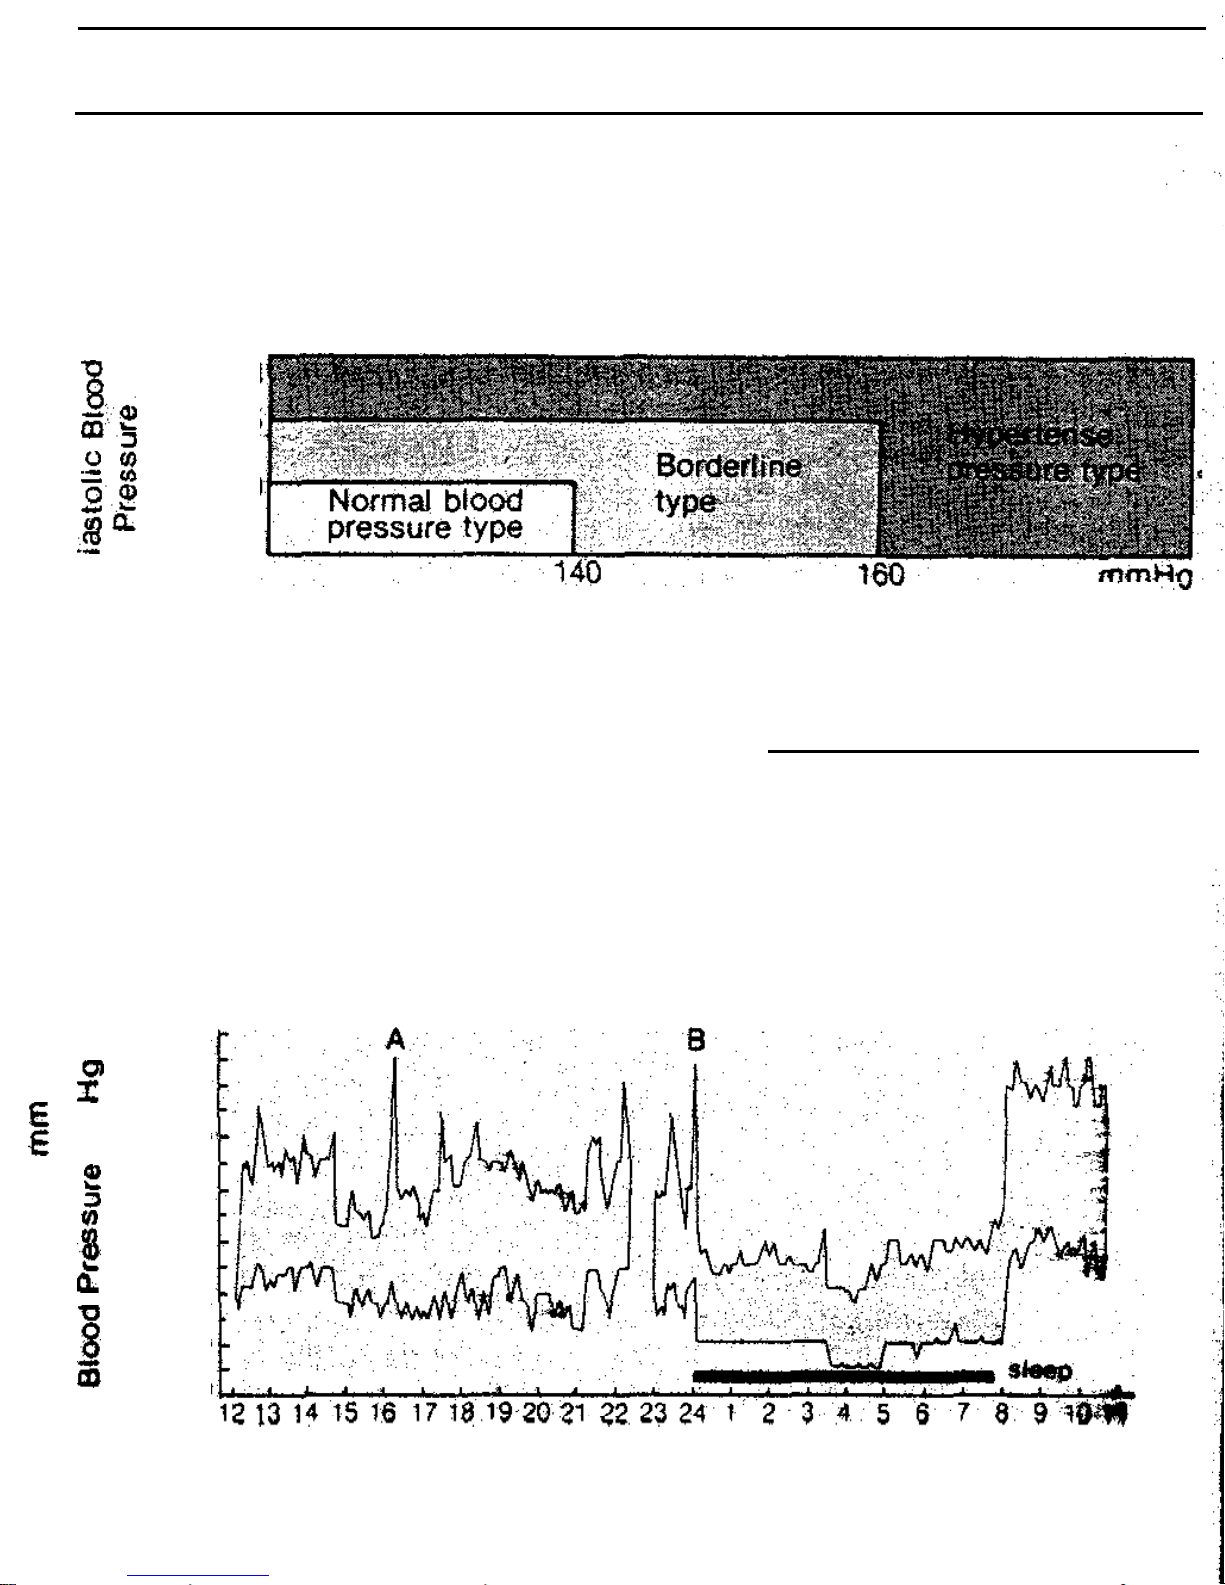
WHO Blood Pressure Classifications
Standards for assessment of high or low blood pressure, without
regard to age, have been established
by
the World Health
Organiza-
tion (WHO), as shown in this chart.
%
mmHg
$2
95
2
1
9:
90
2
cl
Systolic Blood
Pressure
Reference
Material
Investigation
into
Adult
Diseases
Report
by
the
Ministry
of
Health
andSocial
Security
1971.
Variations in Blood Pressure
Individual blood pressures vary greatly both on a daily and a seasonal
basis. These variations are even more pronounced in
hypertense pa-
tients. Normally the blood pressure rises while at work and is at
its
lowest during the sleeping period. The graph below illustrates the
variations in blood pressure over a whole day with measurement
taken every five minutes.
160
r”
140
E120
f
100
I
%80
60
i
40
20
PM
Time
AM
Shown is data
for
measurement taken
every
5 minutes
The thick
line
represents sleep.
The
rises
in blood pressure
at 4 PM (A in We graph)
and
12 PM
(B
in
the
graph)correspondtoanat-
tack
Of pain and
sexual
intercourse
(Beven,
Honour
&
Stott:
Clin. Sci. 36:329.
1969)

Precautions
1. This instrument is constructed of preci-
sion components, and should not be sub-
jected to extremes in temperature,
humidity, direct sunlight, shock or dust.
2. Use a dry, soft cloth to
clean
the instru-
ment. Do not use the thinner, alcohol,
benzene, or wet dusters for the cleaning.
3. Avoid tightly folding the cuff or storing the hose in the folded
Stage for long periods, as such treatment may shorten We life of
the components.
Specifications
Model
7621
Type Oscillometric
Display
Digital
Measurement range 20
-
280mmHg (Pressure)
40
-
200 pulses/minute (Pulse)
Accuracy i3mmHg
or 2% whichever greater (Pressure)
*
5% (Pulse)
Pressurization Manual
pressurizing
Depressurization
Constant-Air-Release Valve System
Deflation
Manual push button
Power sources
Type AAA batteries (4)
Battery life
Approx. 6 months with 3 min. usage per day
operating environment +
10°C
-
+ 40°C. less than 85%
RH
Storage environment
-20°C
-
+55°C. less
than
95%
RH
Dimensions
144(W)
x
70(D)
x
36(H)mm
I
Weight
Approx. 120g
Origh:
Made in Japan for: Hanson
ScaleCom-
pany Division of Sunbeam Corp. Highway
45 North Shubuta, MS 39360
26
. . . . .
:

FULL ONE
YEAR
WARRANTY
This product is warranted for one year from the date of purchase
against defects in material and workmanship. If the product fails to
operate during this period, return it prepaid to Hanson Scale Service
Center,117 Central Industrial Row, Purvis,MS 39475, for repair or replace-
ment without charge at the manufacturer’s option. This warranty
gives you specific legal rights, and you may have other rights which
vary from state to state.
Warrantor.
‘Hanson Scale Company
Division of Sunbeam Corporation, Purvis, MS 39475.
If purchased in Canada, Return prepaid to:
Solaray, Division of Sunbeam Corporation (Canada) Limited
266 Grand River Avenue
Brantford, Ontario,
N3T 4Y4
Made in Japan.
CUSTOMER SERVICE HELP
LINE
We want to be sure you are completely satisfied with your new pur-
chase. If you have any questions of experience any problems,
please
call our toll free help line.
In U.S.A. only: phone: 1-800-621-8854 between 8:00 a.m. 12 p.m. and
1:00 p.m.
4:00
p.m. Central Standard Time, Monday through Friday.
In Canada only: Phone
1-800-265-9856
between the hours of 9:00 AM and
5:00 PM Monday thru Friday, Eastern Standard Time.
.
We will give you prompt assistance in resolving only questions or
problems.
It
is very
important that you follow the instructions then.
CALL BEFORE RETURNING THE PRODUCT FOR REPAIR.
28
. .
Table of contents
Other Sunbeam Blood Pressure Monitor manuals

Sunbeam
Sunbeam TMB-1583-S User manual

Sunbeam
Sunbeam 7659 User manual

Sunbeam
Sunbeam 7620 User manual

Sunbeam
Sunbeam 7654 User manual

Sunbeam
Sunbeam Semi-Automatic Blood Pressure Monitor with... User manual

Sunbeam
Sunbeam HEALTH AT HOME 7623 User manual

Sunbeam
Sunbeam HOME 7655-10 User manual

Sunbeam
Sunbeam 7656-10 User manual

Sunbeam
Sunbeam 7682 User manual

Sunbeam
Sunbeam 7622 User manual


