Sunbeam HL858A2-LT User manual

1
Upper Arm Blood Pressure Monitor
with Voice Broadcast Technology
Instruction Manual
Model: HL858A2-LT
Item:16994
Manual Version: 001
Issue Date: XX

2 3
READ THE MANUAL THOROUGHLY BEFORE USING THIS PRODUCT.
SAVE THESE INSTRUCTIONS
INDICATIONS FOR USE
This device uses the oscillometric method to automatically measure systolic and diastolic
blood pressure as well as heart rate. The intended use of this over-the-counter device is
for home use by adults aged 18 years and older with arm circumference ranging from
9” - 17” (approx. 23cm - 43cm) and 17” - 22” (43cm - 56cm). Measurement position is
on the upper arm. This blood pressure monitor (HL858A2-LT) detects the appearance
of irregular heartbeats during measurement; an indicator symbol will appear with
measuring reading.The BP Category Indicator will show the information with the readings
on the screen for the user tracking their blood pressure level. All values can be read in
one LCD panel.
ABOUT BLOOD PRESSURE
1. What is blood pressure?
Blood pressure is the measurement of the force of blood pushing against the walls of
the arteries.
Arterial blood pressure is constantly uctuating during the cardiac cycle.
• The highest pressure in the cycle (systolic) represents the pressure in the artery
when the heart is beating.
• The lowest pressure in the cycle (diastolic) represents the pressure in the artery
when the heart is at rest.
Both the systolic and the diastolic measurements are necessary for a physician to
evaluate the status of a patient’s blood pressure.
Many factors such as anxiety, physical activity, or time of day can inuence your blood
pressure. Blood pressure is typically lower in the mornings and increases from the
afternoon to the evening. On average, it is lower in the summer and higher in the
winter.
2. Why is it useful to measure blood pressure at home?
Having one’s blood pressure measured by a doctor in a hospital or clinical setting is
often associated with a phenomenon called “White Coat Hypertension,” where the
patient becomes nervous or anxious, causing a rise in blood pressure. Other factors
might also cause your blood pressure to rise at various times.
Medical professionals generally recommend home monitoring of readings
throughout the day following the “Rule of 3,” where you are encouraged to take your
blood pressure three times in a row (at 3 - 5 minute intervals), three times a day for
three days. After three days, an average of the results provides a more accurate idea of
your blood pressure.
MEASUREMENT METHOD
HL858A2-LTAutomatic Upper Arm Blood Pressure Monitor measures blood pressure and
heart rate by oscillometric method, meaning the uctuations in pressure are measured.
Once the cuff is wrapped around your upper arm, just turn on the monitor and ination
automatically starts. The ination of the cuff creates pressure around the arteries inside
upper arm. Within the cuff is a gauge which senses the uctuations (oscillations) in
pressure. The uctuation measured represents the degree of intensity that your arteries
contracting with each heart beat, and also a result of the pressure that the cuff has
placed on the upper arm. The monitor measures these contractions and converts the
information to a digital value. This is the result displayed on the monitor screen. Once the
measurement is complete, the cuff will automatically deate.
ACCURACY
HL858A2-LTAutomatic Upper Arm Blood Pressure Monitor has been clinically tested
against a scientic device called mercury sphygmomanometer, considered the gold
standard in blood pressure measurement.
All HL858A2-LTAutomatic Upper Arm Blood Pressure Monitors have performed
equivalent to measurements taken with this scientic device and are within the accuracy
limits prescribed by the American National Standard for Electronic or Automated
Sphygmomanometers.
The SPHYGMOMANOMETER was clinically investigated according to the requirements of
ISO 81060-2:2013.
PRECAUSTIONS
• Read the Instruction Manual thoroughly before measuring and keep it at hand for your
reference at any time.
• The device is designed for home use and not suitable for clinical use.
• The patient is an intended operator, who can operate the device by himself or herself,
not necessarily by a physician or operator.
• This monitor is not intended for use in the MR environment.
• The device should not be used to either self-diagnose Hypertension or exclude the
diagnosis of Hypertension. If your blood pressure reading is out of normal range,
please consult your physician. Even your blood pressure reading is within the
“normal” range, the device cannot exclude the diagnosis of Hypertension.
• DO NOT take a measurement in a low (less than 41°F / 5°C) and high
(more than 104°F / 40°C) temperature, nor in a place outside humidity ranges
(15 % - 93 % R.H.), and atmospheric pressure ranges (700 - 1060hPa), or you may get
inaccurate readings.
• Wait 30 - 45 minutes before measurement if you’ve just consumed caffeinated
beverages or smoked cigarettes.

4 5
• Consider the electromagnetic compatibility of the device (ex. power disturbance, radio
frequency interference etc.) Please use it indoor only.
• Over high frequency measurements may result in blood ow interference, which is
likely to cause uncomfortable sensations, such as partial subcutaneous hemorrhage,
or temporary numbness to your arm. In general, these symptoms should not last long.
However, if you do not recover in time, please seek your medical practitioners for help.
• Rest at least 5 - 10 minutes before taking a measurement.
• To allow your blood vessels to return to the condition prior to taking the
measurement, please wait at least 3 - 5 minutes in between measurements.You may
need to adjust the wait time according to your personal physiological situation.
• We recommend you using the same arm (preferably the left arm) and measuring
around the same time each day.
• Perform measurements in a quiet and relaxed environment at room temperature.
• DO NOT move or shake the device during a measurement. Please keep quiet and do
not talk during measurements.
• This product is not suitable for:
Pregnant women
People with arrhythmias
Undergoing intravenous injection on any limb
Currently in a dialysis treatment
In pre-eclampsia condition
• For those who have had a mastectomy or lymph node clearance, it is recommended to
take a measurement on the unaffected side.
• When used among medical electronic equipment on the same limb, pressurization of
the cuff may cause temporarily malfunction to other devices.
• If you have one of the circulatory problems as arteriosclerosis, diabetes, liver disease,
kidney disease, severe hypertension, peripheral circulation, please consult your
healthcare professional before using the device.
• Blood pressure measurements taken with this device are equivalent to those obtained
by a trained observer using the cuff / stethoscope auscultation method and are within
the accuracy limits prescribed by the Standard of EN 1060-4.
• If the cuff is worn incorrectly, or the shape of the upper arm is special (for example, the
circumference of the upper arm differs largely from the circumference of the forearm),
excessive gap might occur between the arm cuff and the arm, and it might lead to
measurement errors or inaccuracies. If you have any question about the condition of
cuff wearing and/or measurement result, please consult your healthcare professional.
• The applied part is cuff.
• DO NOT use the device on infants, children, or those who cannot express their own
intention.
• To avoid accidental strangulation, keep this product away from children and DO NOT
drape tube around neck.
• The medical device should not used adjacent to or stacked with other equipment. In
case adjacent or stacked use is necessary. The medical device should be observed to
verify normal operation in the conguration in which it will be used.
DEVICE OVERVIEW
PART NAMES AND PRODUCT COMPONENTS
UNIT DISPLAY
4 AAA “LR03” (1.5V)
Alkaline Batteries
Arm cuff with tube
Month / Date
Hour : Minute Systolic pressure
BP category indicator
Excessive body
motion detector
Cuff tness detection
Diastolic pressure
Average of last 3 measurements
Blood pressure unit
Low battery symbol
Pulse symbol
Heart rate detector
Heart rate
Arm cuff hole
Set button
Memory
button
5 V 1A AC/DC
adapter (optional)
LCD Display
BP Category
indicator
START / STOP button
6 7
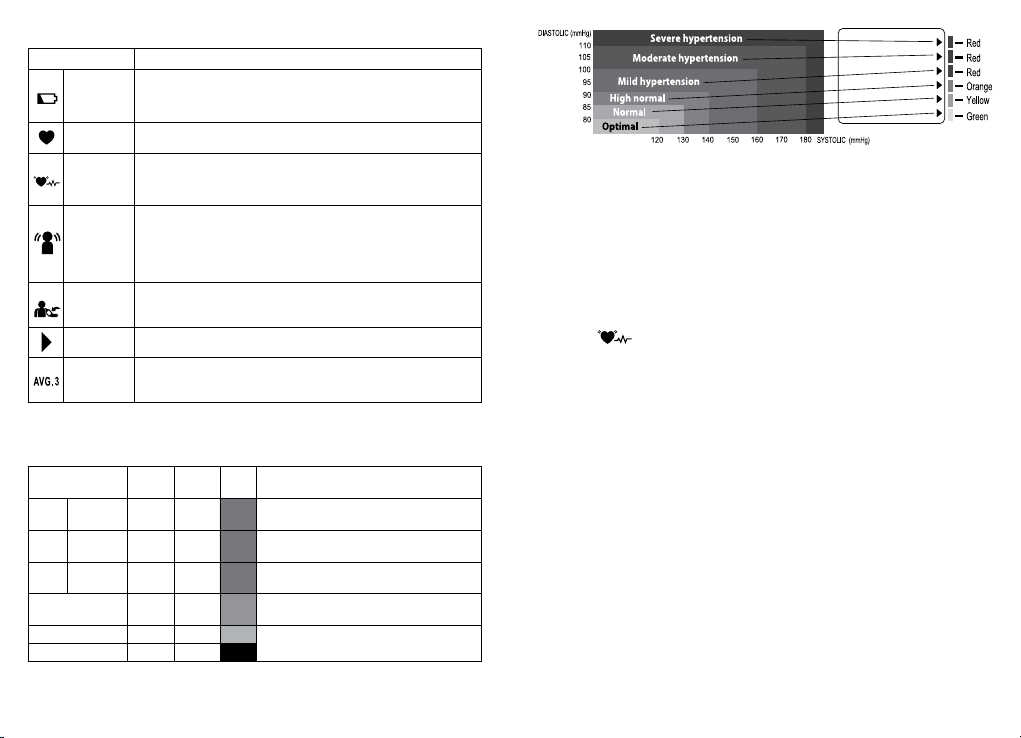
SYMBOL DEFINITIONS
FEATURES
This device is equipped with BP Category Indicator which classies your blood pressure
measurements into six stages (Optimal to Severe hypertension) as shown in below chart:
After each measurement is completed, LCD display will show your position automatically
on the six segments of the bar indicator which corresponds to BP Category Indicator.
NOTE: When a person’s systolic and diastolic pressures fall into different categories,
the higher category should apply.
e.g. systolic pressure 181 & diastolic pressure 99 - Red category (Severe Hypertension)
e.g. systolic pressure 110 & diastolic pressure 95 - Red category (Mild Hypertension)
NOTE: The above table is not exact for classication of blood pressure and it’s intended to
be used as a guide in understanding non-invasive blood pressure measurements. Usually
this is not a cause for concern; however we recommend you consult with your physician
for proper diagnosis or seek medical advice according to our recommendation mentioned
above. Please note that the device does not appropriate to diagnose hypertension, and it
is only for user reference on blood pressure monitoring.
SYMBOLS DEFINITIONS
Low
Battery
Symbol
This symbol appears when the battery power is excessively low or the polarity
reverses.
We suggest you replace all batteries with new ones,and make sure the +/-
polarities are properly positioned.
Pulse Symbol
(Heartbeat)
Once pulse is detected, the symbol ashes with each pulse beat.
Our suggestion: Please do not talk or move during measurements.
Irregular
Heartbeat
Detector
This symbol appears when an irregular heart beat was detected.
Our suggestion: Repeat the measurement after resting for at least 5 minutes, and
restart your measurement while sitting down comfortably and quietly. If symbols
appear frequently, please contact your physician.
Excessive
Body Motion
Detector
Displayed if body movement is detected during measurement, especially, the
movement on the arm the blood pressure monitor is worn on.Besides, if cuff
is worn improperly, or the shape of the upper arm is unusual (for example, the
circumference of the upper arm differs largely from the circumference of the
forearm), excessive gap might exist between the arm cuff and the arm.Notice: The
measured blood pressure reading may not be accurate if the icon is displayed.
Cuff Fitness
detection
Symbol
Displayed if the cuff was wrapped incorrectly, which is too tight or too loose.
This is the function aid in detecting if the cuff is wrapped properly.
BP Category
Indicator
The arrowhead points out the specic BP Category that your measurement
reading ts in.
Average of
Last 3
Measurements
This symbol appears when LCD displays average value of last 3 readings.
IRREGULAR HEARTBEAT DETECTOR
The symbol will appear on screen indicating a certain heartbeat irregularity was
detected during measurement.The heartbeat rhythm that is more than or less than 25%
from the average rhythm is usually dened as an irregular heartbeat rhythm. Talking,
moving, shaking or an irregular pulse during the measurement can result in the appearance
of this symbol. Usually this is not a cause for concern, however if the symbol appears often,
we recommend you seek medical advice.And please note that the device does not replace a
cardiac examination, but serves to detect pulse irregularities at an early stage.
NOTE:
• The pulse display is not suitable for checking the frequency of heart pacemakers. If a certain
pulse irregularity is detected during measurement often, we recommend you seek medical
advice.
• As a safeguard, we recommend that if you have arrhythmias such as atrial or ventricular
premature beats and atrial brillation or any other special conditions you should check with
your physician before using your device.
• The IHB function is not designed for use by people with arrhythmias nor for diagnosing
or treating an arrhythmic problem. In order to lter the unstable status of user and avoid
affecting the detection of heart rate from any movement, shaking or talking in the beginning
of measurement, the method of averaging heart beat intervals of subject device is calculated
with the three proper heart beat pulses detected in the beginning of measurement and that
is different from a strict mathematical averaging of all recorded intervals.
• At least 3 beats with at least 25% difference from the average heart beat interval will generate
the IHB icon on the screen.
Stages of Blood
Pressure Levels
Systolic
(mmHg)
Diastolic
(mmHg) Color Recommendations by SIGN 49: Hypertension in
older people
Grade 3 Severe
Hypertension ≥180 ≥110 Red Conrm immediately and repeat BP in one day and
again within one week depending on clinical situation.
Grade 2 Moderate
Hypertension 160 - 179 100 - 109 Red Serial blood pressures repeated within one month.
Grade 1 Mild
Hypertension 140 - 159 90 - 99 Red Provide advice about lifestyle modication and conrm
within two months.
High-Normal 130 - 139 85 - 89 Orange Provide advice about lifestyle modication and recheck
in one year.
Normal 120 - 129 80 - 84 Yellow Recheck in 2 - 5 years. (patients aged > 75 years
offered annual health check)
Optimal <120 <80 Green

8 9
POWER SUPPLY OPTIONS
This monitor is designed for operation with batteries or an AC / DC adapter. Use only a
compatible AC / DC adapter with required voltage and current as indicated in this manual.
Recommend Adapter Specication:
Model: FranMar International, FRM06-S05-UU
Rating:
Input: 100 - 240 V, 50 / 60Hz, 0.2A
Output: 5V, DC, 1A
Note:
1. No batteries are needed when operating with an AC / DC adapter. Please remove the
batteries if operating with an AC / DC adapter for an extended period.Leaving batteries
in the compartment may cause leakage and damage to the unit.
2. When you use the blood pressure monitor with AC/DC adapter, place the device where
you can easily reach and disconnect the adapter plug.
SETTING THE DATE & TIME
1. Press START / STOP to turn on the monitor. The device will enter
STANDBY MODE.
2. While in standby mode, press +button for 3 seconds to enter
SETTING MODE. You may then adjust the current year / month / day
(1 - 31) / hour / minute.
3. Press the Mbutton to advance each number. Press the +button to
save each selection. The YEAR digits ash rst. Press the Mbutton
to advance the numbers to the current year. If you advance too far,
continue pressing Mto cycle back to the beginning. Tip: Press and
hold the Mbutton to advance the digits more quickly.
4. Repeat the above steps to set month, day, hour and minute.
SELECTING USER ID
While in STANDBY MODE, press the +button to select
User 1 or 2.
VOICE BROADCAST ON / OFF
The Voice Broadcast feature announces test results out loud.
To turn the function ON or OFF:
1. While in STANDBY MODE, press +button for 3 seconds.
2. After conrming date and time settings, press Mbutton to turn Voice Broadcast ON
or OFF.
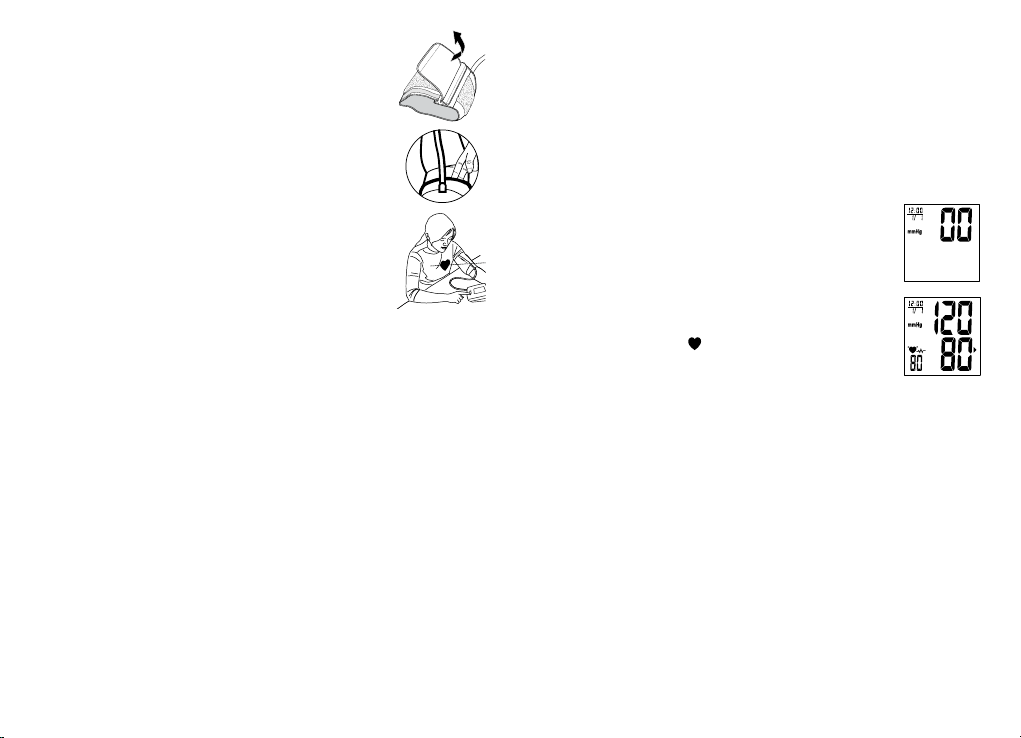
INSTALLING / REPLACING THE BATTERIES
1. Open the battery cover.
2. Insert 4 new AAA (1.5 V,LR03) alkaline batteries
into the compartment, as shown. Make sure the
polazrities “+” and “-” align with the symbols
inside the compartment.
3. Replace the batteries when:
• The low battery icon appears.
• The display is dim or does not turn on.
• Do not mix new and used batteries.
• Do not mix alkaline, standard (carbon-zinc) or rechargeable (cadmium) batteries.
• Such action may shorten the battery life or cause device malfunction.
• Batteries are hazardous waste. Do not dispose of them with household garbage.
Discard in accordance with local recycling guidelines.
• Choking hazard: keep batteries out of reach and away from children and pets.
• To prolong battery life and prevent damage caused by leakage, remove batteries if
the device will not be used for an extended period.
• Stored memory (if any) will not be deleted during battery replacement.
• Date and time must be reset if the AC / DC adapter is unplugged and the unit is
without batteries. Even with batteries in the monitor, plugging the AC adapter into
the monitor causes the time and date to reset.
• After replacing the batteries, reset the date and time.
WARNING
ATTACHING THE CUFF
1. Remove all jewelry, such as watches and bracelets, from your left arm.
Note: If your doctor has diagnosed you with poor circulation in your left arm, use your
right arm.
2. Wrap the cuff on a bare arm or over thin clothing. Roll or slide up your sleeve to expose
the skin.
Note: Make sure the sleeve is not too tight.Thick clothing or a tightly-rolled sleeve will
cause inaccurate blood pressure measurements.
3. Slide the end of the cuff furthest from the tube through the metal ring to form a loop.
The smooth cloth should be on the inside of the cuff.
4. Hold your arm with palm facing up and slide the cuff loop onto your upper arm.
Position the tube off-center toward the inner side of arm in line with the little nger
OR
Talking function is ON Talking function is OFF
Press Mbutton
10 11
Position the artery mark over the main artery (on the inside of your
arm).
Tip: To locate the main (brachial) artery, press 2 ngers
approximately 1” (2-3cm) above the bend of your elbow on the
inside of your left arm. Identify where the pulse can be felt the
strongest. Fit the cuff snugly, leaving enough space for 1” (2 - 3 cm)
between the inner elbow and the lower edge of the cuff. If the cuff is
positioned correctly, the hook-and-loop fabric will be on the outside
of the cuff and the metal ring will not touch your skin. The bottom
edge of the cuff should be located within the Proper Fit Range.
5. Pull the end of the cuff so it tightens evenly around your arm.
6. Make sure the cuff is snug enough to stay in place during
measurement, but not too tight. You should be able to insert one
nger between the cuff and your arm.
7. Press the hook-and-loop fabric strip to secure.
8. Plug the arm cuff tube into the monitor port.
TIPS FOR ACCURATE MEASUREMENT
1. Avoid taking blood pressure:
• within one (1) hour of eating or drinking (especially caffeinated beverages)
• immediately after smoking
• within 20 minutes of bathing
• while talking or moving your hands/ngers
• in a cold environment
• when you feel the urge to urinate
2. Take the measurement in a silent room.
3. Sit comfortably in an upright chair with back supported, feet at on the oor and legs
uncrossed.
4. Rest your testing arm on a at surface with the palm turned upward and the cuff level
with the right atrium of the heart.
5. Rest and relax for 5 minutes before measuring. Take 5 - 6 deep breaths.
6. Stay quiet and still during measuring.
7. Wait at least three minutes between measurements.
8. For meaningful comparison, try to measure under similar conditions. For example, take
daily measurements at approximately the same time,on the same arm, or as directed
by a physician.
IMPORTANT
• Make sure there are no kinks in the air tube.
• Do not twist the cuff in any way.
MEMORY FUNCTION
1. The monitor features memory storage with date and time stamps for two (2) users, saving
120 records per user (240 total).
2. After each measurement, the systolic and diastolic pressure, heart rate and BP Category
Indicator,Irregular Heartbeat Detector and Excessive body motion detector (if any) with the
date and time will be automatically stored. Each new reading will replace the oldest.
TAKING THE MEASUREMENT
1. With the cuff wrapped around your arm, press START / STOP
button to begin.
• All display symbols will appear on the screen for 1.5 seconds,
followed by “00” to indicate “Ready to Measure.”
2. The cuff will automatically inate.
• During ination, the monitor detects your blood pressure and
pulse rate.
• The Heartbeat Symbol ashes at every heartbeat.
3. Do not move or talk until the entire measurement process is
completed.
4. The cuff automatically deates when your blood pressure and heart rate measurement
is complete.
• Your systolic rate, diastolic rate,heart rate, corresponding BP Category Indicator,
Irregular Heartbeat Detector and Excessive body motion detector (if any) are
displayed with date and time for one (1) minute and results saved to memory
automatically.
• If Voice Broadcast is ON (default setting), the device will announce your test results
out loud.
• The device automatically shuts off after one minute of no use.
NOTE: If the cuff does not stop inating, remove the cuff at once. To stop measurement at
any time, press START / STOP. The cuff will deate immediately after the button is pressed.
• If the cuff inates without stopping, unwrap the cuff immediately.
• Do not press the START / STOP button if the cuff is not wrapped around your upper arm.
• Do not wrap the cuff around any body part other than your arm.
• Do not use this device on a wounded or injured arm. Do not use this device after recent
surgery on the wrist or arm (doing so may increase the risk of infection at the surgical site).
Wait until after the wound has healed to use this device.
• If you have an infectious skin condition or disease or the device is used by others with
infectious skin condition or disease, dispose of the device without reuse.
• Before use, always inspect the device. If you notice blood or other soil on cuff, do not reuse.
12 13
SYMBOLS / SYMPTOMS CONDITIONS / CAUSES INDICATION / CORRECTION
Unit does not turn
on when START / STOP
button is pushed.
Worn-out batteries. Replace them with 4 new AAA
(LR03) alkaline batteries.
Battery polarities have been positioned
incorrectly. Re-insert the batteries in the correct
positions.
Measuring Error Symbol
appears when blood
pressure value displayed
is excessively low or high.
Cuff has been placed incorrectly. Wrap the cu properly so that it is
positioned correctly.
Measuring
Error Symbol Air circuit abnormality. Cuff tube may
not be plugged into monitor correctly. Check cuff connection.
Measure again.
Measuring
Error Symbol Ination pressure exceeding 300mmHg. Switch the unit o, then measure
again.
Measuring
Error Symbol
Can’t determine blood pressure
measurement data. Wrap the cuff properly and keep
steady. Measure again.
Cuff is worn improperly,or the shape of
the upper arm is unusual (for example,
the circumference of the upper arm
diers largely from the circumference of
the forearm), excessive gap might exist
between the arm cuff and the arm.
Wrap the cuff snugly so that it is
positioned correctly. If you have any
question about the cuff wearing
and/or measurement result,
please consult your healthcare
professional.
Excessive Body Motion
Detector
Notice: The measured blood
pressure reading may not
be accurate if the icon is
displayed.
Body movement during measurement,
especially,the movement on the arm
the blood pressure monitor is worn
on. e.g. Talking, moving or shaking
of the arm with the cuff on while
measurement.
Measure again. Keep arm steady
during measurement.
Cu is worn improperly, or the shape of
the upper arm is unusual (for example,
the circumference of the upper arm
diers largely from the circumference of
the forearm), excessive gap might be
exist between the arm cuff and the arm.
Wrap the cuff properly and keep
steady. Measure again. If you have
any question about the cuff wearing
and/or measurement result,
please consult your healthcare
professional.
Cuff Fitness
detection Symbol The cuff was wrapped incorrectly (for
example too loosely or too tightly). Please reference “applying the Cuff“
section to wrap the cuff correctly
Note: If "EP" appears on the display, just return the device to your local distributor or importer.
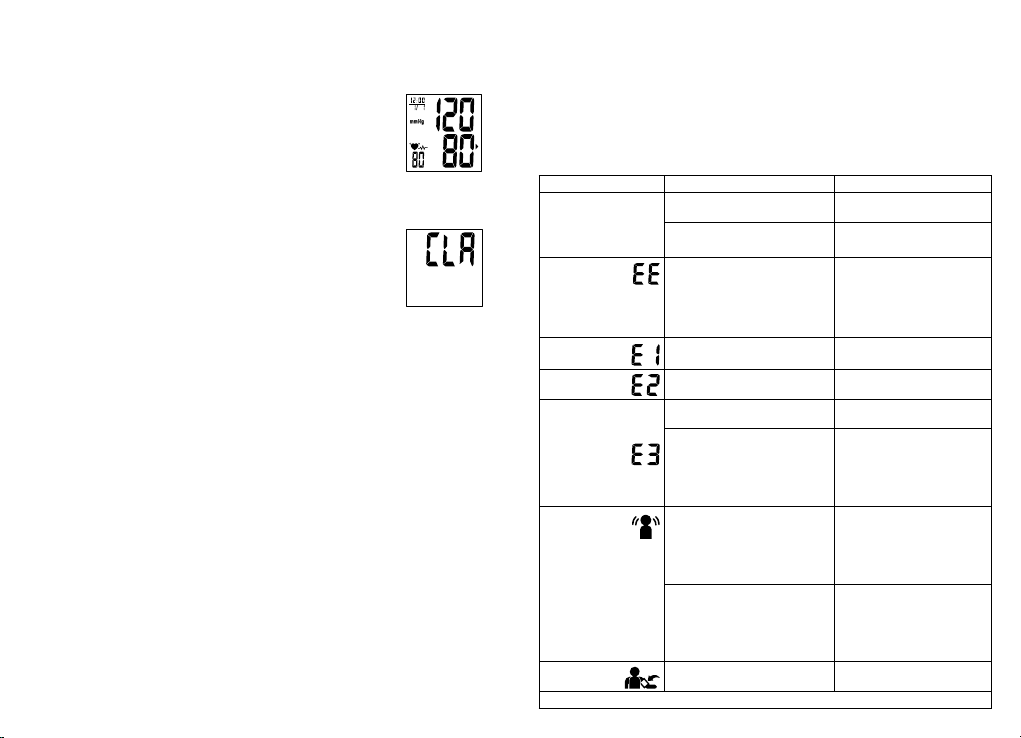
RECALLING DATA
1. Press +button to select User 1 or 2.
2. Press Mbutton to enter Memory Mode.
• If there is no data stored, nothing (except month,date, and time)
will appear on the display.
• If there is data stored, the rst reading will show the average of the
last three (3) records in memory.
3. Press Mto read the preceding measurements in sequence.
4. When nished, press START / STOP (the device will enter Standby Mode).
ERASING DATA
1. Press +button to select User 1 or 2.
2. Press Mbutton to enter Memory Mode.
3. Press and hold Mand +buttons at the same time.All data for the
selected user will be erased automatically.
Note: Once deleted, your data CAN NOT be restored.
CLEANING AND DISINFECTION
• Clean the device with only a soft,damp cloth. Wipe dry.
• Never immerse the device or cuff in water or other liquid.
• Do not use detergent or any strong chemicals to clean the device.
• Make sure the cuff is clean and completely dry before use.
• Inspect the device, LCD display and cuff(s) before and after each use.Discard immediately if
signs of blood, soil or stains exist.
• For at-home use by one user: Clean and disinfect the device and cuff(s) at least once a
month with a commercially available 75% alcohol wipe for a minimum of 30 seconds.
• For at-home use by multiple users,clean and disinfect between each user and at least once
weekly.
STORAGE
• Remove the batteries if storing or not using for an extended period.
• Make sure the device is clean and dry before storage.
• Always store and transport the device in its protective case.
• Avoid dropping, intense shaking or other impact.
• Store the device away from direct sunlight,dust, humidity, and temperature extremes.
LIMITED WARRANTY
This product has a limited warranty of 3 year(s) on the blood pressure monitor, 2 year warranty
on the cuff and accessories (except batteries) from the original date of purchase against
workmanship and defects in material. If under normal use, your product fails to operate, please
be provided to you with proof of purchase. Star Elite Inc. may deny claims of damage caused by
misuse or modications of this product.
TROUBLE SHOOTING

14 15
SPECIFICATIONS
EXPLANATION OF SYMBOLS
Model HL858A2-LT
Internal power supply DC 6V (4 x 1.5V AAA alkaline batteries)
DC 5V 1A (AC/DC Adapter)
Measurement method Oscillographic mode (ination)
Measurement range of Cuff Pressure 0 - 40kPa (0 - 300mmHg)
Measurement range of Determination Pressure 5 - 39kPa (40 - 280mmHg)
Pulse value 40 - 199 beats/minute
Accuracy Pressure ±0.4kPa (±3mmHg), Pulse value ±5%
Memory 2 x 120
Display mode Liquid Crystal Display
Operating conditions Temperature 41˚F - 104˚F (5˚C - 40˚C),
Relative humidity 15% - 93%, Pressure 700 - 1060hPa
Storage & transportation conditions Temperature -13˚F - 158˚F (-25˚C - 70˚C), Relative humidity ≤93%
Unit Dimensions 5.5” x 4.3” x 2.2” (L x W x H) 14cm x 11cm x 5.6cm (L x W x H)
Unit Weight 9.74oz ± 0.18oz (276g ± 5g) (Cuff and batteries excluded)
Cuff Size UC-01: Standard size cuff 9 - 17” (23 - 43cm)
ELC-01: Extra large size cuff 17 - 22” (43 - 56cm)
Symbol Explanation Health & Life Information
Refer to instruction
manual / booklet
TYPE BF Applied Part
To avoid inaccurate results caused
by electromagnetic interference
Warning: Portable RF communications equipment (in-
cluding peripherals such as antenna cables and external
antennas) should be used no closer than 30cm (12
inches) to any part of the device, Otherwise, degradation
of the performance of this equipment could result.
Waste of electrical and electronic
equipment (WEEE)
Discard the used product to the recycling collection point
according to local regulations.
Serial number YYMMXXXXXX
Ingress Protection Rating
First characteristic numeral- Degree of protection against
access to hazardous parts and against solid foreign objects
N1=2 (Protected against solid foreign objects of 12.5mm
Ø and greater) Second characteristic numeral - Degree
of protection against ingress of water N2=2 (Protected
against vertically falling water drops when ENCLOSURE
tilted up to 15°)
Non-ionizing electromagnetic
radiation
NOTE:
This equipment has been tested and found to comply with the limits for a Class B digital
device, pursuant to Part 15 of the FCC Rules.These limits are designed to provide reasonable
protection against harmful interference in a residential installation.This equipment generates
uses and can radiate radio frequency energy and,if not installed and used in accordance with
the instructions, may cause harmful interference to radio communications. However,there
is no guarantee that interference will not occur in a particular installation. If this equipment
does cause harmful interference to radio or television reception,which can be determined by
turning the equipment o and on, the user is encouraged to try to correct the interference by
one or more of the following measures:
• Reorient or relocate the receiving antenna.
• Increase the separation between the equipment and the receiver.
• Connect the equipment into an outlet on a circuit dierent from that to which the receiver
is connected.
• Consult the dealer or an experienced radio/TVtechnician for help.
CAUTION:
To assure continued FCC compliance: Any changes or modications not expressly approved by
the grantee of this device could void the user’s authority to operate the equipment.
RF EXPOSURE WARNING
1. The equipment complies with FCC RF exposure limits set forth for an uncontrolled
environment.
2. The equipment must not be co-located or operation in conjunction with any other antenna
or transmitter.
FCC LABEL COMPLIANCE STATEMENT:
This device complies with Part 15 of the FCC Rules. Operation is subject to the following two
conditions: (1) this device may not cause harmful interference, and (2) this device must accept
any interference received, including interference that may cause undesired operation.
HL858A2-LT ESSENTIAL PERFORMANCE PER IEC 80601-2-30 ADDITIONAL
ESSENTIAL PERFORMANCE REQUIREMENTS:
• 201.12.1.102 Limits of the error of the manometer from environmental conditions. Over
the temperature range of 41°F - 104°F (5°C - 40°C) and the relative humidity range of
15% - 93%(non-condensing), the maximum error for the measurement of the CUFF
pressure at any point of the NOMINAL measurement range shall be less than or equal to
±3mmHg (±0.4kPa) or 2% of the reading, whichever is greater.
• 201.12.1.107 Reproducibility of the blood pressure determination.
The laboratory Reproducibility of the BLOOD PRESSURE DETERMINATION of the AUTOMATED
SPHYGMOMANOMETER shall be less than 3mmHg (0.4kPa).

16 17
APPENDIX APPENDIX
Guidance and manufacturer’s declaration – electromagnetic emissions
The device is intended for use in the electromagnetic environments listed below, and should only be
used in such environments:
Emission test Compliance Electromagnetic environment – guidance
RF emissions
CISPR 11 Group 1
RF energy is used only to maintain device’s
operation. Therefore, its RF emissions are so low
that it’s not likely to cause any interference in
nearby electronic equipment.
RF emissions
CISPR 11 Class B The device is suitable for use in all establishments,
including domestic establishments, and those
directly connected to the public low-voltage power
supply network that supplies buildings used for
domestic purposes.
Harmonic emissions IEC
61000-3-2 Class A
Voltage uctuations / icker
emissions IEC 61000-3-3 Complies
Guidance and manufacturer’s declaration – electromagnetic immunity
The device is intended for use in the electromagnetic environments listed below, and should only be
used in such environments:
Immunity
test
IEC 60601
test level Compliance level Electromagnetic
environment - guidance
Electrostatic
discharge (ESD)
IEC 61000-4-2
±8kV contact discharge
±15kV air discharge
±8kV contact
discharge
±15kV air discharge
In the case of air discharge
testing, the climatic conditions
shall be within the following
ranges: Ambient Temperature:
15°C - 35°C, Relative
Humidity: 30% - 60%.
Power frequency
(50 or 60Hz)
magnetic eld
IEC 61000-4-8
30A/m
50 or 60Hz
30A/m
50 or 60Hz
Power frequency magnetic
elds should be at levels
characteristic of a typical
location in a typical commercial
or hospital environment.
Electrical fast
transient / burst
IEC 61000-4-4
± 2 kV for power
supply lines
± 1 kV for input /
output lines
± 2 kV for power
supply lines
± 1 kV for input /
output lines
Mains power quality
should be that of a typical
commercial or hospital
environment.
Surge
IEC 61000-4-5
AC Power port
±1 KV Line to Line
AC Power port
±1 KV Line to Line
Mains power quality
should be that of a typical
commercial or hospital
environment.
interruptions and
voltage variations
on power supply
input lines
IEC 61000-4-11
0% UT; 0.5 cycle
At 0°,45°,90°,
135°,180°,225°,
270°and 315°.
0% UT; 1 cycles
70% UT; 25 / 30 cycles
0% UT; 250 / 300 cycle
0% UT; 0.5 cycle
At 0°,45°,90°,
135°,180°,225°,
270°and 315°.
0% UT; 1 cycles
70% UT; 25 / 30 cycles
0% UT; 250 /300 cycle
Mains power quality
should be that of a typical
commercial or hospital
environment. If the user
of the device requires
continued operation during
power mains interruptions,
it is recommended that the
device be powered from an
uninterruptible power supply
or a battery.
NOTE: UTis the a.c.mains voltage prior to application of the test level.
18 19
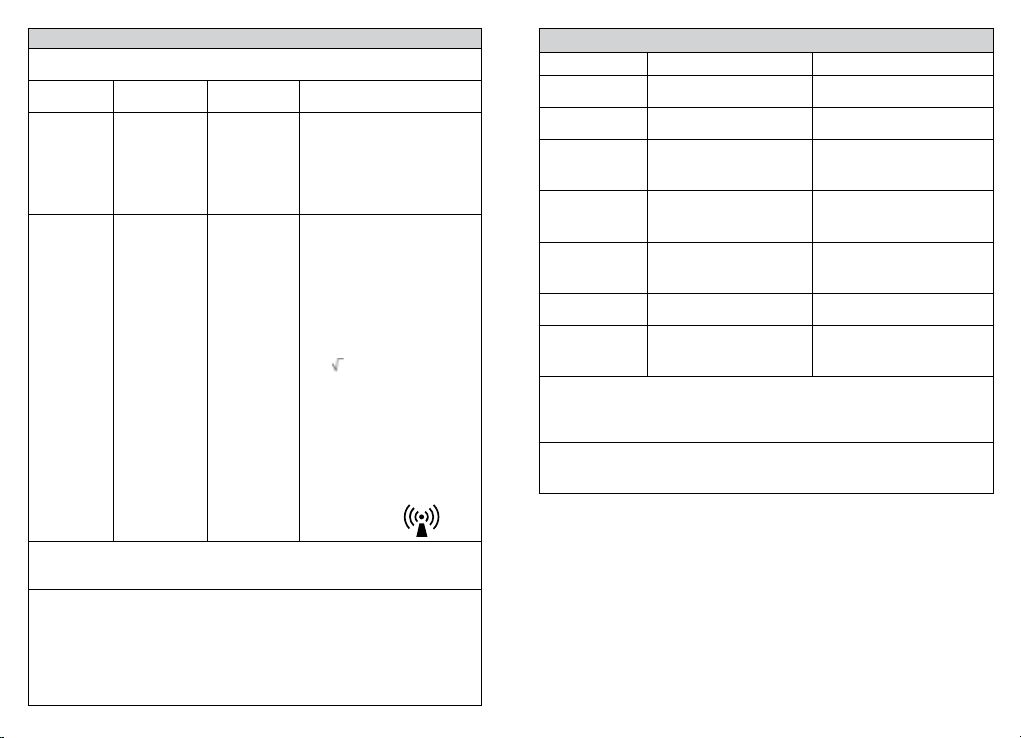
Guidance and manufacturer’s declaration – electromagnetic immunity
The device is intended for use in the electromagnetic environments listed below, and should only be
used in such environments:
Immunity
test IEC 60601 test
level Compliance level Electromagnetic environment
-guidance
Conducted RF
IEC 61000-4-6
3V rms
At 0.15-80MHz
6V rms
At ISM & Radio
Amateur Freq
3V rms
At 0.15-80MHz
6V rms
At ISM & Radio
Amateur Freq.
Portable and mobile RF communications
equipment should be used no closer to
any part of the device, including cables,
than the recommended separation
distance calculated from the equation
applicable to the frequency of the
transmitter.
Radiated RF
IEC 61000-4-3
Proximity
elds from RF
wireless
communications
equipment
IEC 61000-4-3
10 V/m at
80 - 2700MHz AM
Modulation And
9 - 28V/m at
385 - 6000MHz,
Pulse Mode and
other Modulation.
The system shall be
tested as specied in
IEC60601-1-2
Table 9
for proximity elds
from RF wireless
communications
equipment using
the test methods
specied in IEC
61000-4-3
10 V/m at
80 - 2700 MHz AM
Modulation And
9 - 28V/m at
385 - 6000MHz,
Pulse Mode and
other Modulation.
The system shall be
tested as specied in
IEC60601-1-2
Table 9
for proximity elds
from RF wireless
communications
equipment using
the test methods
specied in IEC
61000-4-3
Recommended separation distance
Considering to reduce the minimum
separation distance, based on RISK
MANAGEMENT, and using higher
IMMUNITY TEST LEVELS that are
appropriate for the reduced minimum
separation distance. Minimum
separation distances for higher
IMMUNITY TEST LEVELS shall be
calculated using the following equation:
E=6/d
where P is the maximum power in W,
d is the minimum separation distance
in m, and E is the IMMUNITYTEST
LEVELS in V/m. Field strengths from xed
RF transmitters, as determined by an
electromagnetic site survey, ashould
be less than the compliance level in
each frequency range.bInterference
may occur in the vicinity of equipment
marked with the
following symbol:
NOTE 1 At 80MHz and 800MHz, the higher frequency range applies.
NOTE 2 These guidelines may not apply in all situations. Electromagnetic propagation is affected by
absorption and reection from structures, objects and people.
aField strengths from xed transmitters, such as base stations for radio (cellular / cordless) telephones
and land mobile radios, amateur radio, AM and FM radio broadcast and TV broadcast cannot be
predicted theoretically with accuracy. To assess the electromagnetic environment due to xed RF
transmitters, an electromagnetic site survey should be considered. If the measured eld strength in
the location in which the device is used exceeds the applicable RF compliance level above, the device
should be observed to verify normal operation. If abnormal performance is observed, additional
measures may be necessary, such as reorienting or relocating the device.
b Over the frequency range 150kHz to 80MHz, eld strengths should be less than 3V/m.
P
Test specications for enclosure port immunity to RF wireless communications equipment.
Test frequency (MHz) Modulation IMMUNITY TEST LEVEL (V/m)
385 Pulse modulation 18Hz a) 27
450 FM ±5kHz deviation 1kHz sine b) 28
710
745
780
Pulse modulation 217Hz a) 9
810
870
930
Pulse modulation 18Hz a) 28
1720
1845
1970
Pulse modulation 217Hza) 28
2450 Pulse modulation 217Hza) 28
5240
5500
5785
Pulse modulation 217Hz a) 9
NOTE:
If necessary to achieve the IMMUNITY TEST LEVEL, the distance between the transmitting antenna and
the ME EQUIPMENT or ME SYSTEM may be reduced to 1m, The 1m test distance is permitted by IEC
61000-4-3.
a) The carrier shall be modulated using a 50% duty cycle square wave signal.
b) AS an alternative to FM modulation, 50% pulse modulation at 18Hz may be used because while it
does not represent actual modulation, it would be worst case.

20
If you have any problems, please do not contact the store.
Contact our customer service at 1-877-383-6399
(8:30 am - 5:00 pm EST) Monday - Friday
or contact us at
Our customer service will be happy to assist you.
© 2021 Sunbeam Products, Inc. All rights reserved.
Distributed by Star Elite Inc., Montreal, Canada H3B 3X9
SE005-080621
Upper Arm Blood Pressure Monitor Model HL858A2-LT
Printed in China
This manual suits for next models
1
Table of contents
Other Sunbeam Blood Pressure Monitor manuals

Sunbeam
Sunbeam 7656-10 User manual

Sunbeam
Sunbeam 7689 User manual

Sunbeam
Sunbeam 7621 User manual

Sunbeam
Sunbeam TMB-1583-S User manual

Sunbeam
Sunbeam HEALTH AT HOME 7623 User manual

Sunbeam
Sunbeam 7659 User manual

Sunbeam
Sunbeam 7654 User manual

Sunbeam
Sunbeam 7620 User manual

Sunbeam
Sunbeam 7622 User manual

Sunbeam
Sunbeam 7652 User manual


