Sunbirds SB4 Phoenix User manual

Sunbirds
10 avenue de l’Europe,31520, Ramonville St-Agne, France
contact@sunbirds.aero
www.sunbirds.aero 1
SB4 PHOENIX - USER GUIDE
DATE : 19/08/2019
VERSION : 1.7
SB4 Phoenix
User Guide

Sunbirds
10 avenue de l’Europe,31520, Ramonville St-Agne, France
contact@sunbirds.aero
www.sunbirds.aero 2
SB4 PHOENIX - USER GUIDE
DATE : 19/08/2019
VERSION : 1.7
Contents
A. General Description........................................................................................................ 3
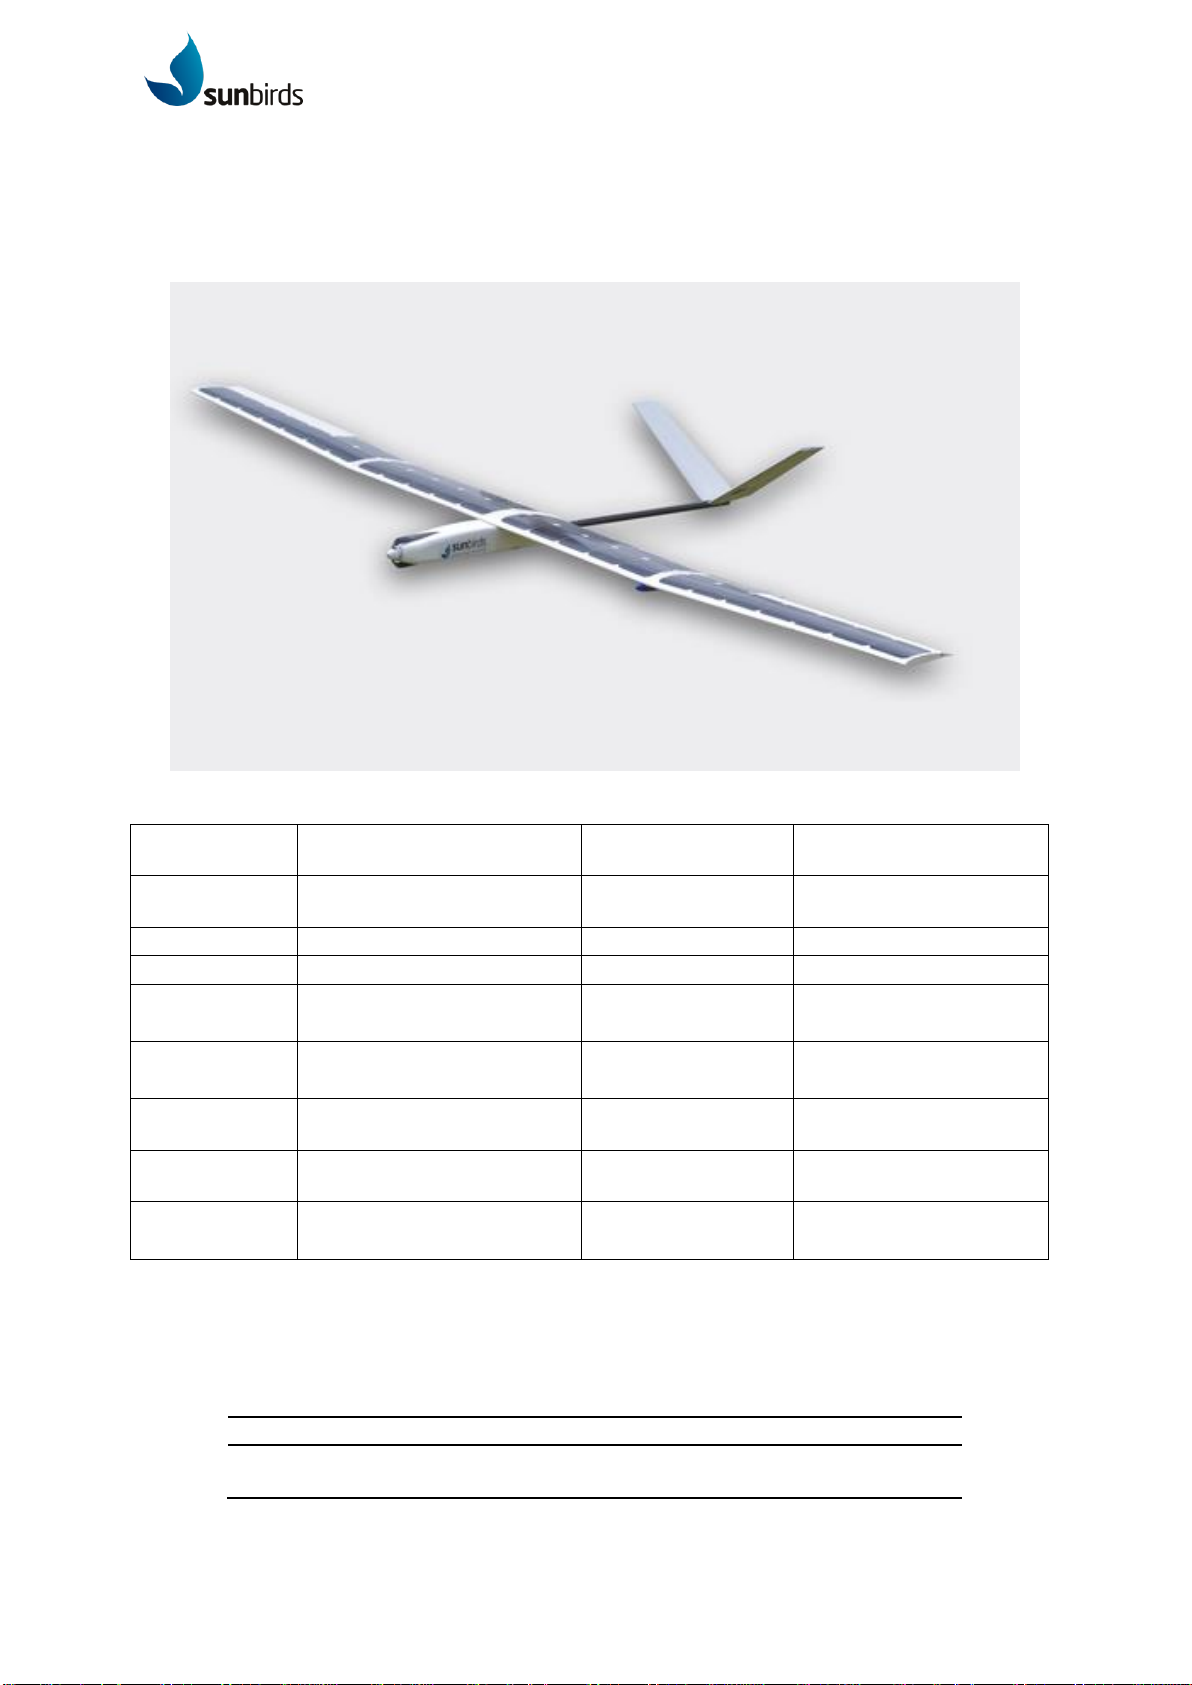
1. The SB4 Phoenix........................................................................................................ 3
2. Equipment list............................................................................................................. 3
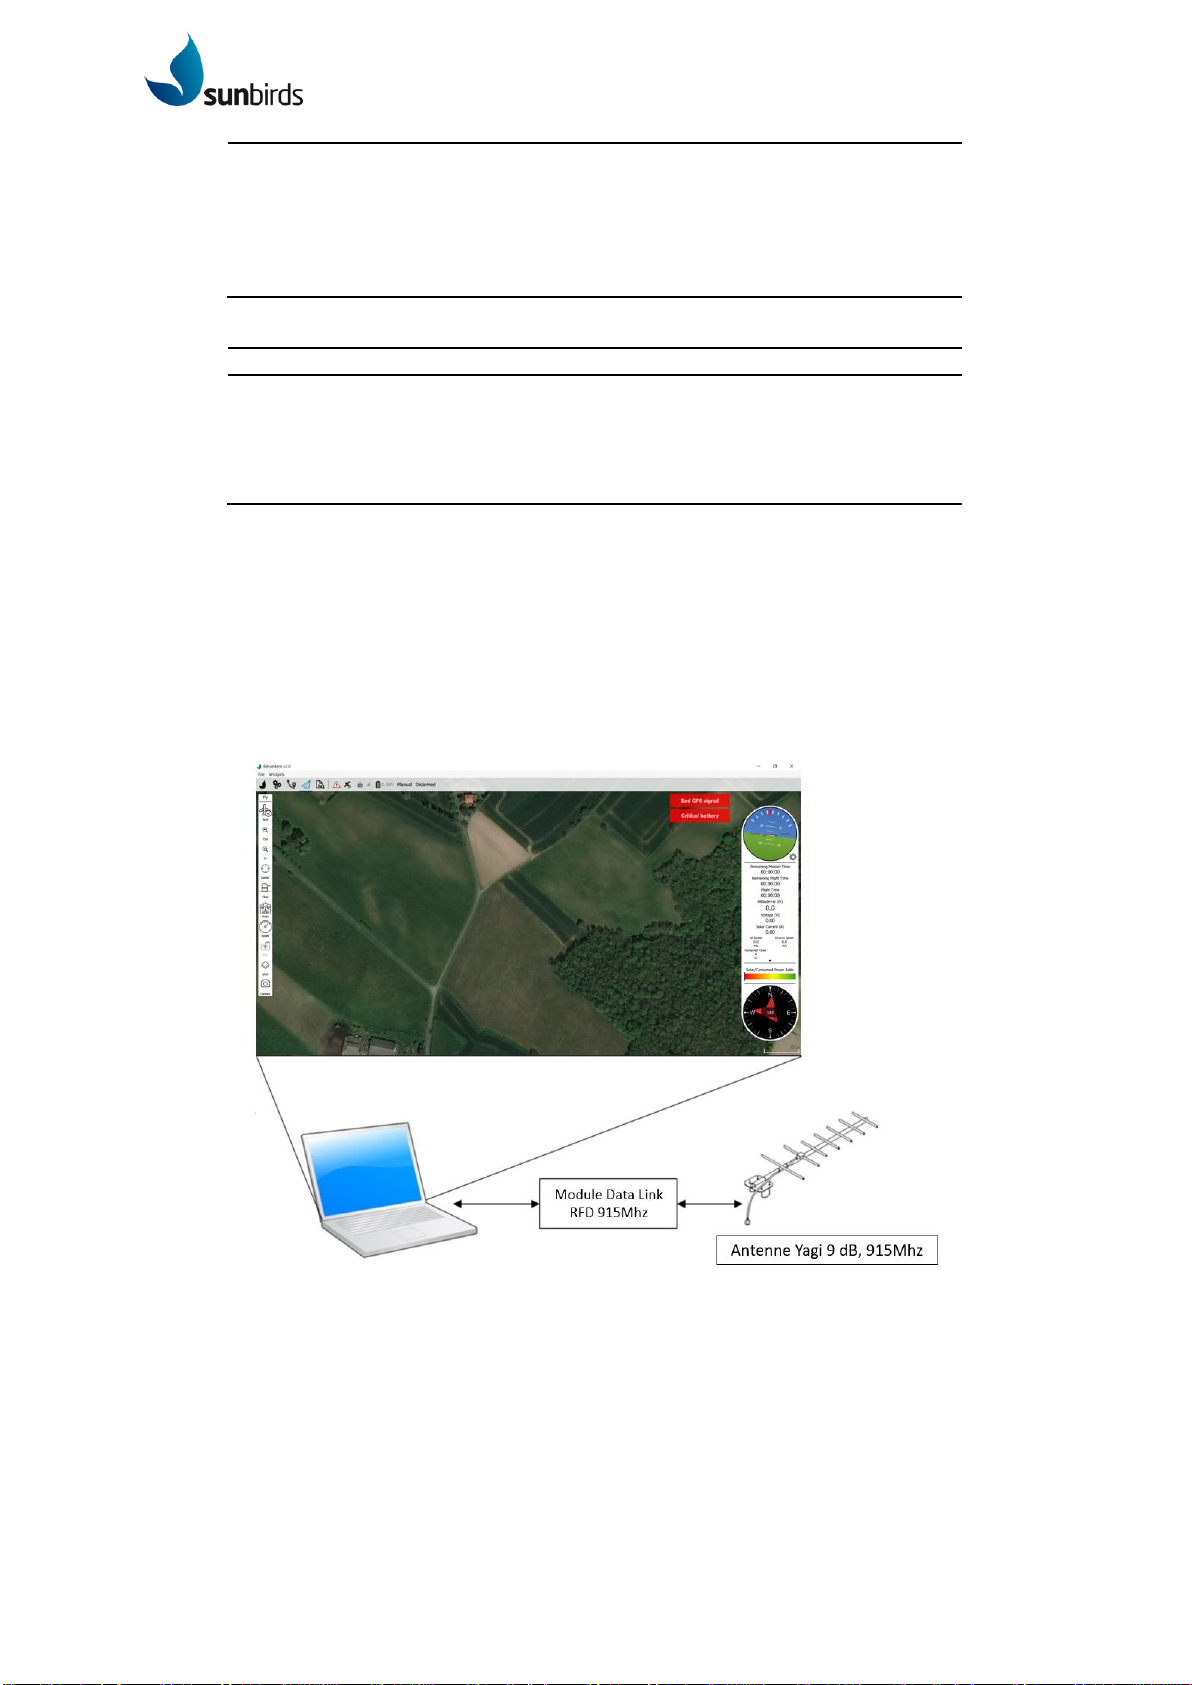
3. Ground station............................................................................................................ 4
4. Radio control (mode 1) ............................................................................................... 5
5. Operational limits........................................................................................................ 5
6. Authorized operations................................................................................................. 6
B. System features and configuration ................................................................................. 7
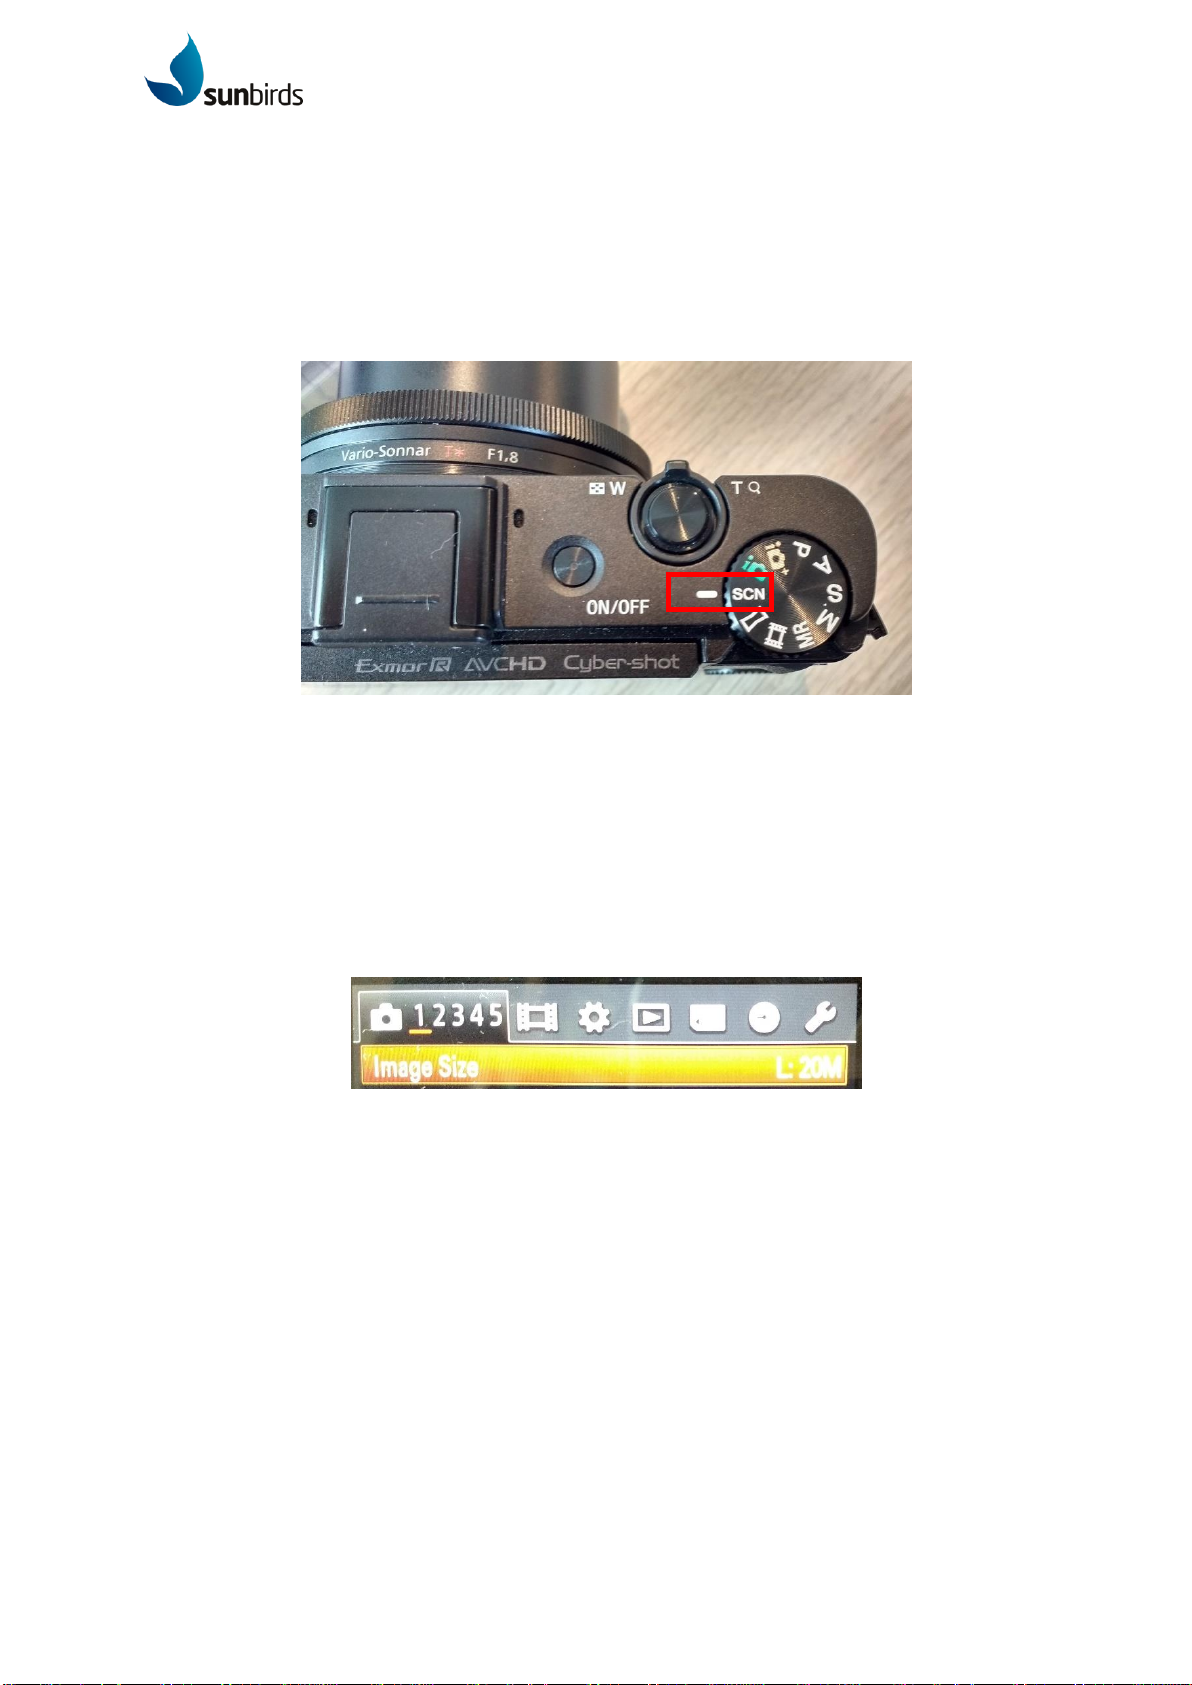
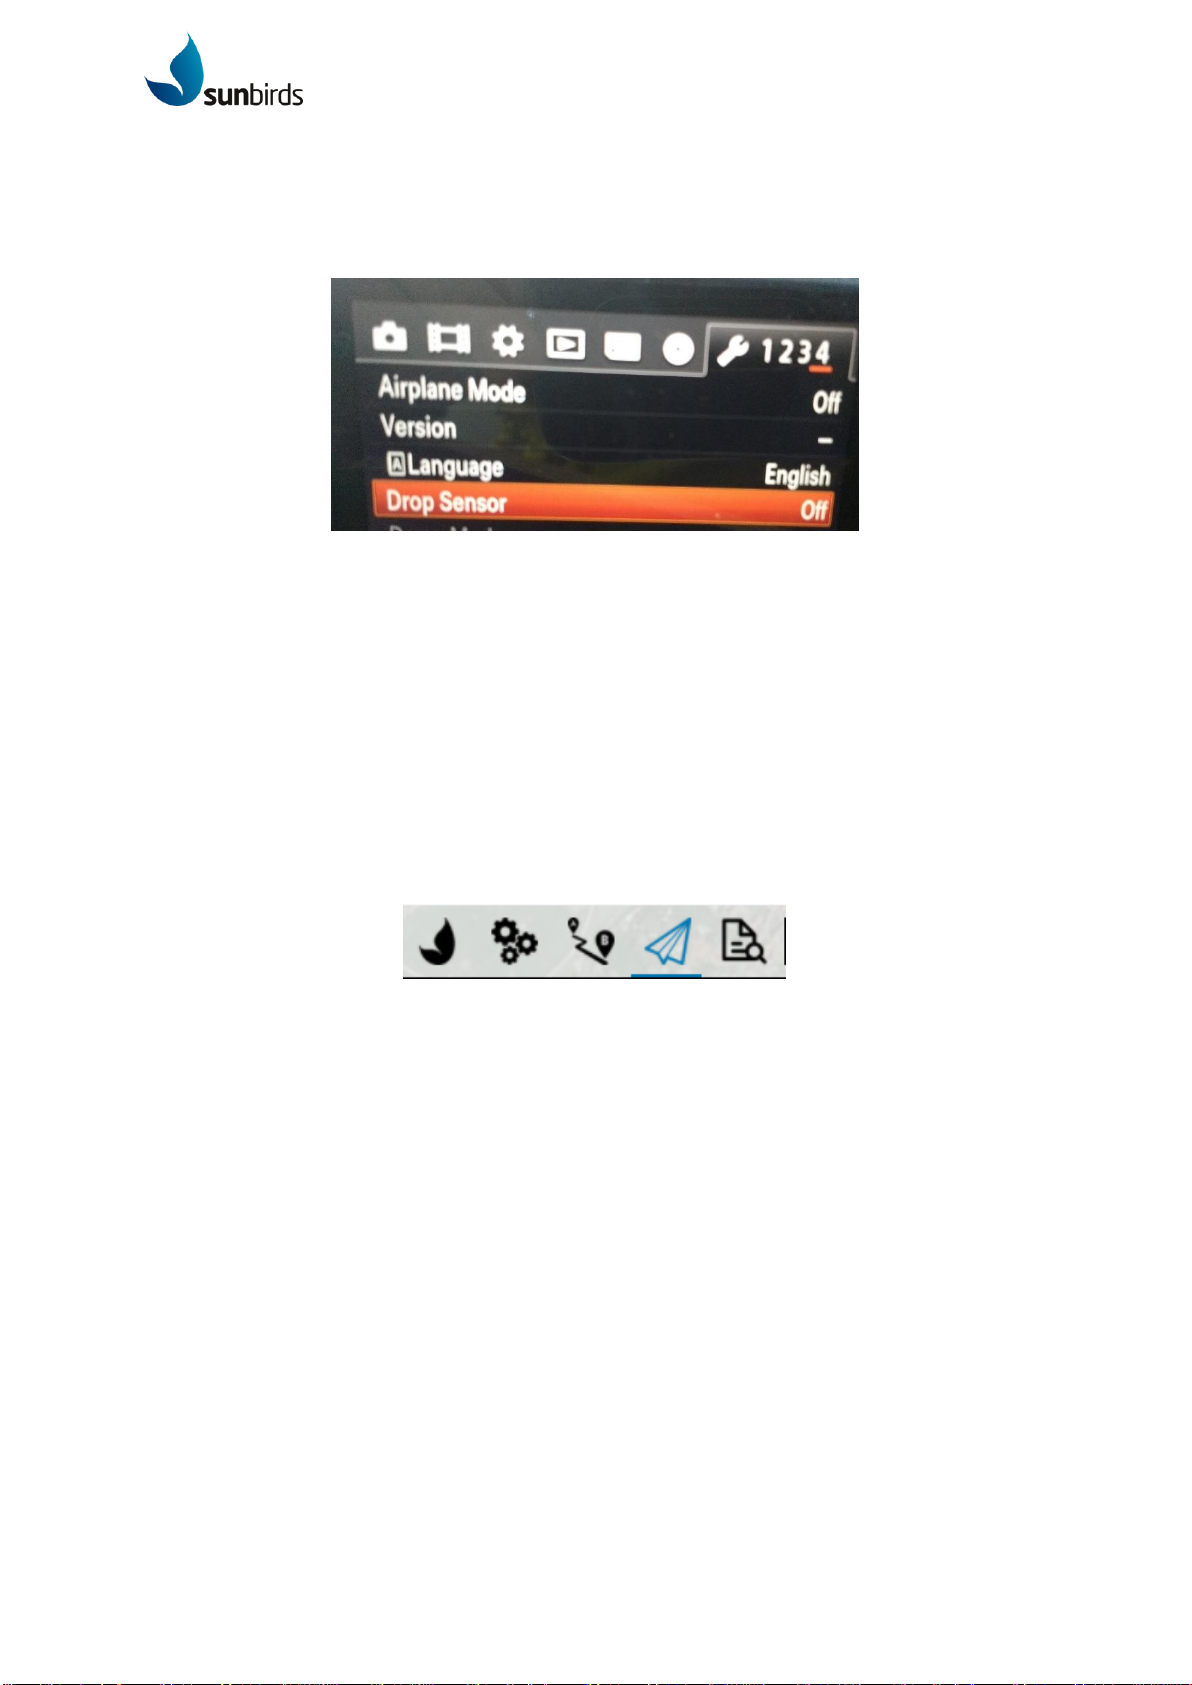
1. Sony RX100 II camera configuration........................................................................... 7
2. Belvedere 2.0 features ................................................................................................... 9
Views................................................................................................................................. 9
Belvedere settings view....................................................................................................10
Parameters view...............................................................................................................11
Plan view..........................................................................................................................11
Flight view.........................................................................................................................21
Logs manager view...........................................................................................................25
C. Setup.........................................................................................................................26
1. Belvedere software setup ..........................................................................................26
2. UAV and Ground station setup ..................................................................................26
D. Flight Operations .......................................................................................................29
1. Flight planning ...........................................................................................................29
2. Pre-Flight checks.......................................................................................................30
3. Launching..................................................................................................................32
4. Mission ......................................................................................................................33
5. Landing......................................................................................................................34
6. After landing procedure..............................................................................................35
7. Safety procedures......................................................................................................35
E. Maintenance..................................................................................................................38
F. Checklist SB4 Phoenix..................................................................................................43

Sunbirds
10 avenue de l’Europe,31520, Ramonville St-Agne, France
contact@sunbirds.aero
www.sunbirds.aero 3
SB4 PHOENIX - USER GUIDE
DATE : 19/08/2019
VERSION : 1.7
A. General Description
1. The SB4 Phoenix
.
Weight
3.5 kg
Mission time -
Inspection
Up to 8 hours*
Wingspan
320cm
Mission time -
Survey
Up to 8 hours*
Length
155cm
Flying range
Up to 300km*
Flight mode
Assisted / Autonomous
Radio link range
Up to 50 km –31 miles
Propulsion
Brushless DC motor &
Folding propellers
Cruise speed
35km/h –9.7 m/s
Battery Pack
LiPo 2,200mAh 6S 22.2V
Wind resistance
40km/h –11 m/s
Launch
By hand
Default payload
Sony RX100 II 20Mpxl
Camera
Connectivity
433 Mhz or 915 Mhz direct
link
GSD
Down to 1 cm - 0.4 in
per pixel
Flight time
Up to 8 hours*
Solar system
110W max. power
*Subject to solar and weather conditions
2. Equipment list
UAV Parts
Quantity
Fuselage
1
Wings
3

Sunbirds
10 avenue de l’Europe,31520, Ramonville St-Agne, France
contact@sunbirds.aero
www.sunbirds.aero 4
SB4 PHOENIX - USER GUIDE
DATE : 19/08/2019
VERSION : 1.7
Tail fins
2
Tail Boom
1
Battery
1
Payload
1
Bay cover
1
Antennas
2
Ground Station Parts
Quantity
Telemetry module
1
Antenna
1
Belvedere ground control software
1
Antenna mast
1
Radio Control
1
3. Ground station
The ground station is mandatory to operate the SB4 Phoenix, it is composed of a laptop with
the software Sunbirds Belvedere 2.0 suite installed, a communication module, the antenna
and its tripod.
Sunbirds Belvedere 2.0 provides the end-user with a graphical interface with diverse frames
and tabs to prepare the flights, control and monitor the SB4 Phoenix all along the flight and
manage the geotags afterwards.

Sunbirds
10 avenue de l’Europe,31520, Ramonville St-Agne, France
contact@sunbirds.aero
www.sunbirds.aero 5
SB4 PHOENIX - USER GUIDE
DATE : 19/08/2019
VERSION : 1.7
Note: To ensure safety during all operations an additional power source might be necessary
for the ground station to cope with the long endurance of the SB4 Phoenix. A power bank or
solar panels might be necessary depending on the location of the operation.
4. Radio control (mode 1)
Switch position
POS 0
POS 1
POS 2
Flight mode
Manual (top)
Stabilized
(middle)
Mission (down)
Motor ARM / DISARM
Disarmed (pushed)
Armed (pulled)
-
Aileron reverse
function
Not reversed (pushed)
Reversed (pulled)
-
Important notice: Sunbirds does not recommend using full manual mode during the flight,
except in case of an autopilot/IMU failure.
Note: Mode 2 R/C operate in the same way, the only difference is that the throttle stick and
elevator stick are swapped
5. Operational limits
Maximum weight
3.5kg
Maximum air speed (VNE)
90km/h
Stall air speed
30km/h
Maximum payload power
5W
Authorized wind gusts
40km/h
Operational temperatures
0°C to 40°C
Center of gravity
30% of the chord with a max of 10% static

Sunbirds
10 avenue de l’Europe,31520, Ramonville St-Agne, France
contact@sunbirds.aero
www.sunbirds.aero 6
SB4 PHOENIX - USER GUIDE
DATE : 19/08/2019
VERSION : 1.7
margin.
Maximum power
672W
6. Authorized operations
National, international and local regulations apply to drone operations. Please refer to the
regulation that apply to your flight location before operating Sunbirds drones. Sunbirds
recommends the following rules:
Night flight
Forbidden
Without VMC
Forbidden
Rain
Discouraged
Above 400 ft
Forbidden
Battery connection
After the drone/ground station are assembled
Operation on the ground
Drone must be disarmed
Motors armed
Propeller clear, wear gloves and long sleeves
Public
150m from flight area
Flight area
Non-populous areas
After landing
Disarm the drone

Sunbirds
10 avenue de l’Europe,31520, Ramonville St-Agne, France
contact@sunbirds.aero
www.sunbirds.aero 7
SB4 PHOENIX - USER GUIDE
DATE : 19/08/2019
VERSION : 1.7
B. System features and configuration
1. Sony RX100 II camera configuration
1. Switch on the Sony RX100 II camera, use the wheel on top off the camera to switch
to the “SCN” mode then press the “MENU” round button in the upper right corner.
1. Once the menu is up, five tabs regarding the camera settings are showed,
respectively from 1 to 5 next a camera icon. To scroll through the sub menus, use the
setting wheel. If the value is not set on the right value, use the center button to open
the value selection panel. Then set the right one using the bottom and top parts of the
setting wheel to scroll through the values and the center button to validate your
choice.
2. Scroll down to check the following parameters ([Shaded] indicates the shaded
parameters which can’t be changed in this specific configuration):
Menu 1
•Image Size = L: 20M
•Aspect Ratio = 3:2
•Quality = Fine
•[Shaded] Panorama: Size = Standard
•[Shaded] Panorama: Direction = Right
•Ctrl with Smartphone = -
Menu 2
•Drive Mode = Cont. Shooting

Sunbirds
10 avenue de l’Europe,31520, Ramonville St-Agne, France
contact@sunbirds.aero
www.sunbirds.aero 8
SB4 PHOENIX - USER GUIDE
DATE : 19/08/2019
VERSION : 1.7
•Flash Mode = Flash Off
•Focus Mode = Continuous AF
•[Shaded] Autofocus Area = Multi
•[Shaded] Soft Skin Effect = Off
•Smile/Face Detect. = Off
•[Shaded] Auto Object Framing = Off
Menu 3
•[Shaded] ISO = ISO AUTO
•[Shaded] Metering Mode = Multi
•[Shaded] Flash Comp. ±0.0
•[Shaded] White Balance = Auto WB
•[Shaded] DOR/Auto HDR = D-Range Opt.
•[Shaded] Creative Style = Standard
•[Shaded] Picture Effect = Off
Menu 4
•Clear Image Zoom = Off
•Digital Zoom = Off
•[Shaded] Long Exposure NR = Off
•[Shaded] High ISO NR = Normal
•AF Illuminator = Off
•Steady Shot = Off
•Color Space = sRGB
Menu 5
•Shooting Tip List = -
•[Shaded] Write Date = Off
•Scene Selection = Sports Action
•[Shaded] Memory recall = -
•Memory = -
3. Don’t forget to go in the menu to the clock tab to verify that the date and the time
match your location
4. Finally go the “SD card section”, as indicated in the picture below and set the “File
Number” to “Reset”

Sunbirds
10 avenue de l’Europe,31520, Ramonville St-Agne, France
contact@sunbirds.aero
www.sunbirds.aero 9
SB4 PHOENIX - USER GUIDE
DATE : 19/08/2019
VERSION : 1.7
5. Then go the tab 4 of the “wrench section”, as indicated in the picture below and set
the “Drop Sensor” to “Off”.
6. Once the parameters are set, the camera must be switched off, plugged and installed
in its bay. Please make sure that the lens is aligned with the opening in the
undercarriage and the camera has the right angle for your mission.
2. Belvedere 2.0 features
Views
Belvedere features different views used to set parameters, plan a mission and control the
drone. Each view has a specific goal: they will be described in the next sections. To change
between the different views, use the views buttons.
Each time a parameter is changed, you have to press the enter key
to save it.

Sunbirds
10 avenue de l’Europe,31520, Ramonville St-Agne, France
contact@sunbirds.aero
www.sunbirds.aero 10
SB4 PHOENIX - USER GUIDE
DATE : 19/08/2019
VERSION : 1.7
Belvedere settings view
The first view is used to control Belvedere 2.0 general settings. It is mostly used by
developers and people looking for advanced options such a debugging and console logs.
The available panels are:
•General
•Commlinks
•Offline Maps
•MAVlink
•Console
•Mock Link
•Debug

Sunbirds
10 avenue de l’Europe,31520, Ramonville St-Agne, France
contact@sunbirds.aero
www.sunbirds.aero 11
SB4 PHOENIX - USER GUIDE
DATE : 19/08/2019
VERSION : 1.7
Parameters view
This view is used for the setup of the SB4 Phoenix. The SB4 Phoenix is shipped ready to fly.
The available tabs are:
•Summary
•Firmware
•Radio
•Calibration
•Safety
•Parameters
It is also mostly used by developers and people looking for advanced options.
Plan view
The plan view is used to set up missions for the drones. The blue circle represents the
geofence. It will be addressed in another chapter.

Sunbirds
10 avenue de l’Europe,31520, Ramonville St-Agne, France
contact@sunbirds.aero
www.sunbirds.aero 12
SB4 PHOENIX - USER GUIDE
DATE : 19/08/2019
VERSION : 1.7
The menu on the left is used to create the mission. The following buttons are available:
•Waypoint
This button is used to create waypoints.
•Survey
This button is used to create surveys. They are addressed in another chapter.
•Landing
This button is used to create a landing procedure.
•Zoom in
Zoom the map in.
•Zoom out
Zoom the map out.
•Center zoom
Center the map zoom on the mission, the home, the current location or the SB4
Phoenix.
•Sync
This button give access to the management of the mission. It can be used to upload a
mission on the drone, download the mission from the drone, save a mission on the
ground station or load a mission from the ground station.
•Erase
The button is used to erase a mission on Belvedere 2.0 and the drone at the same
time.

Sunbirds
10 avenue de l’Europe,31520, Ramonville St-Agne, France
contact@sunbirds.aero
www.sunbirds.aero 13
SB4 PHOENIX - USER GUIDE
DATE : 19/08/2019
VERSION : 1.7
•SRTM
Change the SRTM (Shuttle Radar Topography Mission) options mode, between the
display of the current SRTMs, a trigger used to auto scale the SRTM and an option to
import SRTM to Belvedere 2.0.
At the top is displayed information about the selected waypoint and about the global mission.
On the far top right, the main button to upload the mission to the drone is displayed.
On the bottom, the waypoints of the mission are displayed with their respective relative
altitude to the ground.
Finally, on the right, is displayed the list of the waypoints in the mission, the control of the
geofence and the rally points. This last feature is for now disabled on Belvedere 2.0.

Sunbirds
10 avenue de l’Europe,31520, Ramonville St-Agne, France
contact@sunbirds.aero
www.sunbirds.aero 14
SB4 PHOENIX - USER GUIDE
DATE : 19/08/2019
VERSION : 1.7
Each waypoint comes with various parameters the user can influence on.
HOME
The home is the initial position of the drone. Every waypoint altitude will refer to the home
altitude, to operate in a relative frame (e.g. 50m above home). It is also the location where
the drone will fly to if a “Return to Launch”procedure is triggered.

Sunbirds
10 avenue de l’Europe,31520, Ramonville St-Agne, France
contact@sunbirds.aero
www.sunbirds.aero 15
SB4 PHOENIX - USER GUIDE
DATE : 19/08/2019
VERSION : 1.7
Important notice: The flight altitude of the drone is defined relatively to the home altitude. The
drone uses its barometric sensor to compute its altitude. If the atmospheric pressure varies
significantly during the flight, the drone’s altitude computation will be wrong resulting in an
actual flight altitude different from the altitude set, and potentially leading to collision with
obstacles and making procedures such as auto landing hazardous. Always ensure that the
altitude of the drone is satisfying and if need be, abort the flight and reset the home position
by unplugging the battery. While planning the flight, if a significant change in pressure is to
be expected, make sure that the altitude of each waypoint enables to clear obstacles.
GEOFENCE
1. In Belvedere, click on the Geofence button
2. Set the different parameters:
a. Action in case of geofence violation:
i. None: Nothing is done
ii. Warning: Only warnings are displayed on Belvedere
iii. Loiter: The drone is loitering at the geofence limit
iv. Return to land: The drone enters in the RTL procedure
Important notice: Sunbirds recommends to choose the RTL mode.
b. The user can set the “Radius” (blue circle), the minimum “Radius” is 500m.
c. The user can set the “max Altitude”, the minimum “max Altitude” is 50m.

Sunbirds
10 avenue de l’Europe,31520, Ramonville St-Agne, France
contact@sunbirds.aero
www.sunbirds.aero 16
SB4 PHOENIX - USER GUIDE
DATE : 19/08/2019
VERSION : 1.7
WAYPOINT
A waypoint is used to order the drone to fly to this position. A waypoint is made of
coordinates (longitude and latitude), and altitude. As we can see above, the altitude of this
waypoint is 41m above home. Always ensure that the checkbox “Altitude is relative to home”
is checked in order to set a height above the initialization point of the drone.
Each waypoint also has a camera section, which allows to switch on/off the camera, and set
the various parameters (trigger distance/time). Then you can, for example, turn on the
camera on a certain waypoint, take photos every 3 seconds, and turn off the camera later, on
another waypoint.
JUMP TO

Sunbirds
10 avenue de l’Europe,31520, Ramonville St-Agne, France
contact@sunbirds.aero
www.sunbirds.aero 17
SB4 PHOENIX - USER GUIDE
DATE : 19/08/2019
VERSION : 1.7
A jump to item is used to repeat a certain sequence. You can decide of a target and a
number of times to “repeat” this jump. This way, you can easily fly in a loop.
SURVEY
Surveys are used to map areas. The survey button automatically creates a survey on the
map which can be resized and modified. To change the pattern of the survey or its size one
can use the survey anchors (white dots). To remove an anchor, simply click on it. To move
an anchor one can drag and drop it. To add an anchor on the survey pattern, simply click on
the “+” button on the pattern’s edges.
When the survey is ready, one can access all the surveys parameters on the right panel.

Sunbirds
10 avenue de l’Europe,31520, Ramonville St-Agne, France
contact@sunbirds.aero
www.sunbirds.aero 18
SB4 PHOENIX - USER GUIDE
DATE : 19/08/2019
VERSION : 1.7
The following parameters are available to setup a survey:
•Type of camera
The default payload for the SB4 Phoenix is the Sony RX100 II.
•Overlap
The overlap enables to generate accurate orthomosaics (stitching photos together to
create a map). It refers to the overlap between two pictures. With the SB4 Phoenix,
the recommended overlap is 75% front and 70% side with the camera in portrait
orientation.
•Images in turnarounds
This option let the drone take pictures during its turnarounds. If this checkbox is
unchecked, the camera will stay on but stop taking photos. We recommend to keep
taking pictures in turns as those pictures can be used to generate orthomosaics.
•Angle
Set the angle between the north and the survey lines. Surveys will usually be flown
crosswind, except if there are other parameters more relevant to your mission
(shadows, shape of the area etc.). Be aware that surveys flown crosswind will result

Sunbirds
10 avenue de l’Europe,31520, Ramonville St-Agne, France
contact@sunbirds.aero
www.sunbirds.aero 19
SB4 PHOENIX - USER GUIDE
DATE : 19/08/2019
VERSION : 1.7
in the drone flying sideways but if the wind is constant in strength and direction this
should not impact the quality of the data collected as the yaw angle will be constant.
•Turnaround Distance
Sunbirds recommends to set the radius of the drone’s turnarounds to at least 190m. If
the survey lines are close to one another, it is recommended to increase that value so
that the drone will turn and have enough distance to get aligned with the next leg of
the survey.
•Point of entry
Set the point of entry of the survey from top right, top left, bottom right and bottom
left. Sunbirds recommends to fly surveys starting from the far end and coming back
towards the landing point, for safety reasons.
•Reflying option
If this checkbox is checked, the pattern will be mirrored with and 90° offset. This could
help to achieve a higher overlap.
•Resolution
The resolution of the survey is either set by defining the altitude or the desired ground
resolution. When selecting the right resolution, ensure that you are not exceeding the
maximum legal flight height, nor flying too low to clear obstacles.
•Altitude
Make sure that the checkbox is checked, to set the altitude reference to relative. It will
ensure that flight height is defined above the ground station’s altitude. Take into
account the change in barometric pressure when planning a flight.
Information about the survey is displayed below the parameters:

Sunbirds
10 avenue de l’Europe,31520, Ramonville St-Agne, France
contact@sunbirds.aero
www.sunbirds.aero 20
SB4 PHOENIX - USER GUIDE
DATE : 19/08/2019
VERSION : 1.7
•Covered area in hectares
•The expected number of photos
•The interval between two pictures. Check that this value is not under 2 seconds as
this is the minimum time to trigger the camera.
Important notice: If the interval value is below 2 seconds, the following message will pop up.
Please adjust the flight altitude or the overlap until the interval is at least 2.1s.
•Camera mode
The camera can be triggered at regular distance intervals or regular time intervals.
Those values will follow the “photo distance” or “photo interval” indicated in the survey
information.
LAND
The landing waypoint will create a landing procedure, made of 3 waypoints (U shaped) and a
landing point. A landing procedure must always be defined when setting up a flight plan.
Sunbirds recommends that the downwind and Upwind legs must be at least 350m long and
the crosswind leg at least 250m. Make sure that the final leg is facing upwind. Usually, the
Table of contents