SUNRICH TECHNOLOGY u-850 User manual

USB 3.0 Docking Station
User Manual
Ver. 1.00
All brand names and trademarks are properties of their
respective owners.

MN3000000094 Page 2
Contents:
Chapter 1: Introduction ......................................................3
1.1 Product Introduction ....................................................3
1.2 Features........................................................................3
1.3 System Requirements ..................................................5
1.4 Package Contents.........................................................5
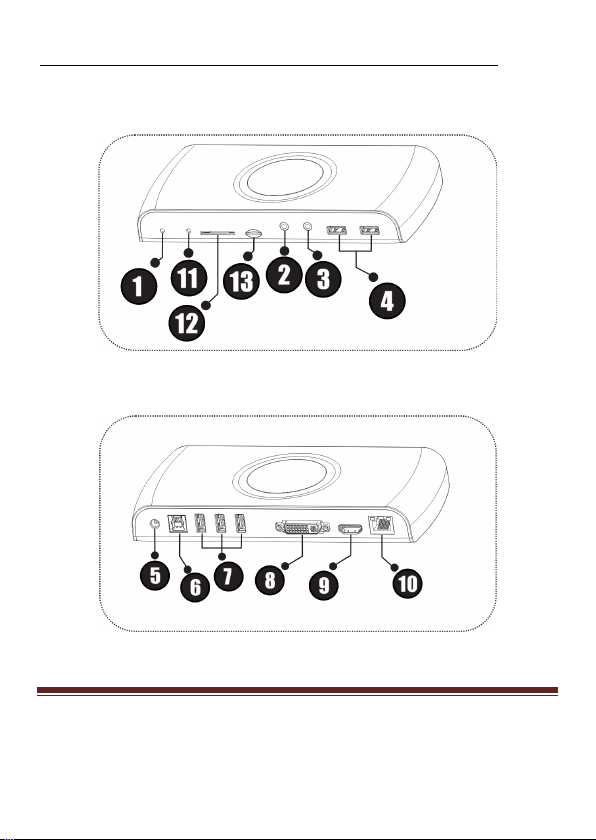
1.5 Hardware Layout .........................................................5
Chapter 2: Getting Started .................................................9
2.1 Driver Installation........................................................9
2.1.1 Installation for Windows.......................................9
2.1.2 Installation for Mac OS X...................................10
2.2 Hardware Installation ................................................12
2.3 Verifying the installation............................................14
2.3.1 Verifying for Windows........................................14
2.3.2 Verifying for Mac OS X......................................14
2.4 Display Configuration ...............................................15

MN3000000094 Page 3
Chapter 1: Introduction
1.1 Product Introduction
This USB 3.0 Docking Station enables multiple USB devices to be
connected to the computer using a single USB 3.0 cable. Now with one
simple cable connection to your computer you can have access to large
screen display, stereo speakers, SD & MicroSD card reader (model
dependent), external hard drive, optical disk drive, printer, USB
keyboard and more.
Just plug in the one USB 3.0 cable from the USB 3.0 Docking Station
to any USB 3.0 or USB 2.0 port on your laptop and your displays and
accessories will be active in seconds. To undock, simply unplug the
one cable and go.
1.2 Features
Easy Installation
An ideal solution for expanding the conn
ectivity of Laptop,
Ultrabook and Macbook

MN3000000094 Page 4
Add up to 6 x USB 3.0 ports (model dependent) / Dual Display /
Gigabit Ethernet Connection / Audio In & Out / SD & MicroSD
card reader
(model dependent) to your Desktop PC / Ultrabook /
Macbook system with one click on driver installation
Dual Display Su
pport allow adding up two monitors for Extend /
Mirror or Primary Display
Compatible with SuperSpeed USB 3.0 and backwards compatible
with USB 2.0 specification
HDMI and DVI ports for two external monitors supports display
resolutions up to 2048x1152 / 1920x1200
Network port offers wired Gigabit Ethernet connectivity (also
10/100 capable)
Dedicated slot for SD and MicroSD card reader (Support SD and
MicroSD at a time)
Audio out to support 2.1 & virtual 5.1 channel sound & a MIC
jack

MN3000000094 Page 5
1.3 System Requirements
Windows® XP 32-bit, Vista/7/8/8.1 (32/64 bit); Mac OS X 10.6
or above
Available USB port (USB 3.0 recommended)
1.4 Package Contents
1 x USB 3.0 Docking Station
1 x USB 3.0 Cable
1 x User Manual
1 x Driver CD
1 x Power Adapter
1.5 Hardware Layout
USB 3.0 Docking Station without Memory Card Reader:
(1 x HDMI output, 1 x DVI output, 1 x RJ45, 1 x Mic In, 1 x Audio, 6 x
USB 3.0 ports):

MN3000000094 Page 6
Figure 1. Front Side
Figure 2. Rear Side

MN3000000094 Page 7
USB 3.0 Docking Station with Memory Card Reader:
(1 x HDMI output, 1 x DVI output, 1 x RJ45, 1 x Mic In, 1 x Audio, 1 x
SD card slot, 1 x Micro SD card slot, 1 x 5 USB 3.0 ports) :
Figure 3. Front Side
Figure 4. Rear Side

MN3000000094 Page 8
1. Power LED: Lights up when the Docking Station is powered
2. Audio output port: Connect to stereo headphone or speaker
3. Min In: Connect to microphone
4. USB 3.0 downstream port: Connect USB peripherals
5. Power jack: Connect to the provided power adapter. The Docking
Station always needs external power supply for operation
6. USB 3.0 upstream port: Connect to the USB 3.0 port of the host
computer
7. USB 3.0 downstream port: Connect USB peripherals
8. DVI output port: Connect to a DVI monitor
9. HDMI output port: Connect to a HDMI monitor
10. RJ45 port: Connect to the Ethernet network via a network cable
11. Memory card activity LED: Steady green indicates the inserted
memory card has been inserted. Flashing when memory card
activity is in progress
12. SD card slot: Insert SD memory card
13. MicroSD card slot: Insert MicroSD memory card

MN3000000094 Page 9
Chapter 2: Getting Started
2.1 Driver Installation
Note: DO NOT connect the Docking Station to your computer before
you install the provided driver.
Follow the procedures below to install the driver and then connect the
Docking Station to your system.
2.1.1 Installation for Windows
1. Insert the provided CD into your disk drive. The CD-ROM will
start automatically. The following screen will show up and please
click “Install Driver”.

MN3000000094 Page 10
*Note: Actual image may vary
Note: If the install program doesn’t run automatically, please
locate and double-click on the Autorun.exe file in the CD to
launch the install program.
2. Please wait while Windows configures DisplayLink Core Softare.
Your screens may temporarily go black or flashing during this
process.
3. When finished, the installation screen will disappear and you will
return to your desktop.
Note: On some machines, you may need to reboot before you can use
USB 3.0 Docking Station.
2.1.2 Installation for Mac OS X
1. Insert the provided CD into your CD-ROM drive.

MN3000000094 Page 11
2. Double-click the “U3 Dock” disc icon, double-click package file
“mac.dmg”, the following “U3 Dock” virtual disk will be
appeared on the Desktop of your Mac OS X system. Then double
click “Drivers” folder.
3. Select “DisplayLink Software Installer” to begin installing the
DisplayLink Driver on your Mac.
4. Follow the instructions on screen to install the driver. After driver
installation is complete, you must restart your computer.

MN3000000094 Page 12
2.2 Hardware Installation
1. Plug the power adapter into the power jack of the Docking
Station.
2. Connect the USB 3.0 Docking Station:
Plug the USB 3.0 cabl3 into the USB 3.0 upstream port on the
back of the Docking Station. Then a pop-up message will appear
in the notification area indicating the installation is complete.
* Actual strings depend on your operation system. This screen shot is
from Windows 7 and might vary slightly for each operating system.
3. Connecting Ethernet network device
•Connect an Ethernet cable to the RJ45 port on the Doing
Station
•Connect the other end of the Ethernet cable to your network
hub, switch or router
4. Connecting DVI/HDMI monitor
•For DVI port: Use a DVI cable (not provided) to connect
the DVI port to a monitor equipped with DVI input jack

MN3000000094 Page 13
•For HDMI port: Use a HDMI cable (not provided) to
connect the HDMI port to a monitor equipped with HDMI
input jack
5. Connecting USB 2.0/USB 3.0 devices
Connect your USB devices to the USB 3.0 ports on the Docking
Station. As long as one USB device is connected to the port and
the connection works properly.
6. Connect speaker/headphone
Insert the plug to the green hole on the front of the Docking
Station. To connect a microphone, insert the plug the pink hole on
the front of the Docking Station.
7. To insert memory card
•For SD memory card: Gently insert a SD memory card,
with the label side facing up, into the SD card slot on the
front of the Docking Station
•For MicroSD memory card: Gently insert a MicroSD
memory card, with the label side facing up, into the
MicroSD slot on the front of the Docking Station

MN3000000094 Page 14
2.3 Verifying the installation
2.3.1 Verifying for Windows
1. Click on the “Device Manager” tab in the Windows Control
Panel.
Start > Control Panel > Device Manager
2. In the USB Display Adaptersgroup, an item named Displaylink
USB 3.0 dock should be displayed.
Note: If there is a question or exclamation mark next to that item, then
the driver is not properly installed. Please delete the item, select the
Delete the driver software for this device option (if provided),
unplug the Docking Station from your computer and then repeat the
installation steps.
2.3.2 Verifying for Mac OS X
1. Choose About this Mac from the Apple menu.
2. Click on More Info…

MN3000000094 Page 15
3. In the Contents sidebar select USB from the Hardware section.
4. Scroll the list to reveal the USB 3.0 Docking Station information
2.4 Display Configuration
When USB 3.0 Docking Station is attached, an icon appears in the
taskbar. This gives you access to the DiaplayLink manager menu.

MN3000000094 Page 16
To use the DisplayLink Manager Menu
1. From the taskbar, click the DisplayLink icon
2. A menu appears with several options. These are shown and
described below.
•Screen Resolution: Click to select an available resolution. Note:
This function is disabled in mirror mode, as the resolution is
defined by the resolution of the primary monitor

MN3000000094 Page 17
•Screen Rotation: Rotates the screen according to the desired
orientation
•Extend to:Extends the screen according to the desired orientation
•Extend: This is the default settings of the USB 3.0 Docking
Station. This mode extends your desktop for easy viewing of
multiple windows. The window will move off the primary display
from the right side and enter the extended display from the left
side
•Set as Main Monitor: Sets the extended screen as the main
screen
•Mirror: Duplicates the primary monitor to the monitor which
connects with the USB 3.0 Docking Station
•Off: Turns off the USB 3.0 Docking Station
•Optimize for Video: Optimize the video quality when playing
back. Text may appear less clear when enabling
•Fit to TV: Adjusts the size of the desktop on the TV. Note: This
function works only when one display is connected
This manual suits for next models
1
Table of contents
Other SUNRICH TECHNOLOGY Docking Station manuals