manuals.online logo
Brands
  1. Home
  2. •
  3. Brands
  4. •
  5. Suntor
  6. •
  7. Transmitter
  8. •
  9. Suntor ST6200BM Installation guide

Suntor ST6200BM Installation guide

ST6200BM User Mannual
Part 1. Safety Caution
Before using this system, please carefully read the following precautions.
please not put the RX antenna near the wall or metal objects.
Please not open the enclosure for any operation without SUNTOR approval.
Before turning on the TX and RX, make sure the antennas are in good connection.
During application, the distance between RX and TX need to be longer than 10meters.
Make sure no any metal objects to enter the system shell
Do not remove the antenna with power. Disassemble the antenna when power off.
Make the video source away from the antenna, and the video line as far as possible
below the antenna.
Before using, make sure the battery is full charged. If the power is low, the system will be unstable and the video will
be discontinuous.
The transmitter is powered by DC, please attention the Positive and negative
Remark: All the settings are configured before shipping. Do not change the parameters
without permission.
Part 2. Device Parameter List
NO.
Name
Model
Qty
Description
1
TX
Transmitter
ST6200BM TX
1
Mini Size
Antenna
TQX-10S
1
This antenna will connect with transmitter
Antenna
Extension Cable
Standard
Configuration
1
To extend the antenna
HDMI Cable
1
Connect the camera and the transmitter
2
RX
Receiver
ST6200BM RX
1
To receive the video and audio
Antenna
TQC-350DII
1
Connect with the receiver
HDMI Cable
1.8meters
1
Connect Receiver with Display
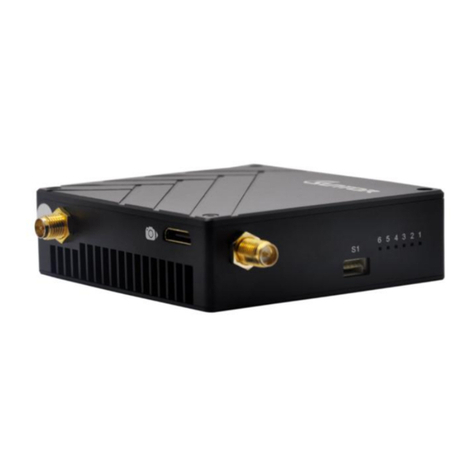
1. Transmitter
Power Input: DC 9--16V
Antenna: SMA(Connect the antenna firstly, then connect the power)
HDMI: HD HDMI(MINI-HDMI)connect 720P Camera
External Fan Fixed Holes: 40*40mm holes to connect an external fan
Indicator: For video source and frequency Channel (when not access to video, the green light
will continuously blink. When TX get the video, the green light will keep on.
When turn on the TX, times the red LED blink, it means the TX is using which channel. For example,
if the LED blink 2 times, the TX is using the second frequency channel.)
Frequency Channel Button: Each pressing, the channel will change 1 time. There are 4channels optional.
Device fixed hole: M3 hole to fix it on UAV or Robot.
2. Receiver
Power Input:DC 9--16V
Antenna: SMA(Connect the antenna firstly, then connect the power)
HDMI: Output HDMI Signal to connect with Display.
POWER: Show power State. It will turn red when power turn on
STATE: Signal State. When get the signal, the green light will turn on.
RES: Reset Button
INFO: Checking the working channel
CH: Switching Channel
Fixed Hole: M3
Tripod Fixed Hole: Professional photographic equipment tripod fixing hole
Part 3 System Operation
1.Diagram
2.operating instructions
Check if the system-related accessories are complete
Connect the TX:First connect the antenna then connect the camera then connect the power.
Connect the RX: Connect the antenna first, then HDMI Cable then power
The system settings are configured before leaving factory, no need to Reset the parameters
Part 4.Common troubleshooting
1. A lot of interference fringes or snowflakes appear on the monitor
Solution: In the TX Side, the distance between video cable and antenna is too close, Put the video
cable a little far away from the antenna cable, the problem can be solved.
2. A black and white image appears on the monitor
Solution: Please check if the video output cable have a good connection with the monitor and ensure
the power have a good connection. Put the video cable a little far away from the TX antenna.
3. When TX near to RX, the RX can get the signal, but when TX far away from RX, the signal
will be disappear or weak.
Solution: Check the RX electromagnetism environment, to confirm if there is interference around.
If there is strong interference, change to another channel.
4. After a good installation of TX and RX, the signal cant be simultaneous.
Solution: Bring the TX to 10meters away from the RX.
5. In Short or long distance, the signal cant be simultaneous.
Solution: Check if TX and RX are in same channel. Or reset the RX.
6. After the good connection of RX and monitor, the monitor cant show the video normally.
Solution: The trouble is caused by the impedance of video cable and the connector.
Do a good connector to ground of the RX and monitor. Or change the HDMI cable.
7. In TX end, after changing the video source, the monitor cant display normally.
Solution: Reset the RX
8. TX has no power output, and the transmit distance is very short.
Solution: The device’s power amplifier is broken. This problem is caused by not connecting
the antenna before connecting power. This way, you need to change a new power amplifier.

Other Suntor Transmitter manuals

Suntor ST15NMT-MiNi User manual

Suntor

Suntor ST15NMT-MiNi User manual

Suntor CD15NMT-MiNi User manual

Suntor

Suntor CD15NMT-MiNi User manual

Suntor ST30NMT User manual

Suntor

Suntor ST30NMT User manual

Suntor ST6200TPS-HD User manual

Suntor

Suntor ST6200TPS-HD User manual

Suntor ST20NPT User manual

Suntor

Suntor ST20NPT User manual

Suntor ST6210SH User manual

Suntor

Suntor ST6210SH User manual

Suntor ST30HPT User manual

Suntor

Suntor ST30HPT User manual

Suntor ST6200TPS-SD User manual

Suntor

Suntor ST6200TPS-SD User manual

Popular Transmitter manuals by other brands

Sage Human T15A user manual

Sage Human

Sage Human T15A user manual

PreSens Microx 4 instruction manual

PreSens

PreSens Microx 4 instruction manual

Emerson Micro Motion 5700 Configuration and Use Manual

Emerson

Emerson Micro Motion 5700 Configuration and Use Manual

Endress+Hauser iTEMP TMT85 operating instructions

Endress+Hauser

Endress+Hauser iTEMP TMT85 operating instructions

Lucoro Broadcast FMTX250M user manual

Lucoro Broadcast

Lucoro Broadcast FMTX250M user manual

Emerson MICRO MOTION 2700 installation manual

Emerson

Emerson MICRO MOTION 2700 installation manual

RKI Instruments 65-2649SS-CH4-4 Operator's manual

RKI Instruments

RKI Instruments 65-2649SS-CH4-4 Operator's manual

R.V.R. Elettronica BLUES50NV Technical Annex

R.V.R. Elettronica

R.V.R. Elettronica BLUES50NV Technical Annex

Ritronics RQT-150 Basic owner's manual

Ritronics

Ritronics RQT-150 Basic owner's manual

Creative BT-W3 quick start guide

Creative

Creative BT-W3 quick start guide

BFT RTD Installation and user manual

BFT

BFT RTD Installation and user manual

EnOcean PTM 215 ZGPGP user manual

EnOcean

EnOcean PTM 215 ZGPGP user manual

Novatech 1732 Technical manual

Novatech

Novatech 1732 Technical manual

Sena SM10 user guide

Sena

Sena SM10 user guide

mcmurdo KANNAD 406 SURVIAL Installation manual operating instructions

mcmurdo

mcmurdo KANNAD 406 SURVIAL Installation manual operating instructions

Absolute Process Instruments APD 2016 quick start guide

Absolute Process Instruments

Absolute Process Instruments APD 2016 quick start guide

Steren AVS-500 instruction manual

Steren

Steren AVS-500 instruction manual

Magnetrol KOTRON SMART RF 805 Installation and operating manual

Magnetrol

Magnetrol KOTRON SMART RF 805 Installation and operating manual

manuals.online logo
manuals.online logoBrands
  • About & Mission
  • Contact us
  • Privacy Policy
  • Terms and Conditions

Copyright 2025 Manuals.Online. All Rights Reserved.