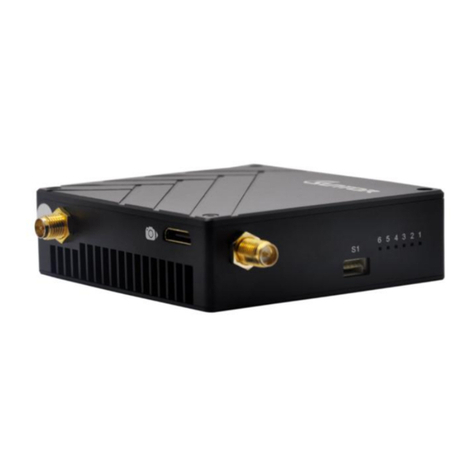
Suntor ST6210SH User manual

1st
ST6210/15SH User Manual
I. Precautions............................................................................................................................................................................ 2nd
II. Instructions ........................................................................................................................................................................... 3rd
2.1.TX................................................................................................................................................................................. 3rd
2.2. RX................................................................................................................................................................................3rd
Ⅲ. Installation Steps................................................................................................................................................................. 4th
3.1. TX................................................................................................................................................................................ 4th
The right step to turn on the system:............................................................................................................................... 4th
1) Install the antenna of the TX.........................................................................................................................................4th
2) Connect the camera with TX.........................................................................................................................................4th
3) Connect the power with TX.......................................................................................................................................... 4th
5) Turn on the TX............................................................................................................................................................... 4th
Now the transmitter is in working state........................................................................................................................... 4th
3.2. RX................................................................................................................................................................................4th
1) Install the two pics antennas........................................................................................................................................ 4th
2) Connect RX with Monitor Display by AV cable............................................................................................................. 4th
3) Connect RX to power.................................................................................................................................................... 4th
4) Turn on power............................................................................................................................................................... 4th
Now the receiver is in working state.................................................................................................................................4th
Ⅳ. Adjust the Parameters......................................................................................................................................................... 4th
4.1. Steps:.......................................................................................................................................................................... 4th
4.2. How to adjust the TX parameters.............................................................................................................................. 5th
4.2.1. The Keys Functions:.........................................................................................................................................5th
4.2.2. Modification Steps.......................................................................................................................................... 5th
4.3. How to adjust the RX parameters.............................................................................................................................. 5th
4.3.1. Modification Steps.......................................................................................................................................... 5th
V. Common Troubleshooting.....................................................................................................................................................6th
SUNTOR ELECTRONICS CO., LIMITED
V1.0

2nd
I. Precautions
Before using this system, please carefully read the following precautions to ensure that the system can safely and
reliably work.
Before powering on the transmitter and receiver, make sure the antennas
are in good connection.
Before powering on, make sure distance between two antennas( TX & RX) longer than 10meters, or the
electrical level will be too high to damage the RX.
Selecting an appropriate installation location and try your best to make the RX antenna in higher place and its
directivity is in open air.
Do not disassemble the antenna until the power is turned off
Make sure the whole power supply system complies with the relevant technical requirements
Try your best to make the video source far away from the TX and avoid the parallel between video source cable
and TX antenna
Before using, make sure the power full . Because with low power the communication will be unstable and the
video will be discontinuous.
Please do not open the case to do some changes without any permission and guidance of supplier.
Please do not allow any metal objects to enter into the system shell
Remark:
The system must be operated in a dry and ventilated environment.
The system settings are configured before leaving the factory. Do not change the parameters randomly.

3rd
II. Instructions
2.1.TX
2.2. RX

4th
Ⅲ. Installation Steps
3.1. TX
The right step to turn on the system:
1) Install the antenna of the TX
2) Connect the camera with TX
3) Connect the power with TX
4) Turn on the power
5) Turn on the TX
Now the transmitter is in working state.
3.2. RX
1) Install the two pics antennas
2) Connect RX with Monitor Display by AV cable
3) Connect RX to power
4) Turn on power
5) Turn on the RX
Now the receiver is in working state
Ⅳ. Adjust the Parameters
4.1. Steps:
11. Connect the antenna of TX
22. Turn on Power of TX
33. Modify the parameters of TX and then continue to modify the RX parameters

5th
44. Connect the antenna and monitor display with of RX
55. Turn on the power of RX
66. Modify the parameters of RX
After the successful parameters modification, the RX will research the TX signal automatically
4.2. How to adjust the TX parameters
State:Signal strength( indicated by the percent)
Freq:Receiving Center Frequency
Band:Frequency Bandwidth
PoE:RF Connector Power Supply(Default OFF)
AES:Manual AES Encryption(Default OFF)
L: Left/R: Right /U: Up/D: Down/M: Menu
4.2.1. The Keys Functions:
1Adjust Video Source Type: HDMI, SDI and CVBS
2Adjust the Frequency
3Adjust the Frequency Bandwidth
4Adjust the Gain
5Adjust the Encryption
4.2.2. Modification Steps
1Press Up or Down keys to choose the term you want to adjust.
2Long Press Menu key to get Modify Mode
3Press Up and Down keys to adjust the parameters.
4Long press the Menu key to save the parameters
4.3. How to adjust the RX parameters
State:Signal strength( indicated by the percent)
Freq:Receiving Center Frequency
Band:Frequency Bandwidth
PoE:RF Connector Power Supply(Default OFF)
AES:Manual AES Encryption(Default OFF)
L: Left/R: Right /U: Up/D: Down/M: Menu
4.3.1. Modification Steps
1Press Up or Down keys to choose the term you want to adjust.
2Long Press Menu key to enter Modify Mode
3Press Up and Down keys to adjust the parameters.
44. Long press the Menu key to save the parameters
Note: When the RX turn on, the LCD will blink to identify the wireless signal. After it successfully received the signal,
the green color signal value percent will be displayed on the state. If the receiver does not receive the signal, the
value percent will be in blue color.
Remark:Before the system shipping out, all the parameters have been set by our engineers. So there is no need to

6th
re-configure the parameters.
V. Common Troubleshooting
Trouble 1.There are many stripes and white dot on monitor display
Reason: The video cable and antenna are too closed of TX side
Solution: Keep the video cable a little far away from antenna
Trouble 2. Black-and-white image on monitor display
Reason: The output video cable of RX has no good connection of Monitor Display
The power cable of RX has no good connection of RX
The Video cable and antenna of TX are too close
Solution: Make all the power and video cable in good connection and keep TX video cable far away from antenna
Trouble 3. In short distance between TX and RX, the signal is good. But in longer distance there is no signal or weak
signal.
Reason: Frequency interference of the RX
Solution: Change another frequency
Trouble 4. After the installing of the whole system, Signals of TX and RX can not synchronized even
in short distance.
Reason: The RX Synchronous Command in short time result this trouble
Solution: Restart the transmitter
Trouble 5. Signals of TX and RX can not synchronized even in short or long distance.
Reason: The Transmitter’s frequency shift
Solution: Restart the transmitter
Trouble 6. The monitor display cant display the video normally
Reason: The RX video connector does not match the video line’s impedance
Solution: Both of the receiver and monitor need to have a good grounding
Trouble 7. The transmitter has no output power even in short distance
Reason: Before powering on, the antenna are not connected with transmitter. This makes the amplifier
burning out.
Solution: Change a new amplifier device
Trouble 8. If the screen of the monitor display is black and no any image. Please check if there is existing the
following wrong operation.
Wrong operation 1. The cables are not in good connection.
Solution: Check if all the cables are in good connection. Especially check if the transmitter video output cable and
power cable has a good connection with monitor display.
Wrong operation 2. Switch the video format during working such as switch HD-SDI to HDMI or HDMI to SDI or
HDMI/SDI to CVBS
Solution: Turn off the system and after 15 seconds turn on it.

7th
Wrong operation 3. Change the video resolution suddenly. For example the TX default resolution is 1080P/I, you
change the resolution suddenly into 720P or 480P.
Solution: Restart the system.
Wrong operation 4. Change the video source device. For example you change the HD-SDI camera to CVBS camera.
Solution: Select CVBS in the transmitter VIDEO menu.
This manual suits for next models
1
Table of contents
Other Suntor Transmitter manuals
Popular Transmitter manuals by other brands

Pro-Tronik
Pro-Tronik PTR-6A user manual

Miccus
Miccus MHRTX-20 Quick start quide

INTERTECHNO
INTERTECHNO ITKL-30 operating instructions

Dini Argeo
Dini Argeo DGT4XAN quick start guide

Magnetrol
Magnetrol Kotron Sentinel II 804 Series Installation and operating manual

Autrol
Autrol APT 3100 Series quick start guide

Extron electronics
Extron electronics XTP T FB 202 4K user guide

CYP
CYP PU-305BD-TX Operation manual

CETC Maritime Electronics
CETC Maritime Electronics VAI8 Operation and installation manual

Endress+Hauser
Endress+Hauser Liquisys M CUM 223 operating instructions

Q5X
Q5X QT-AD10A15 quick start guide

Berner
Berner BDS150 operating instructions