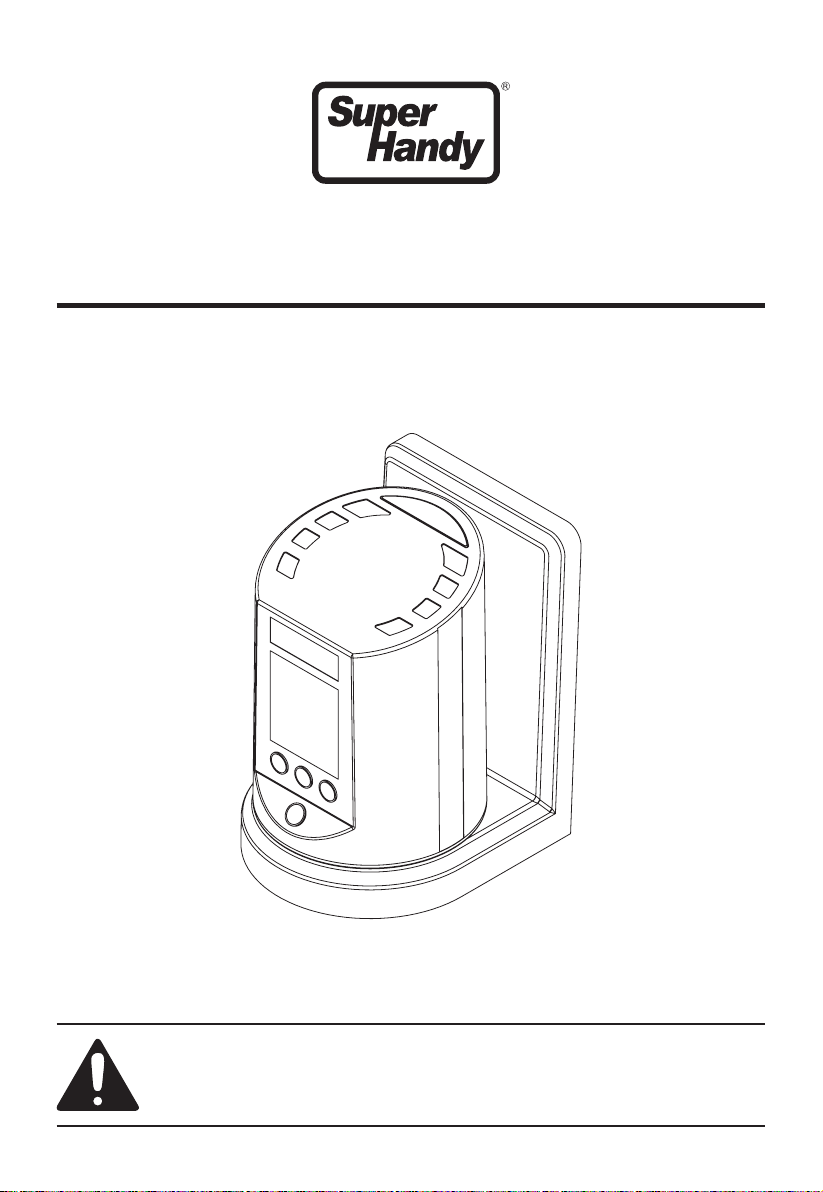
Super Handy GUT160 User manual

Operator's Manual
REV 1.0
Automatic Tire Inflator
WARNING:
Carefully review and understand all INSTRUCTIONS prior to operating this device. Failure to follow
the safety rules and other basic safety precautions may result in serious personal injury. Keep these
instructions in a safe place and accessible so that they can be reviewed as required. Keep these
instructions to assist in future servicing needs.

Please read this user manual carefully and keep it for further reference.
Please read fully and understand this manual before installing and using the
product. This will reduce unnecessary faults and damage.
• DO NOT use the appliance if it is damaged.
• If there is anything abnormal during the operation of the machine, please stop using
immediately and contact the dealer or customer service, who will provide you with prompt
and complete service.
• Make sure the center power line must be grounded.
• The inlet pressure shall not exceed 12.5Bar to avoid to damage the machine.
• The compressed air must pass through a filter such as an oil-water separator before entering
the inflator, that will avoid corrosion of the internal components of the inflator.
• DO NOT point the air source or the air outlet at anybody to avoid personal injury.
• Calibration: This equipment has been calibrated in the factory and has the self-calibra-
tion function. If calibration is required, please contact the manufacturer.
TECHNICAL SPECIFICATIONS
1
Item No.
Power Supply
Maximum Power
Maximum Current
Maximum Inlet Pressure
Maximum Outlet Pressure
Working Range
Accuracy
Operating Temperature
Operating Humidity
GUT160
AC 110~240V 50-60Hz
Max. 10W
800mA
12.5bar (182psi)
12bar (174psi)
0.5-12bar (7-174psi)
±0.08bar (±1psi)
-10°C~50°C (14-122°F)
≤95%

PART LIST (See Fig.1)
OPERATION
1. Operating Button (See Fig.2)
2
3Confirm button
1
Increase the
pressure value 2Reduce the pressure value
4Function selecting button
Fig. 2
Fig. 1
1
Air Hose
2Controller
5
Wall Mounting Board
6
Board Screw
M4.8*38 4pcs
4Hook Screw
M6*38 1pc
3Hook

3
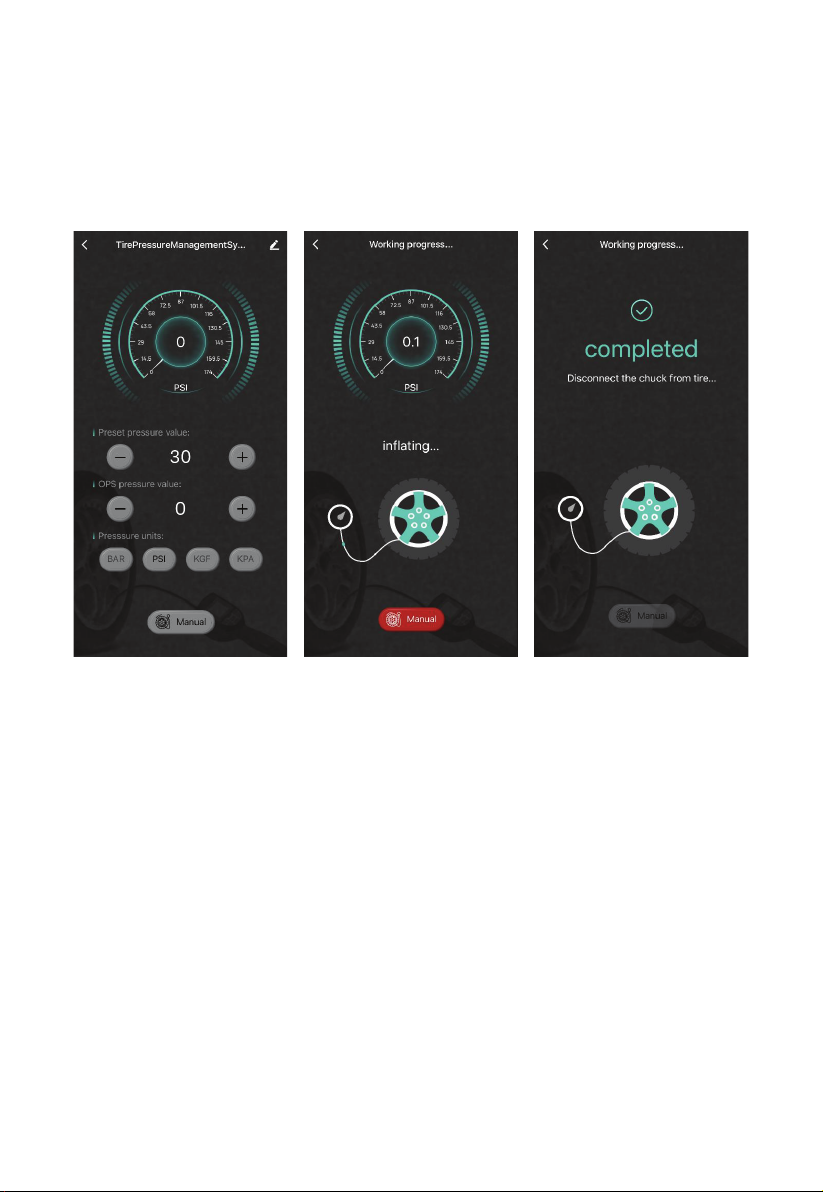
1) Press the "+" or "-" button to set the inflation pressure value, and the inflator will automatical-
ly inflate the tire after connection.
2) When the set pressure value is reached, the buzzer will beep, and the inflation will stop
automatically.
3) Press the " i " button once to convert the display unit: Bar/Psi/Kpa/Kgf.
4) Press the " i " button twice to start the new tire over-inflation function, and press the " "
button after setting until the inflation starts.
2. Function Setting
1) Unit conversion function:
a. Press(i )once, and the current unit flashes. The [SET] icon lights up.
b. Press(-)or(+)to select the unit you wish to use.
c. Press()to save (the original unit is Bar, and there are four units available: Bar/Psi/K
pa/Kgf).
2) [OPS] function:
a. Press(i )twice, and the [OPS] icon flashes on the screen.
b. Press(-)or(+)to select the over-inflation value you wish to achieve and press()
to save.
c. After the over-inflation is set, the [OPS] icon will be displayed on the screen.
d. After clamping the chuck on the inflating valve, press and hold()until the machine
starts to inflate.
e. When the buzzer beeps, the inflation is completed. Pull off the inflation chuck.
3) Special Remark
a. [OPS] is an over-inflation function for the new tire inflated for the first time to make the tire
fit tightly with the wheel hub.
b. The over-inflation value is equal to the maximum tire pressure minus the standard tire
pressure, e.g., a new tire with a MAX. TIRE PRESSURE is 3.5Bar, if the standard tire
pressure is 2.5Bar, then the over-inflation shall be set to 3.5-2.5=1.0Bar.
Note: *1Bar=100Kpa, 1Psi=6.89Kpa, 1Bar=1.02Kgf.
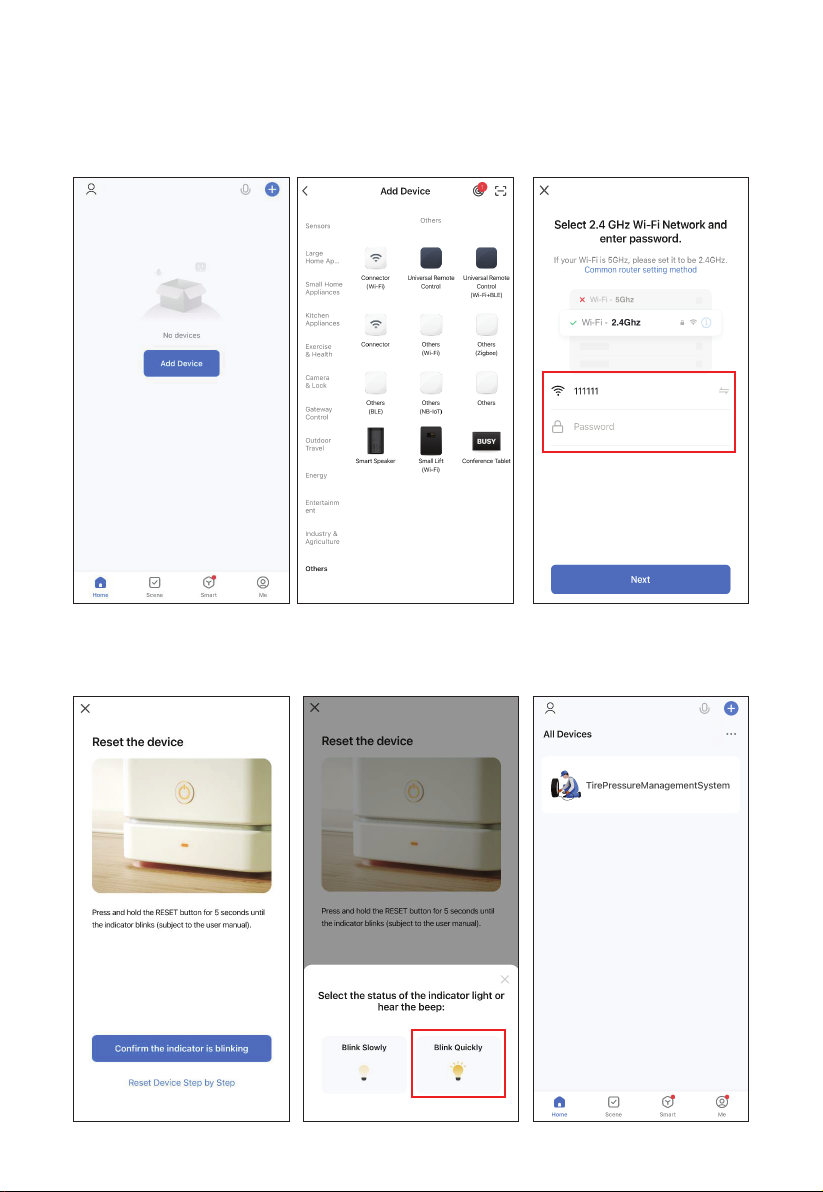
WIFI Connection
1. Download Smart Life app (See Fig. 3)
You can scan the QR code below to download the Smart Life App:
Also, you can search “Smart Life” in either App Store or Google Play to install the app.
Fig. 3

4
2. Add device
1) Power on the device, long press the device network distribution button for 5 seconds to the
Wi-Fi mark blink on the device. (See Fig. 4)
2) Enter the App, tap "Add Device" or "+", then select "Others – Others (Wi-Fi) ". (See Fig. 5)
3) Enter the Wi-Fi name and Wi-Fi password, and click "Next". (See Fig. 6)
4) Click on the APP to "Confirm the indicator is blinking" and select "Blink Quickly".
(See Fig. 7 & Fig. 8)
5) Click "+" after finding the device, and click "Finish" after adding the device. (See Fig. 9)
Fig. 4 Fig. 5 Fig. 6
Fig. 7 Fig. 8 Fig. 9

5
3. Control device
1) Enter the operation interface, you can use the phone to set the target pressure value. (See
Fig. 10)
2) The chuck is connected to the tire valve, the machine automatically starts to work, and the
APP display interface jumps to the working mode. (See Fig. 11)
3) After the inflating and deflating is completed, the machine will be beeping, and the APP
display interface will show to the completion interface. (See Fig. 12)
4) Remove the chuck from the tire and the operating is done.
Maintenance
The inflator has precision electronic components such as built-in integrated circuits and
pressure sensors. To ensure that it can work normally and safely, rough operation shall be
avoided in daily use, and daily maintenance is also essential.
1) Check the connected air channel regularly for leakage, and repair in time if any.
2) Check whether the oil-water separator is working normally regularly, and drain the water in
the oil-water separator in time to prevent the oil in the air channel from entering the inflator,
which may damage the inflator or reduce the service life.
3) Check the power supply connected to the inflator regularly for potential safety hazards in the
circuit.
4) Keep the inflator clean and tidy. Often wipe the machine body with a clean soft cloth. Do not
splash water or oil on the inflator body, to prevent damage to the inflator or other safety
accidents.
Fig. 10 Fig. 11 Fig. 12

Fault
There is a leakage
after connecting
the air source.
The inflator is
working, but no
air inflated.
After the pressure
is set and the
inflator connect to
the tire, the inflator
does not start
automatically.
The inflator deflates
very slowly.
The LCD displays Er1
The LCD displays Er2
The LCD displays Er3
The LCD displays Er4
The LCD displays Er5
The LCD displays Er6
The LCD displays Er7
The LCD displays Er8
Possible cause
The connection is tight enough.
The filter or air hose is blocked.
The air tube is not connected tightly.
At present, the tire pressure is
below 0.2Bar.
The muffler is blocked.
The pressure sensor is damaged.
The chuck is leaking air.
The tire pressure to be inflated is
too high, greater than 13 Bar.
The inlet and outlet ends are
connected incorrectly.
Low voltage.
The program calibration data is lost.
The intake air supply pressure is
lower than the set pressure value
of the pneumatic tire or there is
no intake pressure.
Solution
Check the air tube connection.
Clean the filter and check the air hose.
Check the connection to ensure no air
leakage.
Press the button for a long time.
Clean the muffler.
Turn off the power and return it to the factory.
Clamp the chuck to avoid air leakage.
Stop inflation.
Connect the two ends correctly according to
the inlet and outlet end indication signs.
Check the power supply.
Return it to the factory.
Check the air supply.
Trouble shooting
Warranty
Twelve (12) months for workmanship of the product, except for wearing parts. Warranty period
starts from the product purchase date.
Warranty covers material quality and workmanship only.
Warranty does not cover product for issues caused by improper usage or any operation not in
accordance with the specifications of this manual.
Any modification or tampering with the product in any way voids the warranty.

Size: 145x210mm REV 07/05/23157克双铜
US CA
Great Circle USA
Support Line: 1-866-493-0524
www.greatcircleus.com
www.greatcircleca.com
Scan me to get more new products.
Table of contents