Upon lighting and after the further 10 seconds, release the knob and turn further to the left to the
ON position. The main burner will light and be controlled in accordance with the main burner con-
trol knob setting. Adjust the main burner control knob to the desired setting.
If the pilot is extinguished during use of the fire, you UST wait ten minutes before repeating the
ignition procedure.
To turn the main burner OFF whilst keeping the pilot flame lit, turn the ignition control knob to the
pilot position then only the pilot will remain lit.
To shut the fire off completely, press the ignition control knob down and continue turning to the
right from the pilot position to the OFF position.
A safety interlock prevents re-ignition of the pilot flame until the thermocouple has cooled suffi-
ciently to allow the magnetic valve unit to reset itself.
The remote control unit allows operation of the main burner setting between maximum and pilot
only setting. It does not permanently turn the pilot on or off.
The remote control handset incorporates an inbuilt safety feature to prevent the main burner being
activated or turned up accidentally. It is necessary to press buttons 1 and 2 (see figure 15) simulta-
neously to turn the fire up.
To turn the fire down press button 3 only.
The pilot is visible through the left hand side of the matrix. When cold, the coals or pebbles may be
rotated for good viewing.
Push the slide control knob fully downwards to the SPARK position, and hold there for approxi-
mately ten seconds. Now release the knob and the pilot should stay alight. When the pilot light has
established, move the slide control knob upwards to the LOW flame setting. If the pilot is extin-
guished during use, wait three minutes before repeating the ignition procedure.To achieve the HIGH
setting, move the slide control knob upwards to the HIGH flame setting. The fire can also be set to
operate anywhere between HIGH and LOW by moving the control knob to an intermediate posi-
tion.
To turn the fire OFF, move the slide control knob upwards fully to the position marked ‘O’.
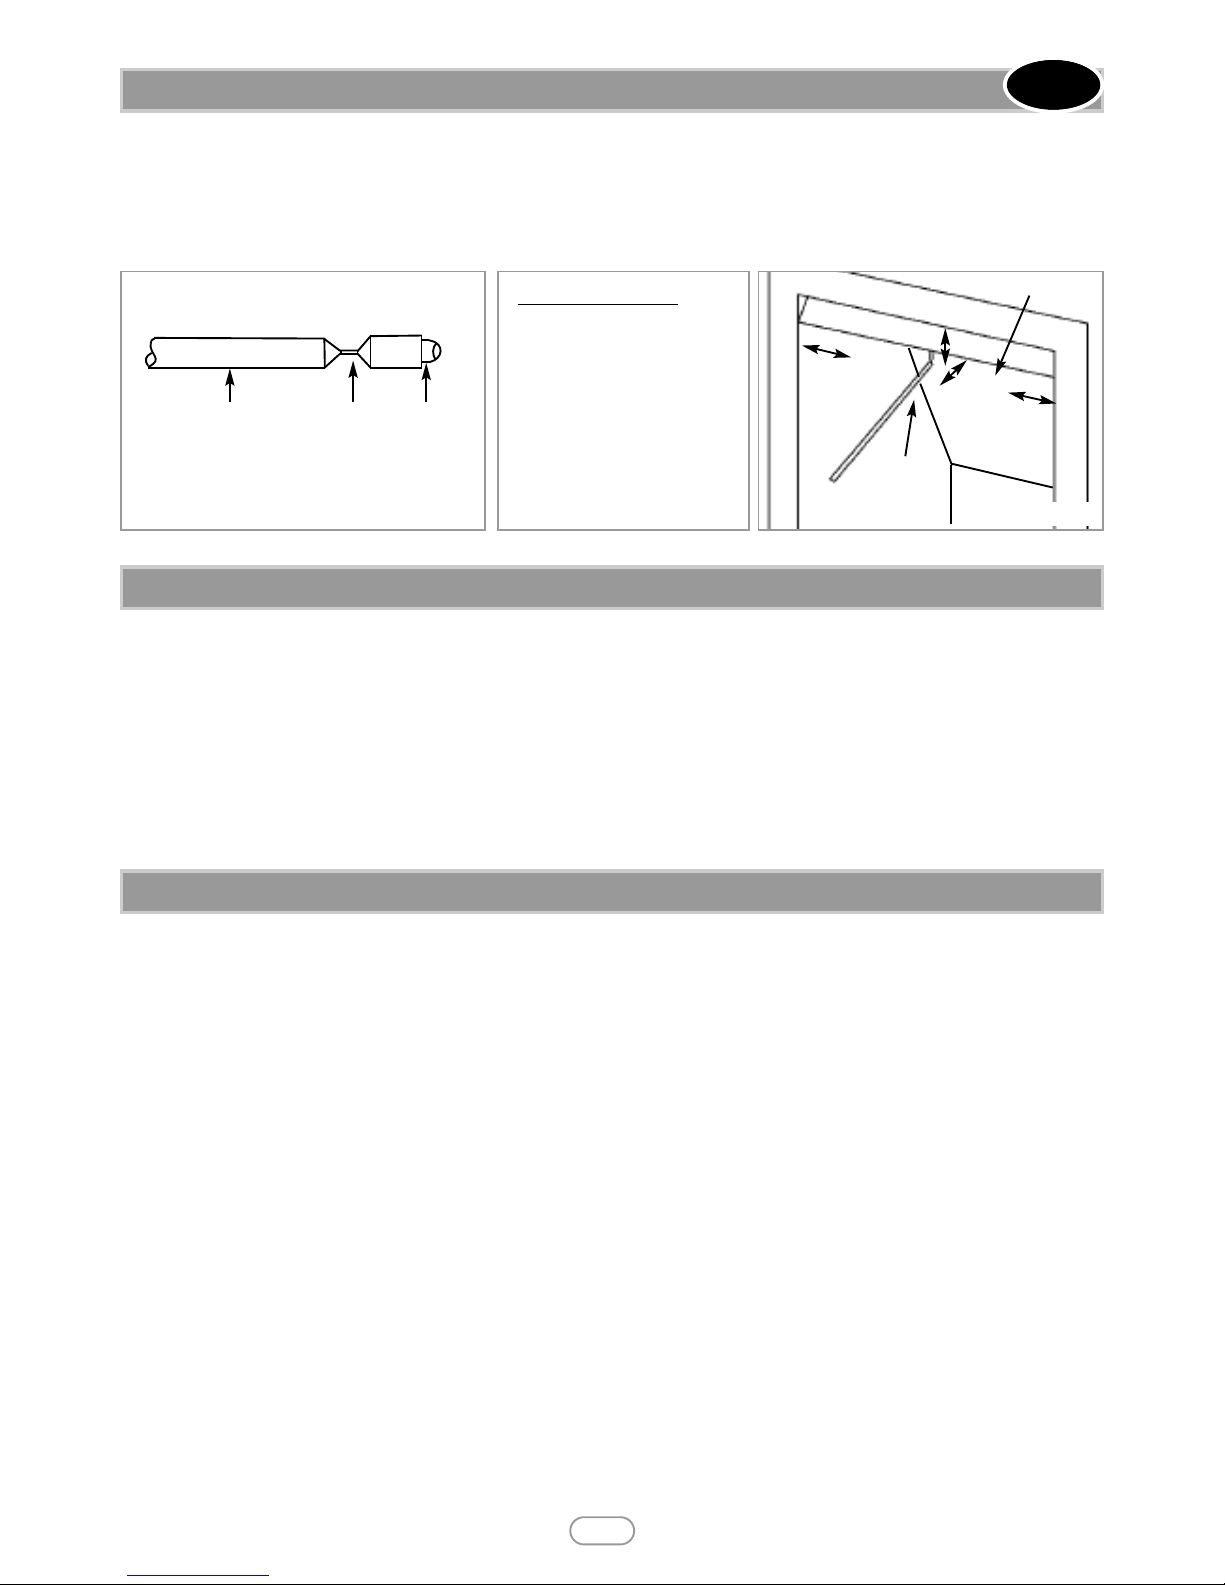
The spark gap between the spark electrode and the thermocouple should be 3.5 - 4.5mm to produce a good spark.
There should be no need to adjust this. If under any circumstances the electric spark fails, the pilot may be lit manually by proceeding
with the ignition sequence as previously described, and after moving the control knob through the spark position, the knob should be
held in (slide control models - down) and the pilot lit with a taper.
Light the fire on the HIGH setting.
To commission the appliance, the operating pressure
must be in accordance with the figures stated in section
2.0 of these instructions. The fire is factory set to achieve
the correct flow rates at the specified operating pressure.
Any significant variation in the operating pressure could
indicate a supply problem. If the operating pressure is too
high the gas supply meter/governor may be set incorrectly. This should be checked with the fire running and if necessary reset by the
gas supplier. If the operating pressure is too low, then check the meter/governor pressure with the appliance running. Upon satisfac-
tory checking of the operating pressure, turn the fire off, disconnect the pressure gauge and refit the test point screw. Light the fire and
check for gas soundness. In the event that the operating pressure is not in accordance with the figures stated in the data section of these
instructions, the appliance must not be commissioned, and the problem investigated and rectified.
This fire is fitted with a flue spillage safety device (ODS). If the fire shuts down during use for no apparent reason then several things
may be suspected. If a door or window has been opened creating a draught, then pilot disturbance is the problem, and removal of the
draught should resolve this. The gas pressure reaching the fire must also be checked (again, recall your installer to check and rectify any
problem). The thermocouple connection into the back of the gas control valve may also have worked loose during installation, simply
get the installer to tighten. If pilot disturbance is not the cause, then the ODS safety system may be in operation. Switch the appliance
OFF, check the flue and carry out any remedial work required. Relight the fire and carry out a spillage test. DO NOT allow the appli-
ance to be used if it continues to fail a spillage test. The aeration hole of the pilot must be carefully cleaned out on each annual service
to ensure continued function of the ODS.The spillage monitoring system shall not be adjusted, modified, or put out of operation by the
installer. Any spare parts fitted UST be of a type supplied for the purpose by the appliance manufacturer. If the fire is not spilling, then
further guidance should be sought, using the Troubleshooting section as a guide.
9© 2012 Superior Fires Ltd.
16.4 SPARK GAP
16.5 OPERATING PRESSURE
Fi
16.2 OPERATING THE FIRE - CONTINUED GB IE
16.6 F UE SPI AGE MONITORING SYSTEM