manuals.online logo
Brands
  1. Home
  2. •
  3. Brands
  4. •
  5. SUR-RON
  6. •
  7. Motorcycle
  8. •
  9. SUR-RON Light Bee User manual

SUR-RON Light Bee User manual

Other manuals for Light Bee

2

Other SUR-RON Motorcycle manuals

SUR-RON STORM BEE R 2022 User manual

SUR-RON

SUR-RON STORM BEE R 2022 User manual

SUR-RON STORM BEE User manual

SUR-RON

SUR-RON STORM BEE User manual

SUR-RON Light Bee QL3000DY User manual

SUR-RON

SUR-RON Light Bee QL3000DY User manual

SUR-RON Ultra Bee Series User manual

SUR-RON

SUR-RON Ultra Bee Series User manual

Popular Motorcycle manuals by other brands

MV Agusta Brutale 675 Workshop manual

MV Agusta

MV Agusta Brutale 675 Workshop manual

APRILIA RSV MILLE - PART 1 1999 User manual content

APRILIA

APRILIA RSV MILLE - PART 1 1999 User manual content

Royal Enfield Himalayan 2018 owner's manual

Royal Enfield

Royal Enfield Himalayan 2018 owner's manual

SSR Motorsports Lazer5 owner's manual

SSR Motorsports

SSR Motorsports Lazer5 owner's manual

MOTO GUZZI 2005 Griso 1100 Use and maintenance book

MOTO GUZZI

MOTO GUZZI 2005 Griso 1100 Use and maintenance book

KTM 85 SX 19/16 owner's manual

KTM

KTM 85 SX 19/16 owner's manual

Beta Motorcycles XTRAINER 250 2T EUROPA 2022 manual

Beta Motorcycles

Beta Motorcycles XTRAINER 250 2T EUROPA 2022 manual

OHVALE GP-0 Use & maintenance

OHVALE

OHVALE GP-0 Use & maintenance

Yamaha Star XV19CTSZ 2009 owner's manual

Yamaha

Yamaha Star XV19CTSZ 2009 owner's manual

KTM 350 XCF-W USA owner's manual

KTM

KTM 350 XCF-W USA owner's manual

HYOSUNG ST7 owner's manual

HYOSUNG

HYOSUNG ST7 owner's manual

Husqvarna FC 250 2016 owner's manual

Husqvarna

Husqvarna FC 250 2016 owner's manual

Yamaha TDR125 owner's manual

Yamaha

Yamaha TDR125 owner's manual

APRILIA ETV MILLE CAPONORD - PART1 02-2001 manual

APRILIA

APRILIA ETV MILLE CAPONORD - PART1 02-2001 manual

KTM Freeride E-XC 2021 owner's manual

KTM

KTM Freeride E-XC 2021 owner's manual

Fantic Enduro 125 user manual

Fantic

Fantic Enduro 125 user manual

Ducati Supersport 750 desmodue owner's manual

Ducati

Ducati Supersport 750 desmodue owner's manual

MV Agusta 2008 F4 312RR 1078 Workshop manual

MV Agusta

MV Agusta 2008 F4 312RR 1078 Workshop manual

manuals.online logo
manuals.online logoBrands
  • About & Mission
  • Contact us
  • Privacy Policy
  • Terms and Conditions

Copyright 2025 Manuals.Online. All Rights Reserved.

SUR-RON LIGHT BEE SERVICE MANUAL
1. Brief Introduction
1.1Safety warning
Do reading the chapter carefully before the repair & maintenance
This service manual is used to guide professional technicians. Please don’t do the repair
and maintenance with the content in this manual neither you take necessary training nor
have any operation experience.
The operations in the manual only can be done in suitable maintenance workshop. Ensure
all essential tools are well prepared before the repair and maintenance.
The power source of LIGHT BEE must be cut off before any operation on the bike. The
failure to cut off its power source may cause serious injury and even death through electric
shock or disassembly and assembly of parts.
When you do the repair and maintenance, please do wear the required cloth and shoes in
case of burning, cutting, collision or other accidents. And use protective goggle or gloves if
necessary.
Chongqing Qiulong Technology Co., Ltd (Hereafter called Sur-Ron) has the power of
interpretation for all information in the manual. Sur-Ron aimed to build the best electric
bike in the world, therefore, any improvements, which can make the bike have better
performance and quality, Sur-Ron will keep doing improvements. If any content missed in
this manual, or finally the bike you got is a little different from the description of this
manual, please check with the local importer or dealer before you do the repair and
maintenance.
1. Brief Introduction
1.1 Safety warning
1.2 Use of the manual
1.3 Disclaimer
2. Technical specification
2.1 Bike parameters
2.2 Torque specifications of important screws
2.3 The top speeds under different battery capacities
2.4 Bike composition
3. Bike operation
4. LIGHT BEE repair tools and preparation work
4.1 LIGHT BEE repair tools
4.2 LIGHT BEE fixing
5. Battery dismount and mount
6. Absorber dismount, mount, and adjustment
6.1 Adjust the compression damping of front absorber
6.2 Adjust setting of absorber
6.3 Absorber lubricating
6.4 Front absorber dismount and mount
6.5 Rear absorber dismount and mount
6.6 Disassembly of rear absorber
7. Check, dismount, mount of the headset
7.1 Check stroke gap of headset
7.2 Disassemble the headset
8. Disassemble and assemble handle bar assembly
9. Wheel checking
9.1 Tire checking
9.2 Rim checking
10. Braking system checking and maintenance
10.1 Brake checking
10.2 Maintenance
10.3 Brake lever dismount and mount
10.4 Brake pump dismount and mount
10.5 Brake clipper dismount and mount
10.6 Brake clipper adopter dismount and mount
10.7 Front brake assembly dismount and mount
10.8 Rear brake assembly dismount and mount
11. Bike body dissemble and assemble
11.1 Mid. Bushing dismounting and mounting
11.2 Motor side-cover dismounting and mounting
11.3 Motor side-cover dismounting
11.4 Disassemble and assemble first level transmission belt
11.5 Disassemble and assemble left pedal assembly
11.6 Disassemble left pedal assembly
11.7 Disassemble and assemble right pedal assembly
11.8 Disassemble pedal assembly
11.9 Disassemble and assemble guard plate under electrical machine
11.10 Disassemble and assemble guard plate under controller
11.11 Disassemble and assemble air switch combination
11.12 Disassemble air switch combination
11.13 Disassemble and assemble USB and electric control lock combination
11.14 Disassemble USB and electric control lock
11.15 Disassemble and assemble electrical machine assembly
11.16 Disassemble and assemble tailstock assembly
11.17 Disassemble tailstock assembly
11.18 Disassemble and assemble left and right limited block of battery
11.19 Disassemble and assemble horn
11.20 Disassemble and assemble back shield
11.21 Disassemble and assemble rear wheel assembly
11.22 Disassemble rear wheel
11.23 Disassemble and assemble rear fork
11.24 Disassemble rear fork
11.25 Disassemble rear fender assembly
11.26 Disassemble rear and inner fender
11.27 Disassemble and assemble cover of battery compartment
11.28 Disassemble and assemble lower stop plate of battery
11.29 Disassemble lower stop plate of battery
12. Checking and maintenance of speed regulation control and brake control device
12.1 Check brake
12.2 Check accelerator
12.3 Confirm power supply control
13. Position adjustment
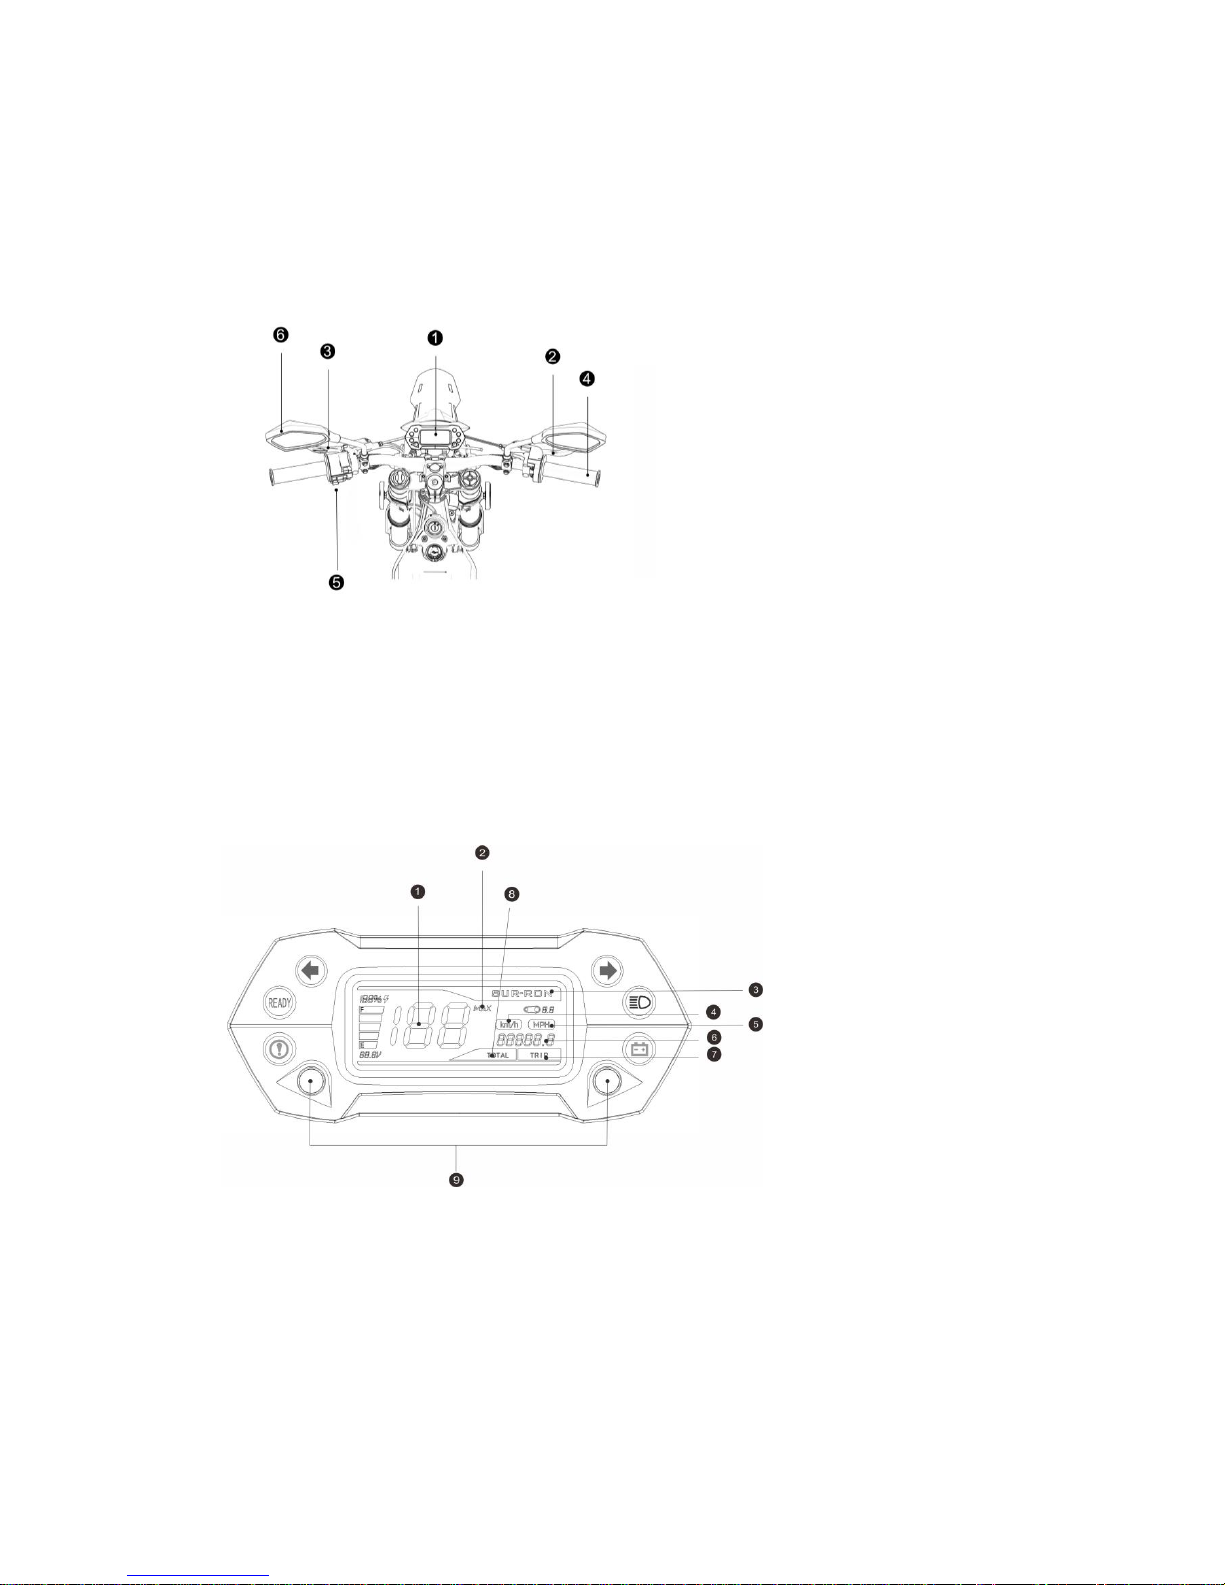
13.1 Adjust handlebar
13.2 Adjust brake handle
14. Disassembly
14.1 Dismount handlebar of accelerator
14.2 Dismount handlebar
14.3 Dismount throttle bracket
15. Transmission gear
15.1 Check chain and chain wheel
15.2 Clean and lubricate chain
15.3 Disassemble and assemble chain
16. Electric system
16.1 Electric system drawing
16.1 Check electric system
17. The use and maintenance of battery
17.1 Disassembly and assembly of battery
17.2 Maintenance and storage of battery
17.3 Battery charging
18. Checking and maintenance of controller
18.1 Disassembly and assembly of controller
18.2 Checking of controller
19. Electrical failure checking and removal
20. Failure diagnosis
1.2 Use of the manual
The symbol represents the dangers the bike may cause or other dangerous situations.
The symbol represents the dangers which may cause serious physical injuries.
The symbol represents the potential dangers which can cause harm to health.
1.3 Disclaimer
Modification of the bike may cause physical injuries.
The modification of the bike without approval of Chongqing Surron Technology Co., Ltd.
will lead to the following results:
• Loss of warranty.
• Needs for another driver’s license.
• Accidents and serious injuries.
Please read local provisions about electrombile and motor vehicle before using Qingfeng
bike.
According to the certification of Ll2-B electric moped Sur-Ron bike has
passed, its highest speed is 45km/h, so it is not allowed on expressway or the
road segment with the minimum speed of more than 45km/h.
If you have any question, please contact any official dealer of Chongqing Surron
Technology Co., Ltd.
The applicable laws require you to provide the following information:
•Your age.
•The equipment necessary for special route.
•Special license for the bike.
•The area with restrictions on vehicles.
2. Technical specification
2.1Bicycle parameters
Electromotor
type
Brushless permanent magnet synchronous DC motor (highest
power 4.0W)
PMAC radial flow brushless, air-cooled and integrated rotate speed
and temperature sensor.
control unit
AC/DC three-phase control unit (highest power 60V-80A) has two
available driving patterns:
SPORT:2 kW ECO:0.9 kW
highest speed
≤45 km/h
power source
type
high-expanded ternary lithium power battery(60V32AH)
rated capacity
1900wh
charger
The special high-performance portable charger for LIGHT BEE
power battery
Power: 600 W
Input: 110V AC or 240V DC (according to local voltage)
Output: 67.2V DC/10A
charging time
(standard)
0%-100% - 3.5 hours
0%-95% - 3 hours
0%-80% - 2 hours
mileage
continuation of
journey
ECO mode (average speed 25km/h)>100km
electromotor
double-stage reduction drive system
bicycle frame/hanger bracket/brake
bicycle frame
Double-beam cradle type,
rear shock absorber
multi-link central shock-proof system
stroke of front fork
200mm.
stroke of rear wheel
210mm.
front brake
target at 4-piston hydraulic disk brake, disk 203mm
rear brake
target at 4-piston hydraulic disk brake, disk 203mm
front tire
cross-country 70/100-19
rear tire
cross-country 70/100-19
front wheel disk
Aluminum- 19*1.4
rear wheel disk
Aluminum- 19*1.4
front shock
absorber
double-shoulder fully adjustable oil pressure reed inverted front
shock absorber
rear shock absorber
multi-link fully adjustable damping single-tube air pressure damping
system
size
wheel base
1,230mm
height of vehicle
seat
815 mm
front rake of seat
tube
26°
ground clearance
270 mm
total length
1860 mm
width
780 mm
height
1,050 mm
weight
no battery
42Kg
bicycle
50 Kg
load capacity
100 Kg
2.2 Torque specification of important screws
serial
numbe
r
item
diameter of thread mm
tightening torque N.m
1、
install left support and right support
under controller
M6
8N•m
2、
fasten front disk brake
M5
8~10N•m
3、
fasten rear disk brake
M6
10~12N•m
4、
fasten rear chain disk
M8
20~25N•m
5、
rear shock absorber, cocket centring
M8
20~25N•m
6、
fasten bolt of belt wheel
M6
12N•m
7、
fasten bolt of output shaft sprocket
M6
12N•m
8、
fasten nut of front belt wheel
M12
40~50N•m
9、
attachment bracket of left and right
pedals and support of left and right
pedals
M10
40~45N•m
10、
fasten support plate under battery
M6
8N•m
11、
fasten bolt of connecting plate
M6
10N•m
12、
fasten bolt of standing seat
M5*25
5-6N•m
13、
fasten bolts of standing seat and
handlebar tube
M5
5-6N•m
14、
fasten front axle
M12
20~25N•m
15、
fasten front disk brake
M6
12N•m
16、
fasten bottom fork shaft
M10
35N•m
17、
fasten auxiliary frame and bicycle
frame
M8
20N•m
18、
fasten nut of seat cushion
M6
8N•m
19、
rear shock absorber, bicycle frame
and bottom fork
M8
25-30N•m
2.3 The highest speeds under different battery capacities (reference)
serial
numb
er
battery capacity
speed(km/h)
1
100%
42.8
2
90%
42.3
3
80%
41.6
4
70%
40.9
5
60%
40.1
6
50%
39.4
7
40%
38.7
8
30%
37.8
2.4 Bicycle arrangement
2.4.1 Position of bicycle parts
Fig 1
1. Rear fender assembly
2. Rear bottom fork
3. Seat cushion
4. Rear shock absorber
5. Tire
6. Bike frame
20、
fasten rear wheel and axle
M12
55~60N•m
21、
fasten rear disk brake
M6
12N•m
22、
fasten electrical machine
M8
25N•m
23、
fasten controller and support of
controller
M6
8-10N•m
24、
fasten pedal and bicycle frame
M8
25-30N•m
25、
fasten guard bolt under controller
M8
20N•m
7. Three-phase brushless DC motor
8. Ternary power lithium battery
9. Control system
10. Headlight
11. Front shock absorber
2.3.2 Position of head parts
Fig 2
1. LCD Speedometer
2. Front brake handle
3. Rear brake handle
4. Throttle grip
5. Control switch
6. Rear-view mirror
2.3.3 LCD Speedometer functions
Fig 3
1. current speed
2. Top speed notice
3. brand logo
4. KMH indication
5. MPH indication
6. Mileage
7. Single trip distance