SureFlap MICROCHIP CAT FLAP User manual

User Manual

1
EN Welcome to your new Microchip Cat Flap
Product tour
Thank you for choosing the SureFlap Microchip Cat Flap!
The SureFlap Microchip Cat Flap has been designed to keep intruder animals out of your
house, making sure your pets feel safe and happy in their own home.
The cat flap is able to recognise either the microchip already implanted in your cat or the
Sure Petcare RFID Collar Tag (sold separately) and will allow entry to your house for your
authorised cat(s). The cat flap is selective entry only and allows any animal to exit. You can
program and store up to 32 pet identities in the cat flap's memory and it is easy to program
at the touch of a button.
1
2
3
6
5
4
Cat Flap
External Frame
2 x Screw Caps
2 x 30 mm Screws
2x 50 mm Screws
2 x 70 mm Screws
1
2
3
4
5
6
What’s in the box?
Please check that you have all these parts
Batteries not included - see
page 7 for more details

2
EN
Contents
Important information
Product overview
Batteries
Programming your cat flap
Fitting your cat flap
- Fitting in wood or plastic
- Fitting in glass
- Fitting in metal
- Fitting into a wall
Manual locking modes
Product care
Help & support
Warranty & disclaimer
3
7
5
7
9
11
13
15
17
22
21
23
24

3
Model - XXXXXX
Important information
PLEASE READ THE FOLLOWING INFORMATION CAREFULLY AND RETAIN THIS
MANUAL FOR FUTURE REFERENCE
Only use SureFlap accessories
to ensure compatibility:
surepetcare.com/accessories
• Please make sure you have all the parts listed on page 1.
• Please ensure that this product is correctly installed before use. Details on installation
begin on page 9.
• Aer fitting you should check all the fixing screws on the external frame and tighten and
inspect them regularly.
• Remember to register the cat flap via the enclosed warranty card.
The cat flap requires 4 good quality AA 1.5V alkaline batteries and should be
inserted and replaced with caution. Do not mix dierent types of batteries or
a combination of new and used batteries. If the cat flap is going to be unused
for several months, please remove the batteries. Only use the battery type
instructed in this manual (see page 7), use of other batteries may not be safe.
Safety warnings for installation
• Do not use this product if parts are missing, damaged or worn.
• Take care when adjusting positions to avoid trapping or pinching of body parts.
• Make sure you use protective equipment, such as eye-wear.
• Take care when using power tools and follow all safety instructions provided with them.
This product
is intended for
domestic pets only.
Do not cut or
drill the cat
flap's tunnel.
Please make sure your cat(s) can
comfortably pass through the
flap before fitting. See page 10 for
details on the flap size.
You can find the product code on the back of the cat flap,
above the tunnel.
The serial number label is
on the inside of the battery
compartment cover.

4
EN
CHILDREN: Children should not be permitted to play with the SureFlap
Microchip Cat Flap. It is not a toy and should not be treated as such.
However, the Microchip Cat Flap can be used by children aged 8 years
and above and also by persons with reduced physical, sensory or mental
capabilities as long as they are supervised or have been given instructions
on how to use the product in a safe way. They should always be made
aware of any potential hazards involved. Do not allow children of any age
to clean the product without supervision.
There are small components used in the construction of this item. Any
loose items should be kept away from young children whilst assembling
your item to avoid the danger of choking hazards.
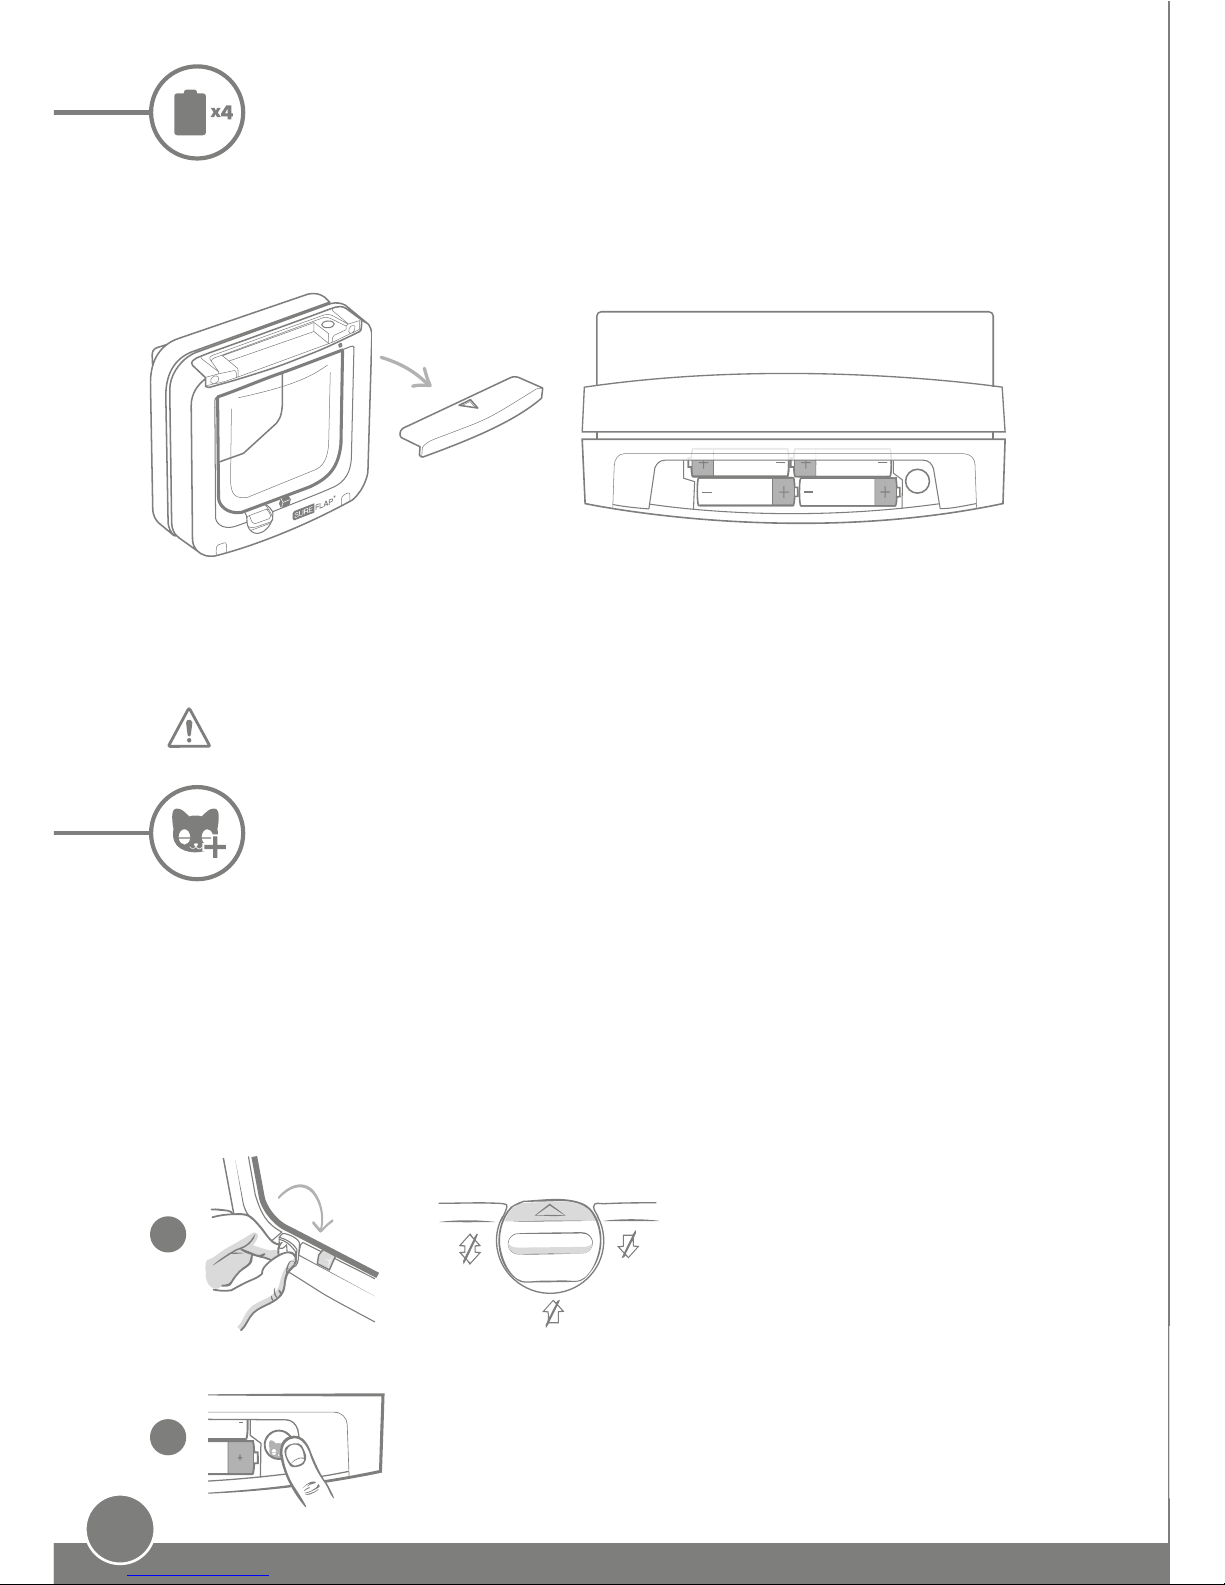
PETS: Sure Petcare recommends that the SureFlap Microchip Cat Flap is
used with your pet’s implanted microchip, however it may also be operated
using the Sure Petcare RFID Collar Tag. If using the collar tag, it should be used
with a safety collar which incorporates a breakaway buckle (cats only). Sure
Petcare cannot accept liability for any injury or death caused by a pets collar.
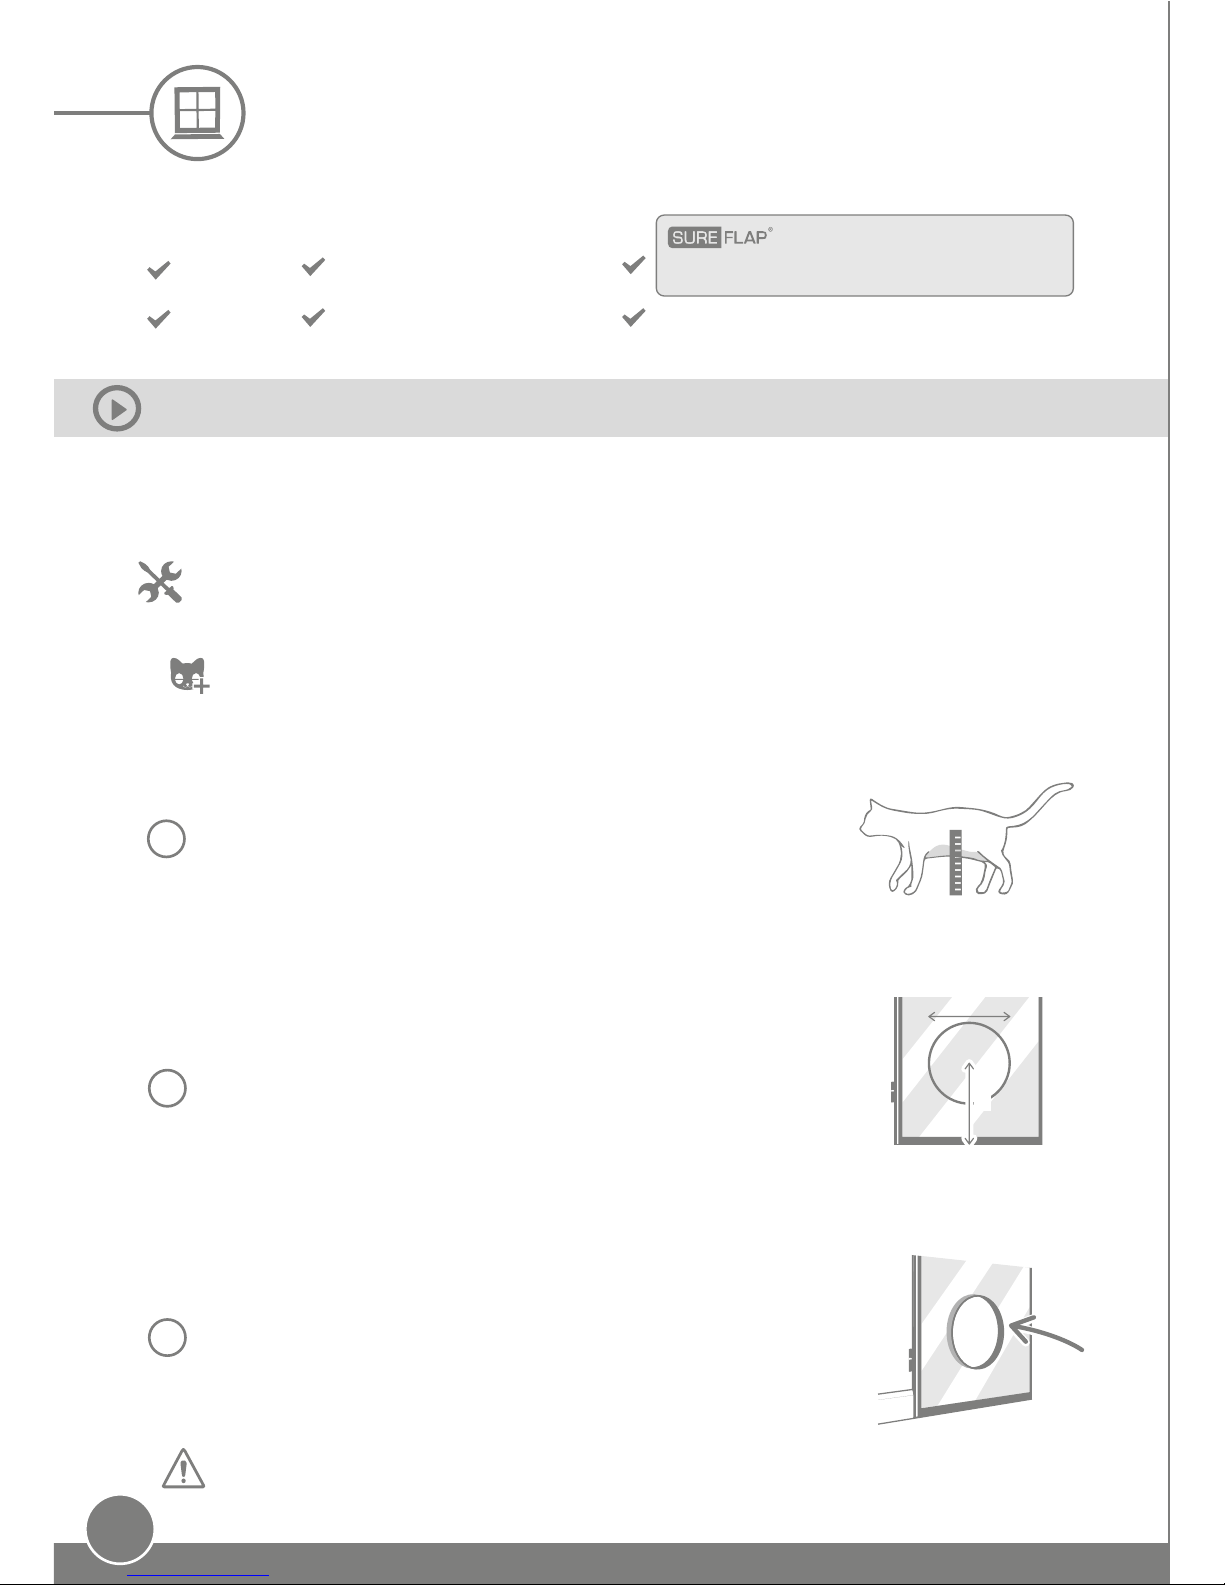
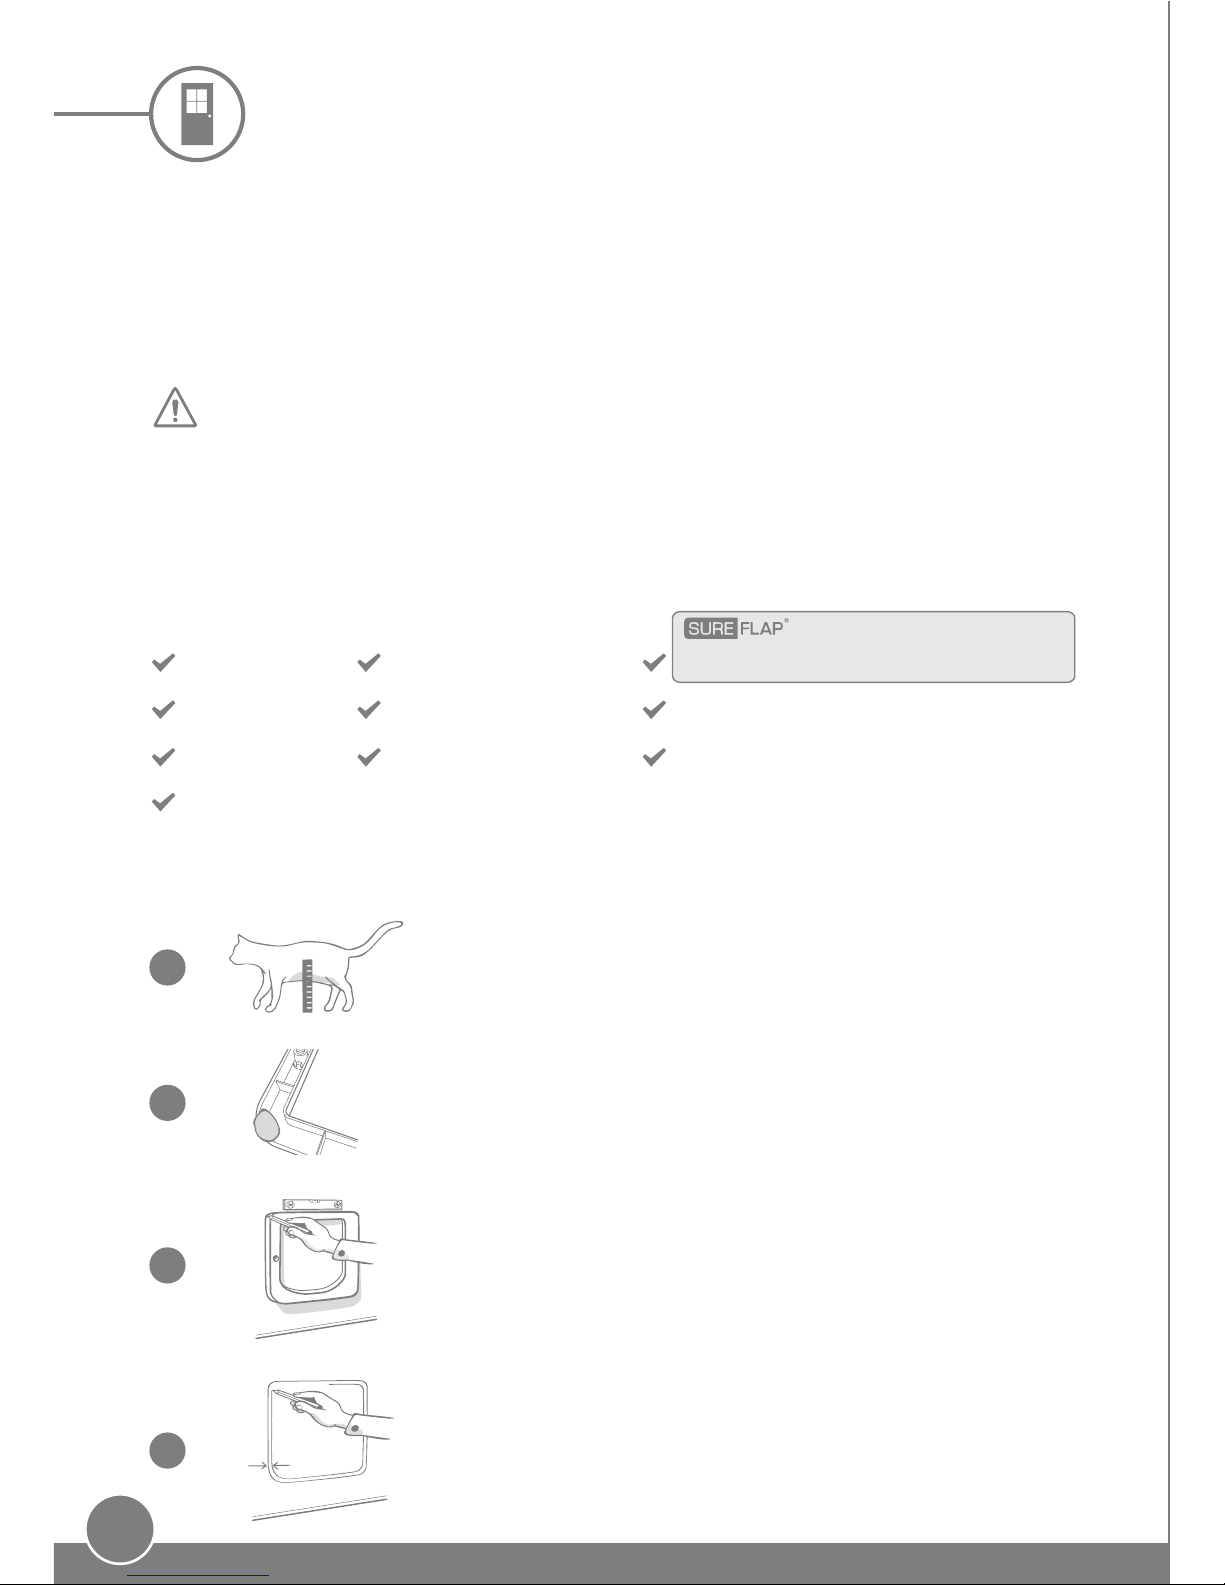
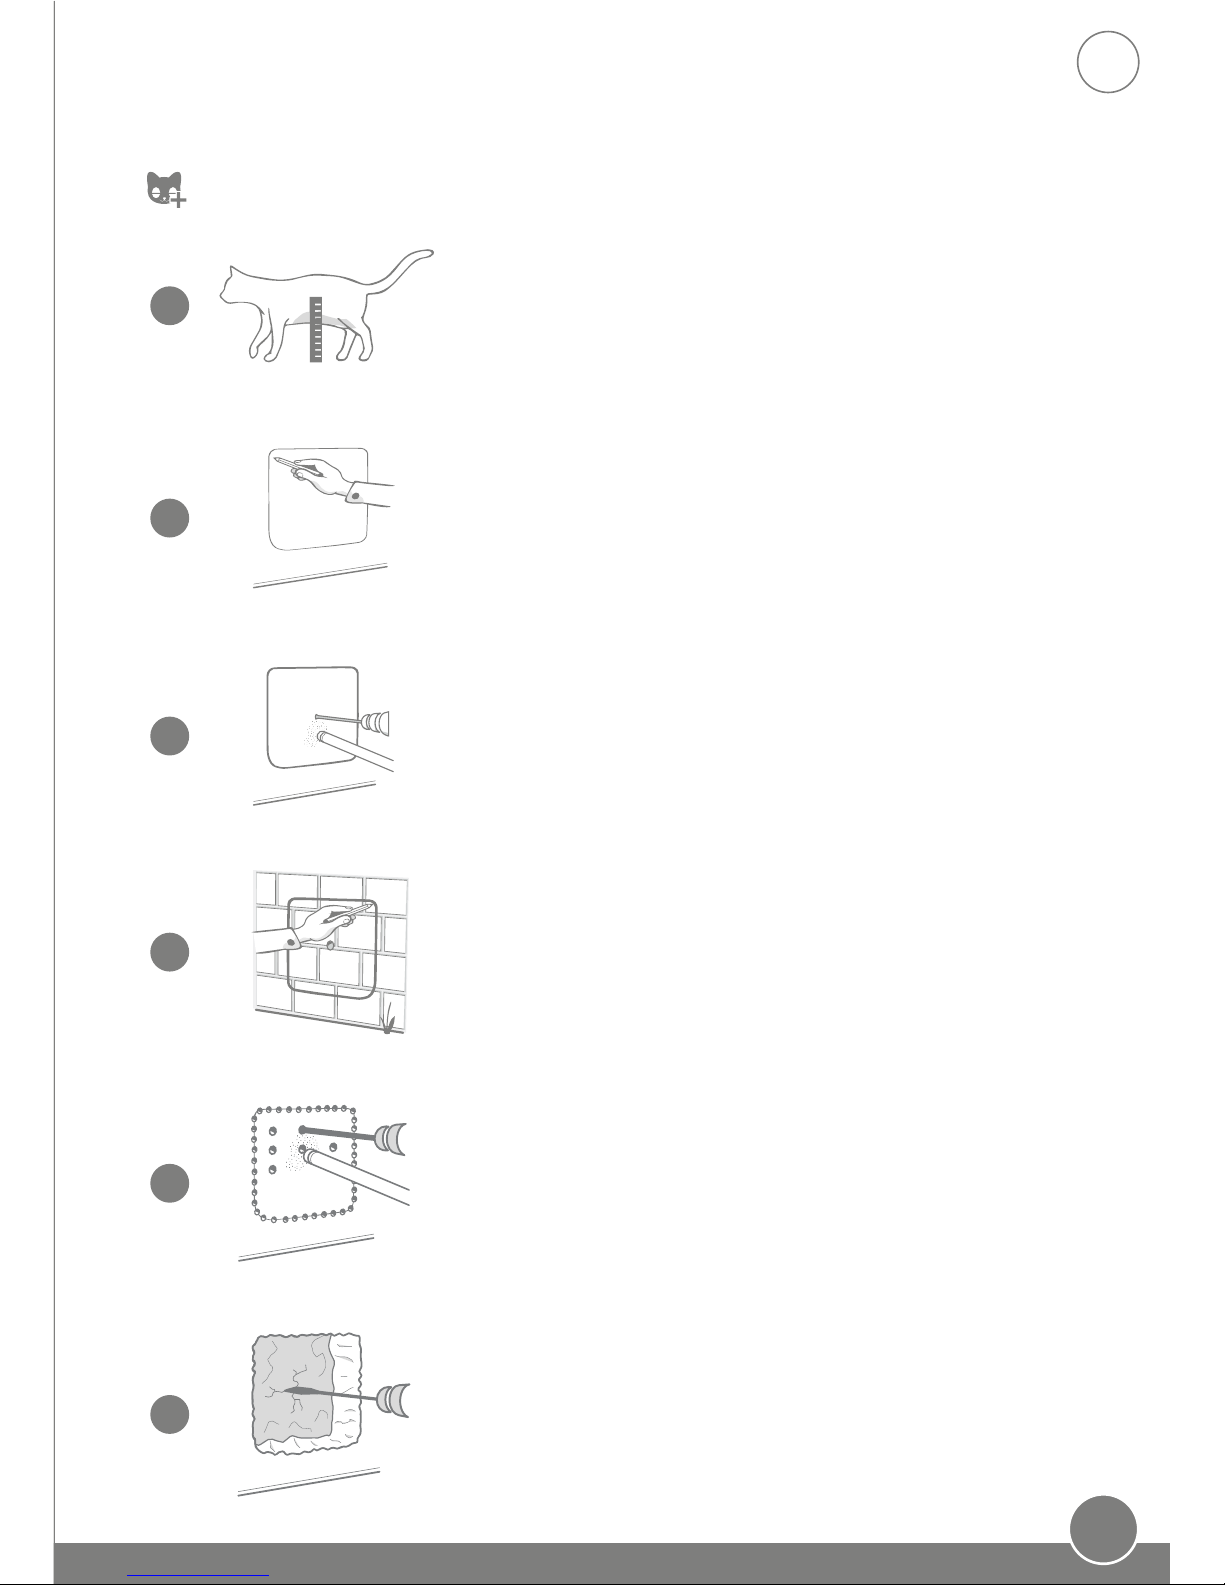
This cat flap is to be used only for cats which can fit through the flap
opening dimensions as shown on page 10.
SECURITY: The motorised locks are provided exclusively to prevent the
entry of unwelcome animals and are not a security device. Sure Petcare
cannot accept liability for unintended use and the owner of this product
accepts full responsibility for supervising the access in and out of the home
that it provides.
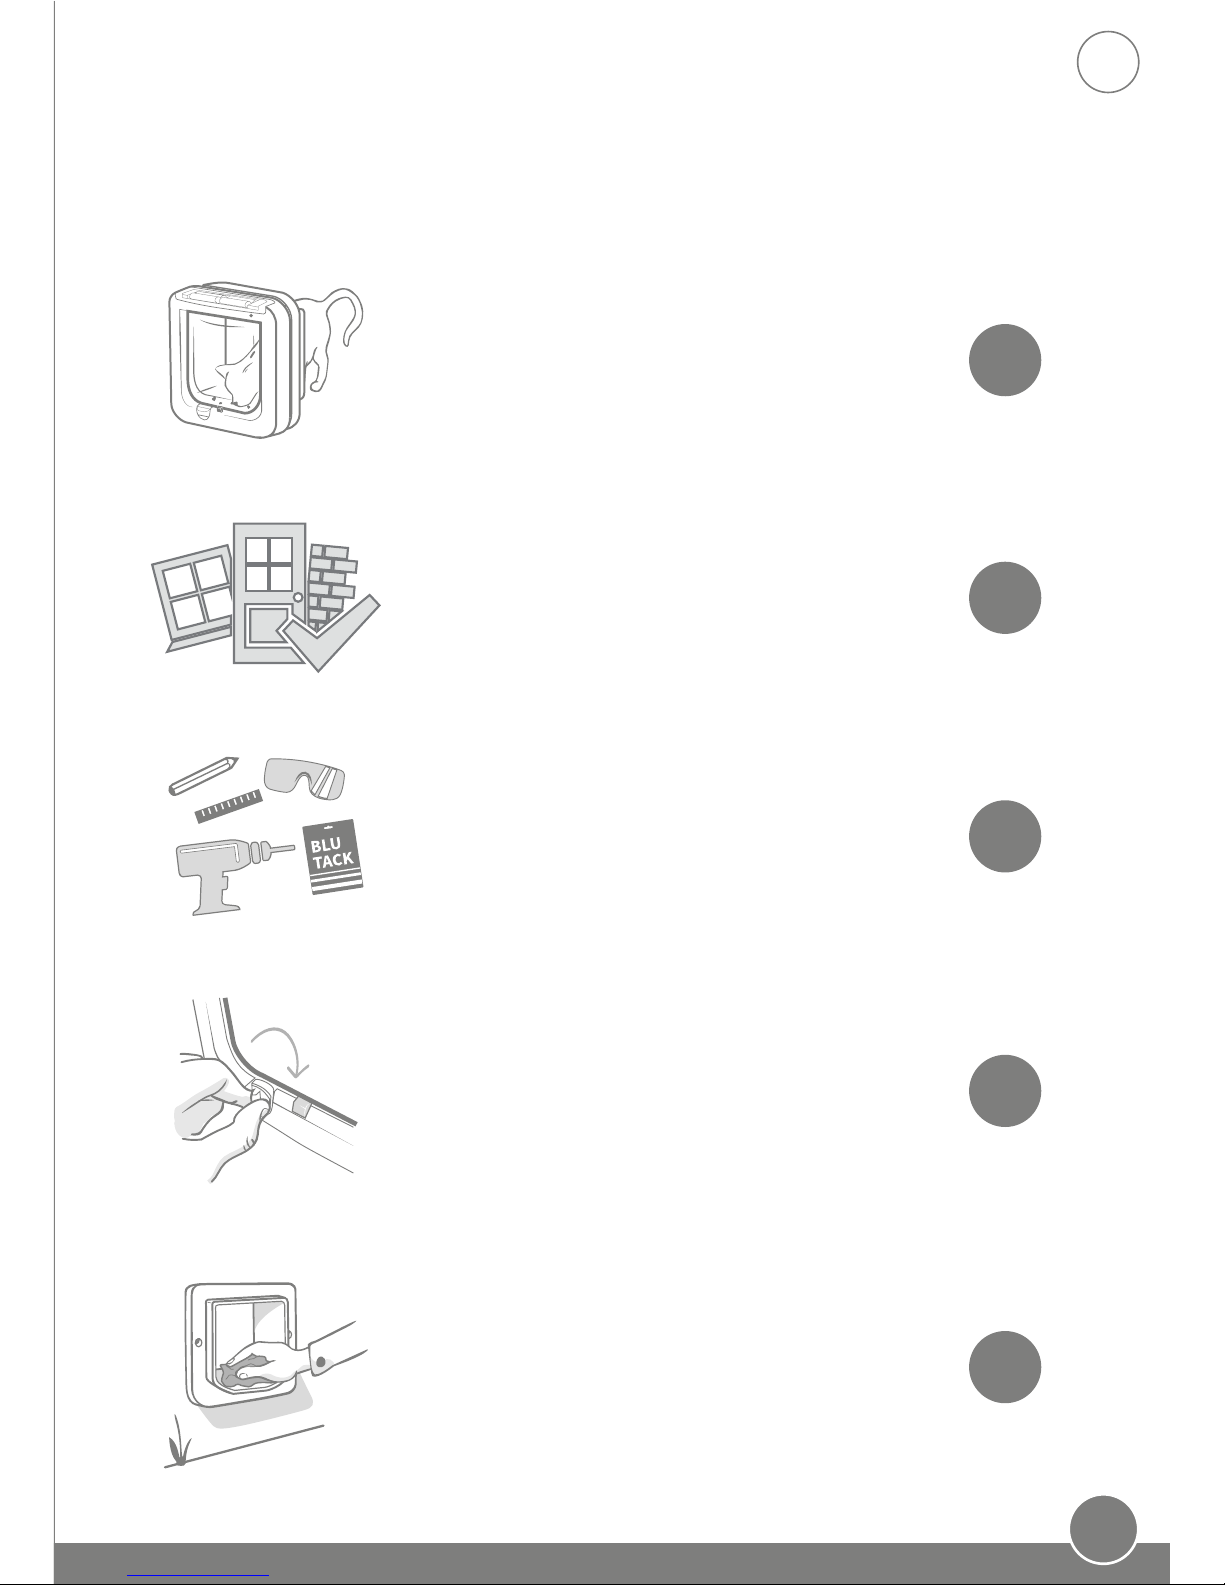
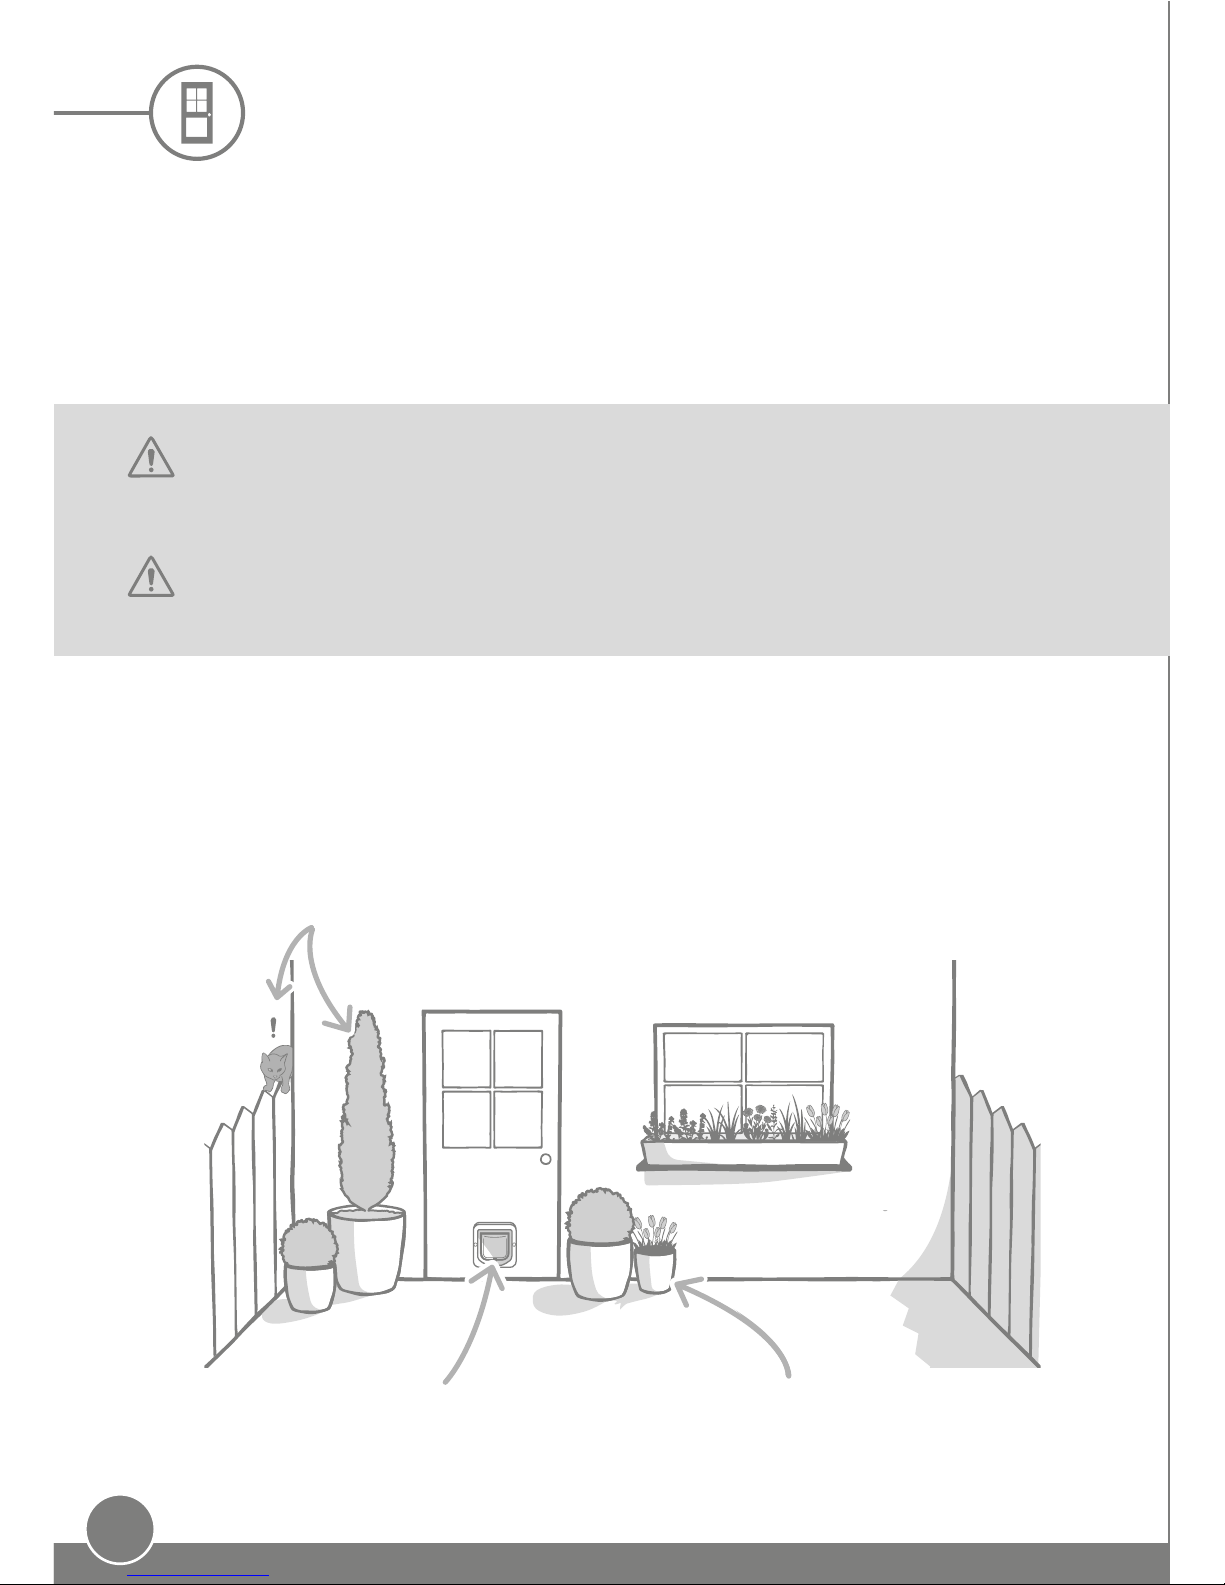
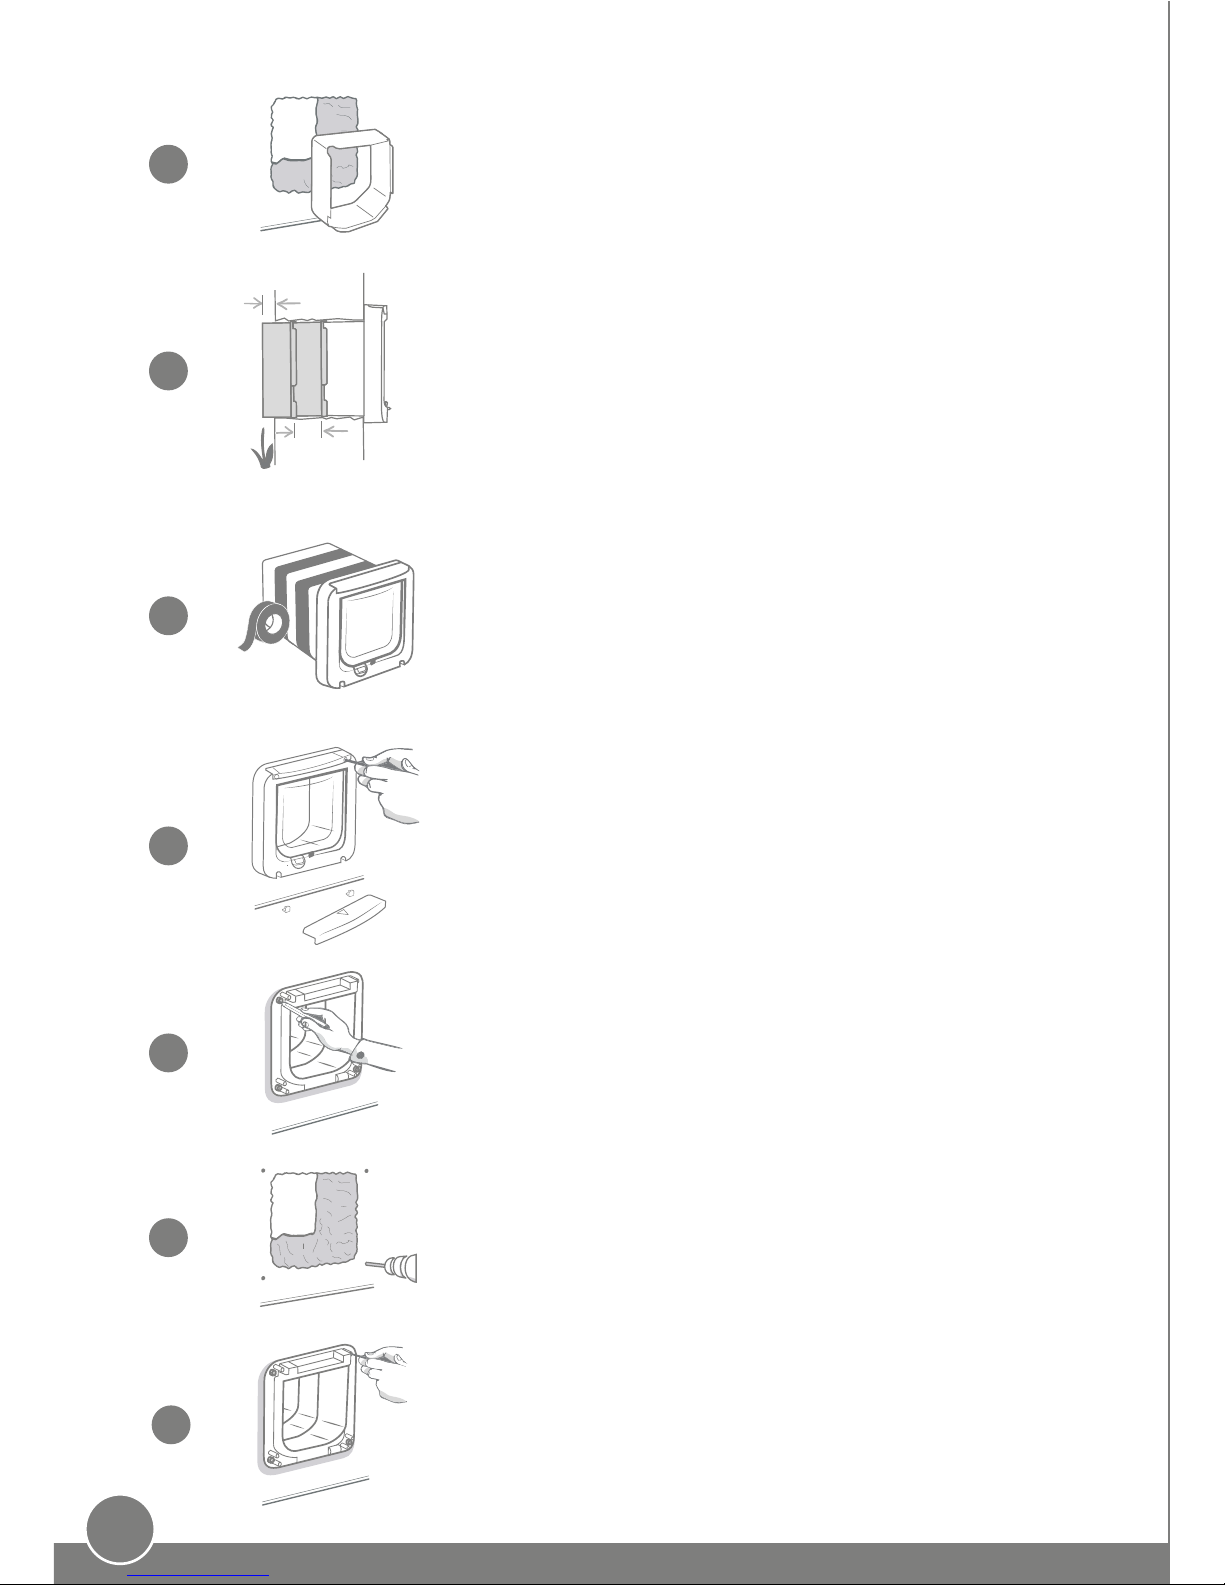
INSTALLATION: Before installing your cat flap you should consider any
potential hazards present inside or outside the intended location, as well
as the impact that subsequent modifications to your property may have on
the use of your cat flap.
If you have any doubts concerning the installation of your cat flap, it is
recommended that you consult a professional.
Do not install the SureFlap Microchip Cat Flap in a fire door, as it will
render the fire door unfit for purpose.
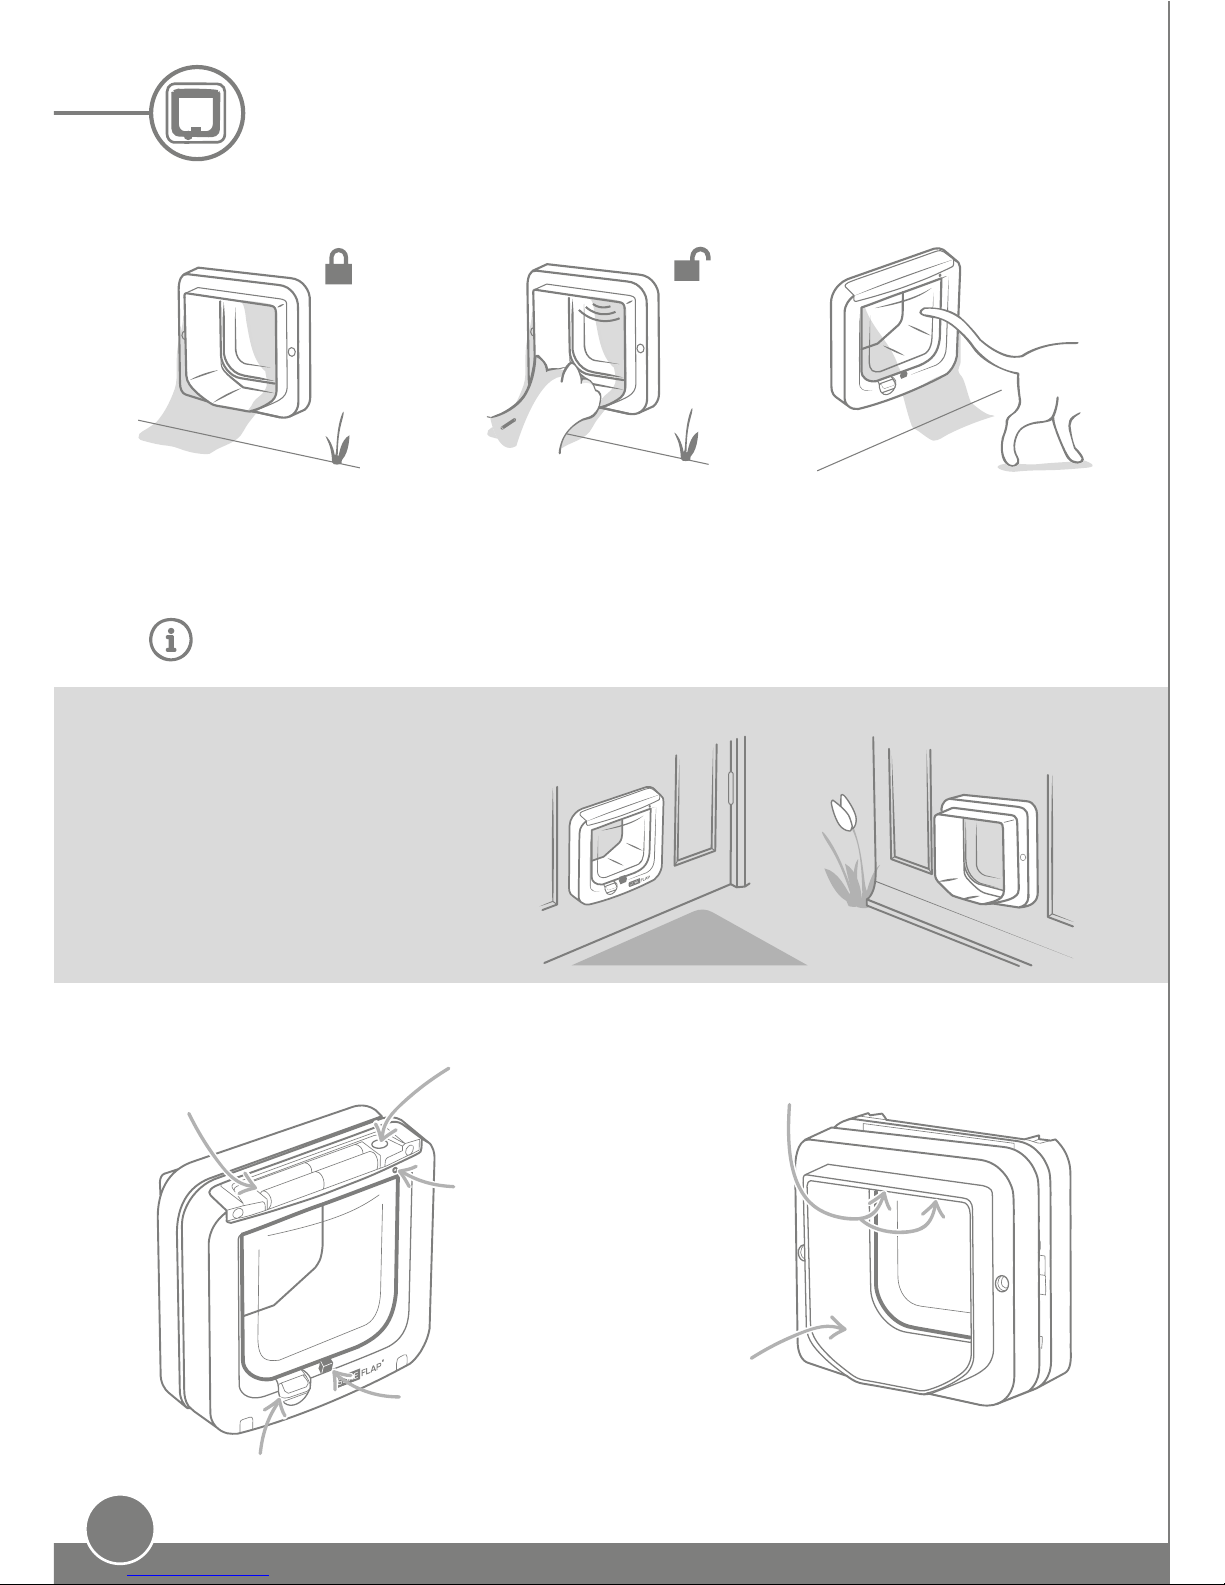
CAUTION: In rare situations and very extreme weather conditions, water may
enter through your door and present a slipping hazard. Take care to clean up
any water on the floor.
CHILD PROOFING: In households with children, it is essential to include
the cat flap in childproofing considerations. Misuse of the cat flap by a
child may result in the child coming into contact with potential dangers. For
this reason, young children should be monitored at all times when in the
immediate vicinity of the cat flap.

5
How the cat flap works
In standard operating
mode the cat flap is locked
from the outside.
It unlocks when it detects your
authorised cat’s microchip or collar
tag, when its head enters the tunnel.
Once your cat has fully
entered the house, the cat
flap will lock.
Sensors
Detect your cat
‘Add a Pet’ button
Used to programme your
cat’s microchip (see page 7)
Key features
Battery
compartment
Manual lock
Controls the opening of the flap in either direction (see page 21)
Catch
Controls the inward opening of the flap
Tunnel
Indicator light
Indicates when the battery
level is low and when the cat
flap is in 'Add a Pet' mode
(see page 7 & 8)
Bear in mind
It’s important to know which side of
your cat flap is fitted to the inside of
the house and which goes outside.
The front of the cat flap is where
you can see the SureFlap logo and
battery compartment and must
be inside.
Product overview
As the microchip reader is located on the outside of the cat flap, it is selective entry
only and any animal can exit.
Outside the houseInside the house

6
EN
To help you set up, fit and use your new Microchip Cat Flap, the points below highlight
the main steps you should follow and where to find them in this manual.
Sensors
Detect your cat
Main set up steps
Thoroughly read the fitting steps
Make sure that you have all the necessary tools and
accessories for your fitting location.
pg 9
Manual locking modes
The manual lock can be used to stop your cat(s)
from leaving or entering your house, giving you more
control over the cat flap.
pg 21
Pg
Essential product care
For the sensors to work eectively and detect your cat,
they need to be free from dirt, so it is important for
you to clean the cat flap regularly.
pg 22
Program your cat flap first
Insert the batteries and program your cat's microchip
ID into the cat flap. We recommend that you do this
first before you fit the cat flap.
pg 7
pg 9
Decide where to fit your cat flap
If you have not yet decided on where to fit your cat
flap, we have created a guide to help you find the
best location as recommended by our cat behaviour
experts.

7
Batteries
Always use 4 good quality AA 1.5V alkaline batteries to ensure the best performance of
your cat flap. For example the Energizer or Duracell brands. When the batteries start to run
low, the indicator light will flash red once every 5 seconds.
To insert the batteries remove
the battery compartment
cover from the front of the
cat flap.
AA
Remove the battery compartment cover to reveal the 'Add a Pet'
button and press it for 1 second to enter the Add a Pet mode.
Make sure the manual lock is set to
Position 1 before you begin. See
page 21 for more information on
the manual lock.
Insert the batteries into the compartment as shown,
with the + and - in the correct orientation. Then
replace the compartment cover.
Programming your cat flap
To start using your cat flap, you need to program your cat's microchip ID into the cat flap.
This process is only required once for each cat, as their ID will be stored in the cat flap's
memory. Follow the simple step-by-step guide to carry out this process. We strongly
advise doing this prior to fitting, however it is possible to program once already fitted
following the same steps detailed below.
Step-by-step
Manual lock - Position 1
The indicator light will initially light up for 2 seconds when you insert the batteries.
1
2
+ -+ -
+ -+ -

8
EN
Place some dry food or a treat inside the tunnel as close to
the clear plastic door as possible. The aim is to encourage
your pet to put its head inside the tunnel.
Tip: You could also try using catnip.
When your cat enters the tunnel to eat the food, the sensors
activate and the cat flap saves the microchip ID. Please see
page 23 - Help and support, for tips to encourage your cat to
use the cat flap.
The catch will now open, allowing your cat to pass through
the flap and the indicator light will flash once every second.
The cat flap is now in Add a Pet mode.
If your cat does not have a microchip, you can buy a Sure Petcare RFID Collar Tag from
surepetcare.com/accessories. To add the tag to the cat flap, repeat steps 2,3 and 5 by
holding the collar tag inside the tunnel, make sure you push the tag against the flap. Do
not wear metal jewellery during this process as it can interfere with the cat flap's sensors.
Once your cat’s microchip ID has been successfully added,
the flap reverts to standard operation. The indicator light will
stop flashing and the catch will lock (move up) when the cat
has moved away from the cat flap.
- Cancel programming your cat's microchip ID into the cat flap
(press the button again for 1 second, aer starting Add a Pet mode)
- Wipe the cat flap's memory (hold down for 10 seconds. The catch
will drop down and come back up once complete)
The 'Add a Pet' button has some extra features
Step-by-step continued
3
4
5
6
7
The cat flap can store up to 32 cat IDs so if you want to add
more than one just repeat the steps above for each cat. If
your cat flap is already installed, but you want to add an
additional cat then repeat steps 2-6.

9
Fitting your cat flap
Where to fit your cat flap
The cat flap can be fitted in any of the following locations. Please see the specified pages for
more information on the tools and supplies you’ll need and step-by-step fitting instructions.
Cat behaviour expert's advice
We have provided a few tips on finding the best placement for your cat flap as they can be
a point of vulnerability for your pet. Whilst the back door might be the obvious place to fit a
cat flap, you need to consider how the layout of your garden might aect your cat.
Conceal the cat flap with potted plants
as entering onto a large open space can
be stressful for some pets.
Use potted plants or garden furniture to try and reduce the risk of neighbourhood cats
being able to ambush your cat from elevated places.
Make sure your cat flap is fitted at the
right height for your pets so it’s easy for
them to get in and out.
It's important to check if your door has metal within it, as this can interfere with the
cat flap sensors. This can be done by holding a magnet to the door, however some
metals such as Aluminium cannot be detected this way so you may need to cut a
small hole to check. See page 15 for more details.
For glass installation you may need to buy a new pane of glass especially if you
have a double or triple glazed unit. A hole has to be cut through the glass to fit the
cat flap and we strongly advice that you contact a glazier to do this. You may need to
provide the glazier with dimensions for placement of the hole, details for this can be
found on page 13.
Doors containing metal, see page 15
Walls (consult a builder), see page 17
Wooden/plastic doors, see page 11
Glass (glazier required), see page 13

10
EN
SureFlap accessories are
required for wall, glass and
metal installation. Visit
surepetcare.com/accessories
Make sure that your cat
flap is facing the right way.
The side with the SureFlap
logo should be inside.
We strongly advise contacting
a glazier for glass fitting and
a builder for wall fitting.
Things to bear in mind
Key fitting features
We recommend
programming your cat(s)
prior to fitting (see page 7).
Make sure you allow
enough time to set up and
fit your cat flap.
Please feel free to watch our
online installation videos at
surepetcare.com/support
External frame
External
screw holes
Tunnel
External
screw
caps
Do not under any circumstances drill
or cut the tunnel of your cat flap
External
frame
dimensions
210 x 210mm
(8 '' x 8 '')
Flap
opening
dimensions
142 x 120mm
(5 '' x 4 '')
External
tunnel
dimensions
165 x 171mm
(6 '' x 6 '')
Tunnel
depth
75mm
(2 '')
External
screws

11
Fitting your cat flap in wood or plastic
Tools and supplies required
Ruler
Spirit level
Blu Tack
Electric drill with a 6mm ('') drill bit
Cross head screwdriver
The screws and caps provided
Sharp pencil
Electric jigsaw
Protective eye-wear
Step-by-step guide
1
2
Stick the external frame to the door using the mark you made
for the height of your cat’s tummy to align the bottom edge of
the hole. Use a spirit level to ensure the frame is level, then run
a sharp pencil around the inside edge of the frame.
3
To ensure your cat has unhindered access through the cat flap,
measure the height from their tummy to the floor. Mark this
height on your door, as this is where the bottom of the hole
should be cut through the door.
Attach a ball of Blu Tack (or similar adhesive putty) to each rear
corner of the external frame so that you can stick it to the door
and use it as a template.
x
When using power tools, please follow all safety instructions provided with the product.
x
Installation video tutorials (English speaking) can be found at surepetcare.com/support
Before you begin, we advise that you program your cat(s) ID prior to fitting, see page 7.
4
Now it’s time to prepare for cutting. We strongly advise
that you drill large holes in all the corners of the outline to
make it easier to cut the hole with a jigsaw. Make sure these
holes are touching the line and that they are big enough for
the blade of the jigsaw to fit through.
x

12
EN
6
8
9
Put the cat flap back through the door and slide the external
frame over the tunnel. Holding the product firmly in place, use a
cross head screwdriver and the screws you selected previously,
to attach the external frame. Fasten the first screw until it is
secure, but not too tight, then do the same to the last one. Once
all the screws are secure, tighten them.
Now, insert the two screw caps into the external frame.
7
10
Once the main hole is cut, check whether there is any metal within your door. If you can
see metal, go to page 15 and follow the instructions for fitting in a metal door.
Now check that the cat flap fits through the hole. Remember
the SureFlap logo must be inside the house. We advise that you
have two people for this, one inside the house and one outside
to help hold the product firmly in place.
Using the jigsaw, cut around the outer edge of the line
you have marked. By doing this, the cat flap should fit
through the hole first time. However, if you cut on, or
inside the line, the hole is likely to be too small. If this is the
case, please take the time to carefully file the hole until the cat
flap fits through easily.
On the outside of the house, make sure the tunnel of the cat flap
is securely pushed through the hole and then slide the external
frame over it. When the external frame is in place, using a
sharp pencil mark through the two holes.
To choose the correct length of screw, from the sets provided
you need to compare the screw lengths to the thickness of your
door. The screw needs to be between 15 to 30mm ( to 1 '')
longer than the thickness of your door.
15 to 30mm
11
Remove the external frame and the cat flap from the door
then drill the two screw holes using a 6mm (/'') drill bit,
remembering to hold the drill horizontally. We recommend that
you choose the correct length of screw to attach the cat flap to
your door at this stage. See the next step.
5x

13
accessory
Fitting your cat flap in glass
Tools and supplies required
Ruler
Glazier
Cat Flap Mounting Adaptor
The screws and screw caps provided
Cross head screwdriver
Clear all-weather sealant
Step-by-step guide for cutting the hole in glass
When working with cut glass always wear protective gloves as the edges may be sharp.
Before you begin, we advise that you program your cat(s) ID prior to fitting, see page 7.
2
Take this height and add 56mm (2 '') to it, this will give
you the total distance from the floor to the centre of the
circle you need cutting. Make sure this point is at least
200mm (7 '') from the bottom of the window frame to
allow room for the mounting adaptor.
H= cat’s tummy height + 56mm = the centre of the circle.
212mm
H
3
If you are fitting in a double or triple glazed unit, the
glazier should use a non-metallic spacer bar around the
hole, as a metal spacer could aect the cat flap's ability
to read microchips. (The spacer bar is needed to fill the
gap between the panes of glass.)
Installation video tutorials (English speaking) can be found at surepetcare.com/support
1
To fit your cat flap into glass, you will require a circular
hole to be cut measuring 212 mm (8 '') in diameter.
This will need to be done by a professional glazier. To
ensure your cat has unhindered access through the cat
flap, you will need to make sure that this circular hole is
cut at the appropriate height. Do this by first measuring
the height from your cat’s tummy to the floor.
If you do not have a hole in your glass door to fit the cat flap you will need to contact a
glazier to visit your home and measure up for the new pane of glass. In most cases it is not
possible to cut a pane of glass in situ, especially if you have a double or triple glazed unit.
x

14
EN
3
Place one of the mounting adaptors (it doesn’t matter which)
over the tunnel of the cat flap so that the side with the sealant is
facing outwards and is not touching any surfaces.
Next, slide the external frame over the tunnel. Using a cross
head screwdriver and the screws you selected previously, secure
the external frame in place. Fasten the first screw until it is
secure, but not too tight, then do the same to the last one. Once
all the screws are secure, tighten them.
6
Step-by-step guide for fitting
2
We advise that there are two people present for glass fitting;
one person inside the house and one outside. Firstly, apply a
strip of clear all-weather sealant to the back of both mounting
adaptors, about 15mm ('') from the edge. Make sure your cat
flap is nearby and ready to be fitted.
5
From the outside of the house, take the second mounting
adaptor and slide it over the tunnel with the sealant facing the
window. You may need the person on the inside of the house to
keep pressure on the cat flap to make sure it stays in place.
4
From inside the house, put the tunnel through the hole in the
glass, making sure the cat flap is positioned centrally within the
hole. Press firmly on both the cat flap and the mounting adaptor
so that you compress the sealant against the glass. Remember
the SureFlap logo must be inside the house.
7Now, insert the two screw caps into the external frame.
Firstly, to select the correct length of screw from the sets
provided, you need to compare the screw lengths to the
thickness of your door. The screw length needs to be between
20 to 35mm (/ to 2 '') longer than the thickness of the
glass.
1
20 to 35mm

15
accessory
Tools and supplies required
Ruler
Spirit level
Blu Tack
Cat Flap Mounting Adaptor
Electric drill with a 6mm ('') drill bit
Cross head screwdriver
Sharp pencil
Electric jigsaw
Protective eye-wear
Step-by-step guide
Fitting your cat flap in a metal door
2
3
It’s important to check whether your door contains a metal plate or thin metal foil before fitting.
This is because the presence of metal can eect the performance of the cat flap.
Doors containing metal include:
- Metal skin doors - Metal garage doors - Security doors - uPVC coated metal doors
uPVC coated metal doors oen look the same as standard uPVC doors and you may
need to look carefully where the panel has been cut.
Metal door handles or letter boxes should not cause a problem and for most cases any interference
from doors containing metal will be unnoticeable as the read range will still be suicient. To reduce
the risk of interference we recommend cutting a slightly bigger hole for the cat flap.
The step-by-step guide will explain how to do this.
1
Stick the external frame to the door and use the mark you made
for the height of your cat's tummy to align the inside bottom
edge of external frame. Use a spirit level to ensure it is level,
then run a sharp pencil around the outside of the frame.
To ensure your cat has unhindered access through the cat
flap, measure the height from their tummy to the floor. Mark
this height on your door, as this will help you to align the hole.
Attach a ball of Blu Tack (or similar adhesive putty) to each
rear corner of the external frame so that you can attach it to
the door and use it as a template.
Now mark your cutting line 5mm (/'') inside the line you
just traced. Once complete, rub out the original traced line if
you can so that you don’t get confused.
4
x
x
5mm
The screws and screw caps provided
Before you begin

16
EN
When using power tools, please follow all safety instructions provided
with the product.
We advise that there are two people present for this step; one
person inside the house and one outside. From inside the
house, put the tunnel through the hole in the door. Remember
the SureFlap logo must be inside the house.
Now it’s time to prepare for cutting. We strongly advise that
you drill large holes in all the corners of the outline to make it
easier to cut the hole with a jigsaw. Make sure these holes are
touching the line and that they are big enough for the blade
of the jigsaw to fit through.
Using a jigsaw, cut around the inner edge of the line you have
marked. Once the hole is cut, to select the correct length of screw
from the sets provided, you need to compare the screw lengths to
the thickness of your door. The screw length needs to be between
20 to 35mm (/ to 2 /'') longer than the thickness of your door.
From the outside of the house, check that the tunnel is in
the centre of the hole and not resting on the edge of the
hole,then take the second mounting adaptor and side it over
the tunnel with the sealant facing the door. You may need the
person inside the house to keep pressure on the cat flap to make
sure it stays in place.
6
7
5
Next, slide the external frame over the tunnel. The person on
the inside of the house should keep pressure on the cat flap
and hold it so that the tunnel is in the centre of the hole. Using
a cross head screwdriver and the length of screw you’d chosen,
secure the external frame in place. Fasten the first screw until
it is secure, but not too tight, then do the same to the last one.
Once all the screws are secure, tighten them.
Now, insert the two screw caps into the external frame.
8
9
10
11
Apply a line of clear all-weather sealant to the back of both
mounting adaptors, about 15mm ('') from the edge. Make
sure your cat flap is nearby and ready to be fitted. Place one of
the mounting adaptors (it doesn’t matter which) over the tunnel
of the cat flap so that the patterned side with the ribs is facing
outwards and is not touching any surfaces.

17
Fitting your cat flap in a wall
Tunnel
External screw holes
External frame Internal screw holes
Behind the battery
compartment cover
Front frame
Internal screw holes
Behind the internal screw covers
Wall mounting
screw holes
Wall fitting features
Installation video tutorials can be found at surepetcare.com/support
Before you begin
Please contact a qualified builder to discuss the best location to fit your cat flap.
Remember some walls can be structural or there may be electrical wires, gas or water
pipes hidden within them which, if damaged, can cause serious problems.
We recommend that you do not attempt the work yourself unless you have relevant
experience. The job will be messy so protective clothing and eye-wear is a must and when
using power tools, please follow all safety instructions provided.
accessory
Tools and supplies required
Cat Flap Tunnel Extenders
Electric drill & masonry bits
Protective clothing & eye-wear
Appropriate power tools for your wall
All-weather tape
Wall plugs & screws
Cross head screwdriver
Clear all-weather sealant
Ruler
Blu tack
Sharp pencil
Vacuum cleaner
For wall installations, tunnel extenders can be stacked together to create a longer tunnel for
the Cat Flap. The existing tunnel is 70mm (2 ”) long. Each tunnel extender adds 50mm (2”) to
the length of the tunnel.

18
EN
Step-by-step guide
Mark a 170 x 170mm (6 ” x 6 ”) square on the wall using the
mark you made to align the bottom edge. Now mark the centre
of the drawn area, this will be used as a reference point. Before
you start to cut the hole remove the cat flap from the area to
minimise the amount of dust the product is subjected to.
2
x
To ensure your cat has unhindered access through the cat flap,
measure the height from their tummy to the floor. Mark this
height on your wall, as this is where the bottom of the hole
should be cut through the wall. Note: If there is a large drop on
the outside of the house you will need to place a step outside
for your pet to access the tunnel.
1x
3
Using the appropriate power tool and drill bit for your wall
(please consult a builder to identify the appropriate tools), drill
a hole all the way through the wall at the centre point you marked.
We advise you have somebody assisting you with a vacuum
cleaner, so as not to fill the room with dust.
x
Now, from the outside of your house, use the drilled hole as a
reference to mark up the 170 x 170mm square. We advise that you
mark this square a few millimetres lower than the inside to
allow for any rain collected in the tunnel to run back outside.
4
Back on the inside of the house; whether you are cutting through
brick, wood, tiles or plaster, you should drill some pilot holes,
firstly around the perimeter of the line you have drawn and then in
the middle of the marked area. The holes around the perimeter
should go slightly over the line by no more than 2mm ('')
and the holes in the centre should go all the way through the
wall to help with the cutting process.
x
5
Now remove all of the material in the centre using the most
suitable tools for the material you’re cutting. We do not
recommend that you cut through to the outside in one go.
Cut away material on the inside of the house first and then move
outside to cut the remainder of the hole. Try to keep the hole
within the outlined area otherwise it will be too big.
6
Before you begin, we advise that you program your cat(s) ID prior to fitting, see page 7.

19
Stack the tunnel extenders together and then attach them to the
end of the cat flap's tunnel, using all weather tape between each
join to hold them together. Do not glue the tunnel extenders
or cat flap together. From the inside of the house, feed the
extended tunnel into the hole in the wall until the cat flap is
flush against the wall. If no adjustment to the hole shape or size
is needed then you are at the point where you can attach the cat
flap to the inside of the house.
9
The cat flap can be secured directly to your inside wall. To access
the screw holes needed, you have to unscrew the front frame
from the tunnel. To do this, first remove the battery cover and
screw covers, then unscrew the 4 screws and lastly pull the
tunnel and front frame apart.
10
We recommend using one of the tunnel extenders to make sure
you have a clear path through the wall. Once this is the case,
clear away any dust and debris.
7
Now locate the 4 screw holes, they are the larger holes in the
corners of the cat flap. Mark the hole positions using a sharp
pencil.
11
Remove the cat flap from the wall and place it away from the
work area. Drill the four holes using the appropriate drill bits
to suit the construction of your wall, being careful not to break
through the edge of the main hole. Once drilled, put the wall
plugs into each of the holes.
12
Replace the cat flap, with its extended tunnel, back into the
hole. Then, using the appropriate screws for your wall plugs,
screw the cat flap to the wall - see the diagram.
13
To extend the cat flap's tunnel through to the outside wall,
you need to use the tunnel extender accessories to make up
this length. To calculate how many extenders you will need,
please go to page 17. It is important to remember that the end
has to stick out by at least 10mm (") for the external frame
to rest on.
8
50mm
10mm
Other manuals for MICROCHIP CAT FLAP
2
Table of contents
Languages:
Other SureFlap Pet Care Product manuals

SureFlap
SureFlap SureFeed Microchip User manual

SureFlap
SureFlap MICROCHIP CAT FLAP User manual

SureFlap
SureFlap SureFeed User manual

SureFlap
SureFlap Microchip Pet Door User manual

SureFlap
SureFlap microship pet door User manual

SureFlap
SureFlap Microchip Pet Door User manual

SureFlap
SureFlap MICROCHIP CAT FLAP User manual

SureFlap
SureFlap MICROCHIP CAT FLAP User manual

SureFlap
SureFlap DualScan Microchip User manual

SureFlap
SureFlap Microchip Instruction Manual