SureShade MTX PULL-OUT BOAT SHADE User manual

S U R E S H A D E T E C H N I C A L D O C U M E N T A T I O N
MTX PULL-OUT BOAT SHADE
Installation Instructions
SURESHADE
A Lippert Components Company
1900 47th Terrace East
Brandenton, FL 34203
Phone 877.333.8323
International: 215-673-2307
www.sureshade.com

Copyright 2020 Lippert Components, Inc. dba SureShade® MTX Installation Guide MTX3-INST-0317002-ENG
Thank you for purchasing a SureShade retractable shade for your boat.
Invented by boaters for boaters, SureShade is the new standard for shade on
boats.
Our automated or manual retractable shade systems are featured on over 50
boat brands as factory or aftermarket installations.
The only U.S. made telescoping marine sunshade on the market, with patents in
the U.S., Canada, Europe and China.
Committed to improving sun safety on boats with shade systems that give
boaters more sun protection... where and when they need it.

3
Copyright 2020 Lippert Components, Inc. dba SureShade® MTX Installation Guide MTX3-INST-0317002-ENG
Contents
Parts and Required Tools List................................................................................................................ 4
Installation Timeframe............................................................................................................................. 5
Important Safety Instructions.................................................................................................................. 7
Warnings, Cautions and Notes............................................................................................................... 8
Installation of Mounting Clamps............................................................................................................. 9
Securing the Actuators.......................................................................................................................... 19
Securing the Roller Assembly.............................................................................................................. 22
Securing the Crossbars......................................................................................................................... 23
Preloading the Canvas.......................................................................................................................... 24
Fine Tuning and Adjustments............................................................................................................. 287
Troubleshooting.................................................................................................................................... 309
Customer Support.................................................................................................................................. 31
Warranty Information:............................................................................................................................ 31
Contact Information: .............................................................................................................................. 31

4
Copyright 2020 Lippert Components, Inc. dba SureShade® MTX Installation Guide MTX3-INST-0317002-ENG
Parts and Required Tools List
Many of the provided parts are pre-assembled before shipping. This helps to ensure all
necessary parts are included and checked for proper fit before delivery. Ensure all
assembled parts are contained in the shipping crate BEFORE starting installation.
Part
Quantity
Shade specification sheet
1
Mounting clamps
4
Pre-assembled actuators
2
Roller assembly w/ mounting hardware
1
Outer crossbar w/ mounting hardware
1
Mid crossbar w/mounting hardware
1
Pre-rolled canvas (attached to roller assembly)
1

5
Copyright 2020 Lippert Components, Inc. dba SureShade® MTX Installation Guide MTX3-INST-0317002-ENG
Installation Timeframe
Although installation can be completed with only one person, it is recommended that
two people perform the installation. It will take approximately 6 to 8 hours to complete a
surface installation and 8 to 10 hours to complete an integrated installation.
Take into account that installation time may vary due to the complexity and location of
having to run the system wiring to the boat’s power source.

6
Copyright 2020 Lippert Components, Inc. dba SureShade® MTX Installation Guide MTX3-INST-0317002-ENG
Required Tools (Not Included)
Surface
Install
Integrated
Install
Safety Glasses/Goggles
X
X
Ratchet and Socket Set
X
X
Power Drill
X
X
Jigsaw
X
X
Drill Bits
X
X
Phillips Head Screw Driver
X
X
Allen Wrench Set (Standard)
X
X
Wire Strippers
X
X
Wire Cutters
X
X
Wire Crimper
X
X
Utility Knife
X
X
Assorted Wire Connectors
X
X
Wire (8 gauge for power, 14 gauge for switch
connections)
X
X
Multimeter (or similar device)
X
X
Tape Measure
X
X
Marine Caulk
X
X
Extension Cord
X
Thread Lock (Loctite®)
X
X
Electrical Tape
X
X
Tubing cutter, Hacksaw
X
Fish Tape (Used to route wires through inaccessible
areas)
X
Level
X
Grease Pencil
X
X
Wire Ties
X
X
Hole Saws
X
Dremel® with round sanding wheels and/or round
grinding bit (If not available, a drill can be used)
X
Ladder
X
X

7
Copyright 2020 Lippert Components, Inc. dba SureShade® MTX Installation Guide MTX3-INST-0317002-ENG
Important Safety Instructions
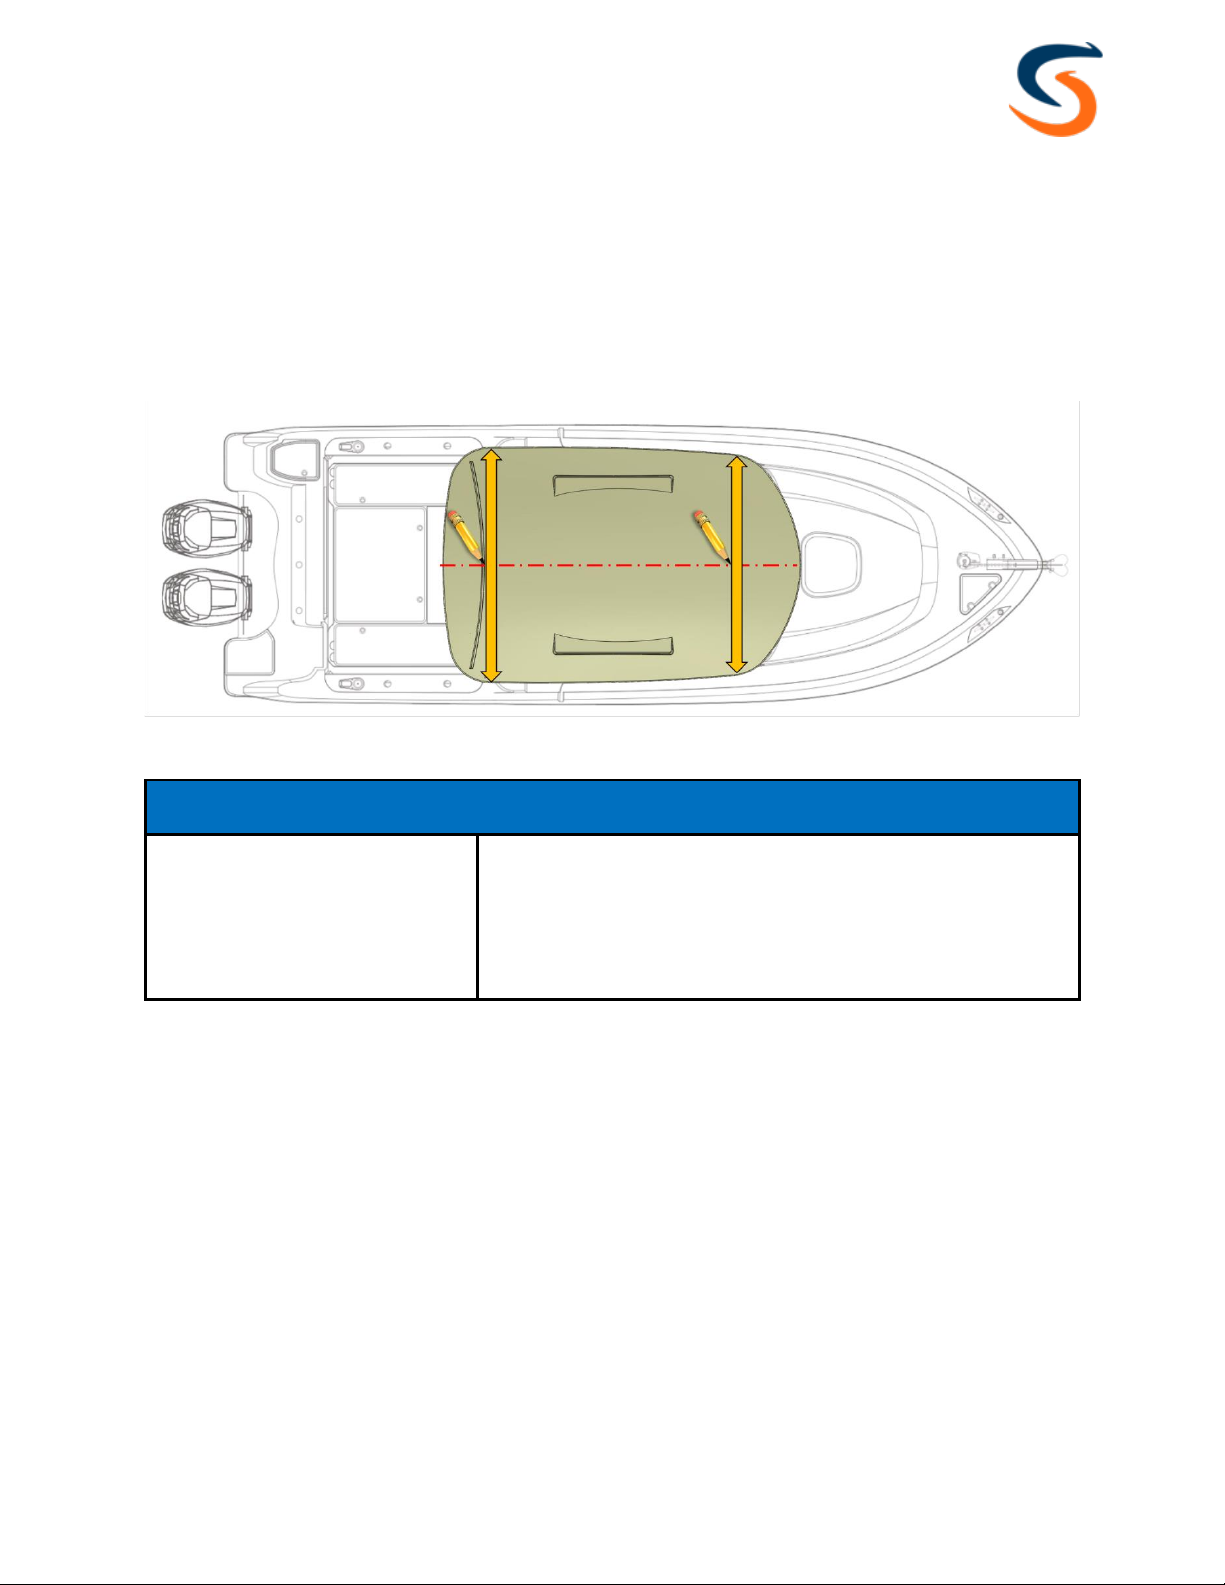
•Read all instructions contained in this document and become familiar with the
shades specification sheet and measurements before installing your SureShade.
Failure to follow these instructions could result in personal injury or damage to
equipment.
•In the event of malfunction call 877-333-8323 before continuing to operate the
system or any repairs are made. Do not attempt to repair shade on your own or
you could risk voiding the warranty.
•Never disassemble actuators without expert guidance.
•When tensioning the canvas, refer to https://www.sureshade.com/service-and-
technical-documentation/ for proper roller preload instructions, improper
tensioning can cause spring malfunction which will prevent the roller assembly
from operating normally.
•When extending/retracting shade, keep all hands, loose clothing, etc. away from
moving actuators.
•Your SureShade product has been designed and tested to withstand wind
speeds of up to 50 mph, however it is recommended to retract the shade while
underway.
•To protect the shade and components, always retract shade during inclement
weather. Retracting the shade when not in use will prolong the life of the canvas
and components.
•Refer to the SureShade website for maintenance and winterization procedures.
https://www.sureshade.com/customer-resources/
•It is important to understand the Warnings, Cautions, and Notes BEFORE
starting the installation.

8
Copyright 2020 Lippert Components, Inc. dba SureShade® MTX Installation Guide MTX3-INST-0317002-ENG
Warnings, Cautions and Notes
WARNING
WARNING
Indicates a potentially hazardous situation that if not
avoided, could result in death or serious injury.
CAUTION
CAUTION
Indicates a potentially hazardous situation that if not
avoided, could result in damage to product/equipment.
NOTICE
NOTICE
Indicates information considered important, but not
hazard related.

9
Copyright 2020 Lippert Components, Inc. dba SureShade® MTX Installation Guide MTX3-INST-0317002-ENG
Installation of Mounting Clamps
Step 1. Determine the centerline of the hardtop.
a. Measure across the hard top at the Forward section from the port to the
starboard. Using a grease pencil, mark the center of the hardtop.
b. Repeat process for the Aft. Using pencil marks as a guide, run tape or
string down the center of the hardtop. (See Figure 1.)
Figure 1: Marking Centerline of Hardtop
NOTICE
NOTICE
Refer to the supplied Shade Specification sheet to
determine your shades centerline width. Centerline
width is determined by the centerline of the Port
actuator tube to the centerline of the Starboard
actuator tube

10
Copyright 2020 Lippert Components, Inc. dba SureShade® MTX Installation Guide MTX3-INST-0317002-ENG
c. Measure half the width of the shade centerline across the hard top at the
Forward and Aft sections from the center of the hardtop to the port side.
Make a mark using a grease pencil. (See Figure 2a.)
d. Repeat process for the starboard side. Using pencil marks as a guide, run
tape or string down the port and starboard sides of the hardtop. (See
Figure 2b.)
Figure 2a and 2b: Determine the Placement of the Mounting Clamps.
CAUTION
CAUTION
Placement of mounting clamps must hold actuators
parallel to each other to ensure proper functioning of
shade system.

11
Copyright 2020 Lippert Components, Inc. dba SureShade® MTX Installation Guide MTX3-INST-0317002-ENG
e. Measure the distance from the Port to Starboard at the Forward and Aft
sections to ensure marks are parallel. These measurements should be the
shade centerline width provided on the Shade Specification Sheet.
(See Figure 3)
Figure 3: Verify Centerline Measurements

12
Copyright 2020 Lippert Components, Inc. dba SureShade® MTX Installation Guide MTX3-INST-0317002-ENG
Step 2. Setting the mounting clamps.
a. Disassemble the four mounting clamps by removing the two ¼ -20 x ¾
socket head screws in each clamp and remove the top clamp. Set the
screws and top clamps aside. (See Figure 4.)
Figure 4. Mounting Clamps (May include spacers depending on installation)
NOTICE
Mounting clamps should be placed 6 to 12 inches from aft of
hardtop.
Spacing between fore and aft bottom clamps should be no less
than 26 inches. 30 inches or more is preferred when applicable.
NOTICE
NOTICE
Actuator can be placed in clamps to aid in aligning and spacing
mounting clamps.

13
Copyright 2020 Lippert Components, Inc. dba SureShade® MTX Installation Guide MTX3-INST-0317002-ENG
b. Place the four bottom mounting clamps along the pre-determined lines on
the hard top. (See Figure 5.)
Figure 5. Mounting Clamp position
c. With assistance, have each person place and hold an actuator onto the
starboard and port mounting clamps.

14
Copyright 2020 Lippert Components, Inc. dba SureShade® MTX Installation Guide MTX3-INST-0317002-ENG
d. Measure from port actuator centerline to starboard actuator centerline at
the Forward and Aft sections to ensure measurements are correct. (Refer
to centerline width located on Shade Specification Sheet.) (See Figure 6.)
Figure 6: Measure Centerline Width for Accuracy
CAUTION
CAUTION
If the mounting surface has a curvature, the centerline markings
will be used as a guide to determine mounting clamp placement.
The curvature of the top and height of the mounting clamps will
offset the mounting clamp positions from the centerline marks.
Ensure spacing and centerline is correct BEFORE drilling any
holes in the boat’s top.
e. When installing on a curvature, adjust the mounting clamps until the
actuators line up with the centerline measurement.

15
Copyright 2020 Lippert Components, Inc. dba SureShade® MTX Installation Guide MTX3-INST-0317002-ENG
If the top is flat, the mounting clamps will be installed using the
centerline locations for both surface and underside mounting. (See
Figure 7a.)
Figure 7a: Surface Mount Flat
i. For top mount with a curvature, mounting clamps will be installed
on the inside of the actuator centerline and will need to be drilled at
an angle. (Depicted by the green centerlines). (See Figure 7b.)
Figure 7b: Surface Mount Curved

16
Copyright 2020 Lippert Components, Inc. dba SureShade® MTX Installation Guide MTX3-INST-0317002-ENG
ii. For bottom mount with a curvature, mounting clamps will be
mounted to the outside of the actuator centerline and will need to
be drilled at an angle. (Depicted by the green centerlines). (See
Figure 7c.)
Figure 7c.: Underside Mount Curved
NOTICE
NOTICE
If mounting on a curvature, mark one clamp and measure from the
clamp centerline to the actuator centerline. Use that measurement
to aid in placement of the remaining clamps.
f. Mark the location of the mounting clamps using a grease pencil.
g. Carefully remove actuator from mounting clamps. Ensure mounting
clamps are in marked location and mark holes for drilling. (See Figure 8a
and 8b.)

17
Copyright 2020 Lippert Components, Inc. dba SureShade® MTX Installation Guide MTX3-INST-0317002-ENG
Figure 8a.: Flat Surface Mount
Figure 8b.: Curved Surface Mount
CAUTION
Re-measure and ensure placement of mounting clamps for both
sides are clear of any obstructions and measurements are correct
before drilling holes.
h. Drill the 2 marked holes for each of the mounting clamps.

18
Copyright 2020 Lippert Components, Inc. dba SureShade® MTX Installation Guide MTX3-INST-0317002-ENG
CAUTION
Use care when tightening mounting clamp bolts. Do
not overtighten to the point where the surface material
starts to buckle.
i. Line up and install the four mounting clamps to the hardtop. We
recommend using 5/16 –18 bolts and tighten down with nuts.
Step 3. Installing the actuators.
a. Place actuators onto installed mounting clamps.
b. Install top mounting clamps with included bolts. Ensure bolts are snug, do
not over tighten. (See Figure 9.)
Figure 9: Install Actuator and Top Mounting Clamps

19
Copyright 2020 Lippert Components, Inc. dba SureShade® MTX Installation Guide MTX3-INST-0317002-ENG
Securing the Actuators
Step 1. Place the remaining actuator onto the installed mounting clamps.
Step 2. Attach the top mount to the mounting clamps using the provided
hardware. Do not tighten.
Step 3. Measure from the end of the main actuator tube to the Aft mounting
clamp. There should be no less than 4 inches between the end of the tube
and the Aft mounting clamp. (See Figure 10.)
Step 4. Repeat process for the other actuator.
Step 5. Once both actuators are aligned, snug the mounting clamp top brackets
temporary until the crossbars are aligned with the locking pins engaged
correctly as described in the next steps.
Figure 10: Measure Space between Main Tube and Mounting Clamp

20
Copyright 2020 Lippert Components, Inc. dba SureShade® MTX Installation Guide MTX3-INST-0317002-ENG
Aligning and Adjusting the Actuators to install crossbars
Step 1. Pull the actuator extending arms to full extension.
a. At full extension ensure the locking pins engage the locking slot (See
figures 9 thru 9B).
b. Rotate the extending tube if needed to ensure the locking pin engages the
slot.
c. Repeat process on all extending arms of both the actuator.
Step 2.
a. Slide the aft crossbar into the ends of actuator tubes (See figures 9 &
9C).
b. Align the mounting hole in the outer crossbar elbow with the outer most
extending arm.
c. You may have to loosen the mounting clamps so you can rotate the
stationary tube to allow the extending arm to line up with the mounting
holes in outer crossbar elbow and insert provided hardware screws
snugly.
d. Repeat the process with the other side actuator.
Fig 9
Fig 9A
Fig 9B
Fig 9C
Ensure crossbar
mounting
hardware lines up
Confirm locking pins engage.
Rotate tubes to align properly
Table of contents
Other SureShade Indoor Furnishing manuals
Popular Indoor Furnishing manuals by other brands

Braun
Braun Aesculap DA074R Instructions for use/Technical description

Courtyard Creations
Courtyard Creations TGS20CK Assembly instructions

Steelcase
Steelcase Solo Sit-to-Stand Desk quick guide

Hooker Furniture
Hooker Furniture 1618-25350-DKW Assembly instruction

Wholesale Interiors
Wholesale Interiors C5236A-B92 Series Assembly instructions

Dimplex
Dimplex Dean GDS25G5-1909 Assembly instructions