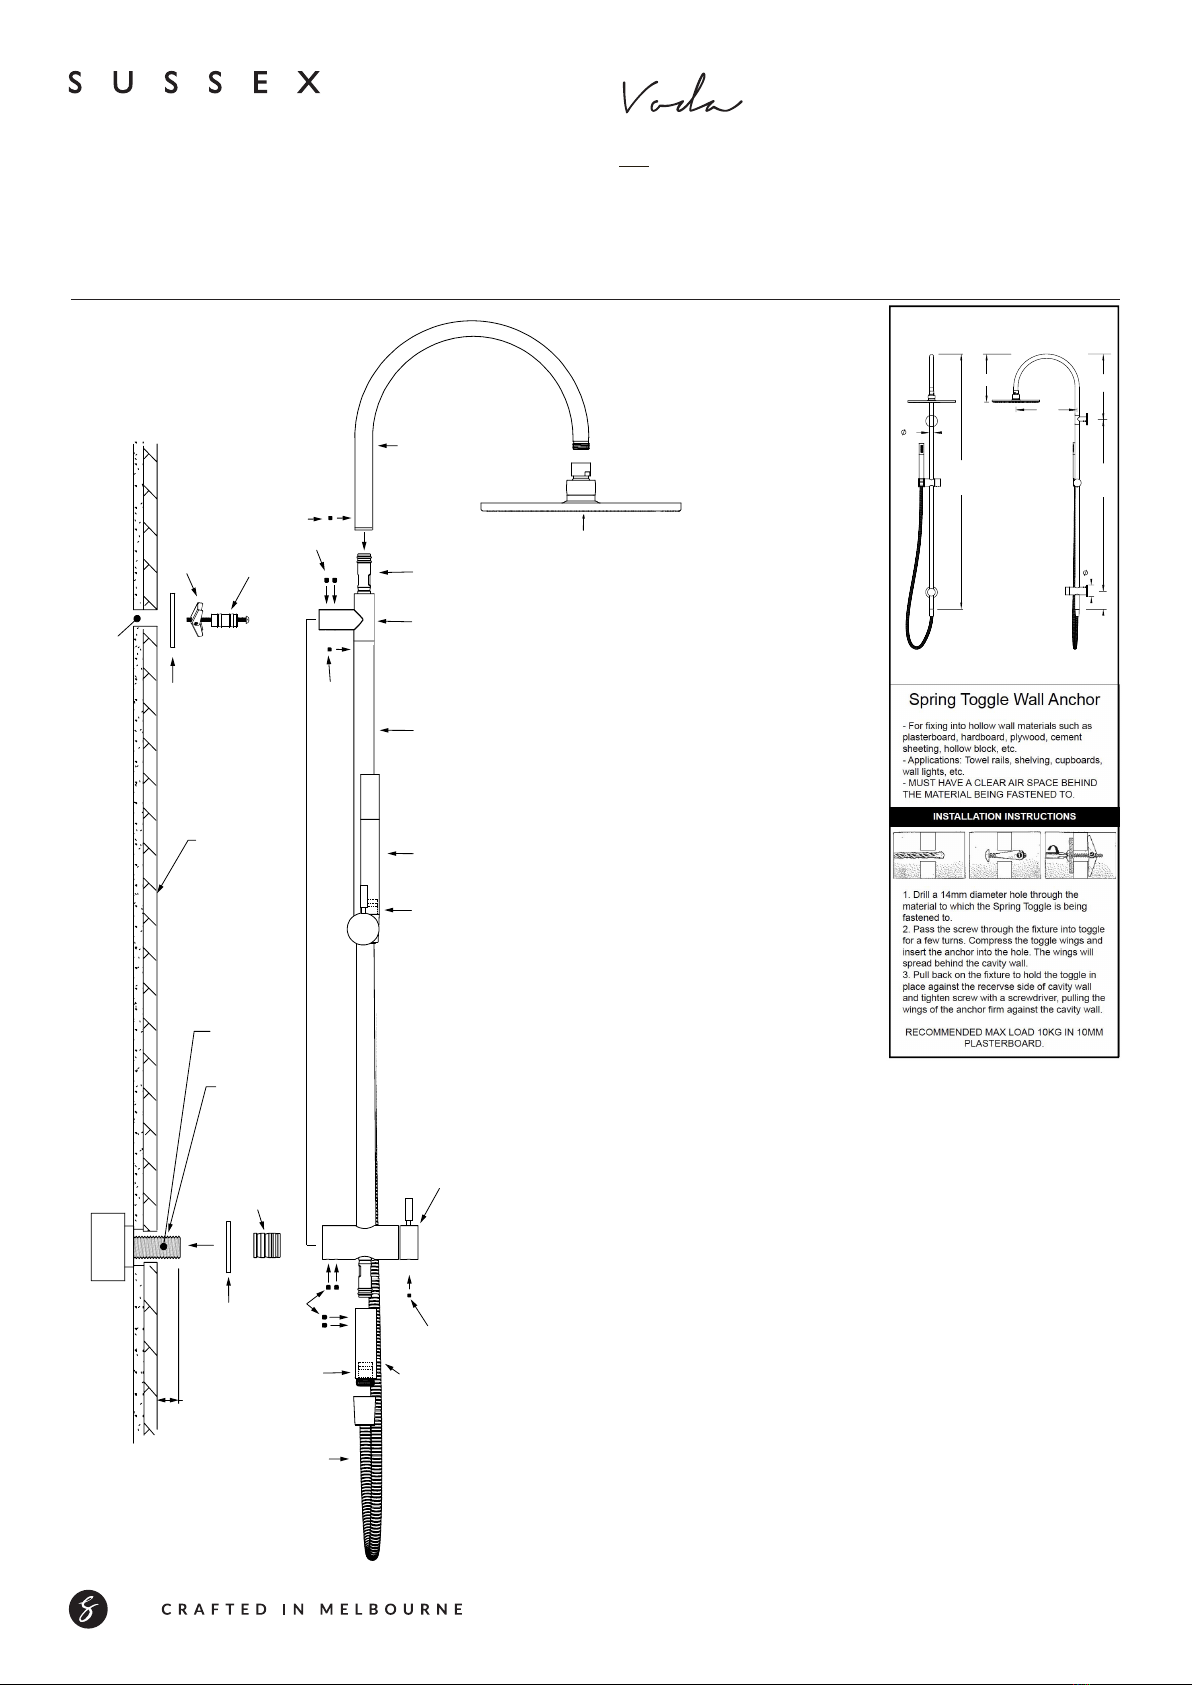
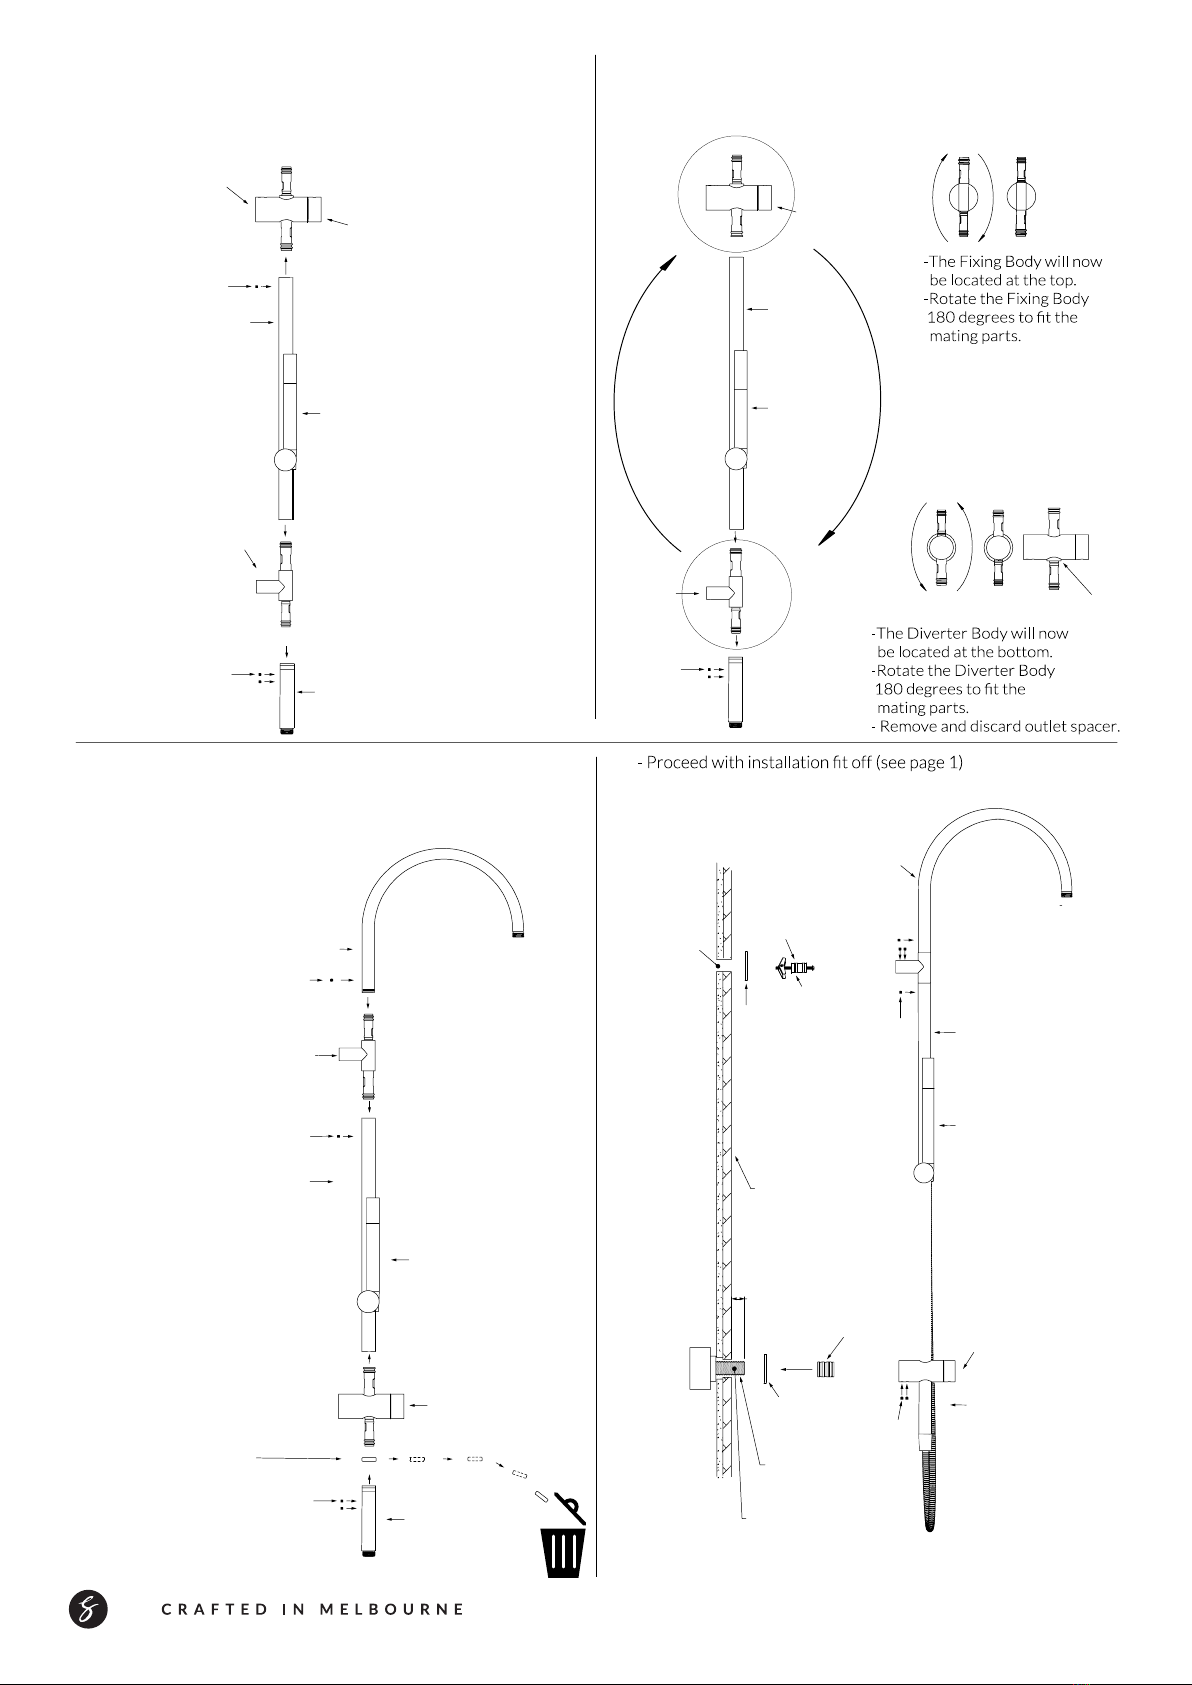
manuals.online logo
Brands
  1. Home
  2. •
  3. Brands
  4. •
  5. Sussex
  6. •
  7. Plumbing Product
  8. •
  9. Sussex Voda VTRS User manual

Sussex Voda VTRS User manual

sussextaps.com.au
Tapware is to be installed by a Licensed
Plumber in accordance with AS/NZS 3500:2003
Recommended working water pressure 300-500 kpa.
Maximum water temperature is 65 deg.c.
INSTALLATION GUIDELINES
- The Rail is supplied part assembled to suit a Top Water Inlet
installation.
- FOR BOTTOM WATER INLET INSTALLATION SEE PAGE 3.
- Remove Inlet Fitting and Wall Fixing by loosening the Set
Screws.
- Accurately mark out and drill for the Wall Fixing 900mm from
centre of Water Feed (see Spring Toggle Wall Anchor guide).
- Ensure the wall penetration is sealed prior to connecting any
fittings.
- Apply thread tape or appropriate sealant to Water Feed Thread
and attach Inlet Fitting using 10mm Allen key.
- Using the provided Spring Toggle Anchor attach the Wall
Fixing.
- Fit the Rail Shower as assembled onto the Wall Fixing and Inlet
Fixing, secure by tightening the Set Screws.
- Align and fit the Shower Arm over the Outlet Post.
- Secure Shower Arm by tightening Set Screws (tighten well).
- Attach Shower Head, tighten using spanner.
- Test function and water flow on both Shower Head and Hand
Shower.
- Check for water leaks.
Voda Twin Shower Rail
Product code:
VTRS
INSTALLATION GUIDE
22
320
900
345
115
250
60
1360
1
Shower
Hose
Shower
Hose
Extension
Check Valve
1/2" BSP
Lugged Elbow
Water Feed
FINISHED WALL
Apply Sealant
Inlet
Fitting
15-20mm
Diverter
To Suit
Toggle
Wall
Anchor
Fixing
Body
Shower Arm
Shower Head
Slide Rail
Noggin
Hand Shower
Check Valve
900mm
Toggle
Anchor
Wall Fixing
Use 10mm Allen
Key To Fit
Set
Screws
x2 Set
Screws
Dress ring
Dress ring
Set
Screw
Outlet Post
2
WARRANTY CONDITIONS
Sussex Taps Warranty covers the repair or, at Sussex’s discreon,
the replacement of any products which are defecve through faulty
workmanship or materials.
The warranty period commences from date of purchase or, for new buildings,
date of handover. To make a warranty claim, proof of purchase, handover
documentaon for new homes or equivalent documentaon must be
supplied for warranty claims to be considered. All claims are to be lodged at
point of purchase, whereby Sussex Taps Aer Sales Service Department will
then be noed.
Sussex Taps will not be liable for any subsequent claims of labour,
addional products or parts associated with alleged faulty product
for work not approved in advance in wring by Sussex Taps.
Should any warranty claim be made and service aended to by a Sussex Taps
authorized Service Agent whereby the installaon has been assessed as an
installaon fault and not a product fault , or from some other cause other than
a manufacturing defect, Sussex Taps reserves the right to charge a service fee
for aending and/or any work carried out.
Sussex Taps require adequate access to products, ngs and xtures
to undertake warranty repairs. Sussex Taps will not be responsible for any
conse que nal dama ge o r cost s where adeq uate access to pro duc t ng s a nd
xtures is not provided.
WARRANTY SHALL BE VOID FOR THE FOLLOWING REASONS
• Inability to provide proof of purchase or equivalent documentaon
• Products not installed by a licensed plumber.
(Excludes Bathroom accessories - towel rails, shelves etc.)
• Products not installed to relevant Naonal Standards
and State Regulaons.
• Products not installed in accordance with the manufacturers
installaon instrucons
• Tapware exposed to water pressures and or temperatures that exceed
stated limitaons as per the product installaon instrucons. Note: AS/
NZS 3500, 1-2003 (clause 3.3.4) species 500KPA maximum water
supply pressure at any outlet within a building for new installaons.
• Fing of other devices to the outlet of tapware. E.g. Water lters
• Fing of Sussex Taps non-approved in tap body or end of line
water ow regulang devices
• Products used for incorrect applicaons, non-potable water etc.
• Damage as a result of obstrucons due to inadequate ushing
of system before use.
• Service, repairs or with non-standard replacement parts previously
undertaken without Sussex Taps wrien approval.
• Damage to nishes by adhesives, sealant etc.
• Damage to nishes which arise from installaon or post-installaon use
• Failure to observe manufacturer’s care and cleaning instrucons
• Improper or abusive use of product, and/or damage resulng from misuse,
accident or neglect.
CARE AND CLEANING INSTRUCTIONS FOR TAPWARE
AND ACCESSORIES
• Under no circumstances should you install tapware using
acetone silicones.
• Never use harsh detergents or abrasive cleaners, as these will scratch the
surface.
• To clean, use a so cloth with warm soapy water to maintain the nish in
perfect condion for a lifeme of use.
• Use of wax based furniture cream should be avoided as this can result in a
build up of deposits, which could detract from the appearance.
• Gold plated products should always be cleaned with care using a so
dry cloth or a so cloth with warm soapy water.
• Do not use undue pressure and wipe in one direcon only.
Note: This is a summary of the Sussex Taps warranty oer for Australian
installed products. Some addional terms and condions may apply.
Sussex Taps reserves the right to alter, or amend this warranty oer in
wring at any me. Sussex Taps reserves the right to provide minor
components (eg. Handles, aerators, buons, dress rings, spindle/cartridges
and seals) as ‘Parts Only’ to the customer.
LIMITATION OF LIABILITY
Sussex Taps’ obligaons under this warranty are limited to the repair or, at
Sussex’s discreon, replacement of any products which are defecve through
faulty workmanship or materials. To the extent permied by law, Sussex Taps
will not be liable for any loss or damage to furniture, oor coverings, walls,
xtures or any other indirect or consequenal loss or damage of any kind
(including personal injury), whether due to negligence or any other cause,
which may be suered or incurred directly or indirectly as a result of or in
any way connected with the product or components, or use of the product
or components. Nothing in this warranty excludes, restricts or modies any
condion, warranty, right or remedy conferred on the customer by the Trade
Pracces Act 1974 (Cth) or any other applicable law that cannot be excluded,
restricted or modied by agreement.
DOMESTIC WARRANTY
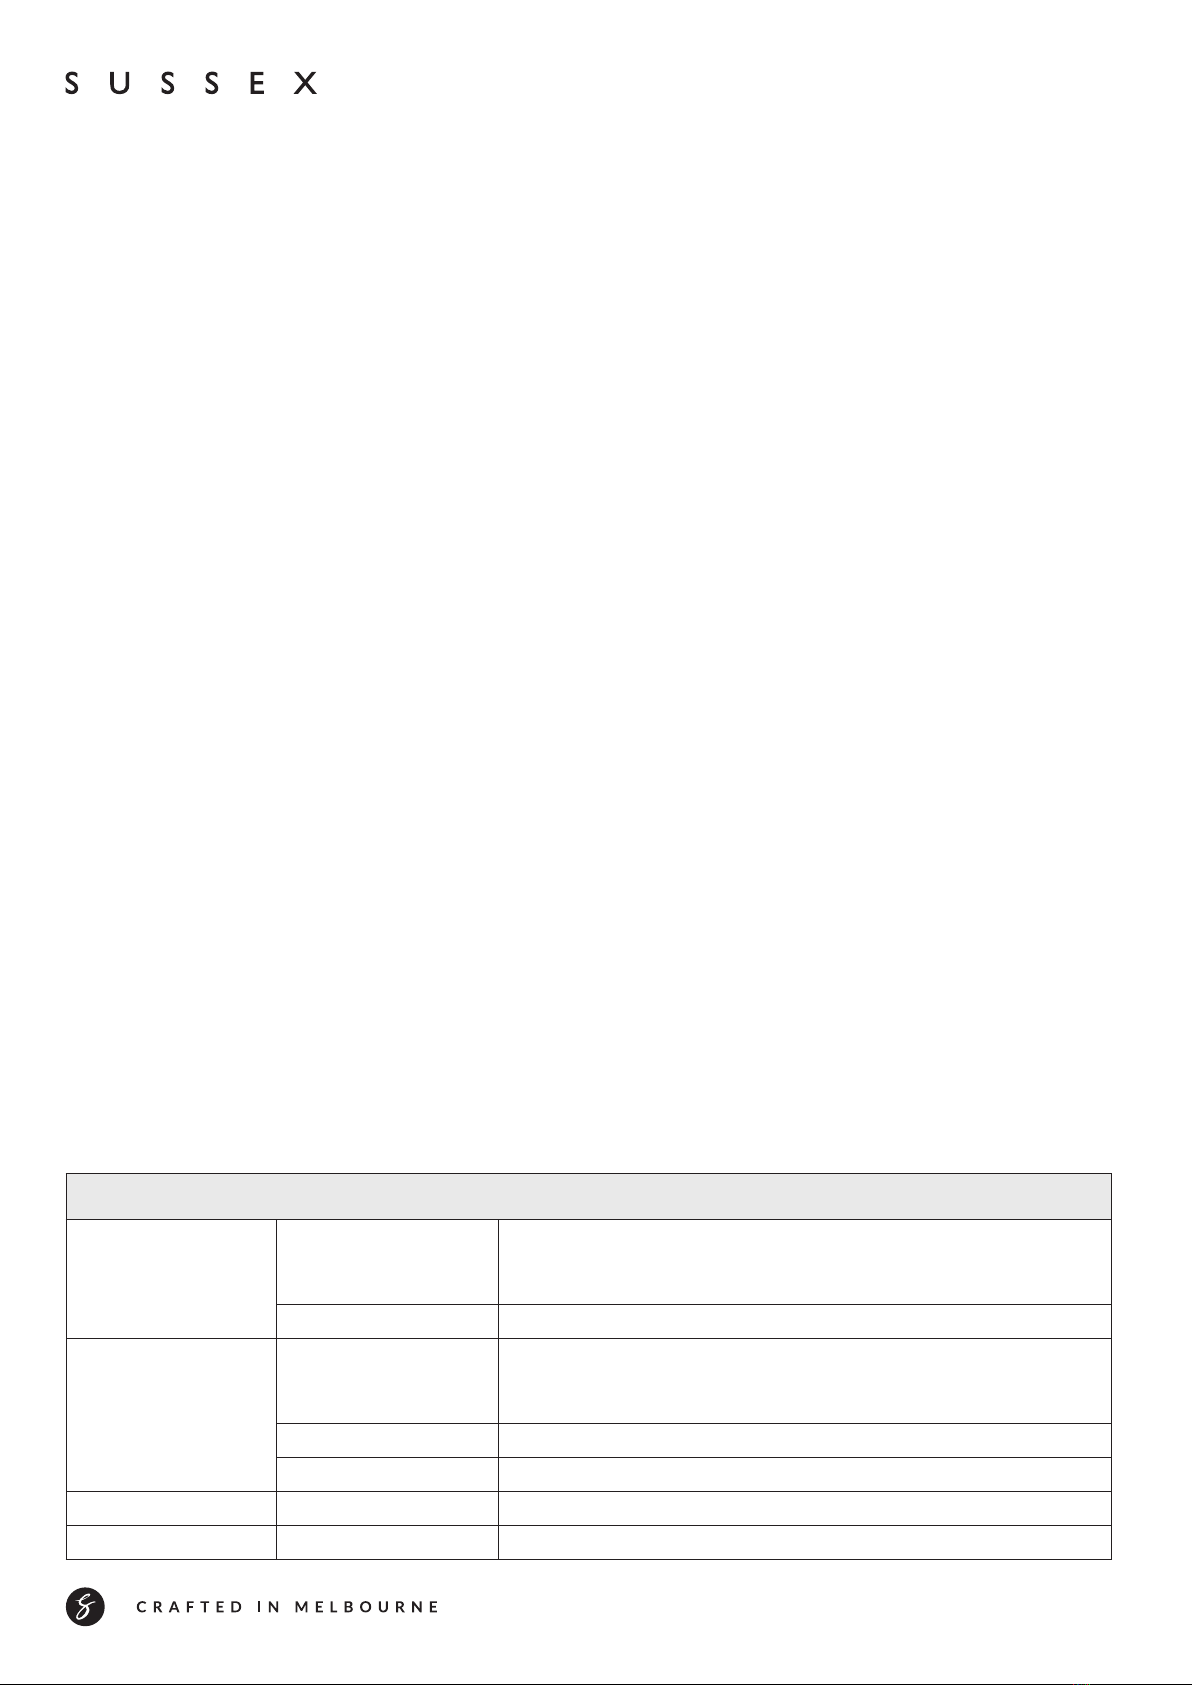
SUSSEX TAPS PTY. LTD.
PRODUCT WARRANTY PERIOD WARRANTY DETAILS
Mixers
15 Years
Replacement product or parts. Cartridge replacement excludes damage to Ceramic
discs from pieces of copper tube, plasc, sand, dirt or thread tape etc.
Note: Pull-out nozzle and hose 1 year parts only.
2 Years On–site labour
Tapware
and Showers
15 Years
Replacement product or parts. Ceramic disc spindles replacement excludes damage to
ceramic discs from pieces of copper tube, plasc, sand, dirt or thread tape etc.
Note: Jumper valves 1 year parts only.
3 Years Rail and Hand Shower replacement product or parts
2 Years On–site labour
Accessories 15 Years Replacement product or parts
Finishes 2 Years Replacement product or parts.
sussextaps.com.au
Note: This warranty applies to purchases after 1st April 2011
sussextaps.com.au
Tapware is to be installed by a Licensed
Plumber in accordance with AS/NZS 3500:2003
Recommended working water pressure 300-500 kpa.
Maximum water temperature is 65 deg.c.
INSTALLATION GUIDELINES
- To change the Water Inlet position, the Diverter, Fixing Body
and Shower Hose Extension will need to be disassembled
(See. Page 4).
- No additional component will be required.
Voda Twin Shower Rail
Product code:
VTRS
INSTALLATION GUIDE
3
22
1360
320
900
345
115
250
60
Shower
Hose
Shower
Hose
Extension
Check Valve
FINISHED WALL
15-20mm
Set
Screws
Fixing Body
Shower Arm
Shower Head
Slide Rail
Hand Shower
Check Valve
To Suit
Toggle
Wall
Anchor
Toggle
Anchor Wall Fixing
Dress ring
1/2" BSP
Lugged Elbow
Water Feed
Apply Sealant
Inlet
Fitting
Noggin
Use 10mm Allen
Key To Fit
Dress ring
Diverter
Set
Screws
Set
Screw
Outlet Post
Set
Screws
900mm
sussextaps.com.au 4
Shower Hose
Extension
Diverter
Body
Slide Rail
Hand Shower
Diverter Body
Coverplate
Fixing
Body
Shower Hose
Extension
Slide Rail
Hand Shower
Outlet spacer
- Swap the Diverter Body and Fixing Body positions.
- Diverter body will now be located at the bottom.
- Fixing body will now be located at the top.
Shower Hose
Extension
Diverter
Body
Slide Rail
Hand Shower
Shower Arm
Shower Hose
Extension
Slide Rail
Hand Shower
Diverter Body
Shower Arm
1/2" BSP
Lugged Elbow
Water Feed
FINISHED WALL
Apply Sealant
Inlet
Fitting
15-20mm
To Suit Toggle
Wall Anchor
Noggin
Toggle
Anchor
Wall Fixing
Use 10mm Allen
Key To Fit
1. 2.
3.
4.
- Remove Diverter and Fixing Body by loosening Set
Screw.
- Re-attach the Fixing Body and the Diverter Body to
Slide rail. Tighten Set Screw.
- Re-attach Shower Hose Extension. Tighten Set Screws.
- Attach Shower Arm and Head. Align Shower Arm and
Tighten Set Screw.
- Attach shower rose.
Fixing Body
x2 Set
Screws
x2 Set
Screws
Set
Screw
Set
Screw
Dress ring
Dress ring
Remove and discard outlet
spacer when diverter body
is to be mounted in the
bottom positon.
Set
Screws
Fixing
Body
Set
Screws
Set
Screw
Set
Screws
Set
Screws

Other Sussex Plumbing Product manuals

Sussex Suba Series User manual

Sussex

Sussex Suba Series User manual

Sussex SCALA User manual

Sussex

Sussex SCALA User manual

Sussex Calibre Series User manual

Sussex

Sussex Calibre Series User manual

Popular Plumbing Product manuals by other brands

Hans Grohe iBox Universal Plus Rough 01850181 Installation/User Instructions/Warranty

Hans Grohe

Hans Grohe iBox Universal Plus Rough 01850181 Installation/User Instructions/Warranty

Blue Lagoon UV-C Series Tech  manual

Blue Lagoon

Blue Lagoon UV-C Series Tech manual

VADO EDIT user guide

VADO

VADO EDIT user guide

TECE solid operating instructions

TECE

TECE solid operating instructions

Toto TBV01101U Installation and owner's manual

Toto

Toto TBV01101U Installation and owner's manual

Toto NEOREST MS990CG instruction manual

Toto

Toto NEOREST MS990CG instruction manual

Hans Grohe Focus 240 31815000 Instructions for use/assembly instructions

Hans Grohe

Hans Grohe Focus 240 31815000 Instructions for use/assembly instructions

Watts SOCLA BA BM installation manual

Watts

Watts SOCLA BA BM installation manual

Hans Grohe 13437180 Instructions for use/assembly instructions

Hans Grohe

Hans Grohe 13437180 Instructions for use/assembly instructions

Graff TARGA 2309000 Instructions for assembly and use

Graff

Graff TARGA 2309000 Instructions for assembly and use

Grohe Essence 32 170 manual

Grohe

Grohe Essence 32 170 manual

Brizo Siderna 85880 Series installation instructions

Brizo

Brizo Siderna 85880 Series installation instructions

Graff 7090 installation instructions

Graff

Graff 7090 installation instructions

Omnires Darling DA5021 Installation and Maintenance

Omnires

Omnires Darling DA5021 Installation and Maintenance

Kalia KONTOUR BF1287 Installation instructions / warranty

Kalia

Kalia KONTOUR BF1287 Installation instructions / warranty

Kohler STATEMENT K-26325T-CP installation instructions

Kohler

Kohler STATEMENT K-26325T-CP installation instructions

Hans Grohe Porter'C 27521 Series Assembly instructions

Hans Grohe

Hans Grohe Porter'C 27521 Series Assembly instructions

American Standard Williamsburg 1041.229.002 Specification sheet

American Standard

American Standard Williamsburg 1041.229.002 Specification sheet

manuals.online logo
manuals.online logoBrands
  • About & Mission
  • Contact us
  • Privacy Policy
  • Terms and Conditions

Copyright 2025 Manuals.Online. All Rights Reserved.