Suunto X9i User manual

EN | FR | DE | ES | IT | NL | FI | SV

3
SUUNTO X9i USER’S GUIDE
EN

4
CONTENTS
1. INTRODUCTION . . . . . . . . . . . . . . . . . . . . . . . . . . . . . . . . . . . . . . . . . . . . . . . . 6
2. BASIC MENU STRUCTURE . . . . . . . . . . . . . . . . . . . . . . . . . . . . . . . . . . . . . . . 7
3. GENERAL SETTINGS . . . . . . . . . . . . . . . . . . . . . . . . . . . . . . . . . . . . . . . . . . . 8
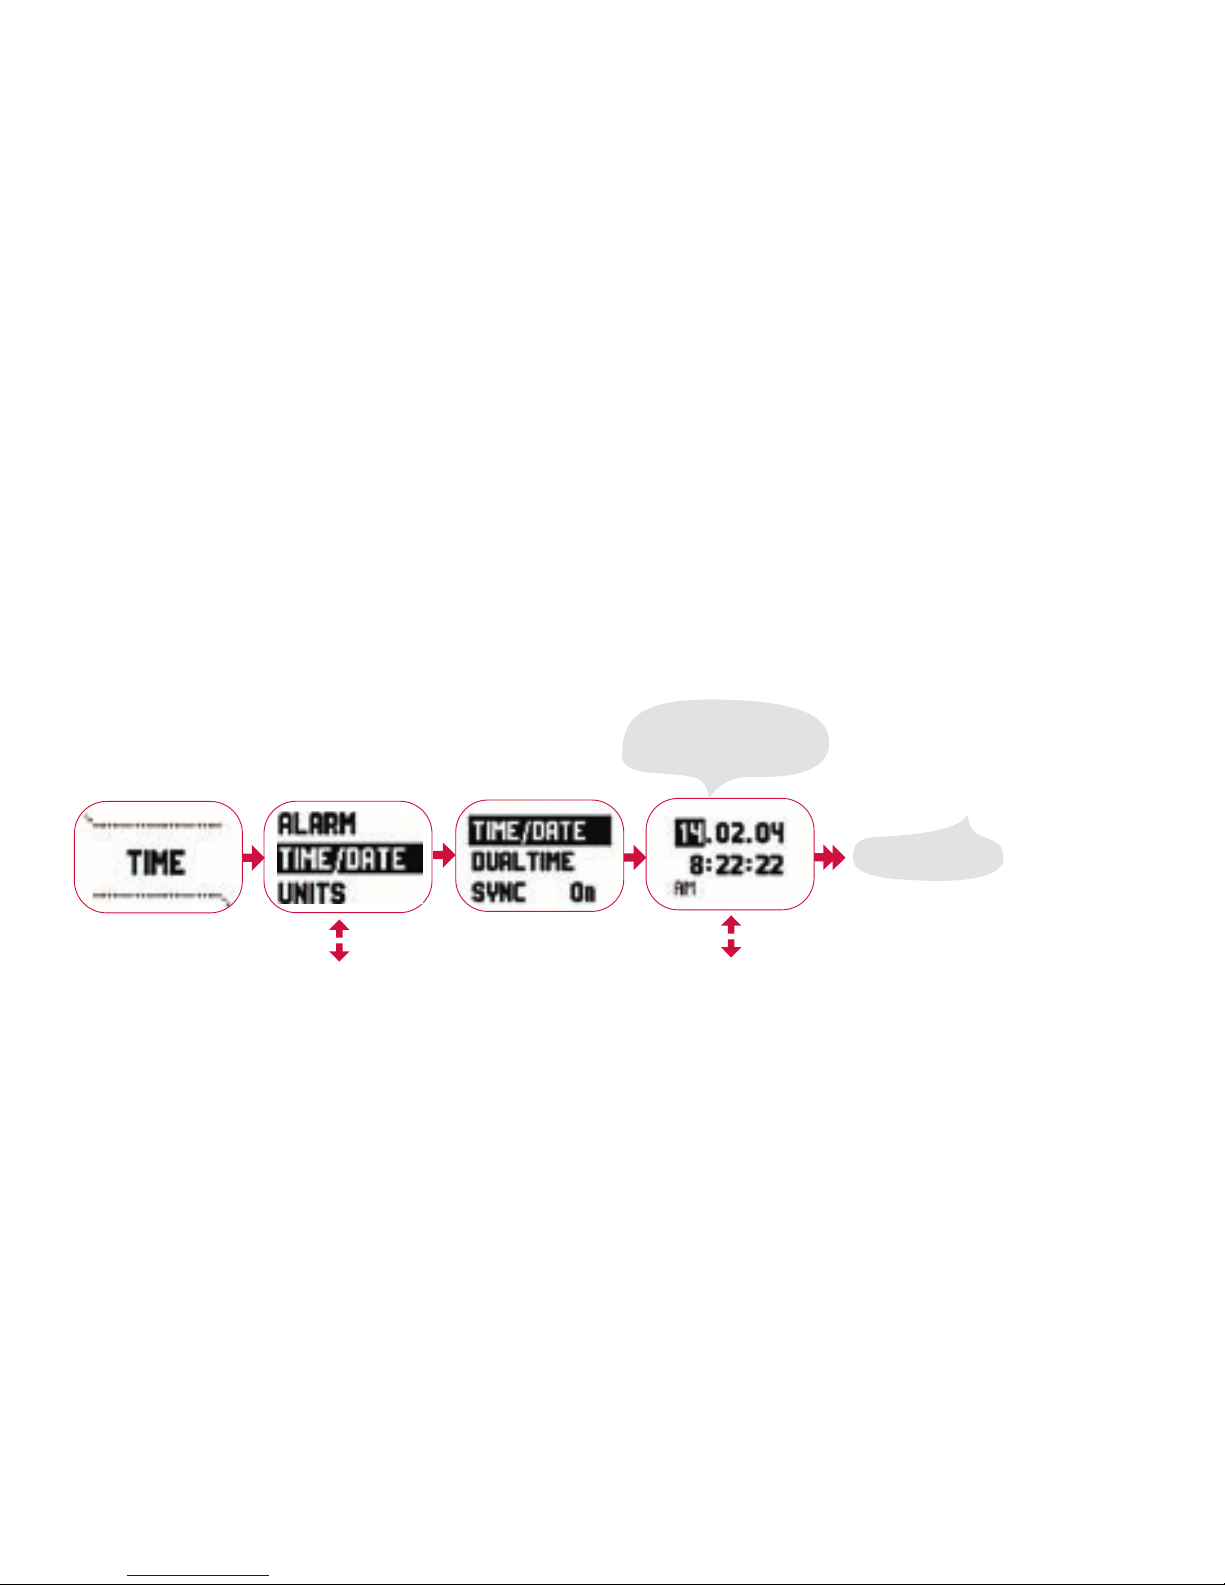
4. TIME MODE . . . . . . . . . . . . . . . . . . . . . . . . . . . . . . . . . . . . . . . . . . . . . . . . . . . 9
4.1. Using the Time mode-specific functions . . . . . . . . . . . . . . . . . . . . . . . . . . 9
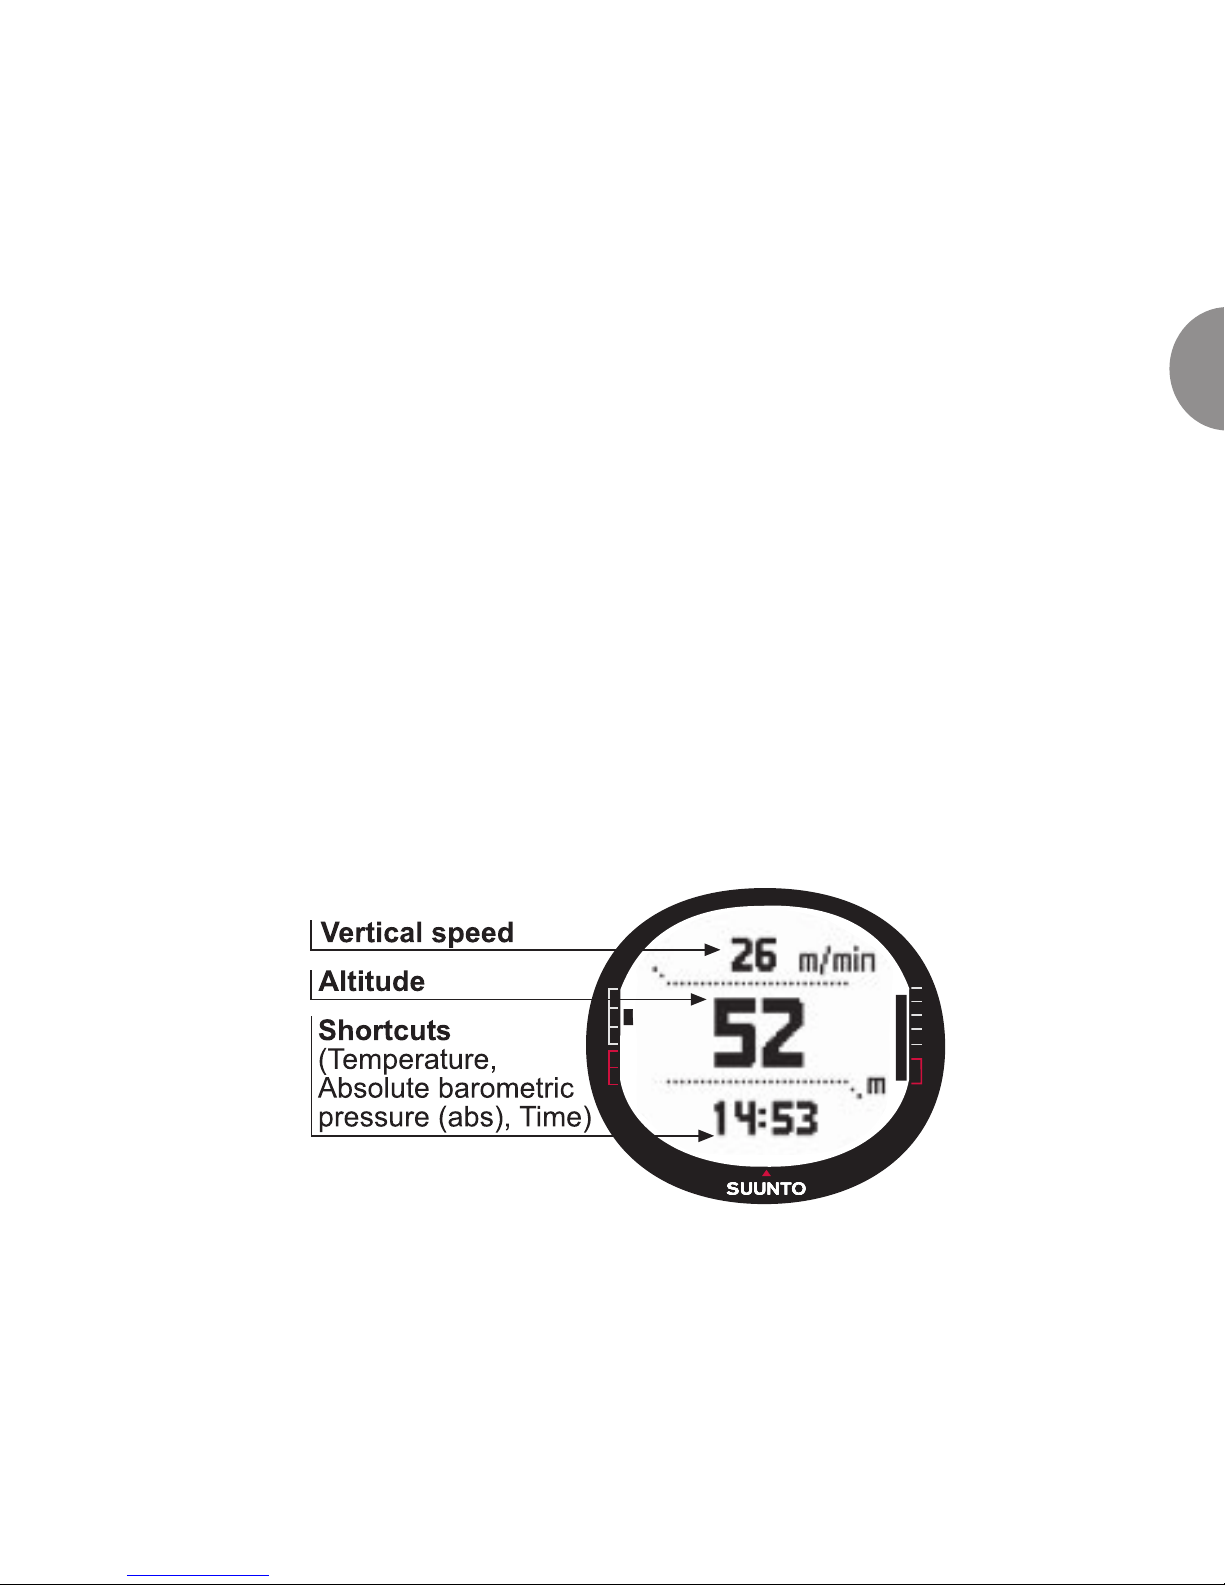
5. ALTI/BARO MODE . . . . . . . . . . . . . . . . . . . . . . . . . . . . . . . . . . . . . . . . . . . . . .11
5.1. Alti use . . . . . . . . . . . . . . . . . . . . . . . . . . . . . . . . . . . . . . . . . . . . . . . . . . .11
5.2. Baro use . . . . . . . . . . . . . . . . . . . . . . . . . . . . . . . . . . . . . . . . . . . . . . . . . 12
6. COMPASS MODE . . . . . . . . . . . . . . . . . . . . . . . . . . . . . . . . . . . . . . . . . . . . . . 13
7. NAVIGATION MODE . . . . . . . . . . . . . . . . . . . . . . . . . . . . . . . . . . . . . . . . . . . . 14
8. ACTIVITY MODE . . . . . . . . . . . . . . . . . . . . . . . . . . . . . . . . . . . . . . . . . . . . . . . 16
9. FUNCTION MENU . . . . . . . . . . . . . . . . . . . . . . . . . . . . . . . . . . . . . . . . . . . . . 18
10. PLANNING YOUR JOURNEY . . . . . . . . . . . . . . . . . . . . . . . . . . . . . . . . . . . . 18
11. BEFORE STARTING THE HIKE . . . . . . . . . . . . . . . . . . . . . . . . . . . . . . . . . . 20
12. DURING HIKING . . . . . . . . . . . . . . . . . . . . . . . . . . . . . . . . . . . . . . . . . . . . . . 25
13. RETURNING HOME . . . . . . . . . . . . . . . . . . . . . . . . . . . . . . . . . . . . . . . . . . . 25
14. AFTER THE JOURNEY . . . . . . . . . . . . . . . . . . . . . . . . . . . . . . . . . . . . . . . . . 27
14.1. Suunto Trek Manager . . . . . . . . . . . . . . . . . . . . . . . . . . . . . . . . . . . . . . 28

5
EN
14.2. Suunto Track Exporter . . . . . . . . . . . . . . . . . . . . . . . . . . . . . . . . . . . . . 29
14.3. Joining the suuntosports.com community . . . . . . . . . . . . . . . . . . . . . . 30
14.4. Third party mapping software . . . . . . . . . . . . . . . . . . . . . . . . . . . . . . . . 31
15. CARE AND MAINTENANCE . . . . . . . . . . . . . . . . . . . . . . . . . . . . . . . . . . . . . 31
15.1. Water resistance . . . . . . . . . . . . . . . . . . . . . . . . . . . . . . . . . . . . . . . . . . 31
15.2. Charging the battery . . . . . . . . . . . . . . . . . . . . . . . . . . . . . . . . . . . . . . . 32
16. HINTS AND TROUBLESHOOTING . . . . . . . . . . . . . . . . . . . . . . . . . . . . . . . 34
17. ONLINE WARRANTY REGISTRATION . . . . . . . . . . . . . . . . . . . . . . . . . . . . 36
18. DISCLAIMERS . . . . . . . . . . . . . . . . . . . . . . . . . . . . . . . . . . . . . . . . . . . . . . . 36
18.1. User’s responsibility . . . . . . . . . . . . . . . . . . . . . . . . . . . . . . . . . . . . . . . 36
18.2. Copyright, trademark and patent notice . . . . . . . . . . . . . . . . . . . . . . . . 37
18.3. CE . . . . . . . . . . . . . . . . . . . . . . . . . . . . . . . . . . . . . . . . . . . . . . . . . . . . . 37
18.4. Limits of Liability and ISO 9001 Compliance . . . . . . . . . . . . . . . . . . . . 38
18.5. Disclaimer . . . . . . . . . . . . . . . . . . . . . . . . . . . . . . . . . . . . . . . . . . . . . . . 38
19. GPS DEFAULT DATUM . . . . . . . . . . . . . . . . . . . . . . . . . . . . . . . . . . . . . . . . 39
20. LOCAL GRID LIST . . . . . . . . . . . . . . . . . . . . . . . . . . . . . . . . . . . . . . . . . . . . 40
21. DISPOSAL OF THE DEVICE . . . . . . . . . . . . . . . . . . . . . . . . . . . . . . . . . . . . 40

6
1. INTRODUCTION
This is the User’s Guide for Suunto X9i wristop computer. It contains brief introductions
to all the modes and guidelines on where and when to use their functions. It also
contains more detailed instructions on how to use the most important functions.
However, it does not include all the information on Suunto X9i, and the information
it contains is not always given in full detail. In other words, the User’s Guide should
be used alongside the User’s manual. Therefore you should first read the User’s
manual carefully before using the User’s Guide. You can find the User’s manual on
the CD-ROM supplied with your Suunto X9i.
Checklist
Make sure the package contains the following items:
• Suunto X9i
• Charger
• PC-interface cable
• CD containing the Suunto Trek Manager software and the User’s manual
• Suunto X9i Pocket Guide
• Suunto X9i User’s Guide
• Should any of these be missing from the package, contact the resale agent who
sold you the package.

7
EN
2. BASIC MENU STRUCTURE

8
3. GENERAL SETTINGS
Before starting to use your Suunto X9i, you need to set the correct time and date.
You can also customize all the necessary units and settings.
These instructions show you how to set the time and date. The adjustments of
the other settings is fairly similar. You can find all the settings in the basic menu
structure.
Setting the time and date:

9
EN
4. TIME MODE
The Time mode includes normal watch functions such as time, date, alarm and
stopwatch. In the Time menu you can select the measuring units for the data displayed
in other modes, adjust the general settings such as display contrast and button tones
and define the GPS position format to match the maps you normally use.
4.1. Using the Time mode-specific functions
General settings
• Set the UTC offset (TIME/DATE)
• Set the time and date (TIME/DATE)
• Customize the desired units and settings, select the coordinate system (UNITS and
GENERAL)

10
Planning your journey
• Set the Position format (UNITS)
• If the position format is Grid, set the grid that matches your map (UNITS)
• If the position format is UTM, select also the correct map datum.
Before starting the hike
• Adjust the time and dual time and the UTC offset if you are in a new time zone
(TIME/DATE)
During hiking
• Use the stopwatch to record your runs, hikes etc.
• Adjust the light settings to suit different conditions (LIGHT)

11
EN
5. ALTI/BARO MODE
The Alti/Baro mode is used for measuring altitude, barometric pressure and
temperature. Suunto X9i calculates the altitude from the current barometric pressure,
which is more sensitive and accurate than the altitude measurement with the GPS,
and is also available when the GPS is off.
Because both altitude and weather data are measured with the same barometric
sensor, you have to select whether you want to use this mode as an altimeter or as a
weather station. The Use selection defines the set of information shown on the main
display. The Alti/Baro menu also contains weather and altitude alarms, the reference
setting needed to relate the current weather state with your current altitude, and the
weather memory.
5.1. Alti use

12
5.2. Baro use
Before starting the hike
• Set the reference altitude (REFERENCE)
• Set the altitude or barometric alarms (ALARM)
During hiking
• View either altitude or barometric information (USE)
After the journey
• View the 7-day barometric memory (BARO MEM)

13
EN
6. COMPASS MODE
The Compass mode aids the GPS functions and offers you navigational support
even when the GPS is off. In the Compass menu you can set the declination and
calibrate the compass to ensure accurate readings in any location.
Before starting the hike
• Calibrate the compass (CALIBRATE)
• Set the compass declination (DECLINATION)
During hiking
• Use the compass to guide you in unfamiliar terrain
• Obtain directions when the GPS is off, or you are moving at such slow speed that
the GPS is not able to measure your direction.
NOTE! The X9Mi model can be set to display mils instead of degrees by using the
Trek Manager SW.

14
7. NAVIGATION MODE
You should use the Navigation mode when you have a pre-planned destination
and you want to ensure that you will find it. The mode includes all the typical GPS
functions related to routes and waypoints. You can create the routes and waypoints
in this mode or on your PC and use them to guide you to your destination. The
Navigation mode also shows you the distance, direction, estimated time of arrival
and other essential information for all the waypoints of the selected route, and guides
you back to your starting point.
The Navigation mode works together with the Activity mode, so even if you do not
activate a route, for instance when running, the Navigation mode always shows you
the distance and direction to the start.

15
EN
Planning your journey
• Create a route (ROUTE)
• Create new waypoints to a route by linking or by entering the coordinates
(LINK WP)
Before starting the hike
• Select a route (ROUTE)
• Choose the navigation method (NAVIGATE)
NOTE: NOTE! The display is updated according to the selected GPS fix interval.
The fix interval is set in the Activity mode.
During hiking
• Navigate on the chosen route
• View navigational data (NAVIDATA)
Returning home
• Follow the active track log to the beginning of the journey (TRACK BACK)
After the journey
• View, edit and/or erase routes and waypoints (ROUTE)
• Download your data to Suunto Trek Manager for further analysis.

16
8. ACTIVITY MODE
While the Navigation mode shows you where to go, the Activity mode displays your
current performance. It is the mode you need when you want to measure and record
your activity, be it running in your neighborhood or navigating in the wilderness.
The Activity mode shows you the speed, distance, time from start and other interesting
data regarding your current activity. It records your track with the speed and altitude
profile that you can view on your PC. It also records memory points if you have
marked them. It also gives you a log summary at any time on the road with just a
push of a button.

17
EN
Before starting the hike
• Choose the activity type (ACTIVITY)
• Select the GPS fix interval (GPS FIX)
• Set the reference altitude in the Alti/Baro menu
NOTE: The display is updated according to the selected GPS fix interval.
During hiking
• View your speed and distance information
• View the log summary (START/DATA button)
Returning home
• Use the track back (TRACK LOG) function to guide you to the nearest point of a
previously recorded track, and after that to the beginning of this track.
After the journey
• View and/or erase track log files (MEMORY)
• View and analyze your journey on the PC using Suunto Trek Manager or Suunto
Track Exporter

18
9. FUNCTION MENU
The Function menu is similar in all the modes. To access the Function menu, press
ENTER in the main display of any mode for more than 2 seconds.
Before starting the hike
• Mark your current position so that you can return there later on (MARK HOME)
During hiking
• View the coordinates of your current position (POSITION)
• Mark specific positions during the activity (MARK MEMP)
Returning home
• Return to the position that you marked with Mark Home (FIND HOME)
10. PLANNING YOUR JOURNEY
When you plan your journey, you can create a route using Suunto X9i, Suunto Trek
Manager or select any of the map providers’ softwares compatible with Suunto X9i.
(Complete list is available at www.suunto.com)

19
EN
Creating a route with Suunto X9i
Mempoint names list
Edit the mempoint names with Suunto Trek Manager.
Coordinate formats
MGRS
Set: This means that you have to set the correct datum/grid.
No adjustment required: This means that this selection does not have any effect
so you do not have to adjust it.

20
11. BEFORE STARTING THE HIKE
Before you start your hike, you should make sure that the compass works properly.
You should also mark the home position so that you can find back if you get lost.
Also make sure that the GPS is on and the route is activated.
Calibrating the compass

21
EN
Activating a route Choosing the navigation method
Navigation methods
Other manuals for X9i
1
Table of contents
Languages:
Other Suunto Watch manuals

Suunto
Suunto G6 User manual

Suunto
Suunto Companion Setup guide

Suunto
Suunto COBRA3 User manual

Suunto
Suunto T1 User manual

Suunto
Suunto X10 User manual

Suunto
Suunto Altimax User manual

Suunto
Suunto T6 User manual

Suunto
Suunto Ambit 2.0 User manual

Suunto
Suunto t3 User manual

Suunto
Suunto VYTEC DS User manual

Suunto
Suunto N3i User manual

Suunto
Suunto RACE OW224 User manual

Suunto
Suunto AMBIT 2.5 User manual

Suunto
Suunto Altimax User manual

Suunto
Suunto N3 User manual

Suunto
Suunto X6 User manual

Suunto
Suunto CORE User manual

Suunto
Suunto ESSENTIAL User manual

Suunto
Suunto OW185 Owner's manual

Suunto
Suunto G6 User manual