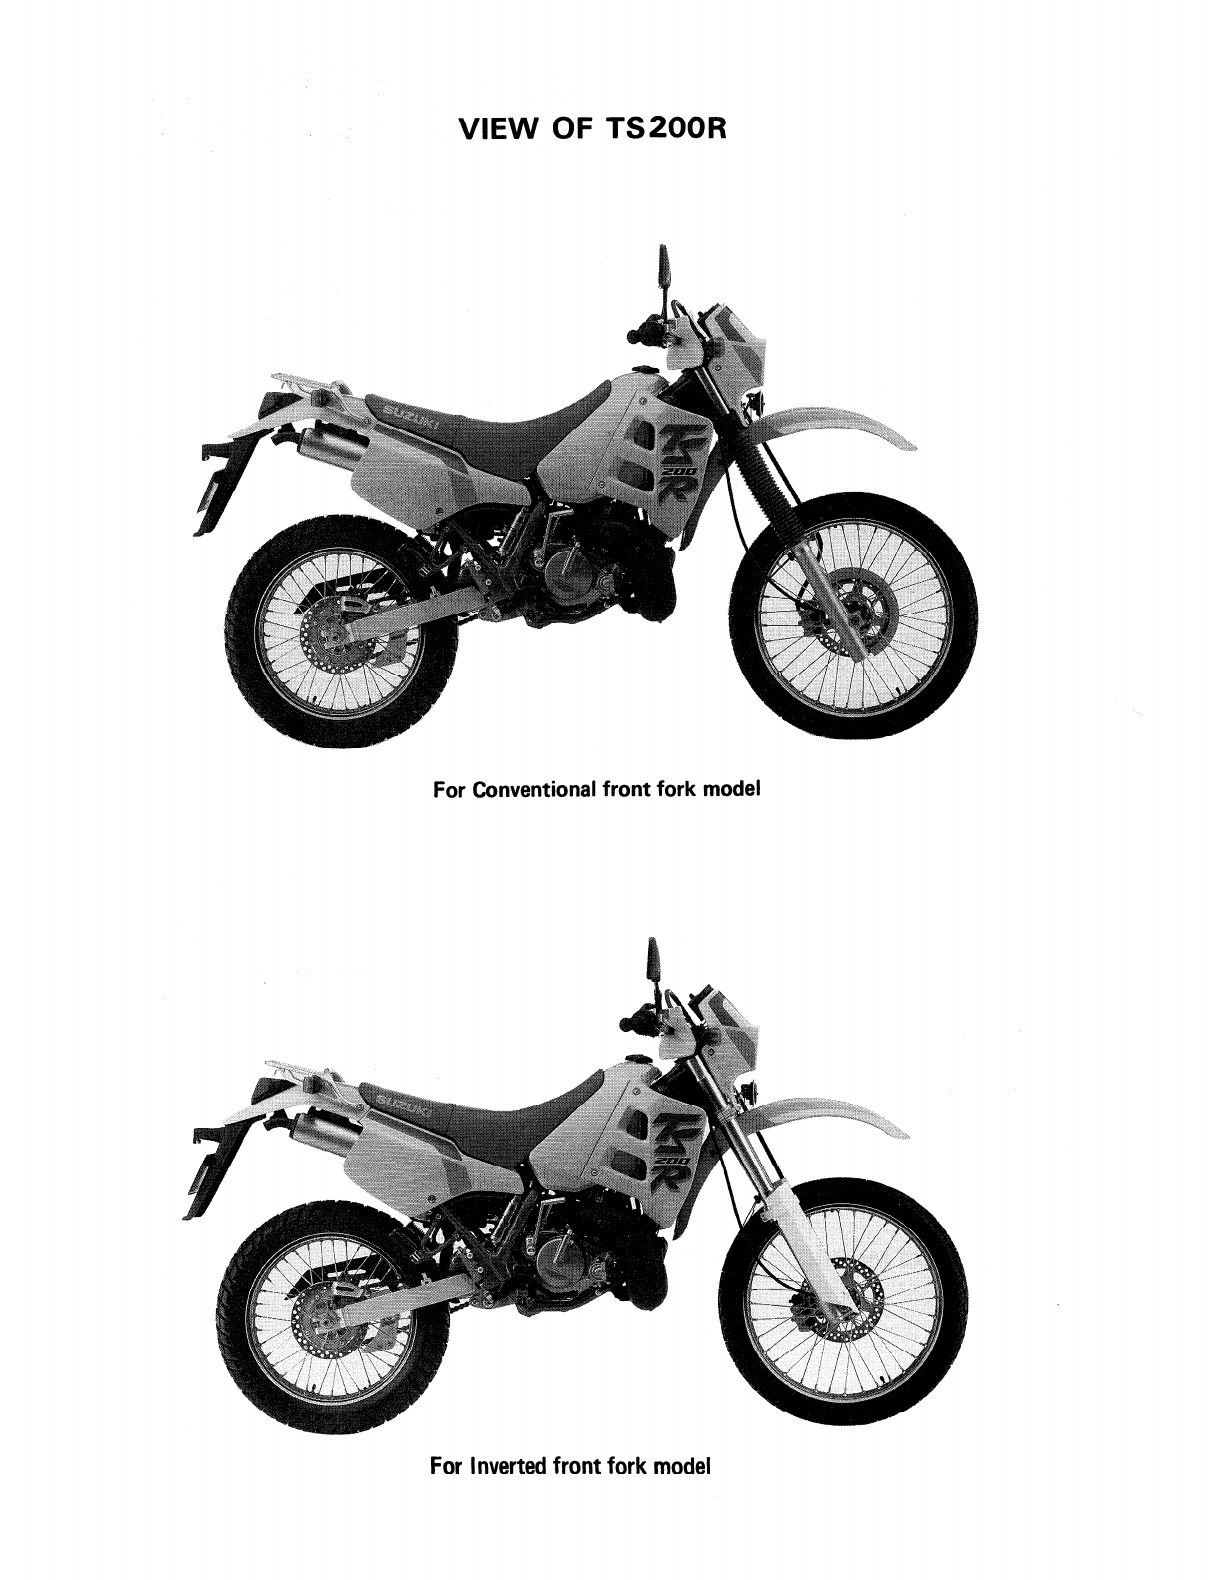
Suzuki TS200R User manual


FOREWORD
The
SUZUKI
TS200R
has
been developed
as
a
new
generation motorcycle to the TS-models.
It
is
packed
with
highly
advanced design concepts
including a
liquid
cooled engine, a crankcase reed
valve, a
Automatic
Exhaust Timing
Control
(A.
E.
T.C.) a Digital C.D. ignition system a
link
type
rear suspension. Combined
with
precise
control
and
easy
handling the TS200R provides excellentperfor-
mance andoutstanding riding comfort.
This service manual
has
been produced
primarily
for
experienced mechanics whose
job
is
to
inspect,
adjust, repair
and
service
SUZUKI
motorcycle.
Apprentice mechanics and
"do
it
yourself"
mechanics
will
also
find
this manual to be an
extremely usefulguide.
The TS200R, manufactured to standard specifica-
tions,
is
the main subject
matter
of
this manual.
However, the TS200R machines distributed
ih
your
country
might
differ
in
minor
respects from the
standard-specification and,
if
they do,
it
is
because
some
minor
modifications (which are
of
no
consequence
in
most
cases
as
far
as
servicing
is
concerned) had to be made to
comply
with
the
statutory
requirements
of
your
country.
This manual contains up-to-date
information
at
the
time
of
its
issue.
Later made modifications and
changes
will
be explained to
each
SUZUKI
distrib-
utor
in respective markets, to whom
you
are
kindly
requested
to
make query
about
updated
information,
if
any.
SUZUKI MOTOR CORPORATION
Motorcycle
Department
Overseas Service
Division
©COPYRIGHT SUZUKI MOTOR CORPORATION 1990
GROUP INDEX
GENERAL
INFORMATION
PERIODIC MAINTENANCE
AND
TUNE-UP PROCEDURE
IENGINE n
L___
_
__
g
Llc_o_o_L_IN
__
G_s_v_s_~_EM
__
·--~-------~
I
FUEL
AND
LUBRICATION SYSTEM
II
IELECTRICAL SYSTEM Ill
CHASSIS
IL
s_E_R_"'_Jc_I_N_G_IN_F_o_R_M_~_~_~_o_N
___
B
L..._T._S_2_o_o_R_N_f_'9_2_-M_O_D_E_L_J
___
___.q
TS200RP
('93-MODEL)
~
L_____
_
______jllliil

VIEW
OF
TS200R
For Conventional
front
fork
model
For
Inverted
front fork
model

GENERAL
INFORMATION
~----------------CONTENTS----------------~
VIN
AND
SERIAL NUMBER
LOCATIONS..............................
1-1
FUEL, OIL
AND
COOLING SOLUTION
RECOMMENDATIONS ....................................................... 1-1
BREAKING-IN PROCEDURES .............................................. 1-2
SPECIAL MATERIALS........................................................ 1-3
PRECAUTIONS
AND
GENERAL INSTRUCTIONS ................... 1-5
SPECIFICATIONS
..............................................................
1-j'

,:The
frame serial number or V.I.N. (Vehicle Identification
Number)
CD
is
stamped on the steering
head
pipe. The engine
serial number
®
is
located
on
the left side
of
the crankcase.
These
numbers
are
required especially
for
registering the
machine
and
ordering
spare
parts.
FUEL, OIL
AND
COOLING SOLUTION
RECOMMENDATIONS
FUEL
For
CANADA
model
Use
only
unleaded gasoline
of
at
least
87
pump
octane
( R
~M
method) or
91
octane
or higher rated by
the
Research
Method.
For
other
models
Gasoline used should be graded
85-95
octane or higher.
An
unleaded gasoline is recommended.
ENGINE OIL
Use SUZUKI
"CCI"
oil
or
SUZUKI CCI Super oil.
They
are
formulated
to
give
best
engine
performance
with
least
com-
bustion chamber deposits, least preignition,
maximum
spark
plug life and best lubrication.
If
they
are
not
available, a good
quality
TWO-STROKE OIL (non-diluent
type)
should be used.
TRANSMISSION OIL
Use a
good
quality
SAE
20W/40
multi-grade
motor
oil.
FRONT FORK OIL
Use
fork
oil
#
1
0.
99000-99044-10G
:
SUZUKI FORK
OIL#
10
BRAKE FLUID
Specification
and
classification :
DOT
4
99000-2311
0 :
SUZUKI BRAKE FLUID

COOLING SOLUTION
Use an anti;.freeze
&
Summer coolant compatible:·
with
aluminum radiator, mixed
with
distilled
water
only,
at
ratio
of
50:
50.
WATER FOR MIXING
Use distilled
water
only.
Water
other than distilled
water
can
corrode and clog
the
aluminum radiator.
ANTI-FREEZE & SUMMER COOLANT
The
coolant
performs
as
corrosion and
rustinhibitor
as
well
as
anti-freeze. Therefore, the coolant should be used at all
times
even
though
the atmospheric temperature in
your
area
does
not
go
down
to
freezing point.
SUZUKI recommends
the
use
of
SUZUKI GOLDEN CRUISER
1200NA
anti-freeze
&
summer coolant.
If
this
is
not
availa-
ble, use an equivalent
which
is compatible
with
aluminum
radiator.
99000-99032-10X
:SUZUKI
GOLDEN CRUISER 1200NA
{Non-Amine type)
REQUIRED
AMOUNT
OF
WATER/COOLANT
Solution
capacity
{total) : 900 ml {0.95/0.79 US/Imp
qt)
CAUTION:
Mixing
of
anti-freeze &
summer
coolant
should be
limited
to
60%.
·Mixingbeyond
it
would
reduce
its
efficitmcy.
If
the anti-
freeze &
summer
coolant
mixing
ratio is
below
30%,
rust
inhibiting
performance is greatly reduced,
Be
sure
to
mix
it
above
30%
even
though
the
atmospheric temperature does
not
go
down
to
freezing point.
BREAKING-IN PROCEDURES
During manufacture only the best possible materials.are used
and all machined parts are finished
to
a very high standard,
but
it
is still necessary
to
allow
the
moving
parts
to
"BREAK-
IN"
before subjecting
the
engine
to
maximum
stresses. The
future
performance and reliability
of
the
engine depends on
the
care and restraint exercised during
its
early life. The
general rules are
as
follows.
•
Keep
to
these
breaking-in engine
speed
limits.
Initial 800 km {500 miles) : Below 5 000
r/min
Up
to
1 600 km
{1
000 miles) : Below 7 000
r/min
Over 1 600 km
{1
000 miles) : Below 12 000
r/min
GENERAL
INFORMATION
1-2

1·3
GENERAL
INFORMATION
SPECIAL MATERIALS
The materials listed below
are
needed
for
maintenance
work
on the TS200R,
and
should
be
kept on
hand
for
ready
use.
They supplement
such
standard materials
as
cleaning fluids, lubrications, emery cloth
and the like. How
to
use
them
and
where
to
use
them
are
described in the
text
of
this manual.
Material
SUZUKI
SUPER
GREASE
"A"
99000-25010
SUZUKI
BOND No. 1207B
99000-31140
SUZUKI
BOND No. 1215
99000-31110
THREAD
LOCK
SUPER
"1322"
99000-32110
THREAD
LOCK SUPER
"1303"
99000-32030
THREAD
LOCK
SUPER
"1324"
99000-32120
Part
•
Throttle
grip
• Clutch lever
• Speedometer cable
and
tachometer cable
• Speedometer
gear
box
• Brake pedal shaft
• Side stand
• Kick starter lever
• Crankcase oil
seal
• Water
pump
mechanical
seal
• Crankcase mating surface
• Water thermo-gauge
• Engine sprocket
bolt
• Exhaust pulley
bolt
• Exhaust valve arm screw
• 2nd drive
gear
• Gearshift
arm·
stopper
• Magneto
rotor
nut
Page
Part
Page
2-
2 • Wheel bearings
2-
2
2-
2 7- 1
2- 2 7- 2
7-31
2-
2 • Steering stem bearing and
race
7-25
7- 1 7-29
7·
2 • Swingarm bearing and dust
seal
7-40
2-
2 7-47
2-
2 • Cushion lever and rod bearing 7-40
2-
2 7-47
3-27
4-
8
3-31
4-
9
3· 5 •
Kick
lever
bolt
3-40
3-
6
3-18
3-26
3-32
3-37

Material
~
THREAD
LOCK
SUPER
"1360"
99000-32020
&
THREAD
LOCK
"1342"
99000-32050
~
~
~
~········.A
-
SUZUKI SILICONE
GREASE 99000-25100
~
SUZUKI
BRAKE
FLUID
99000-23110 (0.5L)
~
~
~~~o.2.'-~
...
'···'<~
SUZUKI GOLDEN
CRUISER 1200NA
(Non-Amine type)
99000-99032-1
ox
~
•
OIL
..
~
SUZUKI FORK
OIL#
10
99000-99044-1
OG
Part
• Disc
bolt
Page
7- 1
7- 2
7-31
• Gearshift retainer screw
and
bolt
3-32
• Pawellifter
nut
and
cam
guide screw 3-33
•
Cam
driven
gear
bolt
3-33
• Front
fork
damper rod
bolt
7-13
• Caliper axle
• Brakes
• Cooling solution
•
Front
fork
7-16
7- 5
7-34
1-
1
2-10
1-
2
1-
1
7-17
7-22
GENERAL
INFORMATION
1-4
Part
Page

1-5
GENERAL
INFORMATION
PRECAUTIONS
AND
GENERAL INSTRUCTIONS
Observe
the
following
items
without
fail
when
disassembling and reassembling
motorcycles.
o Do
not
run engine indoors
with
little
or no
ventilation.
o
Be
sure
to
replace packings, gaskets, circlips,
0-rings
and
cotter
pins
with
new
ones.
CAUTION:
Never reuse a
circlip
after
a circlip has been removed
from
a
shaft,
it
should be discarded and a
new
circlip
must
be installed.
When
installing a
new
circlip, care
must
be taken
not
to
expand
the
end gap larger
than
required
to
slip
the
circlip
over
the
shaft.
After
installing a circlip,
always
insure
that
is
completely
seated in
its
groove and securely
fitted.
o Tighten cylinder head and case bolts and
nuts
beginning
with
larger diameter and ending
with
smaller
diameter, and
from
inside
to
outside diagonally,
to
the
specified
tightening
torque.
o Use special
tools
where
specified.
o Use genuine parts and recommended oils.
o
When
more
than
2 persons perform
work
together,
pay
attention
to
the
safety
of
each other.
o
After
the
reassembly, check parts
for
tightness
and operation.
o Treat gasoline,
which
is
extremely
flammable and
highly
explosive,
with
greatest care. Never use
gasoline as cleaning solvent.
Warning, Caution and
Note
are included in
this
manual occasionally, describing
the
following
contents.
WARNING
.................
The personal
safety
ofthe
rider
or
bystanders
may
be involved. Disregarding
this
information
could result in personal injury.
CAUTION..................
These instructions point
out
special service procedures
or
precautions
that
must
be
followed
to
avoid damaging
the
machine.
NOTE
...
;...................
This
provides
special
information
to
make
maintenance
easier
or
important
instructions
clearer.
REPLACEMENT PARTS
When
you
replace
any
parts, use
only
genuine SUZUKI
replacement parts, or their equivalent. Genuine SUZUKI parts
are high
quality
parts
which
are designed and
built
specifi-
cally
for
SUZUKI vehicles.
CAUTION:
Use
of
replacement parts
which
are
not
equivalent in
quality
to
genuine SUZUKI parts can lead
to
performance problems
and damage.

ASBESTOS INFORMATION
Note
the
following
when
handling a
supply
part
with
the
above WARNING LABEL or
any
part
in
the
parts
list
in
this
section
which
contains
asbestos.
• Operate
if
possible
out
of
doors in a
well
ventilated
place.
• Preferably use hand
tools
or
low
speed
tools
equipped,
if
necessary,
with
an
appropriate
dust
extractor
facility.
If
· high speed
tools
are used,
they
should
always
be so
equipped.
•
If
possible, dampen before
cutting
or
drilling.
• Dampen
dust
and place
it
in a properly closed receptacle
and dispose
of
it
safely.
Any
domestic
asbestos
product
to
which
the
above does
not
apply,
but
which
is likely
to
release fibres during use should
be replaced
by
new
one
when
worn.
Exhaust pipe gasket
GENERAL
INFORMATION
1-6
WARNING
CONTAINS
ASBESTOS
Breathing
ubeatoa
duet
Ia
dang8f'OUI
tohnhh
Follow
safety
Instruction•

1-7
GENERAL
INFORMATION
SPECIFICAITONS
DIMENSIONS AND DRY
MASS
Overall length
............
2 185
mm
(86.0 in)
Overall
width.............
880
mm
(34.6 in)
Overall height
............
1 245
mm
(49.0 in)
Wheelbase
................
1 425
mm
(56.1
in)
Ground clearance....... 320
mm
(12.6 in)
Seat
height...............
880
mm
(34.6 in)
Dry mass .................. 115
kg
(253
lbs)
...
E-24, 28
116
kg
(256
lbs)
...
ENGINE
E-0
2, 04
Type
........................
Two-stroke,
water-
cooled
Intake system
............
Crankcase and reed
valve
Number
of
cylinders .
.. 1
Bore
.........................
66.0
mm
(2.598 in)
Stroke
......................
57.0
mm
(2.244 in)
Piston displacement ... 195
cm
3 ( 11.9
cu.
in)
Corrected
compression ratio ......
8.5
: 1
Carburetor
................
MIKUNI TM30SS,
Single
Air
cleaner
................
Polyurethane foam
element
Starter system
...........
Primary kick
Lubrication system..... SUZUKI
"CCI"
TRANSMISSION
Clutch
......................
Wet
multi-plate
type
Transmission
.............
6-speed
constant
mesh
Gearshift pattern
........
1-down,
5-up
Primary reduction
.......
3.350 (67/20)
Final reduction
...........
2.600 (39/15)
...
E02, 04,
24
2.857 (40/14)
...
E-28
Gear ratios,
Low
........
2.636 (29/11)
2nd
........
1.857 (26/14)
3rd .......... 1.400 (21/15)
4th
......... 1.095 (23/21)
5th
.........
0.916 (22/24)
Top
........
0.800 (20/25)
Drive chain
................
TAKASAGO RK520SO
106 links
CHASSIS
Front suspension
.......
Telescopic, coil spring,
oil dampened
Rear suspension
........
Link type
suspension
system, gas/oil damped,
damping force adjustable,
spring free way adjustable
Steering angle
......•....
43° (right
&
left)
Caster
......................
62°
30'
Trail
.........................
117 mm (4.6 in)
Turning radius
...........
2.3 m
(7
.5
ft)
Front brake
...............
Disc
Rear brake
................
Disc
Front tire size
............
80/100-21
51
P
Rear tire size ............. 110/90-18
61
P
Front
fork
stroke
........
270 mm (10.6 in)
Rear wheel travel
.......
270
mm
(10.6 in)
ELECTRICAL
Ignition
type
..............
SUZUKI
"PEl"
(COl)
Ignition timing
...........
8°
B.T.D.C. below
2
000
r/min
Spark plug
................
NGK BR9ES or
NO
W27ESR
Battery
.....................
12V
10.8
kC (3
Ah)/
10
HR
Fuse
.........................
15A
CAPACITIES
Fuel
tank
including reserve
.....
9.5 L (2.5/2.1 US/Imp
gal)
reserve ..... 1.4 L (0.4/0.3 US/Imp
gal)
Engine oil
tank
...........
1.2 L (1.3/1.1
US/Impqt)
Front
fork
oil
.............
555 ml
...
E-24, 28
452 ml
...
E-02, 04
Transmission oil
.........
950
ml
(
1.00/0.84 US/Imp qt)
Cooling solution
.........
900
ml
(0.95/0.79 US/Imp qt)
These specifications are subject
to
change
without
notice.
E-02
...
For U.K.
E-04
...
For France
E-24
...
For Australia
E-28
...
For
Canada

PERIODIC
MAINTENANCE
AND
TUNE-UP PROCEDURES
~----------------CONTENTS----------------~
PERIODIC MAINTENANCE SCHEDULE
...............................
2-
1
PERIODIC MAINTENANCE CHART
.................................
2-
1
LUBRICATION POINTS
.................................................
2-
2
MAINTENANCE
PROCEDURES
.........................................
2-
3
BATTERY
....................................................................
2-
3
CYLINDER NUTS, CYLINDER HEAD NUTS
AND
EXHAUST
PIPE
NUTS
..................................................
2-
3
CYLINDER HEAD, CYLINDER
AND
MUFFLER
..................
2-
4
SPARK PLUG
..............................................................
2-
4
AIR
CLEANER
..............................................................
2-
5
TRANSMISSION
OIL
....................................................
2-
6
COOLING SYSTEM
......................................................
2-
6
CARBURETOR
.............................................................
2-
7
FUEL
LINE
...................................................................
2-
8
OIL PUMP
...................................................................
2-
8
CLUTCH
.....................................................................
2-
8
DRIVE CHAIN
..............................................................
2-
9
BRAKES
.....................................................................
2-10
TIRES
.........................................................................
2-13
STEERING
...................................................................
2-14
FRONT FORK ..............................................................
2-14
REAR SUSPENSION
.....................................................
2-14
CHASSIS BOLTS
AND
NUTS
........................................
2-15

2-1
PERIODIC
MAINTENANCE
AND
TUNE-UP
PROCEDURES
PERIODIC MAINTENANCE SCHEDULE
The chart below lists the recommended intervals
for
all the required periodic
service
work
necessary
to
keep the motorcycle operating at
peak
performance and economy. Traveling distances
are
expressed
in
terms
of
kilometers.
NOTE:
More frequent servicing
may
be
performed
on motorcycles
that
are used
under
severe conditions.
PERIODIC MAINTENANCE CHART
This interval should
be
judged
by
km 1 000 6 000 12 000 18 000 24 000
odometer reading
or
months,
whichever
comes
first. months 2 12
24
36 48
Battery
-I I I I
Cylinder
nuts,
cylinder head
nuts
and
exhaust
T T T T T
pipe
nuts
Cylinder head, cylinder and
muffler
-
c c c c
Spark plug I R R R R
Air
cleaner Clean every 3
000
km
Transmission oil R -R
-
R
I
-
I
-
I
Radiator hoses Replace
every
4 years
Coolant
Replace every 2 years
Carburetor I I I I I
I
I
I I I
Fuel line Replace
every
4 years
Oil
pump
I I I I I
Clutch
I I I I I
I I I I I
Drive chain Clean and lubricate
every
1
000
km
Brakes I I I I
I I I I
Brake hoses Replace every 4 years
Brake fluid Replace every 2 years
Tires I I I I
Steering I I I I
Front
fork
I I I I
Rear suspension I I I I
Chassis
bolts
and
nuts
T T T T
1:
Inspection and adjust, clean, lubricate or replace as necessary
C:
Clean
R:
Replace T: Tighten
I
I
I
I
I
I
T

PERIODIC
MAINTENANCE
AND
TUNE-UP
PROCEDURES
2·2
LUBRICATION POINTS
Proper
lubrication
is
important
for
smooth
operation
and long life
of
each
working
parts
of
the
motor-
cycle.
Major
lubrication
points
are
indicated
below.
NOTE:
* Before lubricating
each
part, clean
off
any
rusty spots and wipe
off
any
grease,
oil,
dirt
or
grime.
* Lubricate exposedparts which are subject to rust,
with
motor
oil
or
grease.
: Clutch lever
~:Motor
oil
m:
Grease
;:-c---
~
: Clutch cable
m:Side stand
m:
Kick starter lever
m:
Brake pedal shaft
m:Rear wheel
bearing
~
: Drive chain
~
:
Throttle
cable
m:Speedometer cable and
gear
box

2-3
PERIODIC
MAINTENANCE
AND
TUNE-UP
PROCEDURES
MAINTENANCE PROCEDURES
This section describes the service procedures for each section
of
Periodic Maintenance.
BATTERY
J1nspect Every 6
000
km
(
12
months)
• Remove
the
left
frame cover.
• Check
the
battery
voltage
with
the
pocket
tester.
09900-25002
: Pocket
tester
If
the
voltage
reading is
below
12.0
V,
this
battery
needs
recharging.
Battery
voltage
:
Above
12.0
V
•
Disconnect
the
battery
8 and
8:)
lead
wires
and remove
the
battery.
WARNING:
When
disconnecting
the
battery
lead
wire,
8 lead
wire
first.
CAUTION:
Read
the
II
ELECTRICAL SECTION''
I
for
the
servicing
battery.
CYLINDER NUTS, CYLINDER HEAD NUTS
AND
EXHAUST
PIPE
NUTS
Tighten
Initial 1
000
km
(2
months)
and Every
6
000
km
(12
months)
CYLINDER NUTS
AND
CYLINDER HEAD NUTS
• Remove
the
seat and fuel
tank.
(Refer
to
page
3-2.)
• Remove
the
first
muffler.
(Refer
to
page
3-2.)
• First loosen
the
nuts
and
tighten
the cylinder
nuts
and then
cylinder
head
nuts
to
the
specified
torque
in ascending
numeriacal order as
shown.
Tightening
torque
:
23
-
27
N·m
(2.3
-
2.
7
kg-m,
16.5
-
19.5
lb-ft)
EXHAUST
PIPE
NUTS
•
Tighten
the
exhaust
pipe
nuts
to
the
specified
torque.
Tightening
torque
:
10
-
16
N·m
(1.0-
1.6
kg-m,
7.0-
11.51b-ft)

PERIODIC
MAINTENANCE
AND
TUNE-UP
PROCEDURES
2-4
CYLINDER HEAD, CYLINDER
AND
MUFFLER
Remove carbon Every 6
000
km
(
12
months)
• Carbon deposits in the combustion chamber
of
the cylinder
head and
at
the piston
crown
will raise the compression
ratio and may cause preignition
or
overheating.
• Carbon deposited
at
the exhaust port
of
the cylinder
will
prevent the
flow
of
exhaust gas, reducing the
output.
Remove cabon deposits periodically.
SPARK PLUG
Inspect 1
000
km
(2 months) and Replace Every
6
000
km
(
12
months)
Remove the carbon deposits
with
a wire
or
pin and adjust
the spark plug gap
to
0.6
-
0.8
mm
(0.02
-
0.03
in)
measuring
with
a thickness gauge.
When removing carbon deposits,
be
sure
to
observe the
appearance
of
the plug, noting the color
of
the carbon
deposits. The color observed indicates whether the standard
plug is suitable or not.
If
the standard plug is apt
to
get
wet,
replace
with
hotter
one.
----
NGK
ND
Standard BR9ES W27ESR
Hot
type
BASES
W24ESR
CAUTION:
Confirm
the
thread size and reach when replacing the plug.

2-5
PERIODIC
MAINTENANCE
AND
TUNE-UP
PROCEDURES
AIR CLEANER
IClean Every 3
000
km
If
the
air cleaner is clogged
with
dust,
intake resistance
will
be increased
with
a resultant decrease in
power
output
and
an increase in
fuel
consumption.
Check and clean
the
element
in
the
following
manner.
• Remove
the
seat and
left
frame
cover.
• Remove
the
air cleaner case cover.
• Remove
the
air cleaner
CD.
• Separate
the
polyurethan
foam
element
®
from
the
element
frame
®.
• Fill a washing pan
of
a proper size
with
nonflammable clean-
ing
solvent.
Immerse
the
element in
the
cleaning
solvent
and
wash
it
clean.
• Squeeze
the
cleaning
solvent
out
of
the
washed
element
by
pressing
it
between
the
palms
of
both
hands:
do
not
twist
or
wring
the
element
or
it
will
develop tears.
• Immerse
the
element in MOTOR OIL SAE #
30
or 1
OW/40,
and squeeze
the
oil
out
of
the
element leaving
it
slightly
wet
with
oil.
• Fit
the
cleaner
element
to
frame
properly.
CAUTION:
* Before and during the cleaning operation, inspect the element
for
tears. A
torn
element must be replaced.
*
Be
sure
to
position the element snugly and correctly,
so
that
no incoming air
will
bypass
it.
Remember, rapid wear
of
piston rings and cylinder bore
is
often
caused
by
a defective
or
poorly
fitted
element.
CAUTION:
If
driving under dusty conditions, clean the air cleaner element
more frequently. The surest way
to
accelerate engine wear
is
to
use
the engine
without
the element
or
to
use
aruptured element.
Make
sure
that
the air cleaner
is
in good condition
at
all times.
Life
of
the engine depends largely on this component!
CORRECT INCORRECT

PERIODIC
MAINTENANCE
AND
TUNE-UP
PROCEDURES
2-6
TRANSMISSION OIL
Replace (change) Initial
1
000
km
(2
months)
and
Every
12
000
km
(24
months)
After
a long period
of
use,
the
transmission oil will deteriorate
and quicken
the
wear
of
sliding and interlocking surfaces.
Replace
the
transmission oil periodically
following
the
proce-
dure
below.
• Keep
the
motorcycle
upright.
• Startthe engine
to
warm up
the
oil, this will facilitate drain-
ing
of
oil.
Shut
off
the
engine.
• Place
the
oil pan
below
the
engine and drain
the
oil
by
removing
the
filler cap
CD
and drain plug
®.
•
After
draining
the
oil completely,
fit
the
drain plug
®
securely.
Drain plug
tightening
torque:
20-25
N·m
(2.0-2.5
kg-m,
14.5-18.0
lb-ft)
•
Add
the
good
quality
SAE
20W
/40
multi-grade
motor
oil.
The transmission
will
hold about
950
ml
of
oil.
• Install
the
filler cap correctly.
•
Start
up
the
engine and
allow
it
to
run
for
several seconds
at
idling speed.
• Turn
off
the
engine and
wait
for
about one minute, and
check
the
oil level
screw
®.
If
the
oil does
not
run
out
from
the
hole, add
the
oil until
it
runs
out.
COOLING SYSTEM
Inspect Initial 1
000
km
(2
months)
and Every
12
000
km
(24
months)
Replace (change)
coolant
Every 2 years
Replace hoses Every 4 years
• Loosen
the
screw
and remove
the
radiator cap
@.
• Remove
the
drain plug
®
and drain
the
coolant
thorough-
ly while holding
the
motorcycle
upright.
WARNING:
Do
not
open
the
radiator cap
when
the
engine is
hot,
as
you
may
be injured
by
escaping
hot
liquid
or
vapor.
WARNING:
Cooling solution
may
be
harmful
if
swallowed
or
if
it
comes
in
contact
with
skin
or
eyes.
If
cooling solution
gets
into
the
eyes
or
in
contact
with
the
skin,
it
should be flushed
thoroughly
with
plenty
of
water.lf
swallowed,
induce
vomit-
ting
and call physician immediately.

2-7
PERIODIC
MAINTENANCE
AND
TUNE-UP
PROCEDURES
• Flush the radiator
with
fresh water.
• Tighten the drain plug securely.
• Fill the specified coolant up
to
the radiator inlet hole.
NOTE:
For
coolant
information,
refer
to
"COOLING
SYSTEM"
section
page
4-2.)
• Fill
the
reservoir
tank
to
the
"F"
level
with
coolant.
• Close
the
radiator
cap securely.
•
After
warming
up and cooling
down
the
engine,
check
the
coolant
level
of
the
reservoir
tank
and add
the
coolant
to
the
"F"
level
if
the
level is
below
"L".
Including reservoir tank capacity: 900
ml
(0.95/0.79
US/Imp
qt)
Reservoir tank
capacity:
150
ml
(0.16/0.13
US/Imp
qt)
CARBURETOR
Inspect
Initial
1
000
km
(2
months)
and
Every
6
000
km
(12
months)
ADJUSTING THROTTLE CABLE
• Loosen
lock
nut
CD.
•
Adjust
the
cable
play
®
to
0.5
-
1.0
mm
by
turning
adjuster@.
Throttle
cable
play
® :
0.5
-
1.0
mm
(0.02
-
0.04
in)
•
After
adjusting
the
cable play,
tighten
the
lock
nut
CD.
IDLE R/MIN ADJUSTMENT
•
Adjust
the
throttle
cable paly.
NOTE:
Make
this
adjustment
when
the engine is
hot.
•
Connect
a
tachometer.
•
Start
the
engine and
turn
the
throttle
valve
stop
screw
®
so
that
engine idles
at
1
500
r/min.
•
Turn
the
air
screw
®
in
or
out
around
1
/4
turn
from
the
original
setting.
(Refer
to
page 5-3.)
• The engine
r/min
will increase
or
decrease in
accordance
with
the
turning
of
the
air
screw.
•
Set
this
screw
in a
position
that
allows
the
engine
to
idle
at
the
highest
r/min.
•
Turn
the
throttle
valve
stop
screw
again and
adjust
the
specified
engine idle r/min.
Engine idle
r/min
: 1
400
±
100
r/min
CAUTION:
This
adjustment
could
affect
the
oil
pump
control
cable play,
so
readjust
the
oil
pump
control
cable
play
if
necessary.

PERIODIC
MAINTENANCE
AND
TUNE-UP
PROCEDURES
2-8
FUEL LINE
Inspect
Initial 1
000
km
(2
months)
and Every
6
000
km
(
12
months)
Replace Every
4
years
OIL PUMP
Inspect
Initial 1
000
km
(2
months)
and Every
6
000
km
(
12
months)
The engine oil is fed
by
the oil pump
to
the engine. The amount
of
oil fed
to
it
is regulated
by
engine speed and
the
oil
pump
control
lever
which
is controlled
by
the
amount
of
throttle
opening.
Checkthe oil pump in the following manner
to
confirm correct
operation
for
throttle
valve full opening position.
• Turn
the
throttle
grip full open.
• Check
whether
the
red mark
CD
on
the
oil
pump
control
lever is aligned
with
the index mark ®
when
the
throttle
valve is positioned
as
above.
•
If
the
marks are
not
aligned, loosen the lock
nut®
and
turn
the
adjuster @ in
or
out
to
align
the
marks.
•
After
aligning
the
marks,
tighten
the
lock
nut@.
CAUTION:
Oil
pump
cable
adjustment
must
be done
after
throttle
cable
adjustment.
CLUTCH
Inspect
Initial 1
000
km
(2
months)
and Every
6
000
km
(12
months)
• Loosen
the
lock
nut
® and
turn
the adjuster ®
fully
in.
• Loosen the cable lock
nut
(j)
and adjustthe play
of
the cable
with
the
adjuster
®
until play
of
the
clutch
lever is
1
0 -
15
mm.
Lever play ® :
10
-
15
mm
(0.4-
0.6
in)
•
Tighten
the
lock
nuts
®,
(j).
•
If
the specified play can
not
be
obtained
with
adjuster, carry
out
the
adjustment
using the adjuster on the
clutch
lever
side.
Other Suzuki Motorcycle manuals

Suzuki
Suzuki GSX-1300R User manual

Suzuki
Suzuki GSX650FA User manual

Suzuki
Suzuki PE400 User manual

Suzuki
Suzuki GSR600 User manual

Suzuki
Suzuki XF650 Freewind User manual

Suzuki
Suzuki SVF650K9 User guide

Suzuki
Suzuki Intruder VZ1500 User manual

Suzuki
Suzuki GSXR-1100 1990 User manual

Suzuki
Suzuki GSX1250FA User manual

Suzuki
Suzuki GS1000 User manual

Suzuki
Suzuki DL650 User manual

Suzuki
Suzuki 1987 GSX-R150 User manual

Suzuki
Suzuki GS500E User manual

Suzuki
Suzuki FZ50 1979 User manual

Suzuki
Suzuki DL1000 User manual

Suzuki
Suzuki FZ50 T 1980 Manual

Suzuki
Suzuki DR 125 User manual

Suzuki
Suzuki DL1000 User manual

Suzuki
Suzuki GSX-F 750 - User manual

Suzuki
Suzuki V-Strom DL650 2017 User manual