Sven RX-G960 User manual

www.sven.fi
USER’S MANUAL
Ігрова миша
RX-G960
Gaming Mouse

ENG
Gaming Mouse
2
Congratulations on your purchase of the Sven mouse!
Please read this User’s Manual before using the unit and retain this User’s
Manual in a safe place for future reference.
COPYRIGHT
© SVEN PTE. LTD. Version 1.0 (V 1.0).
This Manual and information contained in it are copyrighted. All rights reserved.
TRADEMARKS
All trademarks are the property of their legal holders.
NOTICE OF RESPONSIBILITY RESTRICTION
Despite the exerted efforts to make this Manual more exact, some dis-
crepancies may occur. The information of this Manual is given on “as is” terms.
The author and the publisher do not bear any liability to a person or an
organization for loss or damages which have arisen from the information
contained in the given Manual.
BUYER RECOMMENDATIONS
•Shipping and transportation equipment is permitted only in the original
container.
•Does not require special conditions for realization.
•Dispose of in accordance with regulations for the disposal of household and
computer equipment.
APPOINTMENT
RX-G960 gaming mouse is an input device. It is designed for entering
(entering) information into the computer, as well as controlling the operation
of the computer.
PACKAGE CONTENTS
•Gaming mouse — 1 pc
•Changeable side panels — 4 pcs
• Operation Manual — 1 pc
• Warranty card — 1 pc

3
ENG
User’s Manual RX-G960
SPECIAL FEATURES
•Adjusting the resolution to 6400 DPI
•Soft touch coating
•Navigation buttons "Forward" and "Back"
•Customizable backlight
SYSTEM REQUIREMENTS
• OS Windows.
• Free USB port.
PREPARATION TO WORK
• Connect the gaming mouse to an available USB connector on the PC.
• After connecting to the USB port, the PC will automatically recognize the
device.
• To adjust the buttons and backlight, you need to install the software
(downloaded from the website www.sven.fi). Run the previously downloaded
file to install the driver, follow the installer’s advice.
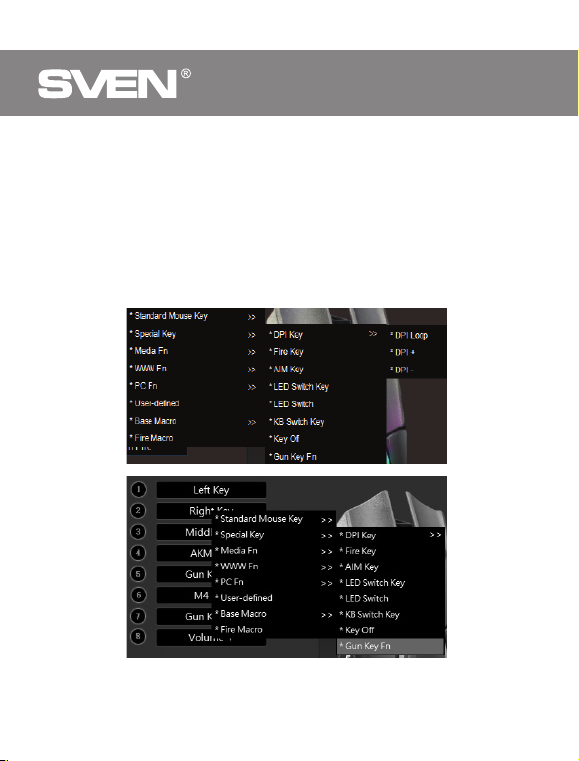
• The software consists of 4 main sections of settings: Mode Settings (Office
and Game), Advanced Settings, Backlight Settings, Macro Settings.
• By default, the software contains 3 profiles. Each can be customized to suit
your preferences. The driver provides three buttons for managing the
configuration elements: exporting the configuration, importing the
configuration, and reading the parameters.
Settings
The software has 5 types of settings: office mode, game mode, advanced
settings, macro settings and backlight settings. You can switch between settings
by clicking on the icons at the top of the software.
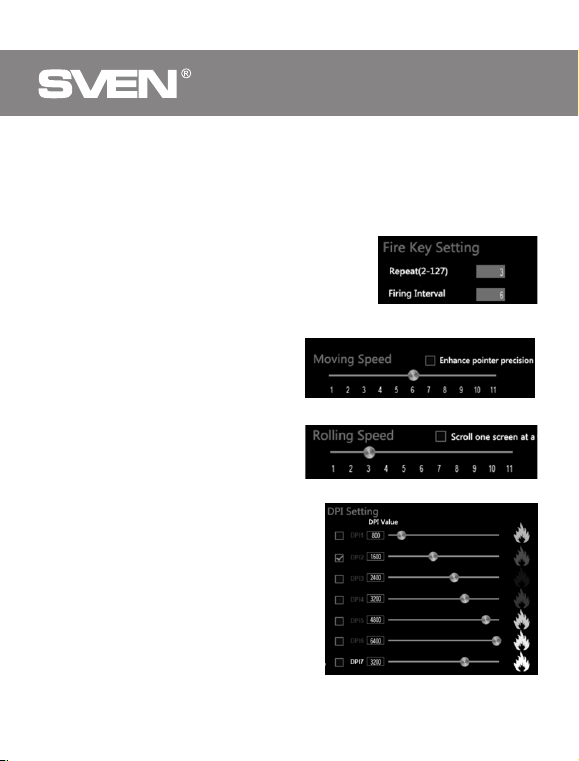
Saving settings
After setting the required parameters, click "Apply" button. The settings will
be automatically saved in the memory of the mouse.

Button settings
The software allows you to program 8 buttons according to your own
preferences. When you press a programmable button number, two-level
windows will appear, allowing you to select desired button value.
The software includes a left-click protection option that does not allow you to
reassign button that is responsible for left-clicking on another function without
having previously saved a left-click on another button, as this function is
important for mouse operation. If you try to assign another function to the left
button, without saving the left click function on another button, a system
message will pop up asking you to save the left click function.
Gaming Mouse
ENG
4

Clicking on the item that is responsible for the corresponding button will open
a window that allows you to select new functionality, as shown in the picture
below. The menu consists of 7 items: standard mouse button functionality,
specialized functions, multimedia functions, internet functions, PC functions,
custom set and macros.
Standard Mouse key
The first item includes 5 standard mouse
functions: left, right and middle clicks, K4 –
back, K5 –forward, as shown in the figure
below.
Special Key
Advanced settings allow the buttons to be assigned the following functions:
• Switching DPI/DPI Key
Function that allows you to adjust the speed of the cursor. «DPI Loop» –
switching will happen cyclically, «DPI +/-» – will increase or decrease the
speed of movement.
5
ENG
User’s Manual RX-G960

• Fire key
• AIM Key
• LED Switch Key
• LED Switch
• KB switch key
A feature that allows you to switch between office and gaming mouse settings.
To switch between modes, press and hold the button for 3 seconds
• Key Off
• Gun Key Fn
ENG
6
Gaming Mouse

Gun Key Fn: Use this key to set the offset value of the mouse cursor for better
aiming.
Adjusting the sight shift range: In the game mode, add a special Gun Key Fn
softkey, hold down this key, and adjust the mouse wheel to change the range
of the shifting sight. Scroll the wheel up to increase the range of shift of the
sight, scroll down to reduce the range of shift of the sight.
Media Fn
Media Fn allows you to assign buttons to multimedia functions:
• Play / Pause
• Stop
• Previous Track
• Next Track
• Volume +
• Volume -
• Mute
Functions for use on the Internet (WWW Fn)
The following functions are grouped in this section:
• Home. The homepage opens
ENG
7
User’s Manual RX-G960

•Search. The address bar goes into Search Mode
•Previous page (www Back). Open the previous page
• Next page (www Forward). Open the next page from which you previously
returned
• Stop. Stop the page from loading
• Refresh. Refresh the page
• Favorites. Open a tab of sites that have been added to favorites (does not
work with all browsers)
Computer control features
This option allows the keys to be assigned the following functions:
• My Computer
• Calculator
• Desktop. After assigning a button to this function, clicking on it will minimize
all open windows.
User-selected keyboard shortcuts (User-defined)
With this option, you can assign a keyboard shortcut to a mouse button, such
as: Ctrl + C (Copy), Ctrl + V (Insert), Win + D (Minimize all open windows), and
so on.
ENG
8
Gaming Mouse

Base macro
The macro lets you write down a keyboard
shortcut and assign it to a selected mouse
button.
In this section, you can select a macro from
the list of previously recorded ones.
More details on how to create macros will
be explained in the next section.
Advanced settings
Advanced settings consist of 5 basic elements:
• Fire Key Setting
•Moving Speed
•Double click speed
• Rolling Speed
•Mode settings DPI and mode values DPI, when the fire button is pressed (DPI
Setting)
Configuration selection. The user can
select the desired configuration from the
menu at the top left. This driver supports up
to 3 configurations.
9
ENG
User’s Manual RX-G960

Fire Key Setting
Repeats you can specify the number of repetitive clicks that a button should
make after clicking.
Firing Interval You can specify the interval at which the cartridges will fly.
Moving Speed
Settings allow you to choose from 11 cursor
movement modes.
Rolling Speed
The scroll speed is governed by the
number of rows that will be scrolled
on the user's screen.
DPI Setting
The software allows you to configure
up to 7 DPI modes in the range of
500 to 6400. Each DPI mode
corresponds to the user-selected
color.
The checkbox indicates which DPI
mode is currently set.
Color selection for DPI Mode
If you click on the color icon to the
right of the DPI value bar, a window
will appear. Select the color that will
be assigned to the DPI mode. After
selecting a color, press OK. The
color will be assigned to DPI mode.
After changing the DPI mode, the
backlight will flash in a color that
matches the selected mode.
ENG
10
Gaming Mouse

Creating and using macros
Macros allow one keystroke to play
the keyboard and mouse key
combination.
Creating macros
Instruction
Click the Macro tab (Macro).
Select the macro playback mode:
•Stop the macro after the button is
released.
• Stop the macro after playing the
full combination.
You must click "New Macro" to
create a macro and enter any name.
Then click «ОК».
ENG
11
User’s Manual RX-G960
Select the amount of time the Record
Delay keys should be pressed. This
mode will record the real time with
which the keys are entered.
Delay Setting. User defined fixed time.
No Delay. In this mode, a minimum
interval of 8 ms will be set.
To record a macro, press
"Record"and enter the
keyboard shortcuts you
want to assign to that
macro.

When you have entered the desired
combinations, press Stop to finish
recording.
You can also manually enter the time
between pressing the desired value. To
do this, right-click on the interval you
want to change and select Edit.
ENG
12
Gaming Mouse
In the created macro, you can delete the
entered keys or the time between clicks.
To do this, right-click on the desired
parameter and select "Delete" from the
context menu.
If you want to add a key value to an existing
macro, you have to right-click in the place
where you want to edit and select Insert.
Then you have to select the required action
and click "OK".

To assign a macro to a mouse button,
select «Base Macro», select the desired
macro, and then click «Apply».
ENG
13
User’s Manual RX-G960
Macro control
Right-clicking on a macro will bring up a
context menu that will prompt you to
select the next action:
• New Macro
• Rename
• Delete Macro
• Import One
• Import All
• Export One
• Export All
Gun key Settings
In game mode, you can assign a
button to a weapon by selecting it
from the provided list. To do this,
select Fire Macro from the options
list.
In the box, select one of the
suggested weapons. You can also
customize the selected weapon:
• Fire Count (to 256)
• Y-axis firing
• Y axis offset
• Time interval between shots
• Color shots

14
ENG
Gaming Mouse
LED Light. This section allows you
to switch the backlight level between
maximum brightness and semi-
brightness.
Section LED Mode Setting lets you
select the backlight mode from the
seven available.
Profile Management
This software allows you to save
profiles and download previously
saved ones.
Backlight settings
To go to the backlight control panel, press the
Light button at the top of the software.
Gun Key Fn: Use this key to set the offset value
of the mouse cursor for better aiming.
LED Status. In this section, you can choose
Open mode, which will always work the backlight
or Close, in which the backlight will always be off.
LED Switch. If Open mode is selected in this
section, the backlight can be turned on or off by
simultaneously pressing the scroll wheel and DPI
button.
LED Mode Switch. If Open mode is selected in
this section, the backlight mode can be switched
at the same time by left-clicking and DPI buttons.

TECHNICAL SPECIFICATIONS
Parameter, measurement unit
OS compatibility
Type of mouse
Resolution, dpi
Q-ty of buttons
Interface
Сable length, m
Dimensions, mm
Weight, g
Value
Windows
optical
500-6400
7 + 1 (scroll wheel)
USB
1.8
130 × 83 × 40
164
Technical support is on www.sven.fi.
Notes:
• Technical specifications given in this table are supplemental information and
cannot give occasion to claims.
• Technical specifications are subject to change without notice due to the im-
provement of SVEN production.
TROUBLESHOOTING
Problem
The mouse is not
working.
Solution
1. Disconnect the mouse from the PC and check
connector pins for possible damage. If there is no
external damage found and connector pins are OK,
connect the mouse to the PC.
2. Address your nearest authorized service center.
15
RX-G960
ENG
User’s Manual

Model:
RX-G960
Импортер в России: OOO «РЕГАРД», 105082, РФ,
г. Москва, ул. Фридриха Энгельса, д.75, стр. 5.
Уполномоченная организация в России: ООО
«РТ-Ф», 105082, г. Москва, ул. Фридриха
Энгельса, д. 56, стр. 1.
Условия гарантийного обслуживания смотрите
в гарантийном талоне или на сайте www.sven.fi.
Гарантийный срок: 12 мес. Срок службы: 2 года.
Производитель: «СВЕН ПТЕ. Лимитед»,
176 Джу Чиат Роуд, № 02-02, Сингапур, 427447.
Произведено под контролем «Свен Скандинавия
Лимитед», 48310, Финляндия, Котка,
Котолахдентие, 15. Сделано в Китае.
Manufacturer: SVEN PTE. LTD, 176 Joo Chiat Road,
№ 02-02, Singapore, 427447. Produced under the
control of Oy Sven Scandinavia Ltd. 15, Kotolah-
dentie, Kotka, Finland, 48310. Made in China.
® Registered Trademark of Oy
SVEN Scandinavia Ltd. Finland.
Gaming Mouse
RX-G960
Table of contents
Other Sven Mouse manuals