Swagelok PTX User manual

Pressure and
Temperature
Transducer (PTX)
This manual contains important information for the safe and
effective operation of the Swagelok®Pressure and Temperature
Transducer, PTX series. Users should read and understand its
contents before operating the transducer.
User’s Manual
www.swagelok.com

2Pressure and Temperature Transducer User’s Manual
Contents
Introduction . . . . . . . . . . . . . . . . . . . . . . . . . . 3
Product Information . . . . . . . . . . . . . . . . . . . . . 3
Specications . . . . . . . . . . . . . . . . . . . . . . . . 4
Control Drawing . . . . . . . . . . . . . . . . . . . . . . . . 5
Installation . . . . . . . . . . . . . . . . . . . . . . . . . . 6
Mounting . . . . . . . . . . . . . . . . . . . . . . . . . . 6
Power Supply. . . . . . . . . . . . . . . . . . . . . . . . 7
DeviceNet™ Network Cable . . . . . . . . . . . . . . . . 7
Setup . . . . . . . . . . . . . . . . . . . . . . . . . . . . . 8
Node Setup. . . . . . . . . . . . . . . . . . . . . . . . . 8
Parameter Setup . . . . . . . . . . . . . . . . . . . . . . 9
Operation . . . . . . . . . . . . . . . . . . . . . . . . . . . 13
Zero Compensation . . . . . . . . . . . . . . . . . . . . 13
Poll Request . . . . . . . . . . . . . . . . . . . . . . . . 14
Maintenance . . . . . . . . . . . . . . . . . . . . . . . . . 14
Troubleshooting . . . . . . . . . . . . . . . . . . . . . . . 15
Glossary . . . . . . . . . . . . . . . . . . . . . . . . . . . . 16

Pressure and Temperature Transducer User’s Manual 3
Introduction
The Swagelok Pressure and Temperature Transducer (PTX) is an industrial pressure and temperature transducer
for monitoring uid pressure and temperature in automated uid systems using a MEMS pressure‑sensing
technology. It communicates pressure and temperature data via the DeviceNet industrial network protocol. The
PTX is available with a 1.5 in. Swagelok Modular Platform Component (MPC) surface mount in accordance with
ANSI/ISA 76.00.02 or with 1/4in.Swagelok tube tting connections.
Product Information
Fig. 1 PTX with MPC Modular Surface Mount
front view
Module LED
Fig. 2 PTX with 1/4 in. Swagelok Tube Fitting
End Connections
Network LED
M12 Network
Connector Plug
Mounting holes
back view

4Pressure and Temperature Transducer User’s Manual
Specifications
Power
Voltage 24 V (dc), nominal
Current < 100 mA (dc) at 24 V (dc)
Wattage < 2.4 W at 24 V (dc)
Temperature (environment)
Operating (Ambient) Minimum 23°F (–5°C)
Maximum 158°F (70°C)
Media Minimum 32°F (0°C)
Maximum 158°F (70°C)
Storage Minimum ‑40°F (–40°C)
Maximum 158°F (70°C)
Temperature
Measurement
Measurement Range 23 to 158°F (–5 to 70°C)
Accuracy, including:
Repeatability
Hysteresis
Nonlinearity
± 2.2°C absolute accuracy
Full-scale Range
0 to 50 psig (0 to 3.4 bar)
0 to 250 psig (0 to 17.2 bar)
0 to 500 psig (0 to 34.4 bar)
Pressure
Measurement
Accuracy at 77°F (25°C)
including:
Repeatability
Hysteresis
Nonlinearity
± 1 % of full scale pressure, following
steps in accordance with setup
procedures described in this manual
Over Pressure 2 × full scale
Burst Pressure 5 × full scale
Weight
with MPC process connections 0.83 lb (375 g)
with 1/4 in. Swagelok tube
fitting connections 1.26 lb (570 g)
Certifications
■ANSI/ISA 12.12.01‑2011 Non‑incendive Electrical Equipment for use
in Class I, Division 2 Hazardous Locations
■UL 61010‑1, Safety Requirements for Electrical Equipment for
Measurement, Control, and Laboratory Use—Part 1, Edition 2
■CSA C22.2 No. 213‑M1987, Non‑incendive Control Equipment for
use in Class I, Division 2 Hazardous Locations
■CSA C22.2 No 61010‑1, Safety Requirements for Electrical
Equipment for Measurement, Control, and Laboratory Use—Part 1,
Edition 2
Ingress Protection IP64
Electromagnetic
Compatibility
EN 61326‑1:2006
■RF Emissions: EN 55011
■ESD Immunity: EN 61000‑4‑2
■RF Immunity: EN 61000‑4‑3
■EFT Immunity: EN61000‑4‑4
■Conducted Immunity: EN 61000‑4‑6
Vibration Sinusoidal 9 to 200 Hz, 5 g acceleration
Random 20 to 500 Hz, 15.5 g average acceleration
Shock Pulse 70 m/s2(7.2 g)
Entity Parameters See Control Drawing: PTX‑DN‑0006‑SCHEDULE
Supported
Communication
Baud Rates
Auto‑baud function, allowing the device to detect the speed of network
traffic. It is compatible with 125 kbaud, 250 kbaud, and 500 kbaud
rates.
Note: Before installing the PTX in a hazardous location, review the control drawing on page 5.
This will help ensure all electrical connections to and from the PTX comply with safety requirements.

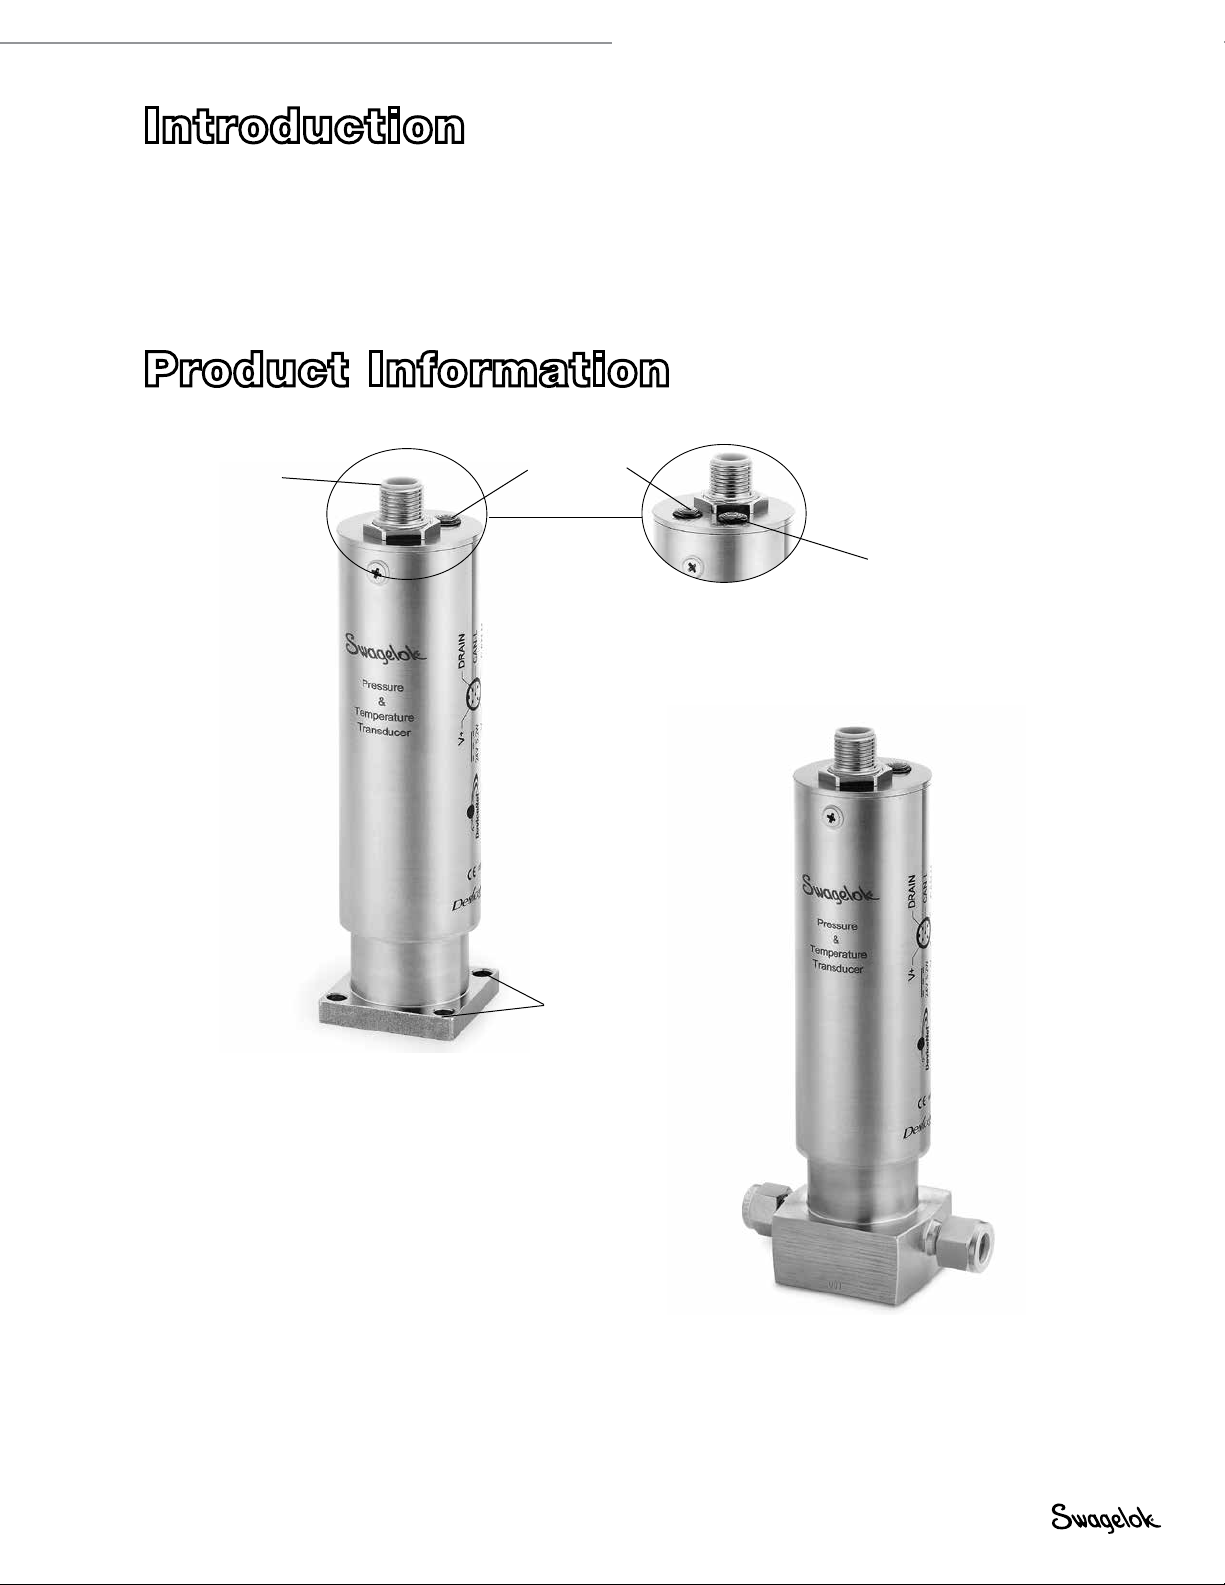
Pressure and Temperature Transducer User’s Manual 5
Control Drawing
OR
1
23
4
5
Notes:
(1) The Entity Concept allows interconnection of nonincendive apparatus with
associated apparatus not specifically examined in combination as a system when the
approved values of Voc and Isc of the associated apparatus are less than or equal to
Vmax and Imax of the nonincendive apparatus and the approved values of Ca and
La of the associated apparatus are greater than Ci+Ccable and Li+Lcable respectively
for the nonincendive apparatus.
(2) Capacitance and inductance of the field wiring from the nonincendive equipment
to the associated apparatus shall be calculated and must be included in the system
calculations as shown in Table 1. Cable capacitance, Ccable, plus nonincendive
equipment capacitance, Ci, must be less than the marked capacitance (Lcable, Li
and La or Lo, respectively). Where the cable capacitance per foot are not known, the
following values shall be used: Ccable = 60 pF/ft., Lcable = 0.2
µ
H/ft.
TABLE 1:
TABLE 2:
Nonincendive Equipment
Associated Apparatus
V max (or Ui)
≥
Voc (or Uo)
I max (or Ii)
≥
Isc (or lo)
P max (or Pi)
≥
Po
Ci
≤
Ca (or Co)
Li
≤
La (or Lo)
If Po of the associated apparatus is not known, it may be calculated using the formula:
Po = (Voc * Isc)/4 = (Uo * Io)/4.
(3) Associated apparatus must be installed in accordance with its manufacturer's
control drawing and Article 504 of the National Electrical Code (ANSI/NFPA 70), the
Canadian Electrical Code, or other local installation codes, as applicable. The
resistance of the ground path must be less than 1 ohm.
(4) When required by the manufacturer's control drawing, the associated apparatus
must be connected to a suitable ground electrode per the National Electrical Code
(ANSI/NFPA 70), the Canadian Electrical Code, or other local installation codes, as
applicable. The resistance of the ground path must be less than 1 ohm.
(5) The PTX is powered by two separate nonincendive circuits, designated Power and
Signal as indicated in Table 1. Cable and wiring for these two circuits must maintain
the separations for different nonincendive circuits required by Article 504 of the
National Electrical Code (ANSI/NFPA 70), ISA RP12.6 for installing nonincendive circuits,
or other local codes, as applicable.
(6) Associated apparatus must not be used in combination unless permitted by
associated apparatus certification.
(7) WARNING: Substitution of components may impair safety.
(8) The ambient operating (Tamb) range for this product is -5C to 70C.
(9)
Each unit must be connected to an IP64 or higher rated connector or IP rating will be void.
HAZARDOUS LOCATION
Class I, Div. 2, Groups A, B, C, D
Any associated apparatus power
supply with Entity Concept
Parameters (1) appropriate for
connection to an nonincendive
device with Entity concept
parameters listed in Table 1.
Any nonincendive or associated
apparatus communication
controller with Entity Concept
parameters (1) (Vmax, Imax, Ci,
Li) appropriate for connections to
nonincendive devices with Entity
Concept parameters listed in
Table 1.
NON-HAZARDOUS LOCATION
CONTROL
EQUIPMENT
NONINCENDIVE FIELD
WIRING - POWER CIRCUIT
(PINS 2,3)
NONINCENDIVE FIELD/
ASSOCIATED APPARATUS
WIRING - SIGNAL CIRCUIT
(PINS 4,5)
Field Wiring Diagram
1 - Drain bare
2 - V+ red
3 - V- black
4 - CAN_H white
5 - CAN_L blue
WARNING: ANY CHANGES MADE TO THIS DOCUMENT MUST BE REVIEWED AND APPROVED BY SWAGELOK COMPLIANCE DPT
MATERIAL: NA
DESCRIPTION: SWAGELOK DEVICENET PTX CONTROL DRAWING
Male
DWG.
NO.
PTX-DN-0006-SCHEDULE
TITLE
DRAWN BY
CHECK/APR BY
JEK
DWG.
NO.
PTX-DN-0006-SCHEDULE
THIS PRINT IS THE EXCLUSIVE PROPERTY OF SWAGELOK COMPANY. IT MUST BE RETURNED ON
REQUEST ALONG WITH ANY DOCUMENTS CONTAINING INFORMATION OBTAINED FROM THIS
PRINT. NEITHER THIS PRINT NOR ANY PART OF IT NOR ANY INFORMATION CONCERNING IT MAY
BE COPIED, DISCLOSED TO OTHERS OR USED FOR ANY PURPOSE EXCEPT IN FURTHERANCE OF
YOUR BUSINESS WITH SWAGELOK. THE PARTS REFERRED TO ON THIS PRINT MAY BE THE
SUBJECT OF PATENTS AND/OR PENDING APPLICATIONS AND MAY NOT BE MANUFACTURED
WITHOUT PERMISSION FROM SWAGELOK COMPANY.
SCALE
NONE
REV.
-
SHEET
1 of 1
REVISIONS
TOLERANCE ON ENGLISH DIMENSIONS
UNLESS OTHERWISE SPECIFIED
7
6
5
4
3
2
1
D
C
B
A
8
8
7
6
5
4
3
2
1
A
B
C
D
APPROVAL/SCHEDULE DRAWING
.XX
.031
.XXX
.015
ANGLES
1 DEGREE
DCN
REV.
Jul-5-11
DATE
DATE
BRM
Jul-29-11
-- DIMENSIONS ARE INCHES NEXT TO [MILLIMETERS].
© Swagelok Company All Rights Reserved
Fig. 3 PTX-DN-0006 SCHEDULE

6Pressure and Temperature Transducer User’s Manual
Installation
Mounting
A PTX with 1/4 in. Swagelok tube tting process end connections should be installed in the system according to
Swagelok Tube Fitting Instructions for 1 in. (25 mm) and smaller ttings, MS‑12‑01.
A PTX with a 1.5 in. Swagelok MPC modular surface mount should be installed in the system according to the
surface mount assembly instructions in the MPC Series Modular Platform Components Assembly and Service
Instructions, MS‑12‑39.
Dimensions, in inches (millimeters), are for reference only and subject to change.
Fig. 4 Product Dimensions
MPC Modular Surface Mount Swagelok Tube Fitting End Connections
M12
connector
5.77
(147)
0.25
(6.4)
0.59
(15.0)
1.50
(38.2)
Four
mounting
holes,
0.21 (5.3)
dia
1.50
(38.2)
Front FrontBottom
Top Top
M12
connector
1.49
(37.8)
6.35
(161)
2.54
(64.5)

Pressure and Temperature Transducer User’s Manual 7
Power Supply
The PTX requires voltage supplied to be within the range of the DeviceNet standard, which states:
24 volts ±1 % or adjustable to 0.2 %. Use of a lower voltage network power supply will decrease the reliability
of the network and may make it inoperable. Swagelok validated the performance of the PTX operating at 11, 24,
and 28 V (dc).
Hazardous Location Power Supply
It is required that a Class 2 power supply be used when the PTX is used in Class I, Division 2 hazardous
locations. Class 2 power supplies have a maximum power outlet of 100 W.
DeviceNet Network Cable
Cable Length
DeviceNet network cable lengths are dened in ODVA’s Planning and Installation Manual: DeviceNet Cable
System, chapter1, www.odva.org. Using cable lengths longer than those recommended can result in
degradation of signal integrity and decrease of supply voltage.
Hazardous Location Cable Length
The power supply used determines the maximum capacitance and inductance for the network. The total
network inductance and capacitance can be determined by adding together the inductance and capacitance
values of the devices on the network along with that of the cable.
The Swagelok PTX adds 0 µH and 0 µF to the network.
Cable parameters can be determined from the manufacturer’s data sheet. Worst case values of 60 pF/ft and
0.2µH/ft can be assumed when that information is not available.
Cable Bend Radius
The DeviceNet network cable should not be bent too tightly, as this causes excess strain on the cable and the
attachment point on the device. After the cable has been installed, the bend radius can be adjusted so long as
it is no smaller than its xed radius. Typical cables and their bend radii can be found in ODVA’s Planning and
Installation Manual: DeviceNet Cable System, chapter1.
Connecting the Cable
Connect the micro M12 connector end of the network cable to the network interface plug on the PTX. Connect
the opposite end to the system network.
1
2 3
4
5
V‑V+
CAN_L
CAN_H
Mechanical key
Drain
Fig. 5 M12 Female Connector End
V+ = 24 V (dc) supply
V–= Ground
CAN_H = High signal of CAN differential
signal
CAN_L = Low signal of the CAN differential
signal
Drain = Cable shield, ground at the power
supply end

8Pressure and Temperature Transducer User’s Manual
Setup
Node Setup
Register the Electronic Data Sheet (EDS)
1. Download the electronic data sheet (EDS) and the icon le (PTX.ico) from www.swagelok.com. (path TBD)
Save both les to the same directory.
Note: Altering the EDS in any way voids the product warranty.
2. Open your network conguration tool. The screen captures in this manual use RSNetWorx™ for DeviceNet.
Alternatives include OMRON®DeviceNet Congurator and Anybus®NetTool.
3. Register the EDS using the network conguration tool.
4. Connect the PTX to the network.
5. Scan the network for the PTX and once found, open the properties interface for the device.
6. Set the device address (MAC ID) of the device to the desired value.
Device Address (MAC ID)
The PTX will have a factory set address of 63 when initially powered on. Addresses between 0 and 63 are
valid DeviceNet addresses. Do not duplicate addresses. Duplicate addresses will cause the devices at that
address to be unable to communicate with the network. As noted, new devices will be set to address 63, so it is
recommended to leave that address open to accommodate new hardware.
Assign higher priority devices a low network address as the lowest network address will be given priority during
network arbitration.
Fig. 6 General Tab

Pressure and Temperature Transducer User’s Manual 9
Parameter Setup
Open the parameters menu after the device is recognized by the conguration software. Set the parameters
that follow as desired for use with your network.
Fig. 7 Parameters Tab

10 Pressure and Temperature Transducer User’s Manual
Message Format
The PTX supports several message formats as dened below. Each message format contains different
information and results in a different amount of network trafc. The truncated integer values use fewer bytes to
encode, resulting in less network trafc.
Name I/O Type* Bytes Format
Status, Pressure, Temperature
(REAL)
(factory default)
Polled Input 9
Status Byte (See Operation)
Pressure (Real)
Temperature (Real)
Status, Pressure (REAL) Polled Input 5Status Byte (See Operation)
Pressure (Real)
Status, Pressure, Temperature
(Integer) Polled Input 5
Status Byte (See Operation)
Pressure (Integer)
Temperature (Integer)
Status, Pressure (Integer) Polled Input 3Status Byte (See Operation)
Pressure (Integer)
Alert Reset Polled Output 1Reset Byte
Note: Input and output are dened from the standpoint of the DeviceNet network.
Fig. 8 Setting Message Format

Pressure and Temperature Transducer User’s Manual 11
Fig. 9 Set Units
Fig. 10 Set Alarms
Set Units
The PTX can report the pressure and temperature values to the network in a variety of units.
Pressure Units Temperature Units
psig
(factory default)
°F
(factory default)
bar °C
kPa % full scale
% full scale
Set Alarms
The PTX can be set to send an alarm when the pressure or temperature falls below, or rises above, a certain
value. Additionally, alarm hysteresis and settling time can be set.
Note: The units for the alarms will be the same as those set in Set Units.
The factory default setting is zero for these elds.
Alarm Description
Alarm Trip Point High Value above which an alarm occurs.
Alarm Trip Point Low Value below which an alarm occurs.
Alarm Hysteresis The amount by which the value must
recover to clear an alarm.
Alarm Settling Time
The amount of time that the value
must exceed the trip point before an
alarm is triggered (in msec).

12 Pressure and Temperature Transducer User’s Manual
Fig. 11 Maintenance Dates
Set Averaging Time
The PTX allows the averaging time of the measured value to be set. This allows the user to implement a type
of low pass ltering on the measured data, removing transient measurements from the reported values. This
parameter is entered as the amount of time over which the measurements will be averaged in milliseconds
(msec). The factory default is 0 msec.
Alarm Enable
The alarm enable sets whether the alarms are activated.
Maintenance Dates
The last and next maintenance date can be set by the user. The factory set default for both elds is the date of
manufacture.
Parameter Name Description
Last Maintenance Date Documents the date maintenance
was performed.
Next Maintenance Date
Documents the next date
maintenance will be performed. This
would be determined by the system
calibration schedule.

Pressure and Temperature Transducer User’s Manual 13
Operation
Zero Compensation
To achieve the specied pressure accuracy from the PTX, under all conditions, the following zero compensation
procedure must be performed. Zero compensation for the PTX is essentially equivalent to the tare function on
a weight scale.
1. Apply 0 psig (i.e. ambient atmospheric pressure) to the PTX.
2. Allow the PTX to stabilize to the temperature and atmospheric pressure of the environment in which it is
installed.
3. With 0 psig applied to the PTX, retrieve a series of measurements (10 or more) from the PTX and average
them together. This average is call the zero compensation offset.
4. Zero compensate subsequent PTX measurements by subtracting the zero compensation offset from them.
Zero compensated PTX measurements are guaranteed to be less than 1 % of full scale away from the actual
pressure applied to the PTX. The span of the PTX never needs adjusted or calibrated.
NOTE: Excessive over pressure conditions may require the zero compensation procedure to be repeated to
maintain the PTX’s high accuracy.

14 Pressure and Temperature Transducer User’s Manual
Poll Request
Send a poll request to the congured PTX’s MAC ID in order to receive data. The PTX will return a status
message in the format set for Message Format, Units, and Alarms in Setup.
For example:
If the value has been set up to be returned as an integer, a pressure value of 100 psig (6.8 bar) would be
converted to a hexadecimal as 0x0064, then transmitted by the PTX to the network as 0x6400. The last byte
(0x00) represents the most signicant byte while the lower byte encodes the least signicant byte.
If the value has been set up to be returned as a real number, a pressure value of 100.00 psig (6.8 bar) would be
converted to a IEEE‑754 compliant real value of 0x42C80000, then transmitted by the PTX to the network as
0x0000C842.
Notice that the integer data format is shorter, which will result in less network trafc. However, the real number
format contains decimal values, which results in higher measurement resolution.
The status byte will return the status of the alarms in the following format.
Status Byte
Bit 7 Bit 6 Bit 5 Bit 4 Bit 3 Bit 2 Bit 1 Bit 0
0 0 0 PUR POR TUR TOR Power
1 = true; 0 = false
Bits 1 through 4 refer to alarms set to show true when the measured pressure or temperature value exceed
preset levels:
Bit 4: PUR—Pressure Under Alarm Trip Point
Bit 3: POR—Pressure Over Alarm Trip Point
Bit 2: TUR—Temperature Under Alarm Trip Point
Bit 1: TOR—Temperature Over Alarm Trip Point
The alarms on the PTX can be reset by sending a Reset Byte to the device. The format should be as follows:
Reset Byte
Bit 7 Bit 6 Bit 5 Bit 4 Bit 3 Bit 2 Bit 1 Bit 0
00000001
Maintenance
Additional assembly hardware for the MPC surface mount is available. Refer to Modular Platform Components
(MPC), MS‑02‑185, for ordering information.
There are no eld‑maintainable parts within the PTX. Contact your authorized Swagelok representative for
assistance.

Pressure and Temperature Transducer User’s Manual 15
Troubleshooting
Problem Cause Remedy
Module (MOD) Light
Off No power applied to the device. Connect power.
Green Normal operation. No action needed.
Flashing Green Device needs to be configured. Configure device.
Red Device has an unrecoverable fault.
Cycle power to device. If device fails to
recover, contact your authorized Swagelok
representative.
Flashing Red Device has invalid configuration. Check configuration setup.
Network (NET) Light
Off
The device has no power or the channel is
disabled for communication due to bus off
condition, loss of network power, or has been
intentionally disabled.
Power‑up the DeviceNet scanner, provide
network power to channel, and make sure
channel is enabled in both the scanner
configuration table and module command
word.
Green Normal operation. No action needed.
Flashing Green
The channel is enabled but no communication
is occurring.
The two‑digit numeric display for the channel
on the DeviceNet scanner indicates an error
code that provides more information about the
condition of the channel.
Configure scan list table for channel to add
device.
Red
The communication channel has failed.
The two‑digit numeric display for the channel
on the DeviceNet scanner indicates an error
code that provides more information about the
condition of the channel.
This may indicate a defective DeviceNet
scanner.
Reset DeviceNet scanner. If failures continue,
replace DeviceNet scanner.
Flashing Red
At least one of the devices in the DeviceNet
scanner’s scan list table has failed to
communicate with the DeviceNet scanner. The
network has faulted.
The two‑digit numeric display for the channel
on the DeviceNet scanner indicates an error
code that provides more information about the
condition of the channel.
Examine the failed device and examine the
scan list table for accuracy.
General
System displays
pressure when
process media
supply has been
turned off.
Measurement is within of tolerance band.
The PTX measures pressure within a tolerance
of ± 1 % of the full scale range of the device.
A reading of 0.5 psig (0.03 bar) for a 50 psig
(3.4bar) PTX is normal even when system
pressure is at zero.
Ambient temperature is outside of specification.
The pressure measurement will not be thermally
compensated when the ambient temperature is
outside the specified range.
Process media is trapped within the system. Ensure the system has been properly vented.
The sensor element has been damaged. Replace the PTX.
The PTX goes
offline periodically. The M12 connector is loose. Ensure that the M12 connector has proper
thread engagement and is firmly attached.
Contact your authorized Swagelok representative for additional assistance.

Glossary
Term Definition
CAN Controller Area Network, a message based communication protocol
DeviceNet Scanner Device that provides the bridge between the DeviceNet network and the PLC
EDS Electronic data sheet, a file used by node commissioning tools to interpret parameters on
the device
Entity Parameters Values used to determine the suitability of the device for use in hazardous environments
LED Light Emitting Diode
MAC ID Media access controller identifier
MOD LED Module LED, a light that provides feedback on the status of the module
NET LED Network LED, a light that provides feedback on the status of the PTX network connection
PLC Programmable Logic Controller
Swagelok—TM Swagelok Company
DeviceNet—TM ODVA
RSNetWorx—TM Rockwell Automation, Inc.
OMRON —TM OMRON Corporation
Anybus—TM HMS Industrial Networks AB
© 2012‑2019 Swagelok Company
MS‑13‑222, RevA, December 2019
Table of contents
Other Swagelok Transducer manuals
Popular Transducer manuals by other brands

S+S Regeltechnik
S+S Regeltechnik PREMASREG 7100 VA ID Series Operating Instructions, Mounting & Installation

S+S Regeltechnik
S+S Regeltechnik PREMASGARD ALD Operating Instructions, Mounting & Installation

Simrad
Simrad 38-9 - INSTALLATION REV A installation manual

MKS
MKS MicroPirani 925 Series Operation and installation manual

OHIO SEMITRONICS
OHIO SEMITRONICS PC5 Series OPERATION & CALIBRATION MANUAL

Thyracont
Thyracont VSC43MA4 operating instructions