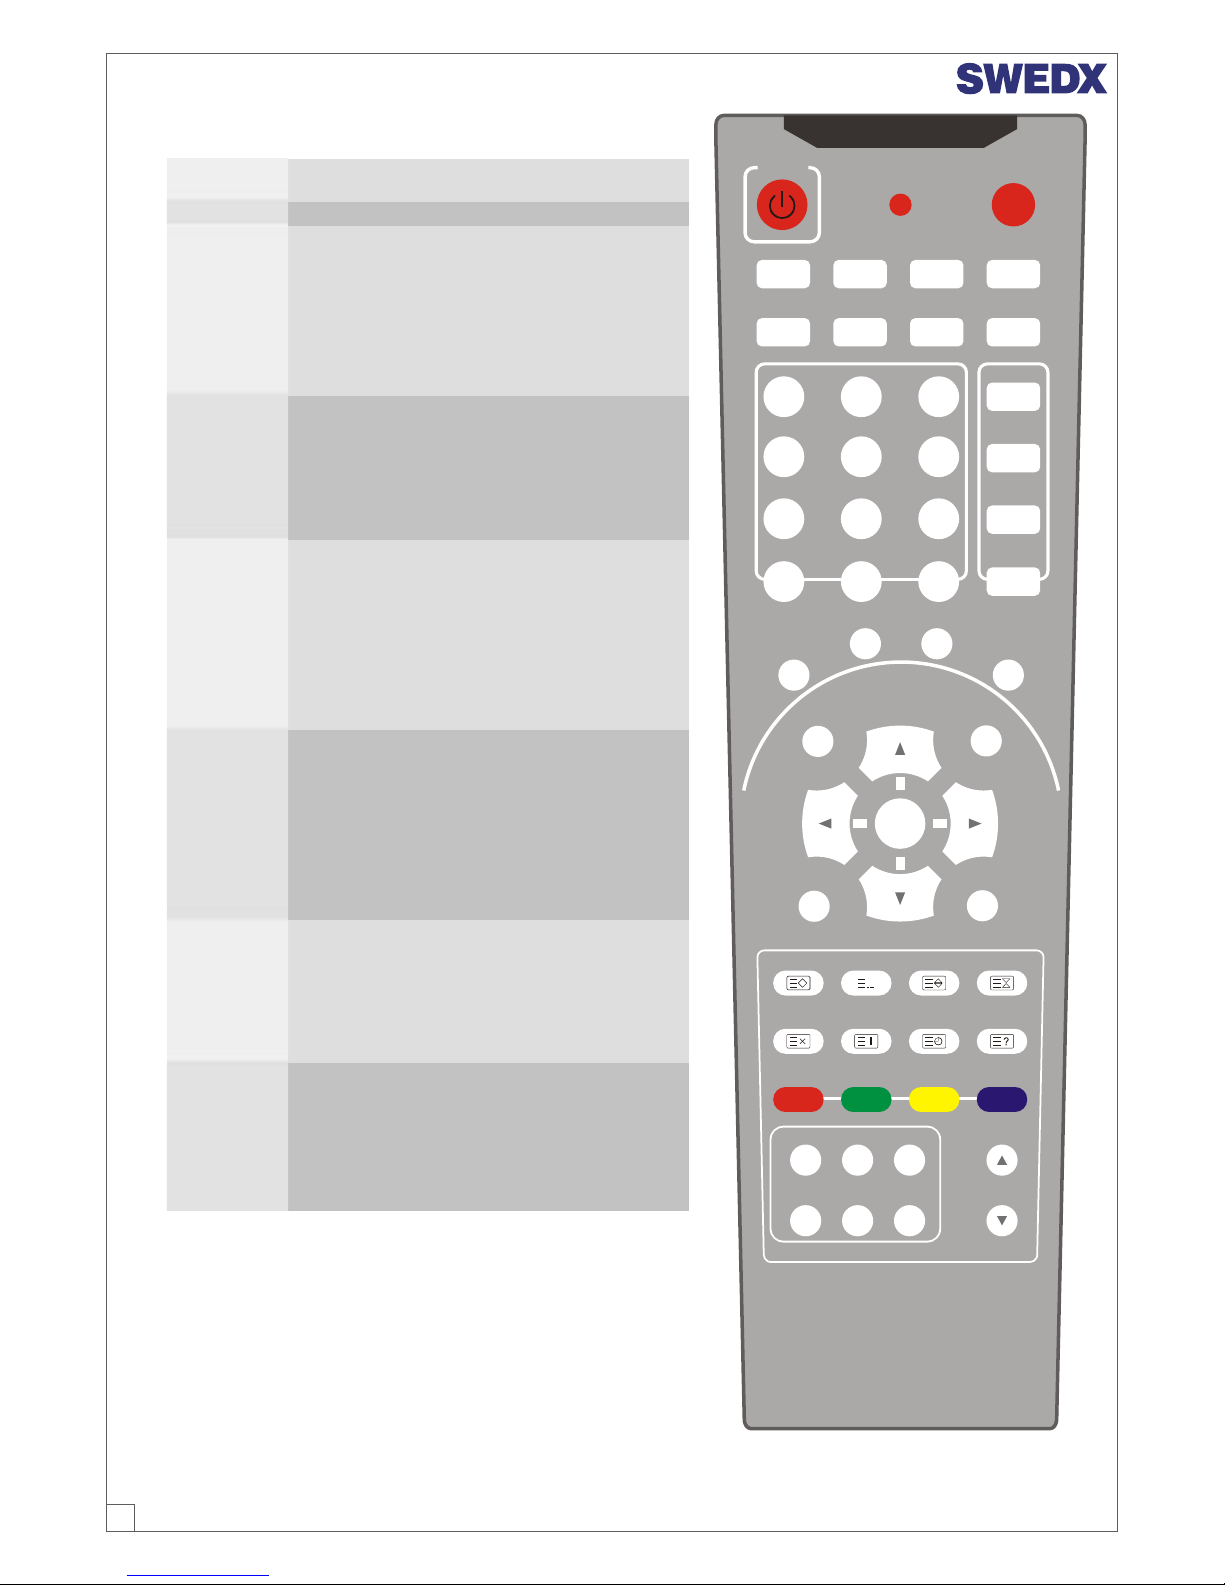
SWEDX XV1-26TV User manual

User’s Guide
XV1-26TV
XV1-32TV
XV1-40TV
European Version

2
Operating instructions and safety precautions
Introduction
Thank you for buying SWEDX XV1-xx LCD-TV. Please read this manual thoroughly before
operating the monitor. Make sure the monitor was not damaged in transit. Should the monitor be
damaged, please contact your dealer and do not install it. Check that you have all the
accessories according to the model.
Preparation
• Put the monitor on a stable surface.
• Do not fix the monitor with others fixations than those provided or suggested by the manufacturer.
• If you have a wallmount, check that it is steady.
• Do not place any material on the monitor.
• Do not block or cover the ventilation openings on the monitor.
• The monitor must be plugged with a tension source of 220 volts and 50 Hz.
• Power cord and cables must be properly routed and protected to prevent people from
stepping on them and causing the monitor to fall.
• Keep the power cord away from any heat source. Possible fire hazard.
Heating sources and humidity
• Keep the monitor dry and away from humidity.
• Keep the monitor away from heat sources.
Cleaning and maintenance
• Unplug the monitor before cleaning it. Do not use solvents or liquids to clean the monitor.
• Only clean the monitor with a soft and dry cloth.
• In case of troubleshooting, do not use spare parts other than those suggested by the
manufacturer. Using inadequate spare parts can lead to electric shocks, short-circuits fire or
others incidents. Please contact a technical authorized by SWEDX brand.
Departure in holidays
• Unplug the LCD-TV during lightning storms or when unused for long periods of time.
Contents
Plug
x 4 Screw A
x 4 Screw B
x 4 Remote control
x 1
Parts A. Wall-
mounting. 2pcs.
x 1 Aerial cable
x 1
AC cable
x 1
POWER SOURCE
MUTE SLEEP STILL INFO.
DUAL I-II ARC PSM SSM
PIP
P.INPUT
P.POSITION
P.SIZE
321
65
4
987
PRE/CH
PC
AP
SW
L CTS.SEE
TV
MENU EXIT
PR+
VOL+
PR-
VOL- ENTER
MIX
TTX ON
STORE FLOP/LIST SIZE HOLD
CANCEL INDEX TIME REVEAL
RED GREEN YELLOW BLUE
PIP PR+
PIP PR-
PG UP
PG DOWN
FAV
GUIDE
TV/RADIO
DTV SETUP
0-/--

3
Display Aspect Ratio
Resolution
Brightness (cd/m2)
Contrast
Maximum Rate
Viewing Angle(U/D/L/R)
Response Time(ms)
16:9
1366x768
500
1000:1
100 Mhz
85/85/85/85 9 9 9 9
8 ms
16:9 16:9
1366x768 1366x768
500 500
1000:1 1000:1
100 Mhz 100 Mhz
85/85/85/85 8 /8 /8 /8
8 ms 8 ms
Supported
Signals
Analog PC H Frequency Range: 20 - 82 kHz
V Frequency Range: 55 - 90 Hz
Maximum resolution> 1280x1027 60Hz
Maximum pixel rate> 110 Mhz
Digital PC
(DE Mode)
H Frequency Range: 20 - 82 kHz
V Frequency Range: 55 - 75 Hz
Maximum resolution> 1280x1027 60Hz
Maximum pixel rate> 110 Mhz
DTV mode support> 480i/576i, 720P, 1080i
CVBS, S-Video NTSC-M. PAL-BGHI. NTSC-4.43. SECAM. PAL-60.
Component 1080i. 720P. 480i/576i. 480P/576P.
TV All PAL / NTSC / SECAM Systems
Connections
(Video)
TV
Digital TV
AV1
AV2
S-Video
Component1
PC Analog
PC DVI
ANT In (75 ohms coaxial cable)
Y/Pb/Pr SD Component Video (576i)
SCART1 AV In (75ohms 0.1/1.0 Vp-p) CVBS,RGB,RF Out
SCART 2 AV In (75 ohms 0.1/1.0 Vp-p) CVBS, AV Out
S-Video In
Y-Pp DTV RCA In (75 ohm,s , 0.7Vp-p)
DSUB In (Analog) 75 ohms ± 10%. 0.7Vp-p ±5%)
DVI-I Type (Digital Only)
TV
SCART1
SCART2
PC
S-Video Comporent1
Audio Out
Speakers
Connections
(Audio)
Tuner SIF In
SCART1 Stereo Sound In (500mVrms)
Stereo Audio Line In (500mVrms)
RCA Stereo Audio Line In (500mVrms) - Shared RCA
Stereo Audio Line Out (500mVrms)
26” & 32” 2PCs * 10W 40” 4PCs * 10W
TV Tuning System
Tuning Range
No of Programs
Sound System
MTS Support
Color
PAL / SECAM / NTSC System
45MHz-889MHz
100 Channels
BG, DK, I, L, L
Mono / Stereo/ NICAM / Bi-lingual
16.7 million
OSD
Power
Dimension
Weight
OSD Type Graphic & text
Power Supply
Power Consumption
Power Consumption
Power Input
Dimension with base
Dimension w/o base
Weight
24V(DC)
Normal < 170.0W < 190.0W < 270.0W
Stand-by < 5W < 5W < 5W
110-240 V 110-240 V 110-240 V
800x477x76 mm 921x550x76 mm 1120x660x105 mm
800x477x154 mm 921x550x185 mm 1120x700x190 mm
19 kg 23 kg 33 kg
Specification
XV1-26 XV1-32 XV1-40

MENUMENUMENU
EXITEXITEXIT MENU
CHCHCH
CH
CHCHCH
CH
VOLVOLVOL
VOL
EXIT
1345
7
1. Source/Exit: Choose the input source / Exit the OSD menu
2. Vol: Decrease and increase the audio volume / Navigate the OSD
menu
3. LED: Power indicator
4. ON / OFF: Power switch
5. IR: Remote control receiver
6. CH: Zap the channels / Navigate the OSD menu
7. Select/Menu: Select in the OSD menu / Activate the OSD menu.
VOLVOLVOL
VOL
2 6
0
I
- 4 - Connections on the rear of the LCD-TV
1 2 34
5
611 12
7
8
9
10
1. Power switch On/Off
2. Power connector
3. DVI connection
4. VGA connection
5. PC Audio-in
6.
7. S-Video
8. Video
10. DTV.DVD connection Video + Audio
Audio-out
9. Audio-in S-video/ AV
11. Scart 1
12. Scart 2
1 .
14. RS232
3 Antenna input
13 14
4
SELECTSELECTSELECT
ON / OFFON / OFFON / OFF
SOURCESOURCESOURCE SELECT
ON / OFF
SOURCE
Control buttons

POWER SOURCE
MUTE SLEEP STILL INFO.
DUAL I-II ARC PSM SSM
PIP
P.INPUT
P.POSITION
P.SIZE
321
65
4
987
PRE/CH
PC
SWAP
S.SE ECT
L
TV
MENU EXIT
PR+
VOL+
PR-
VOL- ENTER
MIX
TTX ON
STORE FLOP/LIST SIZE HOLD
CANCEL INDEX TIME REVEAL
RED GREEN YELLOW BLUE
PIP PR+
PIP PR-
PG UP
PG DOWN
FAV
GUIDE
TV/RADIO
DTV SETUP
0-/--
Operation
§Power on / off
§Activates main OSD when no main
OSD activated
§Navigates parent menu when main
OSD activated
§Stops auto frequency search
§Activates source select OSD when no
main menu activated.
§Changes input source that selected by
source select navigation
§Executes function by OSD help
commands when main OSD activated
§Activates child menu when child menu
exists.
§Increases program number & tune
channel when no OSD activated.
§Navigates input source when source
OSD activated
§Executes function by OSD help
commands when main OSD activated
§Navigates previous menu when main
OSD activated.
§Decreases program number & tune
channel when no OSD activated.
§Navigates input source when source
OSD activated.
§Executes function by OSD help
commands when main OSD activated
§Navigates next menu when main OSD
activated.
§Decreases speaker / headphone sound
volume when no OSD activated.
§Executes function by OSD help
commands when main OSD activated
§Decreases values of user menu when
main OSD activated.
§Increases speaker / headphone sound
volume when no OSD activated.
§Executes function by OSD help
commands when main OSD activated
§Increases values of user menu when
main OSD activated.
Key Name
Power Key
Menu Key
Select Key
Up Key
Down Key
Left Key
Right Key
5
Remote Control

6
Operation
§Displays input source information
§Displays current sleep timer value by minute when no sleep timer OSD activated
§Setup minimum sleep timer value more than current sleep timer value when
sleep timer OSD activated.
§If sleep timer is maximum value, disables sleep timer.
§Toggles speaker/headphone sound mute status..
§Activates source change OSD when source change OSD is not activated.
§Deactivates source change OSD when source change OSD is activated
§(Picture Standard Mode)Displays picture standard when picture standard OSD
is not activated.
§Changes picture standard when picture standard OSD is activated.
§(Sound Standard Mode)Displays sound standard when sound standard OSD
is not activated.
§Changes sound standard when sound standard OSD is activated.
§Displays aspect ratio of image when aspect ratio OSD is not activated.
§Changes aspect ratio when aspect ratio OSD is activated.
§Toggles status between motion and still image.
§Changes to last tuned program.
§Displays MTS of sound format when MTS OSD is not activated.
§Changes sound format when MTS OSD is activated.
§Toggles PIP status
§Changes PIP input sources when PIP is on
§Changes PIP image size when PIP is on.
§Changes PIP position when PIP image size is not double screen.
§Swaps main input source and PIP input source.
§Selects main / PIP sound source when PIP is on.
§Changes to PC / DVI source. If current input source is PC, input source is
changed to DVI.
§If current input source is not TV, changes to TV input source.
§Enters digit value to change program directly.
§If main input source is TV that includes TTX information, enters TTX display
mode.
§If TTX mode on, toggles TTX mix and TTX full display mode.
§Sends TTX Red / Green / Cyan/ Yellow command.
§Holds current TTX page.
§Reveals concealed information.
§Toggles LIST and FLOF mode
§Stores ROW24 page to non-volatile memory in LIST mode.
§Updates pages.
§Displays time/date information.
§No function for this LCD-TV.
§No function for this LCD-TV
§No function for this LCD-TV.
§No function for this LCD-TV
§No function for this LCD-TV.
§Increases/Decreases channel if pip video is TV or Digital TV.
Key Name
Info
Sleep Time
Mute
Source
PSM
SSM
ARC
STILL
PRE_CH
Dual I-II
Pip
Pip Select
Pip Size
Pip Position
Swap
S.Select
PC
TV
0~9
TTX ON
TTX MIX
TTX: RED
GREEN
CYAN
YELLOW
TTX Hold
TTX Reveal
TTX List/Flof
TTX Store
TTX Update
TTX Time
DTV Setup
GUIDE
TV/RADIO
FAV
PG Up/Down
PIP CH Up/Down
Remote Control

7
Basic Operation
Turning LCD-TV On And Off
Press Power button on the remote control. The
PDP/LCD will turn on and you will be ready to use its
features. You can also use the Power key on the front
panel.
Select Source
Press Source button on the remote control. Then you
can see the source list menu shown to the right. Press
CH+ / CH- button on the remote control to select the
source.
:Enter
TV
SCART1
SCART2
AV
S-Video
Component
DVI
Connected
Connected
Not Connected
Not Connected
Not ConnectedPC
:Move :Menu
Input Source
Volume Control
Press VOL+ / VOL- button on the remote control to
adjust the volume level.
Press MUTE button on the remote control when you
need to cut the sound temporarily.
Volume
29
OSD Menu Structure
§OSD (On Screen Display) allows users to control or
adjust various features and settings in accordance
with his/her preferences.
§Press the MENU/ENTER button on the remote
control to see the main OSD menu.
Example of OSD Menu:
§Main Menu: Press the MENU/ENTER button on the
remote control to enter the main OSD menu.
First, select Main menu item you need with CH+ &
CH- button.
To select a main menu items, just press VOL+ or
MENU/VIDEO button on the Remote Control.
§Sub Menu: Each menu item has its own sub menu
items to set.
§Sub Menu items:
A : If there is no > part, the item has an under
menu. You can enter the under menu and adjust
an item you need.
Select sub-menu item with CH+ / CH- button on
the remote control and press VOL+ or
MENU/ENTER button to enter the submenu.
B: If there is a > part, you can set the item by
selecting >.
:Enter
:Move :Menu
Picture
Picture Mode
Custom
Colour Tone
Size
Custom
Cool2
Auto Wide

8
:Enter
:Move :Menu
Picture
Custom
Colour Tone
Size
Custom
Cool2
Auto Wide
PICTURE
Picture
1. Press MENU/ENTER button to display the main
OSD menu.
2. Select the picture main menu.
3. Press MENU/ENTER to enter the sub menu.
4. Select Picture mode and press MENU/ENTER
button to enter the sub menu. Then the picture
popup window appears.
5. Select the Picture mode with CH+/CH- button and
press MENU/ENTER button.
6. Press Exit button to return.
Picture
Custom
Colour Tone
Size
Cool2
Auto Wide
Picture Mode Custom
Dynamic
Standard
Movie
Mild
Picture
Custom
Colour Tone
Size
Cool2
Auto Wide
Picture Mode Custom
Dynamic
Standard
Movie
Mild
Picture Mode
:Enter
:Move :Menu
Picture
Colour Tone
Size Auto Wide
Picture Mode Movie
Standard
PICTURE
Custom
1. Press MENU/ENTER button to display the main
OSD menu.
2. Select the picture main menu.
3. Press MENU/ENTER to enter the sub menu.
4. Select Custom and press MENU/ENTER button to
enter the sub menu. Then the custom sub mode
appears.
5. You will see the picture setting bars. Just Press
BACK button on the remote control. You can adjust
each values of the custom setting, but the changed
values are stored as in Custom mode.
:Move :Menu
Custom
Contrast
Colour
Tint
Brightness 40
80
50
50
75
Brightness
45
Custom
Sharpness
:Select
:Adjust :Menu
:Select
:Adjust :Menu
:Select

9
PICTURE > Color Tone
Your LCD-TV has 5 screen temperatures (color settings).
1. Press MENU/ENTER button to display the main
OSD menu.
2. Select the picture main menu.
3. Press MENU/ENTER to enter the sub menu.
4. Select Colour Tone and press MENU/ENTER
button to enter the sub menu. Then the picture
popup window appears.
5. Select the Colour Tone with CH+/CH- button and
press MENU/ENTER button.
6. Press Exit button to return.
WARM 1:2> Screen seems warm: Strong Red.
Normal> Normal: Factory default.
Cool 1:2> Screen seems cool: Strong Blue.
Picture
PICTURE > Size
1. Press MENU/ENTER button to display the main OSD
menu.
2. Select the picture main menu.
3. Press MENU/ENTER to enter the sub menu.
4. Select Size and press MENU/ENTER button to enter
the sub menu. Then the picture popup window
appears.
5. Select the Size with CH+/CH- button and press
MENU/ENTER button.
6. Press Exit button to return.
Picture
Custom
Colour Tone Cool2
Auto Wide
Picture Mode Auto Wide
Wide
Panorama
Zoom1
Zoom2
:Select
:Adjust :Menu
Size
4:3
14:9
ANALOG TV CHANNEL > Country
1. Press MENU/ENTER button to display the main OSD
menu.
2. Select the Channel main menu.
3. Press MENU/ENTER to enter the sub menu.
4. Select Country and press MENU/ENTER button to
enter the sub menu. Then the picture popup window
appears.
5. Select the Size with CH+/CH- button and press
MENU/ENTER button.
6. Press Exit button to return.
Channel
Auto Store
Manual Store Cool2
Auto Wide
Country Austria
Belgie
Croatia
Denmark
Finland
:Select
:Adjust :Menu
Add/Delete
France
Deutschland
Sort
Name
Fine Tune
Channel
Auto Store
Manual Store Cool2
Auto Wide
Country Austria
Belgie
Croatia
Denmark
Finland
:Select
:Adjust :Menu
Add/Delete
France
Deutschland
Sort
Name
Fine Tune
ANALOG TV CHANNEL > Auto Store
1. Press MENU/ENTER button to display the main OSD
menu.
2. Select the Channel main menu with CH+/CH- button
on the remote control.
3. Press MENU/ENTER to enter the sub menu.
4. Select Auto Store with VOL+/VOL- button and press
MENU/ENTER button.
5. Then you can see the tuning bar. LCD-TV will execute
auto program searching.
While searching channel after selecting Start button with
VOL+/VOL-, you can also stop channel searching if you
select Stop button.
Auto Store
13 %233 Mhz
P 3 C 0
Start Stop
:Select
:Move :Menu

10
ANALOG TV CHANNEL > Manual Store
1. Press MENU/ENTER button to display the main OSD
menu.
2. Select the Channel main menu with CH+/CH- button
on the remote control.
3. Press MENU/ENTER to enter the sub menu.
4. Select Manual Store and Press MENU/ENTER to
enter the sub menu.
Channel
Auto Store
Manual Store
Country Deutschland
:Menu
Add/Delete
Sort
Name
Fine Tune
:Move :Enter
Channel
Colour System
Sound System
Prog. 3
Channel
Search
Store
:Select
:Adjust :Menu
SECAM
BG
C 38
233 Mhz
ANALOG TV CHANNEL > Manual Store > Prog.
1. Press MENU/ENTER button to display the main OSD
menu.
2. Select the Channel main menu with CH+/CH- button
on the remote control.
3. Select the Manual Store menu with CH+/CH- button
on the remote control.
4. Select the Prog. menu with CH+/CH- button on the
remote control.
5. Press MENU/ENTER to enter the sub menu.
6. You will see the picture setting square. You can select
the Prog using CH+/CH- button.
Channel
Sound System
3
Channel
Search
Store
:Select
:Adjust :Menu
ANALOG TV CHANNEL > Manual Store > Colour System
1. Press MENU/ENTER button to display the main OSD
menu.
2. Select the Channel main menu with CH+/CH- button
on the remote control.
3. Select the Manual Store menu with CH+/CH- button
on the remote control.
4. Select the Colour System menu with CH+/CH- button
on the remote control. Then the picture popup window
appears.
5. You can select the Colour System using CH+/CH-
button.
Colour System
Prog.
Cool2
Auto Wide
AUTO
PAL
SECAM
NTSC 3.43
Channel
3
Channel
Search
Store
:Select
:Adjust :Menu
Cool2
Auto Wide
BG
DK
I
L
Sound System
Colour System
Prog.
ANALOG TV CHANNEL > Manual Store > Sound System
1. Press MENU/ENTER button to display the main OSD
menu.
2. Select the Channel main menu with CH+/CH- button
on the remote control.
3. Select the Manual Store menu with CH+/CH- button
on the remote control.
4. Select the Sound System menu with CH+/CH- button
on the remote control. Then the picture popup window
appears.
5. You can select the Sound System using CH+/CH-
button.
ANALOG TV CHANNEL > Manual Store > Channel
1. Press MENU/ENTER button to display the main OSD menu.
2. Select the Channel main menu with CH+/CH- button
on the remote control.
3. Select the Manual Store menu with CH+/CH- button
on the remote control.
4. Select the channel menu with CH+/CH- button on the
remote control.
5. Press MENU/ENTER to enter the sub menu.
6. You can operate the Channel.
Channel
Colour System
Sound System
Prog. 3
Channel
Search
Store
:Select
:Adjust :Menu
PAL
I
233 Mhz
C 38

11
ANALOG TV CHANNEL > Manual Store > Search
1. Press MENU/ENTER button to display the main OSD
menu.
2. Select the Channel main menu with CH+/CH- button
on the remote control.
3. Select the Manual Store menu with CH+/CH- button
on the remote control.
4. Select the Search menu with CH+/CH- button on the
remote control.
5. Press MENU/ENTER to enter the sub menu.
6. You can operate the Search.
Channel
Colour System
Sound System
Prog. 3
Channel
Search
Store
:Select
:Adjust :Menu
PAL
I
233 Mhz
C 38
Channel
Colour System
Sound System
Prog. 3
Channel
Search
Store
PAL
I
233 Mhz
C 38
ANALOG TV CHANNEL > Manual Store > Store
1. Press MENU/ENTER button to display the main OSD
menu.
2. Select the Channel main menu with CH+/CH- button
on the remote control.
3. Select the Manual Store menu with CH+/CH- button
on the remote control.
4. Select the Store menu with CH+/CH- button on the
remote control.
5. Press MENU/ENTER to enter the sub menu.
6. You will see the pictures composed with two squares.
You can select Yes / No with VOL+ or VOL- button.
Yes No
:Menu
:Move :Enter
ANALOG TV CHANNEL > Add/Delete
1. Press MENU/ENTER button to display the main
OSD menu.
2. Select the Channel main menu with CH+/CH- button
on the remote control.
3. Select the Add/Delete menu with CH+/CH- button on
the remote control.
4. Press MENU/ENTER to enter the sub menu. Then
you can see the favorite program list.
5. You can select a program with CH+/CH- button on the
remote control.
Channel
Prog.
P1
P2
P3
P4
P5
:Select
:Adjust :Menu
Add/Delete
Added
Added
Added
Added
Added
Channel
C21
C75
C80
C5
C7
Name
BBC1
C4
R5
IV04
AUT8
Channel
Prog.
P1
P2
P3
P4
P5
Channel
C21
C75
C80
C5
C7
Name
BBC1
C4
R5
IV04
AUT8
ANALOG TV CHANNEL > Sort
1. Press MENU/ENTER button to display the main
OSD menu.
2. Select the Channel main menu with CH+/CH-
button on the remote control.
3. Select the Sort menu with CH+/CH- button on the
remote control.
4. Press MENU/ENTER to enter the sub menu. Then
you can see the sort program list.
(notice: You can’t see the sort program list on this
picture since this picture isn’t a real operating mode
but a design mode.)
5. You can select a program with CH+/CH- button on
the remote control.
:Enter
:Move :Menu
TO SORT THE PROGRAM IN THE LIST
If you want to sort a program, press MENU/ENTER button. Then you can select a field with
VOL+/VOL- button. Press MENU/ENTER button on the field to sort. Adjust the field with CH+/CH-
button. To return, press BACK button.

12
ANALOG TV CHANNEL > Manual Store > Name
1. Press MENU/ENTER button to display the main OSD
menu.
2. Select the Channel main menu with CH+/CH- button
on the remote control.
3. Select the Name menu with CH+/CH- button on the
remote control.
4. Press MENU/ENTER to enter the sub menu. Then
you can see the sort program list.
5. You can change a program Name if you want to
change the name of the program.
Channel
Prog.
P1
P2
P3
P4
P5
Channel
C21
C75
C80
C5
C7
Name
BBC1
C4
R5
IV04
AUT8
:Enter
:Move :Menu
TO CHANGE THE PROGRAM NAME IN THE LIST
If you want to change a program Name, press MENU/ENTER button. Then you can select a field
with VOL+/VOL- button. Press MENU/ENTER button on the field to sort. Adjust the field with
CH+/CH- button. To return, press BACK button.
ANALOG TV CHANNEL > Manual Store > Fine Tune
The Fine Tuning function lets you manually adjust the
LCD-TV’s tuner if you are difficult tuning analog
Channels.
1. Press MENU/ENTER button to display the main OSD
menu.
2. Select the Channel main menu with CH+/CH- button
on the remote control.
3. Press MENU/ENTER to enter the sub menu.
4. Select Fine Tune with CH+/CH- button and press
MENU/ENTER button. Then you can see the adjust
bar.
5. Adjust the fine tune with VOL+ or VOL- button.
Channel
Auto Store
Manual Store
Country Deutschland
:Menu
Add/Delete
Sort
Name
Fine Tune
:Move :Enter
Fine Tune
-32Prog 3
Reset
:Select
:Move :Menu

13
ANALOG TV SOUND > Mode
Your LCD-TV has four automatic sound settings
(“Standard”, “Music”,“Movie”,”Speech”) that are preset at
the factory. You can active either Standard, Movie, Music
or News by pressing “SSM” button on the remote
control(or by making a selection from the menu) or you
can select “Custom” which automatically recalls your
personalized sound settings.
1. Press MENU/ENTER button to display the main OSD
menu.
2. Select the Sound main menu with CH+/CH- button on
the remote control.
3. Press MENU/ENTER to enter the sub menu.
4. Select Mode and press MENU/ENTER button to enter
the sub menu. Then the picture popup window
appears.
5. Select the Mode with CH+/CH- button and press
MENU/ENTER button.
:Enter
:Move :Menu
Sound
Volume
Balance
Equalizer
Custom
L100 R0
Mode
0
Auto Volume
Sound Mode
Off
Mono
Sound
Volume
Balance
Equalizer
Mode
Auto Volume
Sound Mode Mono
Auto Wide
Custom
Standard
Music
Movie
Speech
:Select
:Adjust :Menu
ANALOG TV SOUND > Volume
1. Press MENU/ENTER button to display the main OSD
menu.
2. Select the Sound main menu with CH+/CH- button on
the remote control.
3. Press MENU/ENTER to enter the sub menu.
4. Select Volume and press MENU/ENTER button to
enter the sub menu. Then you can see the Volume
bar.
5. Adjust the Volume with VOL+ or VOL- button. Then
press MENU/ENTER button. Volume
29
:Enter
:Move :Menu
Sound
Balance
Equalizer
Custom
L100 R0
Mode
0
Auto Volume
Sound Mode
Off
Mono
Volume
:Enter
:Move :Menu
Sound
Equalizer
Custom
L100 R0
Mode
0
Auto Volume
Sound Mode
Off
Mono
Volume
ANALOG TV SOUND > Balance
This control allows you to adjust the balance of the left
and right speakers output.
1. Press MENU/ENTER button to display the main OSD
menu.
2. Select the Sound main menu with CH+/CH- button on
the remote control.
3. Press MENU/ENTER to enter the sub menu.
4. Select Balance and press MENU/ENTER button to
enter the sub menu. Then you can see the Balance
bar.
5. Adjust the Balance with VOL+ or VOL- button. Then
press MENU/ENTER button.
Balance
Balance
R 23L 77

14
ANALOG TV SOUND > Equalizer
You can use the OSD menu to change the Treble, Bass
and Balance according to your preference.
1. Press MENU/ENTER button to display the main OSD
menu.
2. Select the Sound main menu with CH+/CH- button on
the remote control.
3. Press MENU/ENTER to enter the sub menu.
4. Select Equalizer and press MENU/ENTER button to
enter the sub menu. Then you will see the Equalizer
menu bars.
5. Select a gain bar with VOL+, VOL- button on the
remote control and adjust it with CH+/CH- button.
6. Press EXIT button on the remote control to exit
equalizer. The result will be saved automatically.
Equalizer
50
:Move :Menu
:Select
10kHz
503kHz
501kHz
50300kHz
50100kHz
ANALOG TV SOUND > Auto Volume
1. Press MENU/ENTER button to display the main OSD
menu.
2. Select the Sound main menu with CH+/CH- button on
the remote control.
3. Press MENU/ENTER to enter the sub menu.
4. Select Auto Volume and press MENU/ENTER button
to enter the sub menu. Then you will see the popup
menu.
5. You can select Yes / No with CH+ or CH- button and
press MENU/ENTER button.
Sound
Volume
Balance
Equalizer
Custom
L100 R0
Auto Wide
Mode
0
Auto Volume
Sound Mode
Off
Mono
On
Off
:Select
:Adjust :Menu
ANALOG TV SOUND > Sound Mode
1. Press MENU/ENTER button to display the main OSD
menu.
2. Select the Sound main menu with CH+/CH- button on
the remote control.
3. Press MENU/ENTER to enter the sub menu.
4. Select Sound mode and press MENU/ENTER button
to enter the sub menu. Then you will see the popup
menu.
5. Select the Sound Mode with CH+/CH- button and
press MENU/ENTER button.
Sound
Volume
Balance
Equalizer
Auto Wide
Mode
Auto Volume
Sound Mode Off
Mono
Dual I
Dual II
:Select
:Adjust :Menu
Stereo

15
:Select :Menu
Setup
Time
Language
OSD Tone
English
Off
Reset
SETUP > Reset
1. Press MENU/ENTER button to display the main OSD
menu.
2. Select the Setup main menu with CH+/CH- button on
the remote control.
3. Press MENU/ENTER to enter the sub menu.
4. Select Reset and press MENU/ENTER button to enter
the sub menu.
5. If you want to reset your TV, press MENU/ENTER
button. Then the system will reset.
Enter
Blue Screen Off
Time
On Timer
Off Timer
On Time Channel
Clock
On Time Volume
:Move :Menu
0 : 0
23 : 59
0 : 0
0
0
Off
Off
:Enter
SETUP > Clock
Set the current time.
1. Press MENU/ENTER button to display the main OSD
menu.
2. Select the Setup main menu with CH+/CH- button on
the remote control.
3. Press MENU/ENTER to enter the sub menu.
4. Select Time and press MENU/ENTER button to enter
the sub menu. Then you will see the time menu.
5. Select Clock by pressing VOL+ button.
6. Move the cursor by pressing VOL-, VOL+ button and
adjust time by CH+ and CH- button.
SETUP > On Timer
This LCD-TV can be set to turn on automatically at
specific time that you chose. Before using timer, you
must set the LCD-TV’s Time as described previously.
1. Press MENU/ENTER button to display the main OSD
menu.
2. Select the TIME main menu with CH+/CH- button on
the remote control.
3. Press MENU/ENTER to enter the sub menu.
4. Move the cursor by pressing VOL-, VOL+ button and
adjust on time by CH+ and CH- button.
(Notice: You can’t see the real time on this picture since
this picture isn’t a real operating mode but a design
mode. In a real mode, you can see the real clock time.)
Time
Off Timer
On Time Channel
Clock
On Time Volume
:Move :Menu
0 : 0
23 :00
0 : 0
0
0
Off
On
:Enter
On Timer
SETUP > Off Timer
This LCD-TV can be set to turn off automatically at
specific time that you chose. Before using timer, you
must set the LCD-TV’s Time as described previously.
1. Press MENU/ENTER button to display the main
OSD menu.
2. Select the TIME main menu with CH+/CH- button
on the remote control.
3. Press MENU/ENTER to enter the sub menu.
4. Move the cursor by pressing VOL-, VOL+ button
and adjust off time by CH+ and CH- button.
(Notice: You can’t see the real time on this picture
since this picture isn’t a real operating mode but a
design mode. In a real mode, you can see the real
clock time.)
Time
On Time Channel
Clock
On Time Volume
:Move :Menu
0 : 0
23 :00
0 : 0
0
0
On
Off
:Enter
On Timer
Off Timer

16
SETUP > On Time Channel
Set the channel when LCD-TV power turns on
automatically. - Available only when the Time is set
and On Time is ON.
1. Press MENU/ENTER button to display the main
OSD menu.
2. Select the TIME main menu with CH+/CH- button
on the remote control.
3. Press MENU/ENTER to enter the sub menu.
4. Select On Time Channel.
5. Adjust the channel with VOL-, VOL+ button.
6. Press EXIT button to return.
Time
Clock
On Time Volume
:Move :Menu
0 : 0
23 :00
0 : 0
8
0
On
Off
:Select
On Timer
Off Timer
On Time Channel
SETUP > On Time Volume
Set the sound volume level when LCD-TV power on
automatically. - Available only when the Time is set
and On Time is ON. and On Time is ON.
1. Press MENU/ENTER button to display the main
OSD menu.
2. Select the TIME main menu with CH+/CH- button
on the remote control.
3. Press MENU/ENTER to enter the sub menu.
4. Select On Time Volume.
5. Adjust the sound volume level with VOL-, VOL+
button.
6. Press EXIT button to return.
Time
Clock
:Move :Menu
0 : 0
23 :00
0 : 0
8
20
On
Off
:Select
On Timer
Off Timer
On Time Channel
On Time Volume
SETUP > Language
Set the language to use in OSD.
Supported languages are English, French, German,
Italian, Spanish, Portuguese, and Netherlandish.
1. Press MENU/ENTER button to display the main
OSD menu.
2. Select the Setup main menu with CH+/CH- button
on the remote control.
3. Press MENU/ENTER to enter the sub menu.
4. Select Language and press MENU/ENTER button
to enter the sub menu. Then you will see the popup
menu.
5. Select the language with CH+/CH- button and press
MENU/ENTER button.
:Select :Menu
Setup
Time
OSD Tone Off
Reset Enter
Blue Screen Off
:Move
EnglishLanguage
SETUP > OSD Tone
1. Press MENU/ENTER button to display the main
OSD menu.
2. Select the Setup main menu with CH+/CH- button
on the remote control.
3. Press MENU/ENTER to enter the sub menu.
4. Select OSD Tone and press MENU/ENTER button
to enter the sub menu. Then you will see the popup
menu.
5. Select the On/Off with CH+/CH- button and press
MENU/ENTER button.
:Select :Menu
Setup
Time
Reset Enter
Blue Screen Off
:Adjust
Language
OSD Tone On
Off

17
SETUP > Blue Screen
1. Press MENU/ENTER button to display the main
OSD menu.
2. Select the Setup main menu with CH+/CH- button
on the remote control.
3. Press MENU/ENTER to enter the sub menu.
4. Select Blue Screen and press MENU/ENTER
button to enter the sub menu. Then you will see the
popup menu.
5. Select the On/Off with CH+/CH- button and press
MENU/ENTER button.
:Select :Menu
Setup
Time
Reset Enter
Blue Screen
Off
:Adjust
Language
OSD Tone
On
Off
PIP (Picture in Picture) > PIP
You can watch two programs or sources at the same
time. And set up PIP size and position.
1. Press MENU/ENTER button to display the main
OSD menu.
2. Select the PIP main menu with CH+/CH- button on
the remote control.
3. Press MENU/ENTER to enter the sub menu.
4. Select PIP and press MENU/ENTER button to enter
the sub menu. Then you will see the popup menu.
5. Select the On/Off with CH+/CH- button and press
MENU/ENTER button.
PIP
Input Source
Size
Position
PIP
0
Swap
Sound Select Main
Off
On
:Select :Menu
:Adjust
PIP (Picture in Picture) > Input Source
You can watch two programs or sources at the same
time. And set up PIP size and position.
1. Press MENU/ENTER button to display the main
OSD menu.
2. Select the PIP main menu with CH+/CH- button on
the remote control.
3. Press MENU/ENTER to enter the sub menu.
4. Select Input Source and press MENU/ENTER
button to enter the sub menu. Then you will see the
popup menu.
5. Select the Input Source with CH+/CH- button and
press MENU/ENTER button.
PIP
Size
Position
PIP
0
Swap
Sound Select Main
TV
SCART1
:Select :Menu
:Adjust
Input Source
0
SCART2
0
0
AV
S-Video
Component
DVI
PC
PIP
Input Source
Position
PIP
0
Swap
Sound Select Main
:Select :Menu
:Adjust
PIP (Picture in Picture) > Size
1. Press MENU/ENTER button to display the main
OSD menu.
2. Select the PIP main menu with CH+/CH- button on
the remote control.
3. Press MENU/ENTER to enter the sub menu.’
4. Select Size and press MENU/ENTER button to
enter the sub menu. Then you will see the popup
menu.
5. Select the Pip Size with CH+/CH- button and press
MENU/ENTER button.
Size
On

18
PIP
Input Source
PIP
0
Swap
Sound Select Main
:Select :Menu
:Adjust
PIP (Picture in Picture) > Position
1. Press MENU/ENTER button to display the main
OSD menu.
2. Select the PIP main menu with CH+/CH- button on
the remote control.
3. Press MENU/ENTER to enter the sub menu.
4. Select Position and press MENU/ENTER button to
enter the sub menu. Then you will see the popup
menu.
5. Select the Pip Position with CH+/CH- button and
press MENU/ENTER button.
Size
On
Position
PIP
Input Source
PIP
0
Swap
Sound Select Main
:Select :Menu
:Adjust
Size
On
Position
PIP (Picture in Picture) > Swap
Using swap function, you can exchange two programs
or sources at the same time.
1. Press MENU/ENTER button to display the main
OSD menu.
2. Select the PIP main menu with CH+/CH- button on
the remote control.
3. Press MENU/ENTER to enter the sub menu.
4. Select Swap and press MENU/ENTER button to
swap two programs or sources that you want.
PIP
Input Source
PIP
Swap
Sound Select
TV
:Select :Menu
:Adjust
Size
On
Position
PIP (Picture in Picture) > Sound Select
Using Sound Select function, you can exchange the
sound of two programs or sources at the same time.
1. Press MENU/ENTER button to display the main
OSD menu.
2. Select the PIP main menu with CH+/CH- button on
the remote control.
3. Press MENU/ENTER to enter the sub menu.
4. Select Sound Select and press MENU/ENTER
button to swap the sound of two programs or
sources that you want.
Main
Sub
TV

19
PC
Custom
Colour Tone
Size
Cool2
Auto Wide
Picture Mode Custom
High
Middle
Low
:Select
:Adjust :Menu
Picture (PC) > Picture
1. Press MENU/ENTER button to display the main
OSD menu.
2. Select the picture main menu.
3. Press MENU/ENTER to enter the sub menu.
4. Select Picture mode and press MENU/ENTER
button to enter the sub menu. Then the picture
popup window appears.
5. Select the Picture mode with CH+/CH- button and
press MENU/ENTER button.
PC
Picture (PC) > Custom
1. Press MENU/ENTER button to display the main
OSD menu.
2. Select the picture main menu.
3. Press MENU/ENTER to enter the sub menu.
4. Select Custom and press MENU/ENTER button to
enter the sub menu. Then the custom sub mode
appears.
:Move :Menu
Custom
Contrast
Sharpness
Brightness 40
80
50
:Select
Picture (PC) > Colour Tone
1. Press MENU/ENTER button to display the main
OSD menu.
2. Select the picture main menu.
3. Press MENU/ENTER to enter the sub menu.
4. Select Colour Tone and press MENU/ENTER
button to enter the sub menu. Then the picture
popup window appears.
5. Select the Colour Tone with CH+/CH- button and
press MENU/ENTER button. :Move :Menu
Color Tone
Red (R)
Green (G)
Colour Tone Custom
50
50
:Select
Blue (B) 80
:Move :Menu
Color Tone
Green (G)
Colour Tone Custom
50
50
:Select
Blue (B) 50
Picture (PC) > Colour Tone
If you select Custom in the Colour Tone popup window
on PC, you can select sub modes like as Red, Green,
and Blue.
1. Press MENU/ENTER button to display the main
OSD menu.
2. Select the picture main menu.
3. Press MENU/ENTER to enter the sub menu.
4. Select Red(R) and press MENU/ENTER button to
enter the sub menu. Then the setting bar appears.
5. You can adjust each values of the Colour Tone
setting.
Custom
Cool1
Cool2
Normal
Warm1
Warm2
Red (R)
Picture (PC) > Size
1. Press MENU/ENTER button to display the main
OSD menu.
2. Select the picture main menu.
3. Press MENU/ENTER to enter the sub menu.
4. Select Size and press MENU/ENTER button to
enter the sub menu. Then the picture popup window
appears.
5. Select the Size with CH+/CH- button and press
MENU/ENTER button.
6. Press Exit button to return.
PC
Custom
Colour Tone Cool2
Auto Wide
Picture Mode
4:3
Wide
:Select
:Adjust :Menu
PC
Custom
Size

20
PC
Phase
H-Position
V-Position
-78
Auto in Progress
:Menu
Picture (PC) > PC
1. Press MENU/ENTER button to display the main
OSD menu.
2. Select the picture main menu.
3. Press MENU/ENTER to enter the sub menu.
4. Select PC and press MENU/ENTER button to enter
the sub menu. Then you will see the sub menu of
PC.
5. Select the Size with CH+/CH- button and press
MENU/ENTER button.
Frequency
16
53
24
:Move :Enter
Picture (PC) > PC
1. Press MENU/ENTER button to display the main
OSD menu.
2. Select the picture main menu.
3. Press MENU/ENTER to enter the sub menu.
4. Select Phase and press MENU/ENTER button to
enter the sub menu. Then the setting bar appears.
5. You can adjust each values of the PC setting.
PC
H-Position
V-Position
-78
Auto in Progress
:Menu
Frequency
16
53
24
:Move :Enter
Phase
This manual suits for next models
2
Other SWEDX LCD TV manuals

SWEDX
SWEDX SG-xxT20 User manual

SWEDX
SWEDX XP-xxT12 User manual

SWEDX
SWEDX SG-32T3 User manual

SWEDX
SWEDX XV1-32 User manual

SWEDX
SWEDX T0 User manual

SWEDX
SWEDX XV1-40TV V3 User manual

SWEDX
SWEDX Camo SG-32T2/5 User manual

SWEDX
SWEDX XV1- 32 User manual

SWEDX
SWEDX XP-xxT1 User manual

SWEDX
SWEDX CAMO SG-xxT10 User manual