SWING LOGIC SLX-Hybrid X3 User manual

User Manual
SWING LOGIC VENTURES

INDEX
SLX-HYBIRD X3 USER MANUAL 2
03
04
05
06
07
09
10
11
12
13
14
15
16
17
18
19
20
21
22
28
30
Composition
Quick Start Guide (QSG) Summary
Register Product
Using Bluetooth speaker
Using Launch monitor
Swing detection via multi-sensor
Swing with Nano sensor
Using audible GPS
Using the magnetic mount
Charging and using the power bank
Using the remote button
Nano Button new connecting
LCD Display Guide
Button and LED Guide
Firmware Update
Install SLX-Connect and Using
Calibration at SLX-Connect Setting
Using E6 Connect (STEP 1 ~ 11)
Troubleshooting
Caution and Warning
RULES

Composition
SLX-HYBRID X3 model components.
Main LCD Screen
Power Bank port
Charger port
Charger Cable Registration Card Protective Travel Pouch
Dual Speakers
Magnet mount
Control buttons
Nano Charger port
Nano Sensor / Remote
(only pro model)
Nano Glove Mount
SLX-HYBIRD X3 USER MANUAL 3

QSG Summary
INSTANCE
DISPLAY
BLUETOOTH
SPEAKER
REMOTE
CONTROL
SWING
SENSOR
MAGNET
MOUNT
POWER
BANK
WATER
PROOF
SWING
ANAALYSIS
AUDIBLE
GPS
E6 CONNECT
COMPATIBLE
SLX-Hybrid PRO model only
PC/iOS
NEODIMUNGlove Mount
+36,000 courses
iOS / ANDROID
iOS / ANDROID
10W STEREOTN LCD
6000mAh IP 5X
SLX-Hybrid PRO model only
Hybrid Power ON BLE Button 3sec Press “SLX-SPEAKER” Pairing
BLUETOOTH SPEAKER
Feature List
1 2 3
Button Power ON UP/DN Press (club) Mode Press (display)
ROMOTE CONTROL *speaker : volume/pause
1 2 3
Hybrid Power ON Display Select (mode) Club select (up/down)
INSTACE DISPLAY
1 2
Unit select (pause) install 3~4 ft back and swing
4 5
3
BLE Speaker paring Connect SLX APP ROUND MENU Select
AUDIBLE GPS
1 2
Go to the Tee box Click button and Get TTS remaining distance
4 5
3
Nano PW ON Connecting Check Glove mount install
SWING With SENSOR
1 2
Club select (up/dn) Setup(vibration) and Swing
4 5
3
PC/Phone BLE ON Connect (SLX-HYBIRD) Configure/Setting
SWING With SENSOR
1 2
Club control Using Simulator or Swing Analyzer
4 5
3
SLX-HYBIRD X3 USER MANUAL 4

Register Product
Welcome to SLX. Register your product right away.
After registration, you will receive an E6 Connect license.
You must register your product and serial number on SwingLogic.us and select the license type
to receive your E6 License key.
Or navigate to
https://register.swinglogic.us
Scan QR with Camera App
1. Scan included QR code (navigate to https://register.swinglogic.us)
2. Input required device registration information
- Accessible through the SwingLogic User Portal
4. Download E6 Connect app for PC/iOS
5. Visit https://portal.e6golf.com
- using the same email that was registered in STEP 2.
6. REDEEM License Key
Registration STEPS
The Registration Process is REQUIRED to receive your Free E6 License Key.
SLX-HYBIRD X3 USER MANUAL 5

Using Bluetooth speaker
SLX-Hybrid features high-quality, high-power dual stereo speakers.
For Bluetooth Connection, find the device name "SLX-SPEAKER" and pair it.
BLE button click
Change to SPEAKER mode
Pairing mode LED (blue color)
Speaker mode LCD
Speaker bluetooth paired ICON
Speaker mode
Volumn up/down
Launch Monitor mode
Pause / Play
find the device name
"SLX-SPEAKER" and pair it.
SLX-SPEAKER
AB
SLX-HYBIRD X3 USER MANUAL 6
SLX-SPEAKER may not be discoverable if it is connected to another phone.
When connecting to a new phone, please disconnect from the previous phone.

Using Launch Monitor
You can quickly check swing results with the LCD Display
While using the app, you can audibly hear results through the TTS.
TIP: If you connect the SLX-Conncect app, you can check your selected result
through voice TTS using headphones.
Ball Speed
Distance
Distance
Head Speed
Head Speed
Smash Factor
Toggle result
Change Display by using the Mode/Power Button
Hybrid Location
Install 3~4f horizontally behind the ball in line with intended direction.
Club Change
Mode Change
Units Change
3f ~ 4f
“The distance is
245 yards.”
SLX-HYBIRD X3 USER MANUAL 7

Using Launch Monitor
You can use it by applying it according to various places of use.
Available clubs: Driver through 9 iron
Detection sensor: Radar sensor
It is more convenient to connect the SLX app
and use it as an earphone through TTS.
On the Range:
Available clubs: Driver through Putter
Radar sensor + Nano Sensor (option)
When using as a simulator,
utilize with the Nano to get direction
and swing tempo results.
Indoor Simulator or Outdoor Net
Ball Location
TIP: Depending on the type of shot, if you adjust the position in the ball
detection zone, the recognition rate will increase.
“The distance is
245 yards.”
SLX-HYBIRD X3 USER MANUAL 8
Approach (4 ft)
Normal (3.5 ft)
Putting (3 ft)
Hybrid
Ball detecting zone

Swing detection via multi-sensor
Swing analysis is possible with a multi-sensor that combines radar and Micro sensor.
(Patent Pending)
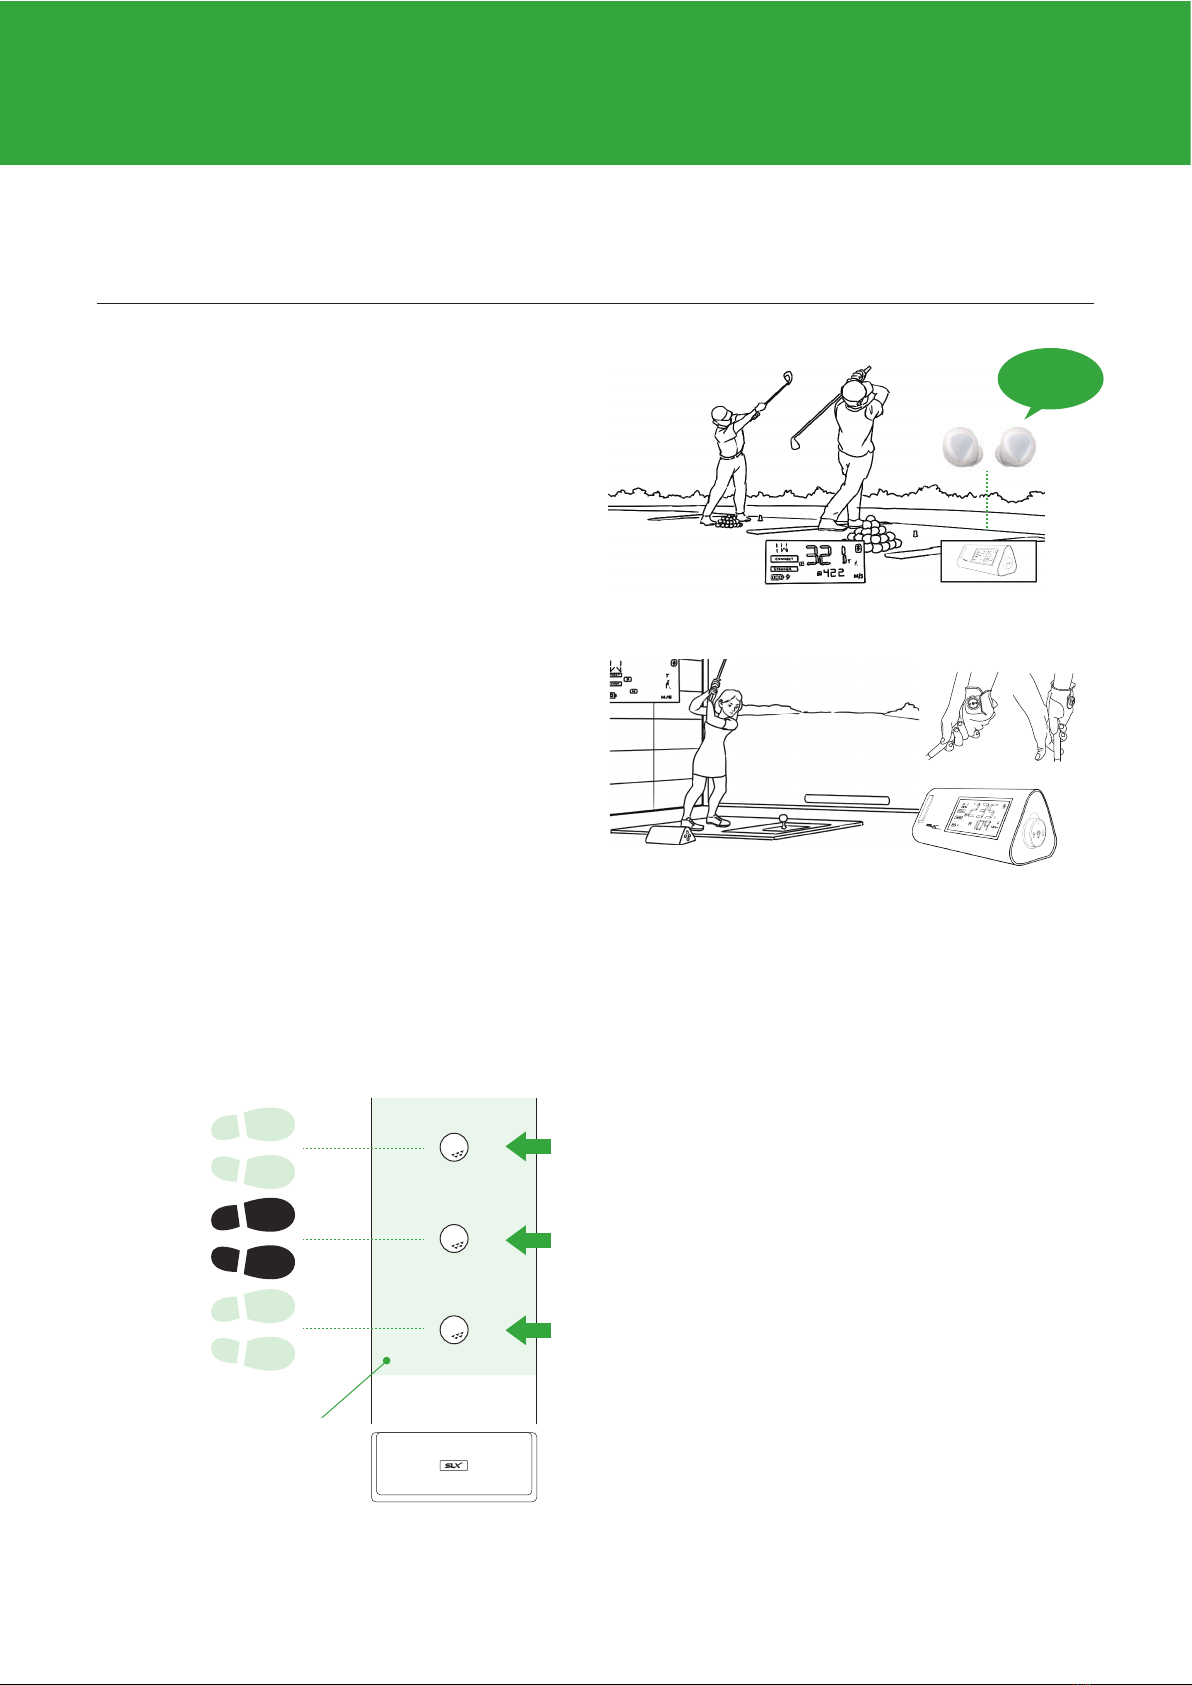
It can be used in a variety of ways,
from short-distance putting to real ball striking.
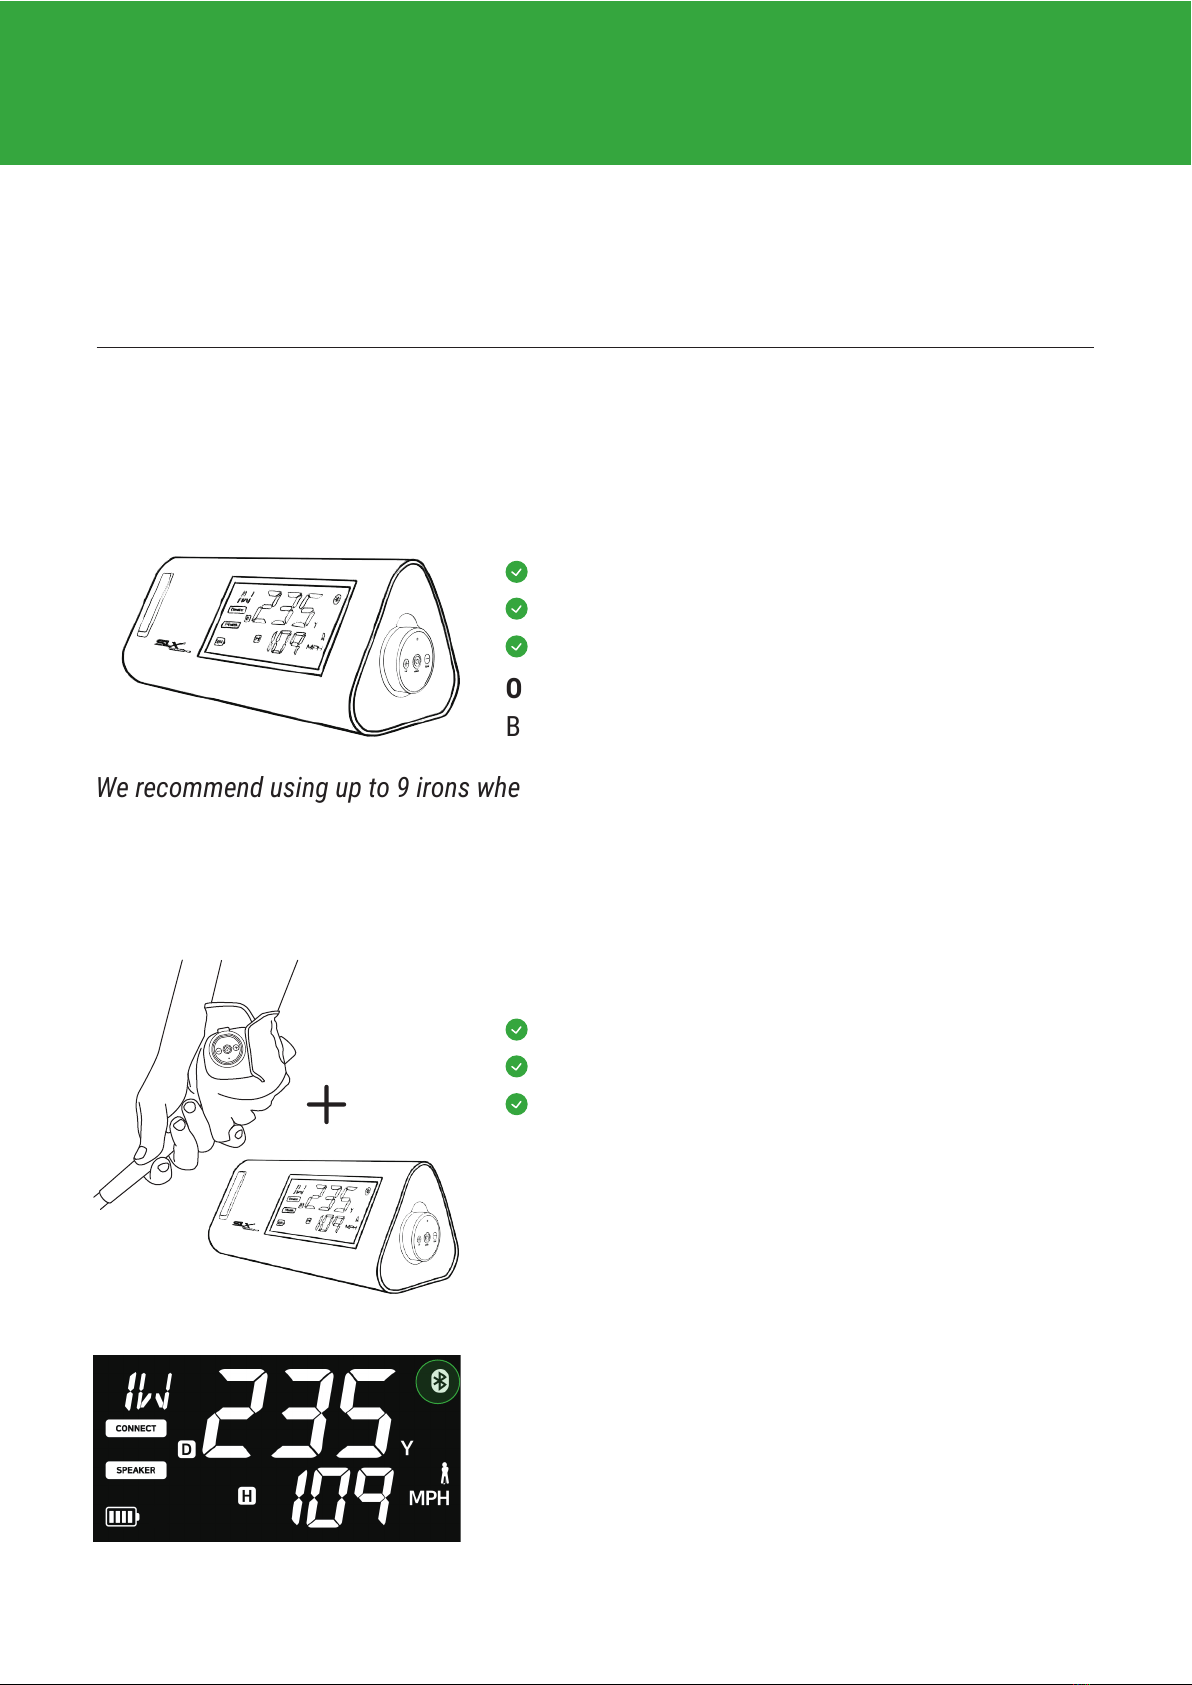
Using only Hybrid (Radar Sensor)
When practicing without app
We recommend using up to 9 irons when using radar only.
(Wedges can easily get out of range of radar due to launch angle. Smash factor approaches
1.0 and distance can be accurately shown when combined with Nano)
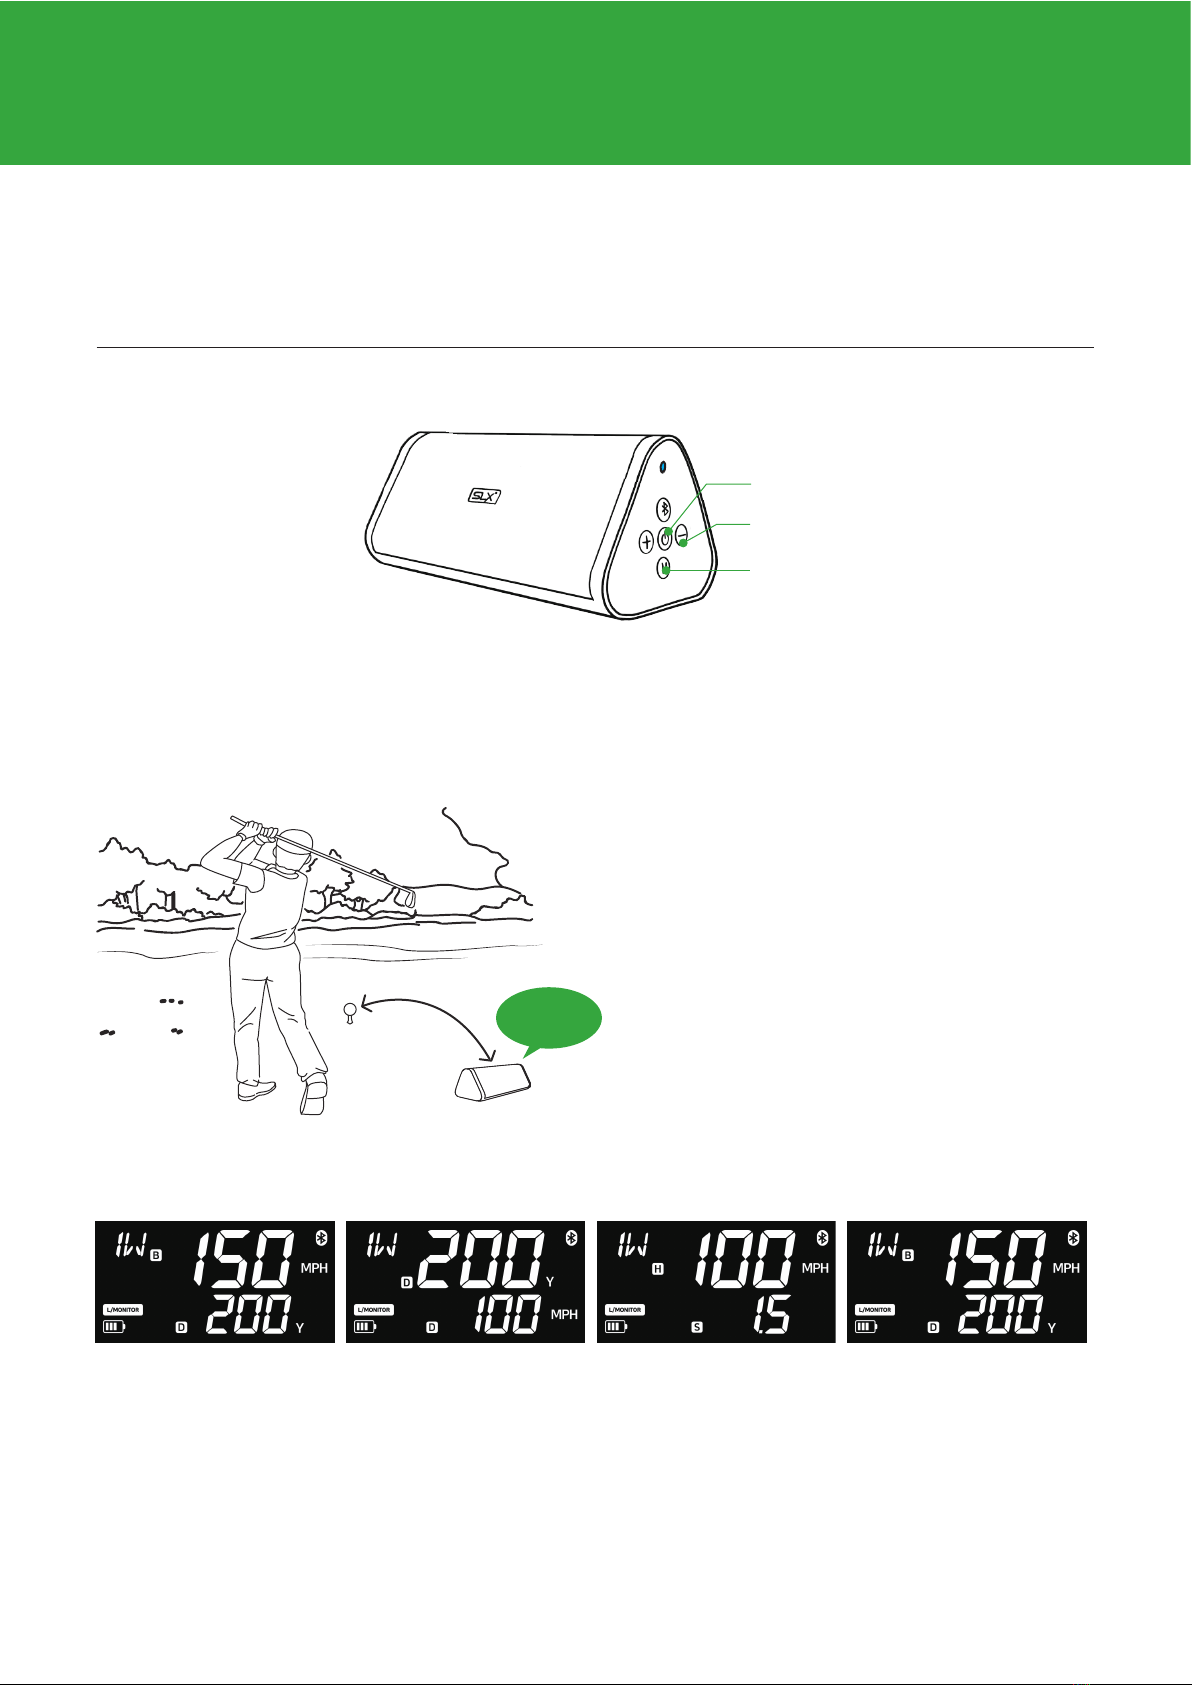
Output data:
Ball Speed, Head Speed, Distance , Smash Factor
Ball speed, head speed detection
Putting (head speed) detection
Distance, smash factor
Using with nano sensor (Radar + Nano Sensor)
For use as a golf simulator and detailed analysis
Output data:
Launch direction / Face, Path Angle / Side Spin /
Tempo / Swing Type / Swing Score
(Swing Score Related Tempo compared to Pro's)
When the nano power is turned on,
it is automatically connected to the hybrid.
When connected, the Bluetooth icon is
displayed on the LCD.
Practice swing recognition
launch direction/tempo detection,
head speed verification
SLX-HYBIRD X3 USER MANUAL 9

Swing with Nano sensor
Utilizing the Nano Sensor provides more accurate swing results.
Golf gloves are required when swinging using the nano sensor.
(Nano Sensor may be clipped to watch band or tape on wrist for putting analysis without a glove)
Mount the sensor as shown in the figure below and install it vertically in the correct position
to increase the accuracy.
If you use nano sensor, you can get more accurate swing results.
For accurate use, install it as shown in the figure below.
NOTE: Swing recognition may be difficult for extremely strong or weak grips.
The Nano Sensor can be adjust by turning the clip at an angle to improve setup recognition.
Insert the glove with top of clip facing up (wrist) as shown in the picture.
Insert the NANO sensor into the mount, turn it exactly 90 degrees clockwise
(USB should be facing towards thumb when properly installed.)
Limit waggle at setup to prevent Nano Sensor reset.
Swing within 3 seconds after address posture
Raise your wrist up with palm facing the ground and Nano Sensor horizontal,
to use +/- on the Nano Sensor for club selection
NANO Glove mount and Swing Guide
Left-handed people must wear
gloves on their right hand.
SLX-HYBIRD X3 USER MANUAL 10

Using audible GPS
Use the audible GPS function using the SLX-Connect app.
You can now easily check the distance from the cart to the pin.
Connect speaker and use the nano button to check the remaining distance.
NOTE: Hybrid device relies on SLX Connect Application and mobile phone location sharing
for GPS function.
SLX-Connect Run Course Enter Tee Box > Select GPS menu
Bluetooth Speaker paring SLX-Connect Connect Select round
1 2
Go the tee box in course Click mode button and get distance
Max 20m
4 5
3
The remaining distance
to the pin is 245 yards.
SLX-HYBIRD X3 USER MANUAL 11

Using the magnetic mount
Use the strong magnet on the Hybrid base bottom to attach to cart, or rely on the non-slip
coating to set in cart seat or cup holder area.
Depending on the location of the magnet, it may fall off due to impact.
It is the user's responsibility to exercise caution when driving the cart.
You can hear good sound quality without shaking in anywhere
Neodymium Magnet
SLX-HYBIRD X3 USER MANUAL 12

Charging and using Power bank
Charge your phone during a round of golf with power bank function.
USB Wall Adapter not included.
It can be charged with USB-C type using a 5V - 1AmH charging adapter.
Hybrid charging time 8 hours, Nano charging time 2 hours
Device Charging
Hybrid
5V
Nano
5V
Using Power Bank
You can charge your phone and Nano button through the USB port.
PwerBank max 6000mAh (3.7v standard)
SLX-HYBIRD X3 USER MANUAL 13

Using the remote button
Utilize the Nano Sensor as a remote control.
Audible GPS mode
NOTE: It is recommended that a speaker be connected for Voice GPS output.
You need to connect the SLX-CONNECT and enter the course in Play mode.
Button matching
Launch Monitor mode
Up/Down Button
Mode Button
Up/Down
Club Change
Mode Button
Display change
When the nano power is turned on,
it is automatically connected to the hybrid.
When connected, the Bluetooth icon is
displayed on the LCD.
successful nano sensor connection
Connect Check
Up/Down
Club Change
Mode Button
Audio OUT TTS
SLX-HYBIRD X3 USER MANUAL 14

Nano Button new connecting
Nano Sensor comes paired with Hybrid Unit, however if a new connection is needed or
replacement Nano Senor required, they can be paired as follows:
New Connection
Press the minus button of Hybrid and Nano together for 5 seconds to try pairing
between new devices. The icon blinks for Hybrid, and blinks blue for Nano
Hybrid and Nano are connected and shipped from the factory.
NANO Connect checking
When Hybrid-Nano is connected, the rear swing icon
is activated, and the Nano's LED will be green.
Auto Paring
5 Sec press 5 Sec press
Red to Green
SLX-HYBIRD X3 USER MANUAL 15

Nano Connect
APP Connection
GPS mode
Speaker paired
Battery Charging B : Ball Speed
H : Head Speed (club Speed)
D : Distance (carry)
S : Smash Factor (Ball/Head)
First Result / Second Result
CLUB
LCD Display Guide
Hybrid provides optimal LCD display in various modes.
Optimized for viewing directly behind hitter.
Hybrid LCD
Voice GPS mode
CP : Center Pin
BP : Back Pin
FP : Front Pin
Hole Remaining Distance Play / Pause
Volume
The volume label may not change
depending on the connected phone.
Speaker mode Launch Monitor mode
Radar power
Swing mode
Putting mode
putting mode icon blinks
long putting mode.
SLX-HYBIRD X3 USER MANUAL 16

Button and LED Guide
Easy to understand LED lights show connection and unit status.
Hybrid Button
Club / Volume Up/Down button
Power (ON) / Display Mode button / power off: press for 3 seconds
Speaker mode button
Club / Volume Up/Down button
Power (ON) / Display Mode button / power off: press for 3 seconds
Pause / Unit Change button
Speaker
Connected
NANO
New Pairing
Speaker
Disconnected
Hybrid Error
Hybrid LED
Nano Sensor
Nano
Disconnected
Nano
connected
Nano
Swing Ready
Low Battery
NANO LED
SLX-HYBIRD X3 USER MANUAL 17
Green
blink
Blue
blink
Red
blink
Red
double
blink
Red
slow
blink
Red
fast
blink

Firmware Update
Connect SLX-CONNECT > Connect menu > Device Select
When the firmware of HW is updated, it is activated with a green button.
Initial Firmware Updates will require separate Update App.
Integration into SLX Connect underway.
You can temporarily install and use the SLX-FIRMWARE MANGER app.
Direct updates from SLX-CONNECT will be updated later.
SLX-HYBIRD X3 USER MANUAL 18

Install SLX-Connect and Using
SLX Connect includes Swing Analysis, on-course GPS, Swing Video capture,
and mini simulator game.
Search “SLX-CONNECT” in app store
Support OS : IOS/Android/PC compatible
Support Device : iPad / Tablet / Phone compatible
Shot History 3D Analyzer menu
GPS Menu Camera Menu(auto Trigger)
Important!
Calibrate your swing for each club by your shot result through the calibration included in the
setting menu (patented technology) Some features may be updated in the future.
Recommended OS : Window 10 / Android 12 / iOS 12
It may not work under the recommended OS or lower.
SLX-HYBIRD X3 USER MANUAL 19

Calibration at SLX-Connect Setting
User calibration can be done according to the customer's swing
and club. (Patent Pending)
Connect SLX-CONNECT > SETTING > CALIBRATION MENU
Rate adjustment
Club Select Calibration value select Adjustment
1 2 3
Calibration allows each customer to customize the results to fit their specific swing pattern.
Calibration is stored and launch monitor optimized for you.
Example) Distance 1.1 ,Club Path Rate 1.1, Club Path Gap 3
1
2
3
Rate Value
Distance 50% ~ 150%
Ball , Head Speed,
side spin, back spin
Face angle , path angle,
launch angle, direction,
Gap Value
Launch Angle -5.0 ~ +5.0
Tempo, Face angle ,
path angle, launch angle,
launch direction
Rate
Rate
GAP (left / right)
It can be adjusted from a minimum of 80% to a maximum of 120% in percent.
GAP adjustment
You can adjust the gap if your swings are constantly fading or drawing.
more than initially calculated.
234 3.22
SLX-HYBIRD X3 USER MANUAL 20
Table of contents
Popular Speakers manuals by other brands

Gogen
Gogen BS 023 user manual

Monster
Monster BTW248XBK user manual

TRU Audio
TRU Audio CL-70v-6UL user manual

Cooper Notification
Cooper Notification LSPK installation instructions

KYE Systems Corp.
KYE Systems Corp. Genius SP-i220 Service guide

Bowers & Wilkins
Bowers & Wilkins CM4 Owner's manual and warranty