Swisscom Aton H61 User manual

en 10.2008
Aton H61
User Guide
Cover_Aton_H61_en.indd 1 18.8.2008 13:34:52 Uhr

2
Dear customer:
Thank you for purchasing this Swisscom product; we appreciate your trust in us.
This product was manufactured with the upmost care, should you encounter any difficulties
during its use, we recommend that you refer to this user guide.
For your comfort and safety, we ask that you read the following paragraphs carefully:
Recommendations and safety instructions
Your DECT headset must not be installed in a humid room (wash room, bathroom,
laundry room, kitchen, etc.) unless it is 1.50 m away from a water point. Your headset
must be operated at temperatures ranging from 5°C to 45°C.
Only use the supplied power adaptor. You can only use these two types of power
adaptors for the base:
Manufacturer Model Ratings
Sure-power Ltd. SW_7515075500EU Input: 100-240V 50~60Hz 0.2A
Output: DC 7.5V 500mA/ 7.5V 150mA
Electronic Sales Ltd. IW275E Input: 100-240V 50~60Hz 0.2A
Output: DC 7.5V 500mA / 7.5V 150mA
Connect the power adaptor to the base socket according to the installation
instructions provided in this booklet and the indications on the identification label
afxed to it (voltage, current, electric network frequency).
Your headset has a built-in 290mAh Li-polymer battery. Do not replace the battery
unnecessarily or there will be a risk of explosion.
If there is a need for replacement, you can use these two types of batteries for the
headset:
Manufacturer Model Voltage Capacity
TCL 391841N-II 3.7V 290mAh
McNair MLP441944 3.7V 290mAh
Worn out batteries must be disposed of properly in accordance with appropriate
environmental standards.
This headset was designed for use on the public switched telephone network (PSTN).
In case of a problem, you must rst contact your reseller. Only use the supplied
telephone cord.
Your DECT headset has an indoor radio range of about 40 metres and an outdoor
range of up to 250 metres. The immediate presence of metal parts (of a television for
example), or of any electric appliance may result in range reduction.
In t r o d u c t I o n

3
In t r o d u c t I o n
Some sensitive medical equipment and safety equipment may be affected by the
radio-frequency transmissions of your headset. In all cases, we ask that you respect
the safety recommendations.
In areas where storms are frequent, we recommend that you protect your telephone
line using a surge protection device.
This device does not function in case of a power failure. For the emergency
calls, use a self-contained cord telephone.
The CE marking certies that the product meets the essential requirements of the
European Union Directive 1999/05/EC pertaining to radio equipment and
telecommunications terminal equipment, for the safety and health of users.

4
co n t e n t s
Your headset 5
Unpacking 5
Overview of your headset 6
Getting started 7
Connecting the base 7
Charging the headset 8
Attaching headband 8
Operating your headset 9
Registration 9
Make a call 9
Answer a call 9
Appendix 10
De-registration 10
Low-Battery Signal 10
Care and Maintenance 10
Causes of Poor Reception 10
Troubleshooting 11
Environmental information 12
Environmental impact 12
Maintenance/Warranty 13

5
Unpacking
Place the box in front of you, open it and make sure it contains the following items:
• one base,
• one headset,
• one AC power adapter,
• one telephone line cord,
• one Swiss double plug TT89,
• one ear hook,
• one headband,
• this user guide.
Yo u r h e a d s e t

6
Yo u r h e a d s e t
Overview of your headset
It comes with a base that allows registration of up to 5 headsets.
1. Volume keys
Short press Vol (+) to increase or Vol (-) to decrease the volume of the headset earpiece.
The last volume setting shall be kept.
2. LED indicator
Green (steady): Indicates that there is an ongoing call
Green(ashingquickly):Indicatesthatthereisanincomingcallorpage
Green(ashing):Indicatesthattheheadsetisinregistrationmode
Red(steady):Indicatesthattheheadsetisinchargingposition
Red(ashingslowly):Indicatesthatthebatteryislowinstandbymode.(Headsetoutside
base)
Green/Yellow(alternateashing):Indicatesthatthebatteryislowintalk-mode.
3. Talk/End key
Short press to pick up an incoming call or end a call.
4. Page key
Short press to nd headsets.
Long press to start registration of your headsets.

7
Ge t t I n G s t a r t e d
Connecting the base
Beforemakinganyconnections,pleaserefertothesafetyinstructionspresentedatthe
beginningofthisuserguide.
Place the base in a central location near the telephone socket and power socket.
You will need to connect both your phone and headset base to the same telephone landline.
Note: Your headset will not function without a phone connected to the same telephone landline.
If you only have one single-slot telephone socket, you may use the supplied double plug for your
connection.
Connect the line cord and the power cable to their respective connectors at the back of the
base, as shown in the diagram.
Connect the other end of the line cord and power cable to their respective wall sockets.
Installation on two phone line sockets Installation with Swiss double plug
Phone line socket Phone line socket Phone line socketPower socket Power socket
Swiss
double plug

8
Charging the headset
Your headset has a built-in 290mAh Li-polymer battery.
Once the base is powered, place the headset on the charging cradle of the base. It takes
around one to two minutes for the LED indicator on the headset to turn on, verifying the battery
is charging. The red LED is always on when the headset is in proper charging position. When
the battery is low, the red LED ashes.
Foroptimalbatterycharge,leavetheheadsetonthebaseforatleast16hoursduring
initialuse.Duringcharging,thebatterymayheatup,thisisquitenormal.
Attaching headband
As seen in the illustration, attach your headband to the
back of your headset by tting the tabs on both ends.
Push into place until you hear a click sound.
To remove the headband, simply pull it away from your
headset.
Ge t t I n G s t a r t e d

9
op e r a t I n G Y o u r h e a d s e t
Registration
Yourheadsetis pre-registered tothe
base,soitisreadyforuseafterithas
beencharged.
Simply press the Talk/End key upon initial
power up to link up with the base.
In case of missing link, please follow these
instructions to register it to the base:
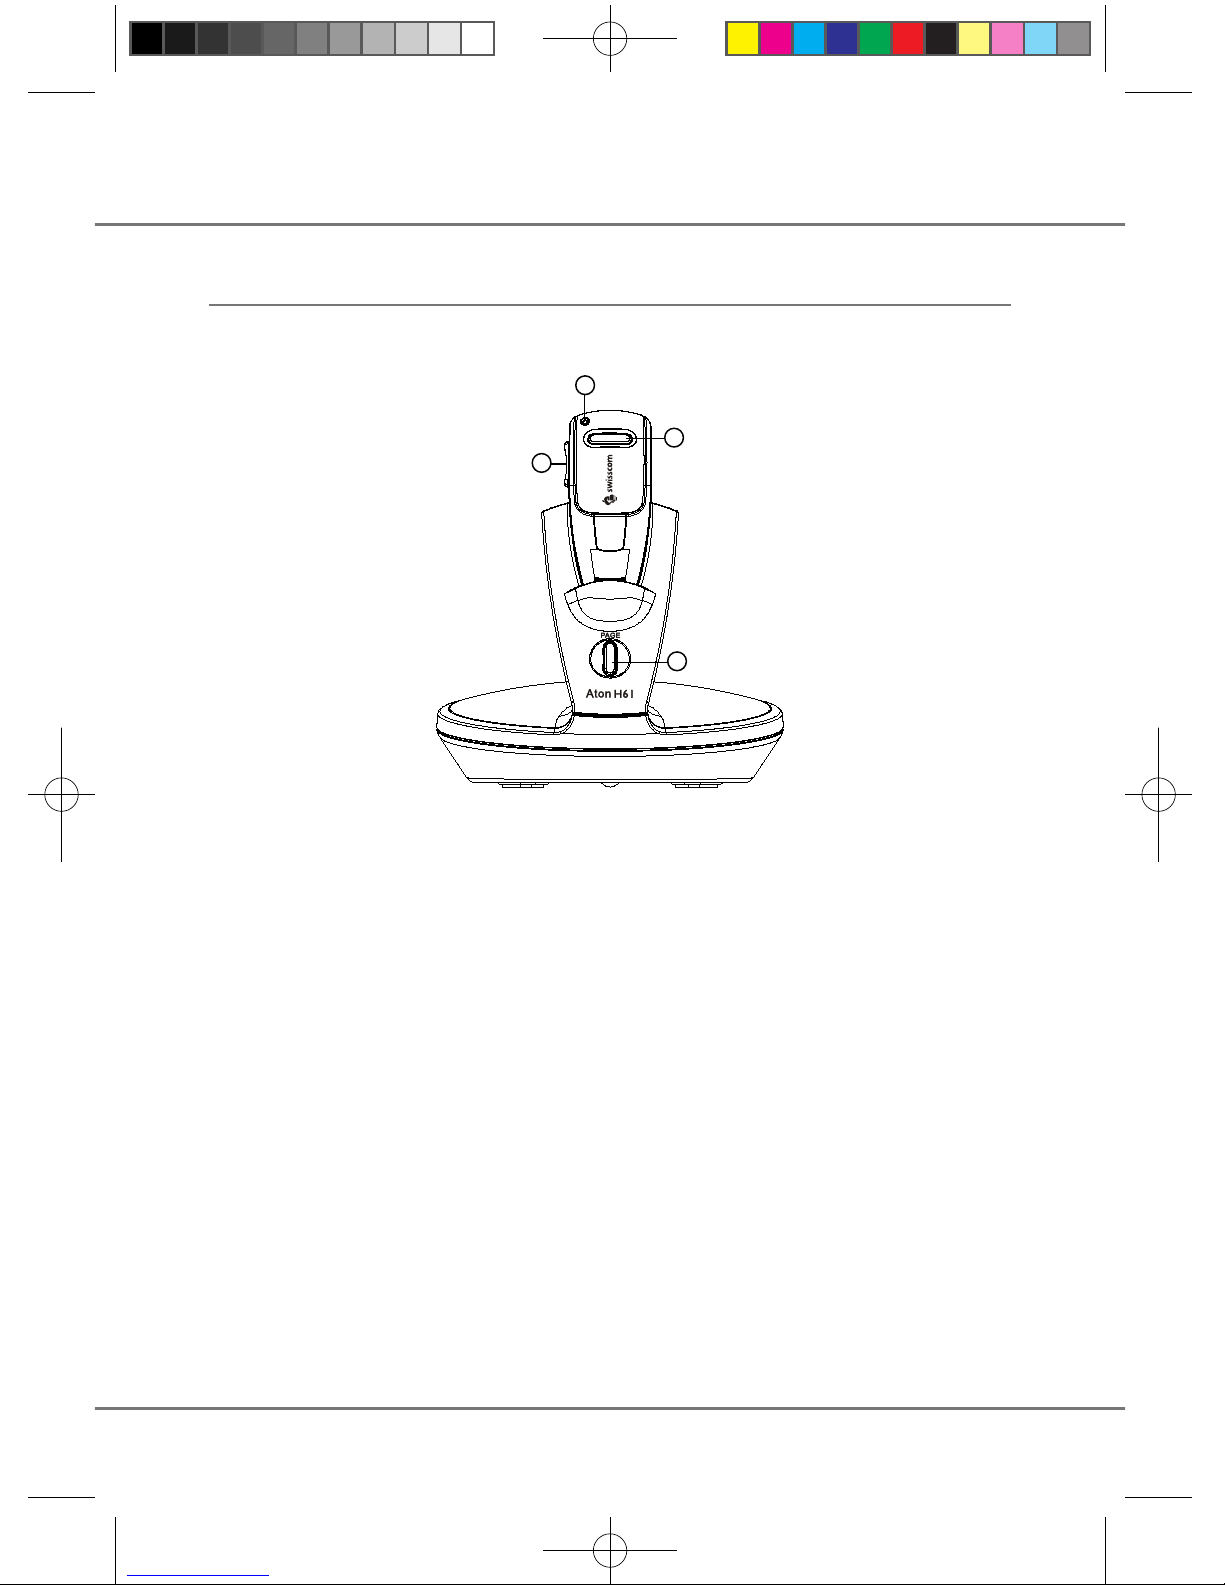
When the headset is in idle mode, press and
hold the page key on the base for 5 seconds
to start the registration procedure.
On your headset, press the Talk/End key
until the green LED flashes. Make sure you
are holding your headset near to the base
during the registration process.
Press the Vol (-) key 3 times, then press the
Talk/End key once.
After completing the registration, the green
LED on the headset will be turned off.
If the link is still missing, you may need to de-
register your headset before registering it the
base again. See "De-registration" on page 10.
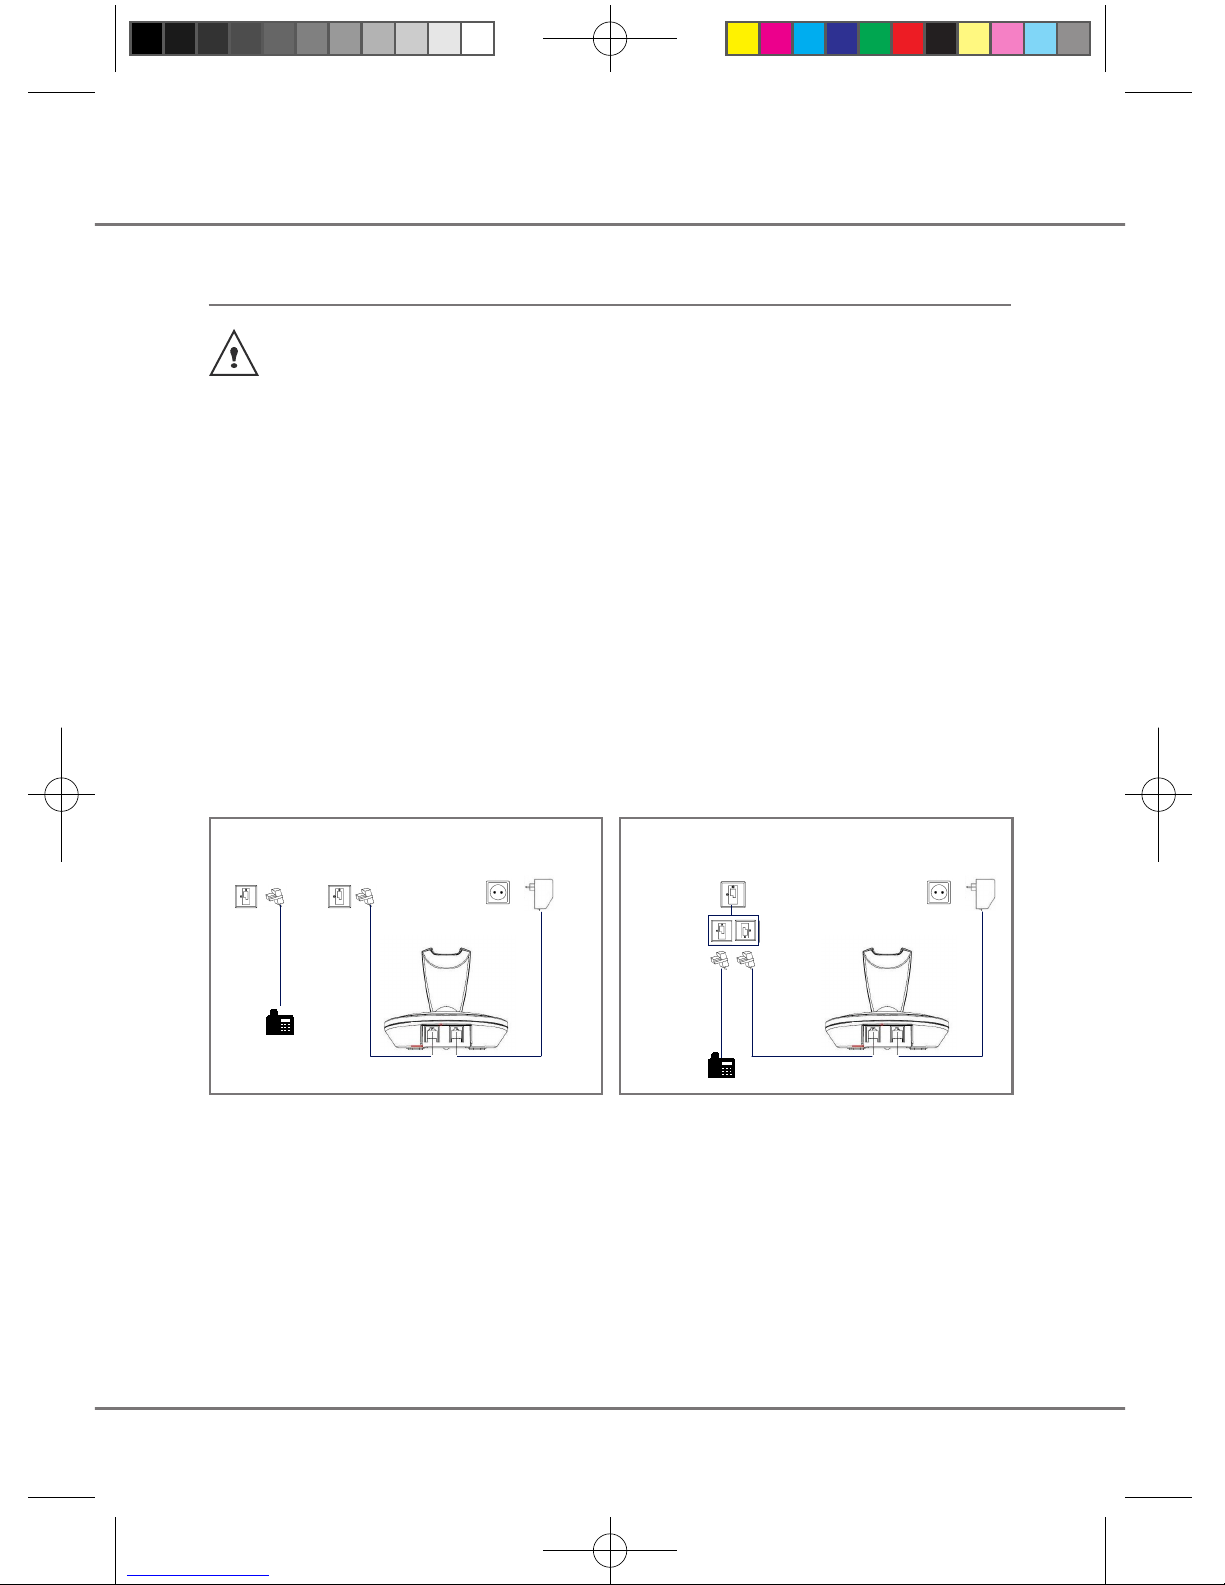
Make a call
Operatephoneandheadsettogether
onlywhenhandsfreemode(if
available)isoff.
You cannot initiate a call with the headset.
Dial the number on your phone. Press the
Talk/End key on the headset to join the
call.
Bring your phone back to on-hook state.
When nished, press the Talk/End key to
hang up.
Answer a call
When the phone rings, a soft incoming tone is
heard on the headset’s earpiece.
Press the Talk/End key to answer the
call. When finished, press the Talk/End key
to hang up.
You may adjust the headset volume by
pressing the volume keys during a call.

10
ap p e n d I x
De-registration
Itisnotrecommendedthataheadsetbede-registeredunlessabsolutelynecessary
becauseonceaheadsetisde-registered,thatheadset’stelephonefeaturescannotbe
useduntiltheheadsetisre-registered.
On your headset, press the Talk/End key until the green LED ashes. Make sure you are
holding your headset near to the base during the de-registration process.
Press the Vol (+) key 3 times, then press the Talk/End key once.
When the headset is successfully de-registered, the green LED will be turned off.
Low-Battery Signal
• A beep sound can be heard.
• If headset is in talk-mode, the LED ashes between Green and Yellow.
• If headset is in standby mode (outside base), the LED ashes slowly in RED.
Care and Maintenance
Use a slightly damp cloth to wipe the base and headset, do not use a dry cloth as this may
cause electrostatic charges.
Causes of Poor Reception
• Aluminium siding.
• Foil backing on insulation.
• Heating ducts and other metal construction that can shield radio signals.
• Close to appliances such as microwaves, stoves, computers, etc.
• Atmospheric conditions, such as strong storms.
• Base is installed in the basement or lower oor of the house.
• Headset battery is low.
• You’re out of range of the base.

11
Troubleshooting
Refer to the table presented below in case of an operational malfunction:
Problems Remedies
There is distortion on the headset’s
earpiece and I cannot hear properly.
The receiver’s volume may be too high. Lower the
volume on the headset.
Caller cannot hear me clearly. - You may be out of range. Move closer to the base.
- The battery may be low. Charge your headset.
The headset is not charging. Make sure that:
- the power adapter is properly connected to a power
socket.
- the power connector is properly plugged into the base.
- the fuse and circuit-breaker are working properly and
that the power socket is switched on.
The headset cannot be registered. The battery may be low. Charge your headset.
ap p e n d I x

12
en v I r o n m e n t a l I n f o r m a t I o n
Environmental impact
Atthe endof itsworkinglife, this device must notbedisposedof as normal
wasteunderanycircumstances.Itmustbetakentoapointofsaleorcentral
collectionpointforelectronicandelectricaldevicesinaccordancewiththeSwiss
OrdinanceontheReturn,Taking BackandDisposalofElectricalandElectronic
Appliances(ORDEA).
Theindividualmaterialsarerecyclableasindicated.Byreutilizingorrecyclingthem
inanyotherforms,youaremakingamajorcontributiontowardsenvironmental
protection.

13
ma I n t e n a n c e /Wa r r a n t Y
Rental devices
If your headset does not operate properly, notify Technical Assistance (phone number 0800 800
800). The repair 1) and the fault action are free of charge.
Purchased devices
Repair services are performed free of charge within the warranty period in accordance with the
regulation of the warranty certicate 1). If a repair is necessary, the device must be returned
to the place of purchase.
If Technical Assistance is made available (during the warranty period as well 1)), the fault action
is charged (route lump sum price as well as time expenses). The repair costs are additional
outside the warranty period.
Batteries
Battery cells are considered consumed material, which is not covered by the warranty service.
Defective batteries are not replaced free of charge. This applies to both rental and purchased
devices.
Help
If you have any general questions about products, services, etc., please contact your Swisscom
Information Centre (toll free number 0800 800 800).
General remark
1) except for damage to wearing parts (cables, labels, batteries, etc.) and damage arising from
incorrect handling such as dropping it or allowing uid to penetrate into the headset, etc.
This device is intended to be operated on the Swiss analogue network. Country-specic
conditions have to be taken into account. If you have any questions about the differences
between the public phone networks, please contact your specialist dealer or network provider.
Swisscom hereby declares that this device meets the essential requirements and other
relevant regulations laid down in Directive 1999/5/EC.
The Declaration of Conformity can be found on the following website: www.swisscom.ch/
onlineshop under the rubric, Phone, Declaration of Conformity.
Table of contents