Changes and errors excepted.
© IVS GmbH 2018 • All rights reserved
Manual_SH_140_en_A4-A7_v10
5. Scenes
Create scenes to fully use your SH 140 in your home.
A scene is a way to control connected devices simul-
taneously with only a touch of a buon from your
smartphone for dened occasion. For example, set
“
Leave Home
” to turn o the lights in mulple places.
Note! Scenes can only be created if you’re signed in
to your KAFO account and have at least one device
connected.
6. Profile
View and modify you prole sengs.
•
Scenes
: see previous chapter.
•
Device sharing
: to share the device with other KAFO
accounts.
•
Message Center
: see messages from devices or service.
•
Integration
: see instructions on how to integrate voice
control services like, Amazon Echo (Alexa) or Google Home.
•
Scan QR code
: for adding devices that comes with a QR
code.
•
Feedback
: send feedback to the developers
•
About
:
•
Rate Us
: Rate this app.
•
Current version
: check app version.
•
Check for Update
: for keeping the device updated with the
latest improvements.
Click
Sengs
in the upper right corner to view and modify
the prole sengs.
7. Voice control integration
In the KAFO app you can nd brief instrucons on how to
integrate your swisstone smart devices with voice control
services like, Amazon Echo (Alexa) or Google Home in
Prole
/
Integraon
. Find more informaon and control words online
for your chosen service.
Note! If you have already created groups and/or scenes in
the app, you might not be able to use them with Amazon
Echo (Alexa) or Google Home. It is only possible to group
devices with the respecve service, scenes are not possible.
8. Reset
A reset of the device can help you troubleshoot any issues
that you may have. Please keep in mind that a factory reset
will erase all of your custom sengs and restore them to
factory default sengs.
Reset the SH 140 by pressing and holding the buon ! for
10 seconds unl it blinks quickly.
Aer the reset, the SH 140 will enter pairing mode.
9. Other information
Safety instructions
WARNING
The unit and the accessories can contain small parts. Keep all of the
equipment out of the reach of small children. The mains adapter is the
disconnect device between the product and mains power. The mains socket
outlet must be close to the equipment and easily accessible.
• The product is intended for indoor use only.
• Use the product for its intended purpose only.
• Protect the unit from moisture. Rain/snowfall, moisture and all types of liquid
can contain substances that corrode the electronic circuits. If the unit gets wet,
If the unit gets wet, immediately disconnect the power supply.
Aenon danger to life! Before further use, make sure that the device has
completely dried out and is funconal. If necessary, seek professional advice.
• Do not use or keep the unit in dusty, dirty environments. The unit’s moving
parts and electronic components can be damaged.
• Do not keep the unit in warm places. High temperatures can reduce the
lifespan for electronic equipment and distort or melt certain plascs.
• Do not keep the unit in cold places. When the unit warms up to normal
temperature, condensaon can form on the inside which can damage the
electronic circuits.
• Do not drop the unit. Do not knock or shake it either. If it is treated roughly
the circuits and precision mechanics can be broken.
• Do not use strong chemicals to clean the unit.
• Do not use the product in areas where the use of electronic devices is not
permied.
• Do not modify the product in any way. Doing so voids the warranty.
• Do not aempt to disassemble, repair, or modify the device.
• The product may only be operated with the type of power supply network
described on the name plate.
• Only connect the product to a socket that has been approved for the device.
The socket must be installed close to the product and easily accessible.
• Never connect mulple units of this product in series.
• Do not operate the product outside the power limits given in the specica-
ons.
• Do not use any heat-generang devices (such as electric blankets, coee machines,
etc.) with this product. There is a risk of re and injury.
• Do not use this product with any devices that are motorised or any devices that have
a rotang component or workpiece. There is a risk of injury.
• Do not open the product. Do not connue to operate the product if it is damaged,
which may be indicated by smoke, odour or loud noises.
If the unit is not working as it should, please contact the place of purchase for
service. Don’t forget the receipt or a copy of the invoice.
Correct disposal of this product
(Waste Electrical & Electronic Equipment)
(Applicable in countries with separate collecon systems)
This marking on the product, accessories or manual indicates that the product and
its electronic accessories (e.g. charger, headset, USB cable) should not be disposed
of with other household waste. To prevent possible harm to the environment or
human health from uncontrolled waste disposal, please separate these items from
other types of waste and recycle them responsibly to promote the sustainable reuse
of material resources.
Household users should contact either the retailer where they purchased this
product, or their local government oce, for details of where and how they can
take these items for environmentally safe recycling. Business users should contact
their supplier and check the terms and condions of the purchase contract. This
product and its electronic accessories should not be mixed with other commercial
wastes for disposal. This product is RoHS compliant.
RF Exposure Information
This device meets the EU requirements on the limitaon of exposure of the
general public to electromagnec elds by way of health protecon.
The device complies with RF specicaons when the device used at 20 cm from
your body.
Declaration of Conformity
We hereby declare that the radio equipment type
swisstone SH 140 is in compliance with Direcves:
2014/53/EU and 2011/65/EC (RoHS).
A copy of the Declaraon of Conformity is available at www.swisstone.de.
Warranty
In case you need support during setup or usage of your product you will nd the
relevant contact details on the following website: www.swisstone.de.
If you detect a defect resulng from manufacturing and/or material faults within
24 months from purchase, please contact your dealer. The warranty does not
apply for improper treatment or failure to comply with informaon contained
in this user guide, for interference on device executed by dealer or user (e. g.
installaons, soware downloads,…) and for total loss. Furthermore it does not
apply to ingress of liquids, use of force, non-maintenance, improper operaon or
other circumstances caused by the user. It also does not apply to failure caused
by a thunderstorm or any other voltage uctuaons. The manufacturer reserves
the right in this case to charge the customer for replacement or repair. For wear
parts such as baeries or casing a restricted warranty period of 6 months is valid.
Manuals and possibly supplied soware are excluded from this warranty. Further
or other claims arising from the manufacturer’s warranty are excluded. Thus,
there is no liability claim for business interrupon, loss of prots, loss of data,
addionally installed soware by user or other informaon. The receipt with
purchase date forms the warranty proof.
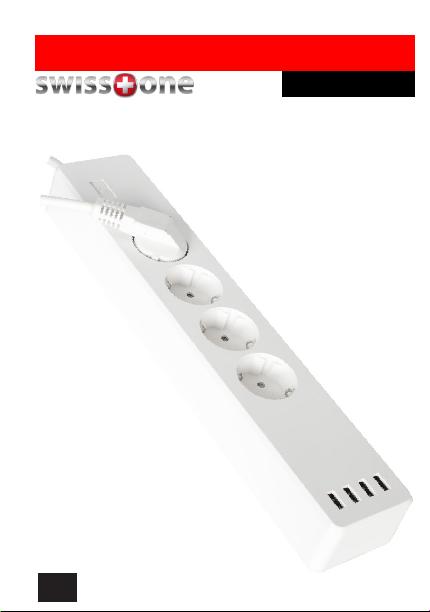
Technical Specifications
Input voltage 220-240 V/50Hz
Output voltage 220-240 V/50Hz
Maximum Load: 10 A
Maximum Power: 2300 W
Max. USB Power: 5 VDC / 2.1 A / 10.5 W per USB,
4.2 A Total
Wi-Fi (MHz)
[maximum radio-fre-
quency power/dBm]:
IEEE 802.11b/g/n (2412-2472) [20]
Dimensions: Height: 40 mm
Width: 68 mm
Lenght: 350 mm
Length of cable: 180 cm
Waterproof: NO, IP 20 (indoor use only)
Operang temperature: Min: -10°C (14°F)
Max: 40°C (104°F)
No restricons exist in the use of radio frequencies or frequency bands in
all EU member states and EFTA countries.