Sylvac D70S User manual

User guide
Manuel d’utilisation
Bedienungsanleitung
E
F
D
Software version V1.04
OS V1.00
D70S/H/I
D70S/H/I
D70S/H/I
D70S/H/I
D70S/H/I
Universal display unit
Unité d’affichage universelle
Universelle Anzeigeeinheit

2

Introduction 4
Versions 4
Features 4
Main technical features 4
Dimensions and installation 5
Connectivity 5
D70S and D70I 5
D70H 6
Communication ports 6
Connector pins 6
Mini-USB connector 6
Graphical interface 7
The two main parts 7
General details 8
Configuration window 8
Virtual keyboard 9
Configuring the device and the measurements 9
Definitions 10
Display 11
Configuration 12
Locking 12
Measurement 13
Measurement screen 13
Functions of the sidebar buttons 14
Selecting the type of galvanometer 14
Temporary dynamic measurement mode 15
Tolerance-free mode 16
Communication protocol 17
Commands 17
List of commands 17
Display calibration / Pairing with a probe 20
Linearisation / Correction table 21
Firmware update 22
Restoring factory settings 23
Applications 23
French / Français / Französich 25
German / Allemand / Deutsch 47
Certificates / Certificats / Zertificate 69
E
3
Table of contents

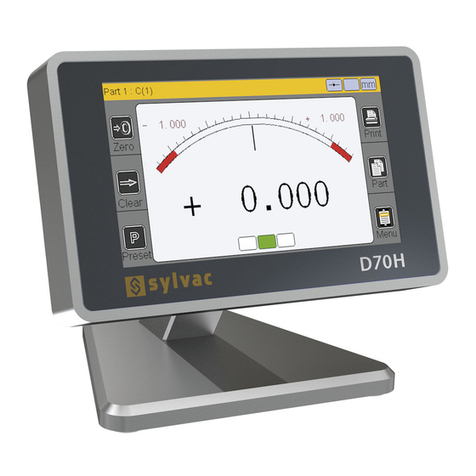
The D70 display uses 1 or 2 sensors to carry out any kind of measurement testing. Basic
measurements (using a sensor) can be carried out, as can measurements of sums and meas-
urements of differences.
The screen can be split to show two displays. The D70 can make direct (static) measurements
or dynamic measurements (min, max, etc.)
Measurements can be made in comparison to a reference level, i.e. a benchmark.
The D70 has a large number of customisable functions, making it suitable for a vast range of
testing applications.The D70 display can be connected to a PC using its RS-232 and USB ports.
A multifunctional pedal can also be connected to the device.
Introduction
D70S
Connections for Syl-
vac-brand or other
compatible capacitive
sensors
D70H
Connections for Heid-
enhain sensors
D70I
Connections for Syl-
vac-brand or other
compatible inductive
sensors
Main technical features
tColour 4.3» touchscreen, 480 x 272 resolution
tStatic or dynamic measurements (min, max, average, etc.)
tAnalogue and digital display
t2 measurement configurations (2 measurements)
tOption to automatically select the configuration or select using the touchscreen
tRelative or absolute display selected using the touchscreen
tDisplay precision (from 2 to 5 decimal places)
tMetric (mm or µm) or imperial (in) units
tRS-232 port for PC communication
tM-Bus port for I/O connection
tUSB port for PC connection and/or power supply
Features
Versions
4

E
Dimensions and installation
.
tTransfer measurements through the touchscreen, pedal input, or commands via the RS-232 port
tOperating temperature: +15°C to +30°C
t85-265V power supply via AC adapter provided (or by connecting it to a PC via the USB port)
tRelative humidity: maximum 80%
tDimensions: width 14 mm, height 110 mm, depth 105 mm
tWeight: 600 g (700 g incl. adapter)
D70S and D70I
Connectivity
The D70 has four M5-thread holes, meaning that it can be affixed to a worktop, or the base can
be removed in order to place it anywhere.
Note: The four anti-slip pads need to be removed before the D70 can be affixed to a worktop.
On/off button
(hold for 2s to
switch off)
Two ports for
Sylvac inductive
or capacitive
sensors
RS-232 connector for
PC communication
Connector for pedal
Mini-USB connector
for power supply and
transferring the meas-
urement to a PC
5

D70HD70H
On/off button
(hold for 2s to
switch off)
2 ports for Hein-
dehain sensors
RS-232 connector for
PC communication
Connector for pedal
Mini-USB connector
for power supply and
transferring the meas-
urement to a PC
The D70 has an RS-232 port, which means that it can be connected to a machine or external
system. The speed, parity and format can be adjusted by the user.
Connector pins
Equipped with a 9-pin SUB-D female connector.
Description of the RS-232 signals and pin assignments:
Communication ports
Pin Signal Direction Description
1 Unused
2 RX Input Receive data
3 TX Output Transmit data
4 IN1 Input Factory testing only, do not connect
5 Ground - Signal ground
6 Not used
7 IN2 Input Factory testing only, do not connect
8 & 9 Not used
Mini-USB connector
The mini-USB connector has two functions:
1. Powering the display via the adapter. This adapter supplies a regulated constant voltage of
5V/1A.
2. Transferring measurements. If you connect the D70 to a PC, it will be detected as a keyboard
using the standard drivers for the operating system. When you transfer a measurement, the
number will be «written» to the PC as if you had typed it in on a keyboard.
6

E
The second part of the display (measurement screen) can be launched by tapping the measure icon.
tThis part displays the results of measurements so that they can be used. The D70 starts up
on this screen In order to access the icon panel, tap the menu icon on the measurement
screen.
Windows message confirming that the D70 has been correctly detected and installed:
The graphical interface of your D70 has been designed for easy use. This chapter gives an over-
view of the various screens and commands available.
The two main parts
The graphical interface of your D70 is made up of two main parts:
tOne part where you can configure the device and the measurement.This screen is made up
of icons that open other windows on top of the icon panel.
Graphical interface
Measurement screen
7

The following information is visible at the top of the screen:
General details
Name of the active piece
and calculation formula:
Here, it is piece 1,
sensor 1
Static or dynamic (max,
min, etc.) mode
Unit: mm, µm or
inch
You can open configuration windows by tapping the icons in the icon panel.
Configuration window
Example of window appearing on top of the icon panel
The information is then recorded in a variety of ways and saved for re-use when the window
is closed. The following ways of recording the data are available:
tMultiple choice box.Tap the black arrows to cy-
cle through the values.
tInput box. When you tap the input box, a virtual
keyboard appears.
tClosing a window. All windows can be closed
by tapping the white X with a red background
in the top-left of the window.
8

E
Virtual keyboard
Delete
Exit without saving the
changes
Save and exit
This chapter sets out the various windows that can be launched from the icon panel. As a re-
minder, the icon panel can be launched by tapping the appropriate button on the measurement
screen.
You can fully configure your D70 (language, communication, etc.) from this screen. The meas-
urement (precision, tolerance, etc.) can also be configured from this screen.
The following six sections describe the six icons that appear on this screen :
Configuring the device and the measurements
Configuring the device:
Language, pedal set-
tings, etc.
Configures the device’s
locking function
Shows the meas-
urement screen
Setting measurements
(tolerance, benchmark
figure, formula, etc.)
Setting the display,
single, double, bar
chart or needle
Setting the location of
the sensor and applica-
tion of the coefficient
9

Definition
Tapping the « definition » icon launches the following window.
In this window, you can define the precision, unit, formula, tolerance, and benchmark of
each of the two available configurations for the piece.
This window has two areas allowing you to configure two pieces, and three screens that you
can access using the scroll bar on the right:
Choose piece 1 or 2
Move to
screen
1, 2 or 3
Area 1
Static meas-
urement,
i.e. direct
reading, or
dynamic
measure-
ment:
Max, min,
range, mean
average or
median.
Choice of calculation formula C(1) / C(2) / C(1) + C(2) / C(1) - C(2) / -C(1) / -C(2) / -C(1) + C(2) --> C = sensor
You can apply a coefficient to each sensor from the «settings» menu
10

E
Left :
Double :
Galva :
Display
Tapping the « display » launches the following window.
In this window, you can decide whether one or two measurements are shown on the screen,
and how they are displayed (needle/galvanometer or bar chart).
Area 2
You can apply or remove the test limits from this screen, and define them if required. The test
limits are alarms that will alert the user if a tolerance limit is reached (marked in yellow on the
bar charts displayed on the measurement screen).
This part is hidden
if the option is set
to «No»
Automatic changing launches the corresponding programme
when the sensor is moved. This means that the user does not
need to touch the device, and can instead focus on taking the
measurement.
The +/- button
appears sepa-
rately from the
tolerance markers
on the measure-
ment screen, and
allows the user to
manually move the
needle in the same
way as a dial
on an analogue
display.
11

Configuration
Tapping the « configuration » icon launches the following window.
This window can be used to configure the communication settings for your D70.
Locking
Tapping the « locking » icon launches the following window.
This window can be used to configure the communication settings for your D70.
Select means of
communication:
RS-232 or USB
Select language.
Other languages
may be added on
request.
Pedal function:
t«Preset» benchmark
t«transfer»: allows you to transfer the meas-
urements of the current test via the RS-232 or
USB cable
t«range»: allows you to change the active
piece (piece 1 or piece 2)
t«Start Dyn»: Start a dynamic measurement
(min, max, etc.)
t«tare»: Set the value displayed to zero.
If you set the communication to USB, your D70 will be detected as a keyboard as soon as you
connect it to a PC. There is no need to install a particular driver.
When you transfer the measurement, it will appear on your PC screen at the point where you
have placed your cursor (in an Excel worksheet or elsewhere) just as if you had typed it in using
a keyboard.
12

E
Measurement
Tapping the « measure » icon launches the following window.
Please consult the «Measurement screen» section below for an overview of the measurement
screen.
Choosing «yes»
means that a
password will be
required to access
the icon panel.
Allows the
user to hide the
buttons from the
measurement
screen. We rec-
ommend that you
only have the
buttons that you
need displayed
on the meas-
urement screen
in order to keep
the interface as
uncluttered as
possible.
Set password.
The default is
0000
The D70 starts up on this screen
The measurement screen displays the values of the piece being tested. Galvanometer and bar
chart displays mean that the value can be compared to tolerances entered using the definitions
menu.
Measurement screen
13

Automatic Manual
Functions of the sidebar buttons
Transfers the
measurement (RS-
232 or USB)
Manually changes
the active piece
(piece 1 or piece 2)
Allows the user
to access the icon
panel and config-
ure the device
Start a dynamic
measurement
(min, max, etc.)
Absolute or relative mode (allows you to create a zero point where
required).
If relative mode is selected, this button turns red.
In order to return to absolute mode, tap the «Preset» button.
Benchmark - tap-
ping this button
will set the value
displayed to the
benchmark value
entered using the
«definitions» menu
Selecting the type of galvanometer
If the D70 is configured with a galvanometer displayer (see section 5.2), two options are avail-
able:
The automatic galvanometer adjusts automatically to the tolerances entered, and automatically
makes full use of the maximum area available.
The manual galvanometer has a fixed scale and enables the «+/- button» option (see «display»
section).
14

E
Static measurement Max Min Max-Min Mean
Average
Median
Average
You can switch between the two modes by tapping the display areas within the red dots below:
Temporary dynamic measurement mode
As explained in section 5.1, the value is defined as «static» or «dynamic» (min, max, etc.)
If a value is set as static, it is still possible to temporarily switch to dynamic mode directly from
the measurement screen.
Tap the measurement mode symbol to do this.
It cycles through:
Once a dynamic measurement mode is selected, tap the «clear» button to launch the meas-
urement, or use the pedal if this has been set to «Start dyn» (see the «Configuration» section).
15

Tolerance-free mode
This mode is very well suited to Heidenhain type incremental sensors (for example Heidenhain
MT101).
The tolerance-free mode allows only the numerical value to be displayed, without coloured tole-
rance indications.
In addition, it is possible to change the preset value (calibration) directly from the measurement
screen. Press the value as shown on the image below and use the keyboard to enter the new
value:
If dual mode is chosen, 2 dimen-
sions vary, but only one is active.
To select the active dimension
just press it and the box banner
becomes green.
The side buttons then apply only
to the active dimension. In the
example below the active dimen-
sion is the one that shows 1.520.
The active dimension has
access to the side button
functions
16

E
«Definition» Window (commands by dimension with «n» = 1 or 2 (dimension number))
Item Read
command
Write
command
Comment
Resolution nRES? nRES=x x=1 à 5 (number of decimal places)
x=0(mm)
x=1 (inch)
x=2 (µm)
Unit nUNIT? nUNIT=x x=0 (static)
x=1 (maxi)
x=2 (mini)
x=3 (maxi-mini)
x=4 (mean)
x=5 (median)
Dynamic mode nDYN? nDYN?=x x=0 (static)
Formula nFM? nFM=x x=0 (C1)
x=1 (C2)
x=2 (-C1)
x=3 (-C2)
x=4 (C1+C2)
x=5 (C1-C2)
x=6 (-C1+C2)
x=7 (-C1-C2)
The D70 uses the ASCII communications protocol in order to run and configure its functions.
Commands
General details
All commands must terminate with a «CR» character (ASCII code 13). Les commandes
peuvent être envoyées groupées en les séparants par un caractère «;» (max 500 caractères).
L’affichage est rafraîchi une seule fois après la réception du caractère «CR».
List of commands
DEFINITION window
Communication protocol
17

18
DISPLAY window
Direction nDIR? nDIR=x x=0 (none)
x=1 (internal)
x=2 (external)
Tolerance nUT? nUT=seee.ddddd
Nominal nNM? nNM= seee.ddddd
Lwr tolerance nLT? nLT?= seee.ddddd
Standard nMT? nMT?= seee.ddddd
Activate ctrl limits nLIMIT? nLIMIT=x x=0 (inactive)
x=1 (active)
Upper ctrl limit nUCL? nUCL= seee.ddddd
Lower ctrl limit nLCL? nLCL= seee.ddddd
Reference nREF? nREF= xxxxxxxx xxxxxxxx = part reference
«Display» window
Item Read
command
Write
command
Comment
Chgmt AUTO? AUTO=x x=0 (manual)
x=1 (auto)
Bargraph BAR? BAR=x x=0 (left origin horizontal bar graph)
x=1 (centre origin horizontal bar graph)
x=2 (galvanometer)
x=3 (without = numerical value only)
Display DISPL? DISPL=x x=1 (display of two dimensions on 1 screen)
x=2 (display of two dimensions on 2 screens)
CONFIGURATION window

E
19
«Configuration» window
Item Read
command
Write
command
Comment
Transfer PRINT=? PRINT=x x=0 (USB)
x=1 (RS232)
Language LANG? LANG=x x=0 (French)
x=1 (English)
x=2 (German)
x=3 (Spanish)
x=4 (Italian)
x=5 (Hungarian)
x=6 (Czech)
x=7 (Swedish)
x=8 (Portuguese)
Pedal FOOT? FOOT=x x=0 (Print)
x=1 (Preset) --> calibration x=2 (Zero)
x=3 (Range)
x=4 (Dynamic init.)
LOCKING window
«Locking» window
Item Read
command
Write
command
Comment
Protection LOCK? LOCK
UNLOCK
Lock
Unlock
Code PASS? PASS= xxxxxx xxxxxx = 6 figure code
MEASUREMENT SCREEN window

20
«Measurement screen» window
Item Read
command
Write
command
Comment
Zero ZERO Relative zero
Clear CLR Dynamic measurement
Preset PRESET Calibration
Print ?
Range G1
G2
Range1
Range 2
Switch off OFF Switches the equipement off
The D70 for inductive probes is delivered calibrated with the desired probe type.
For best results it is possible to recalibrate the display with your reference sensor to have ho-
mogeneity in your set of displays or to pair a sensor and display assembly.
Attention: After this procedure, the original calibration of your D70 will be irretrievably lost and
replaced by the values from your operation.This function should therefore be used with care.
Display calibration / Pairing with a probe
For this, follow the procedure below:
1. Switch off the D70
2. Switch on the D70
3. When the start screen appers, press Sylvac Logo
4. A desktop with five icons appears, press
«Calibration».
5. The following screen appears
The probe position is displayed:
- Position the value at zero
- Place a 1mm gauge block under the probe
(or move the probe 1mm using a
precision movement system).
- Press OK
- The D70 is now recalibrated
Press the Home icon to return to the standard
D70 menu.
Other manuals for D70S
1
This manual suits for next models
2
Table of contents
Languages:
Other Sylvac Monitor manuals