Symbol RP 1000 User manual

RP 1000

RP 1000
©2002 SYMBOL TECHNOLOGIES, INC. All rights reserved.
Symbol reserves the right to make changes to any product to improve reliability,
function, or design.
Symbol does not assume any product liability arising out of, or in connection with, the
application or use of any product, circuit, or application described herein.
No license is granted, either expressly or by implication,estoppel, or otherwise under
any patent right or patent, covering or relating to any combination, system,
apparatus, machine, material, method, or process in which Symbol products might
be used. An implied license exists only for equipment, circuits, and subsystems
contained in Symbol products.
Symbol and the Symbol logo are registered trademarks of Symbol Technologies, Inc.
Other product names mentioned in this manual may be trademarks or registered
trademarks of their respective companies and are hereby acknowledged.
Symbol Technologies, Inc.
One Symbol Plaza
Holtsville, N.Y. 11742-1300
http://www.symbol.com

1
Quick Reference
Introduction
The RP 1000 printer is a portable, rugged, full-page dot matrix
printer that houses a PDT 8000 or PDT 8100 terminal. With an
easy one-step insertion, the terminal snaps into place in the RP
1000 for direct printing in the cab of a truck, or carried into a
remote receiving area.
About This Guide
This guide covers the procedures for the basic set-up and use of
the printer. Specific topics covered include:
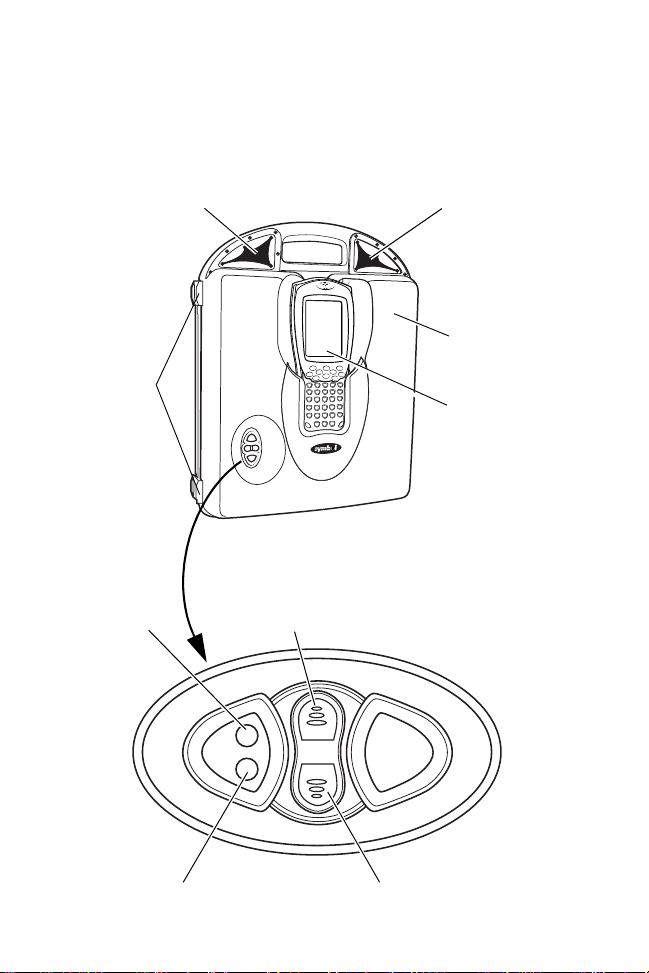
•Parts of the Printer on page 2
• Power Accessories on page 4
• Getting Started on page 4
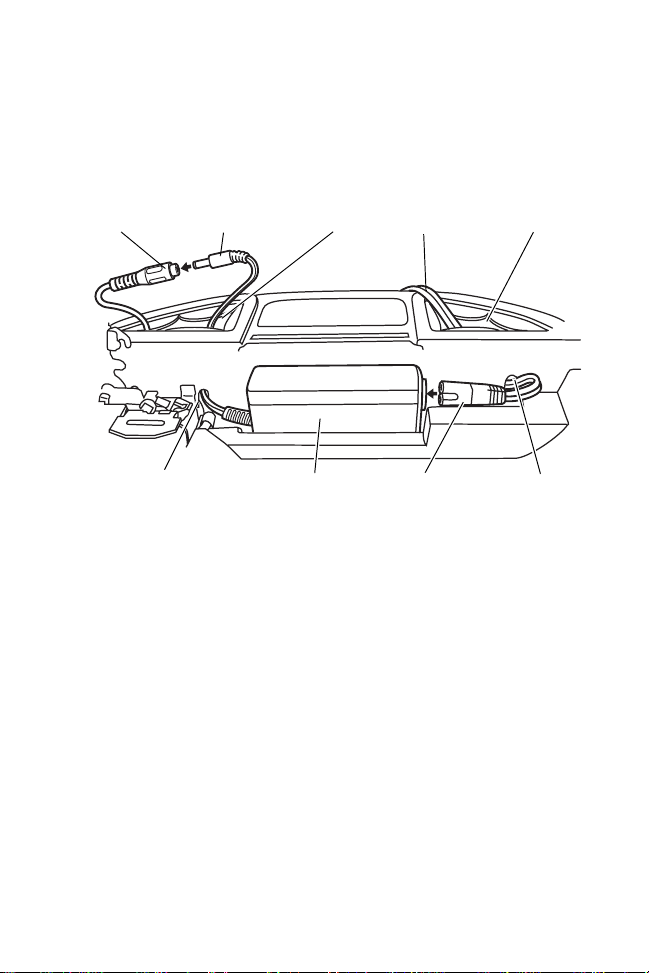
• Installing the Battery on page 5
• Installing the AC Power Adapter on page 6
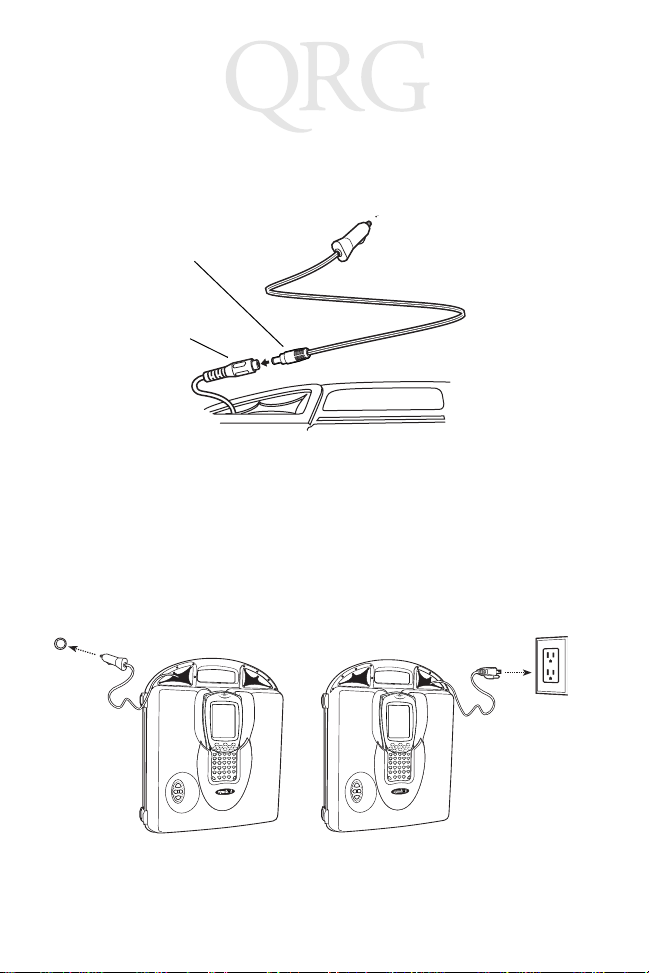
• Installing the Cigarette Lighter Adapter on page 8
•Charging the Battery on page 8
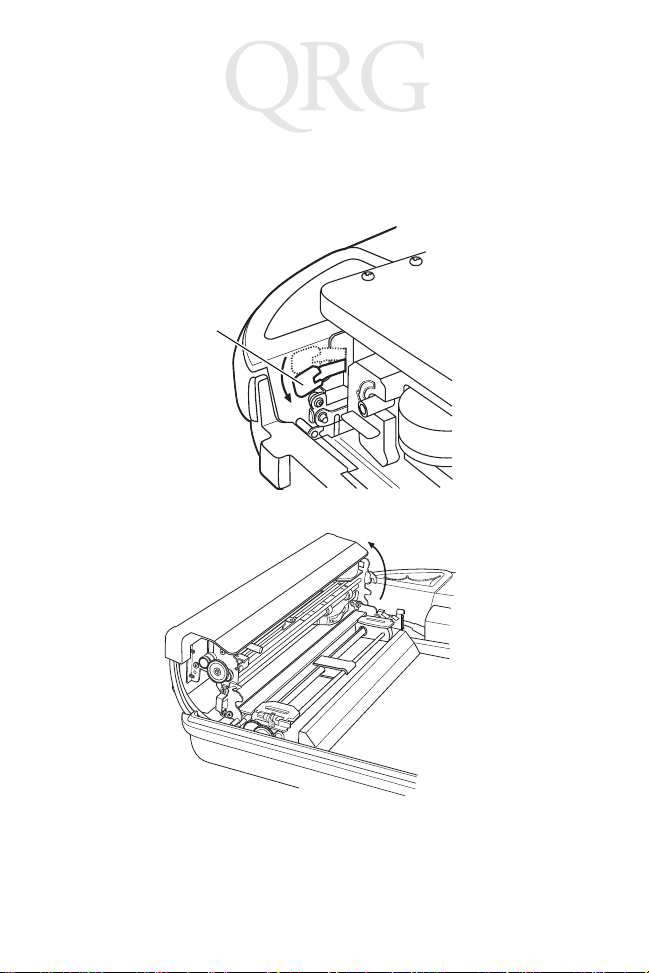
• Installing the Print Cartridge on page 9
• Loading Paper on page 9
•Controls and Indicators on page 13
•Configuration Self-Test on page 14
•Care and Maintenance on page 15
•Supplies on page 15
• Regulatory Information on page 16
•Warranty on page 17
•Service Information on backcover.
For detailed information on portable terminals, see the Quick
Reference Guide or Product Reference Guide for the terminal.

2
RP 1000
Parts of the Printer
AC Power
Adapter*
Cigarette Lighter
Adapter*
Battery*
Printer Assembly
Control Panel
Latch
Latch
Paper Lip
* Optional Accessory

3
Quick Reference
Right Storage PocketLeft Storage Pocket
Terminal (User
Provided)
LED 1 Button 2
LED 2 Button 1
Latches
Printer Cover

4
RP 1000
Power Accessories
Anyof theoptionalaccessories canbe usedto supplypower tothe
RP 1000 printer:
• 12 volt Nickel Metal Hydride battery
• AC power adapter
• cigarette lighter adapter.
Note: If the battery is used, then either the AC power adapter
or the cigarette lighter adapter must be used to charge
the battery.
Getting Started
Before using the RP 1000, perform the following basic set up
procedures:
• installing the battery
• installing the AC power adapter
• installing the cigarette lighter adapter
• charging the battery
• installing the print cartridge
• loading paper.

5
Quick Reference
Installing the Battery
1. Open the cover.
2. Place the battery in the battery well as shown.
3. Connect the cable connector to the battery.
4. Install the battery strap.
5. Close the cover.
6. Charge the battery. Refer to Charging the Battery on page 8.
Battery Well Cable ConnectorBattery
Battery
Strap

6
RP 1000
Installing the AC Power Adapter
1. Open the cover.
2. Depress the locking lever to open the print mechanism.
3. Flip open the print mechinism.
Locking
Lever

7
Quick Reference
4. Feedthe transformerconnectorthrough theaccessholeand
into the left storage pocket.
5. Connect the transformer connector to the connector with the
red tag.
6. Place the connectors into the left storage pocket.
7. Place the print mechanism back to its original position.
8. Feed theAC line cord connector into the right storagepocket
and through the access hole.
9. Plug the cable into the transformer.
10. Close the cover.
Access Hole Access Hole
Transformer
Connector
Transformer Line Cord
Connector
AC Line
Cord
Connector
(Red Tag) Right Storage
Pocket
Left Storage
Pocket

8
RP 1000
Installing the Cigarette Lighter Adapter
Connect the cigarette lighter cable adapter to the connector with
the white tag in the left storage pocket.
Charging the Battery
Note: When a battery is installed, the RP 1000 sounds a
beep every 30 seconds when the battery is low.
To charge the battery, plug the AC power cord into a wall outlet or
the cigarette lighter adapter into the vehicle’s cigarette lighter. The
RP 1000 battery completely charges in approximately 3 to 4 hours
and 4 to 5 hours with the terminal installed in the printer.
Adapter
Connector
Connector
(White Tag)

9
Quick Reference
Installing the Print Cartridge
The RP 1000 ships without the
print cartridge installed. To
install the print cartridge:
1. Remove the print car-
tridge from the package.
2. Open the printer cover.
3. Hold the print cartridge by
the flat handle.
4. Insert the print cartridge
on the print head.
5. Turn knob in direction of ar-
row several times to fully
seat ribbon.
Loading Paper
The RP 1000 can hold the following number of form sheets
depending upon the number of parts in the form.
Form Parts Maximum Number of Sheets
1 200
290
360
450
Handle

10
RP 1000
Caution: Inserting more paper will result in paper jams.
1. Open the two latches on the side of the printer cover.
2. Lift the cover to the fully open position.
3. Depress the locking lever to open the print mechanism.
4. Flip open the print mechinism.
Locking
Lever

11
Quick Reference
5. Lift the two tractor feed clips.
6. Fold the stack of paper in half with the short sides together
and the top of the form coming out from inside fold.
7. Place the paper into the printer cavity with bottom edges un-
der the paper lip in bottom of cavity.
8. Feed the top of the form from the inside of fold through the
tractor feed pins and to the outside edge of the printer.
9. Align the holes in the paper with the studs in the tractor feed
wheel.
Tractor Feed Clips Paper Lip
Paper
Cavity

12
RP 1000
10. Close the tractor feed clips.
11. The left tractor feed is adjustable. Lift the locking lever to re-
lease the tractor feed.
12. Ensure that the paper is taught in order for the paper to feed
properly.
13. Press down on the tractor feed locking lever to lock the trac-
tor feed in place.
14.Close the print mechanism.
15. Close the printer cover.
Setting the Top of a Form
1. Press Button 1 to turn on the printer.
2. Position the paper by pressing Button 1 until the edge of the
paper is at the edge of the case. Press Button 2 to back feed
the paper, if needed.
3. Turn the printer off by simultaneously pressing Button 1 and
Button 2.
4. Press Button 1 to turn the printer on. The top of the form is
automatically set.
Tractor Feed
Locking Lever

13
Quick Reference
Tearing the Paper
1. Set the paper to the top of a form.
2. Grab one side of the paper at a leading edge and pull up.
Once the paper tear is started at the perforation, finish with a
swift pull upward and away.
Controls and Indicators
Controls
LED Indications
Function Action
Line Feed Press Button 1 once
5 Line Feeds Press & hold Button 1
Form Feed Press & hold Button 1 then release
Self Test Press & hold Button 1 until printing starts
Clear “Out of Paper” Press Button 1
Stop Print or Pause/Clear
Buffer Press Button 1
Back Feed Press Button 2
LED 1 Status
Solid Red Charging in progress
Red Flash Slow Low temperature or battery disconnected
Red Flash Fast High temperature
Red/Orange Flash Slow Low voltage
Red/Orange Fast High Voltage
Orange Flash Slow Time out
Orange Flash Fast Internal Error
Solid Green Charge completed

14
RP 1000
Audio Indications
Configuration Self-Test
To establish communication between the computer and RP 1000
printer, check the RP 1000's protocol and set the computer's to
matchit.Printaconfiguration self-testby holdingdown button1for
a few seconds. A sample default configuration is shown below.
Printer Configuration
Printer Type 8i Flash
Firmware Version 2.XX
Timeout 15S
Baud Rate 9600
Parity None
Data Bits 8
Handshaking Both
Beeper On
Battery voltage XX.XV - GOOD
Batt. Temperature 19C
Flash/RAM Memory 4/1 Mbit
Boot Version 2.06
Printhead Driver 1.04
Infrared Configuration
LED 2 Status
Solid Green Power on
Audio Status
Beeping with LEDs flashing Head jam. Check for paper jam.
5 double beeps Out of paper
3 beeps Low battery

15
Quick Reference
Infrared IrDA
Device Name 8i Flash
Device Nickname
IrDA Version 1.0-12
Max IrDA Baud 115.2K
Care and Maintenance
• Do not expose printer to temperatures over 70°C/158°F or
under -40°C/-40°F.
• Use only approved power supplies or damage may result.
• Do not spill liquids on printer or immerse.
• Do not attempt to service this unit. Contact the Symbol Sup-
port Center.
Supplies
Use only supplies certified by the Original Equipment
Manufacturer (OEM). For OEM supplies, please contact the
Symbol Customer Support Center.

16
RP 1000
Regulatory Information
All Symbol devices are designed to be compliant with rules and regulations in
locations they are sold and will be labeled as required.
Any changes or modifications to Symbol Technologies equipment, not expressly
approved by Symbol Technologies, could void the user’s authority to operate the
equipment.
Radio Frequency Interference Requirements
Note: This equipment has been tested and found to
comply with the limits for a Class B digital device,
pursuant to Part 15 of the FCC rules. These limits are
designed to provide reasonable protection against
harmful interference in a residential installation. This
equipment generates, uses, and can radiate radio
frequency energy and, if not installed and used in accordance with the instructions,
may cause harmful interference to radio communications. However there is no
guarantee that interference will not occur in a particular installation. If this equipment
does cause harmful interference to radio or television reception, which can be
determined by turning the equipment off and on, the user is encouraged to try to
correct the interference by one or more of the following measures:
• Reorient or relocate the receiving antenna
• Increase the separation between the equipment and receiver
• Connect the equipment into an outlet on a circuit different from that to which the
receiver is connected
• Consult the dealer or an experienced radio/TV technician for help.
Radio Frequency Interference Requirements - Canada
This Class B digital apparatus complies with Canadian ICES-003.
Cet appareil numérique de la classe B est conforme à la norme NMB-003 du Canada.
Marking and European Economic Area (EEA)
Statement of Compliance
Symbol Technologies, Inc., hereby declares that this device is in compliance with all
the applicable Directives, 89/336/EEC, 73/23/EEC. A Declaration of Conformity may
be obtained from http://www2.symbol.com/doc/.
Tested to comply
with FCC Standards
FOR HOME OR OFFICE USE

17
Quick Reference
Warranty
(A) Warranty Symbol Technologies (hereafter “Seller”) hardware Products are warranted against defects in
workmanship and materials for a period of twelve (12) months from the date of shipment, unless otherwise
provided by Seller in writing, provided the Product remains unmodified and is operated under normal and
proper conditions. Warranty provisions and durations on software, integrated installed systems, Product
modified or designed to meet specific customer specifications (“Custom Products”), remanufactured
products, and reconditioned or upgraded products, shall be as provided in the applicable Product
specification in effect at the time of purchase or in the accompanying software license.
(B) Spare Parts Spare parts (i.e. parts, components, or subassemblies sold by Seller for use in the service
and maintenance of Products) are warranted against defects in workmanship and materials for a period of
thirty (30) daysfrom the date ofshipment. Spare parts may benew or originate from returned units under the
conditions set forth in subsection D below.
(C) Repair of Symbol-branded hardware For repairs on Symbol-branded hardware Products under this
Agreement, including repairs covered by warranty, the repair services provided are warranted against
defects in workmanship and materials on the repaired component of the Product for a period of thirty (30)
days from the shipment date of the repaired Product, or until the end of the original warranty period,
whichever is longer.
(D) Product Service Products may beserviced or manufactured withparts, components, or subassemblies
that originate from returned products and that have been tested as meeting applicable specifications for
equivalentnewmaterialand Products.Thesole obligation of Sellerfordefectivehardware Productsislimited
to repairor replacement (at Seller’s option) on a “returnto servicedepot” basiswith prior Seller authorization.
Customer is responsible for shipment to the Seller and assumes all costs and risks associated with this
transportation; return shipment to the Customer will be at Seller's expense. Customer shall be responsible
for return shipment charges for product returned where Seller determines there is no defect (“No Defect
Found”), or for product returned that Seller determines is not eligible for warranty repair. No charge will be
made to Buyer for replacement parts for warranty repairs. Seller is not responsible for any damage to or loss
of any software programs, data or removable data storage media, or the restoration or reinstallation of any
software programs or data other than the software, if any, installed by Seller during manufacture of the
Product.
(E) Original Warranty Period Exceptforthe warranty applyingsolelytothe repairedcomponentarisingfrom
a repair service as provided in Section C above, the aforementioned provisions do not extend the original
warranty period of any Product that had either been repaired or replaced by Seller.
(F) Warranty Provisions The above warranty provisions shall not apply to any Product (i) which has been
repaired,tampered with, altered ormodified,except by Seller’s authorized service personnel;(ii) inwhich the
defects or damage to the Product result from normal wear and tear, misuse, negligence, improper storage,
water or other liquids, battery leakage, use of parts or accessories not approved or supplied by Symbol, or
failure to perform operator handling and scheduled maintenance instructions supplied by Seller; (iii) which
has been subjected to unusual physical or electrical stress,abuse, or accident,or forcesor exposure beyond
normal use within the specified operational andenvironmentalparametersset forth inthe applicable Product
specification; nor shall the above warranty provisions apply to any expendable or consumable items, such
as batteries, supplied with the Product.
EXCEPT FOR THE WARRANTY OF TITLE AND THE EXPRESS WARRANTIES STATED ABOVE,
SELLER DISCLAIMS ALL WARRANTIES ON PRODUCTS FURNISHED HEREUNDER INCLUDING ALL
IMPLIED WARRANTIES OF MERCHANTABILITY AND FITNESS FOR A PARTICULAR USE. ANY
IMPLIEDWARRANTIESTHATMAYBE IMPOSED BY LAW ARE LIMITED IN DURATIONTOTHE LIMITED
WARRANTY PERIOD. SOME STATES OR COUNTRIES DO NOT ALLOW A LIMITATION ON HOW LONG
AN IMPLIED WARRANTY LASTS OR THE EXCLUSION OR LIMITATION OF INCIDENTAL OR
CONSEQUENTIAL DAMAGES FOR CONSUMER PRODUCTS. IN SUCH STATES OR COUNTRIES, FOR
SUCH PRODUCTS, SOME EXCLUSIONS OR LIMITATIONS OF THIS LIMITED WARRANTY MAY NOT
APPLY.
The stated express warranties are in lieu of all obligations or liabilities on the part of Seller for damages,
including but not limited to, special, indirect or consequential damages arising out of or in connection with
the use or performance of the Product or service. Seller’s liability for damages to Buyer or others resulting
from the use of any Product or service furnished hereunder shallin no way exceedthe purchase priceof said
Product or the fair market value of said service, except in instances of injury to persons or property.

72-58260-01
Revision B — July 2003
Symbol Technologies, Inc. One Symbol Plaza Holtsville, NY 11742-1300
Service Information
Before you use the unit, it must be configured to operate in your facility’s network and
run your applications.
Ifyouhave aproblemrunningyourunit or usingyourequipment,contact your facility’s
Technical or Systems Support. If there is a problem with the equipment, they will
contact the Symbol Support Center:
For the latest version of this guide go to: http://www.symbol.com/manuals.
United States11-800-653-5350
1-631-738-2400 Canada 905-629-7226
United Kingdom 0800 328 2424 Asia/Pacific 337-6588
Australia 1-800-672-906 Austria/Österreich 1-505-5794-0
Denmark/Danmark 7020-1718 Finland/Suomi 9 5407 580
France 01-40-96-52-21 Germany/Deutchland 6074-49020
Italy/Italia 2-484441 Mexico/México 5-520-1835
Netherlands/Nederland 315-271700 Norway/Norge +47 2232 4375
South Africa 11-8095311 Spain/España 91 324 40 00
Inside Spain
Sweden/Sverige 84452900 +34 91 324 40 00
Outside Spain
Latin America
Sales Support 1-800-347-0178 Inside US
+1-954-255-2610 Outside US
Europe/Mid-East
Distributor Operations Contact local distributor or call
+44 118 945 7360
1Customer support is available 24 hours a day, 7 days a week.
Table of contents
Other Symbol Printer manuals