Synthstrom Audible Deluge Manual

Addendum from v3.0 to v3.1
MORE THAN JUST A MANUAL
Guidebook - Reference - Notebook
Guidebook Addendum

II Deluge Ofcial Manual

III
Deluge Ofcial Manual
Original Manual Change Log
From Version 3.0 OS to 3.1 OS.
Page 41.
Note characteristics
• Velocity, Included wording to state default velocity can be changed in the settings menu
• Note repeat instructions added
Page 45.
Note characteristics
• Added instruction for note nudge
Page 53
Note zoom
• Changed the 64th maximum to 128th in header.
Page 55
Note zoom
• Changed the 64th maximum to 128th in step 3
• added the 128th Graphic
Page 258/259
Settings table expanded
• Added Velocity, Resolution to the ‘Defaults’
• Added Colours to ‘Pads’
Pages 226 & 271
USB MIDI
• USB MIDI Input only - Changed to Input and output
• Updated MIDI message descriptions.
Page 263
Mute / Launch pad colours
• Added note to indicate that the defaults can be set in settings.
Page 267
Quick ref
• Added note nudge
• Added note repeat
Page 41 Pages containing 3.1 edited are tagged with the original page number

4Deluge Ofcial Manual
Sequencer3
NOTES
▌ SETTING A RECORDING COUNT-IN
1. Press [SHIFT] + press (SELECT) to access the settings menu.
2. Turn (SELECT) to highlight ‘rECo’ - recording, in-focus.
3. Press (SELECT) to open the sub-menu.
4. Turn (SELECT) to highlight ‘CoUn’ - count-in, in-focus.
5. Press (SELECT) to set the count-in option.
6. Turn (SELECT) to choose ‘oFF’ or ‘on’. This will set the count-in for
recording on or off.
7. Count in will operate when set ON;-
• With Deluge as master, [RECORD] enabled, press [PLAY] to
perform a count-in prior to recording.
• Metronome and display counts down 4-3-2-1 prior to recording.
• Count-in is disabled if recording is going to begin for just one audio
clip from which it’s going to auto-detect the tempo.
No Change

5
Deluge Ofcial Manual
Sequencer 3
NOTES 3.5 Note Characteristics
Several basic characteristics of notes can be changed in settings. These
include, velocity, note repeat, note length, quantization and note scales.
Some of these can be edited in the sequencer.
▌CHANGING A RECORDED SYNTH NOTE VELOCITY
1. After a pattern has been recorded, notes will be at a default velocity
level.
2. Press & hold one or more [PAD]’s for the note to change and turn
(SCROLL◄►).
3. The system default velocity is 64, however the velocity used on the last
note entry / edited will be applied to the next note entered.
4. Velocity will be displayed and its value.
▌SETTING A NOTE TO REPEAT
1. After a pattern has been recorded, notes will be trigger individually
2. Hold [PAD] + Press & turn (SCROLL▼▲). [PAD] is the note to repeat.
3. The value selected will determine the number of repeats to assign to
the selected note, positioned equally in the time interval of the pad.
Page 41
Velocity
Relates to how hard a key is pressed
and how this reects the volume of the
note. This captures organic and human
like recordings.
Deluge pads are not velocity sensitive. The default velocity is 64 but this
default level can be changed in the settings options under the defaults menu.
Velocity is also a
modulation source to apply
to other parameters as well
as volume parameter.
1
Lighter
touch
Heavier
touch
127

6Deluge Ofcial Manual
Sequencer3
NOTES
▌EDITING NOTES’ LENGTH
1. Note lengths can be set when entering clip notes by pressing the note
START [PAD] + END [PAD] on the same row. For kits, samples will
automatically map across the pads matching the sample length.
2. Reduce the note length by pressing one of the extension [PAD]’s to
shorten it.
3. To extend a note across grid views:-
• Press the [PAD] for the note start.
• Scroll to the next grid view ‘page’ using (SCROLL◄►). This would
be further in time from the original note.
• On the same row, press (SCROLL◄►) + [PAD] at the end position.
• The note will be extended across the ‘page’.
4. To create a note for the duration of the clip, for example as a pad or to
create a ‘drone’ note:-
• Press the [PAD] for the note start on the rst column (left position) of
the clip.
• On the same row, press (SCROLL◄►) + [PAD] at the last column
(right position).
• The note will be extended across the full clip.
• Deluge will ensure that these type of notes play continuously
through the clip and will loop. This is handled as a special case and
the note does not restart.
Note
Brightly lit showing start of note
Note Extension
Dimly lit showing length of note Grid edge
No Change

7
Deluge Ofcial Manual
Sequencer 3
▌ADJUSTING A CLIPS HORIZONTAL NOTE EVENT POSITION
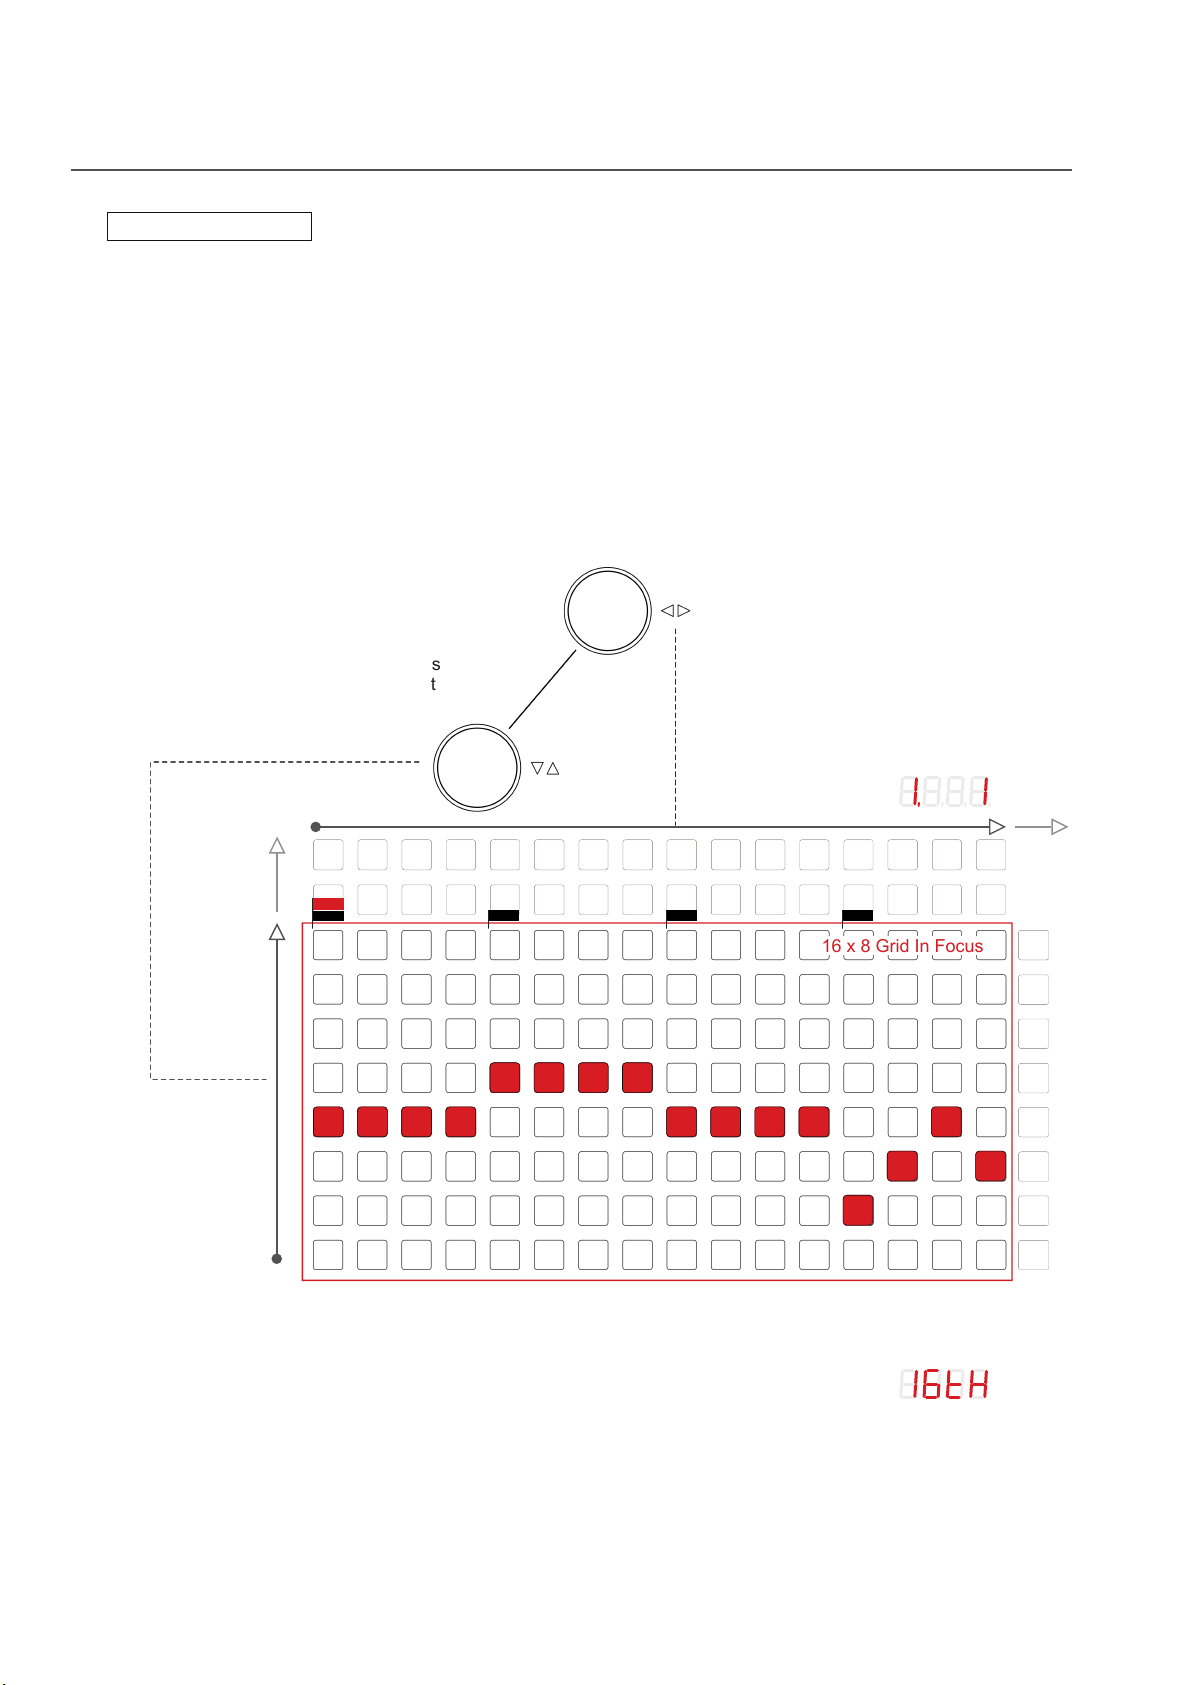
1. Press (SCROLL▼▲) + Turn (SCROLL◄►) control to adjust the clip
note events i.e. notes and automation horizontally across the grid.
• The note events will move 1 step incrementally across the horizontal
grid. The steps are based on the zoom level.
• Note events which scroll off the edge left or right will wrap back onto
the grid from the opposite side.
▌NUDGING INDIVIDUAL NOTES HORIZONTALLY
1. Hold [Pad] + Press and turn (SCROLL◄►) to nudge the selected [Pad]
note event forward or backwards, indicated by +/-values.
2. This will nudge at the songs minimum resolution, default is 384th notes.
▌COPYING / PASTING NOTE RANGE
1. Press [LEARN / INPUT] + press (SCROLL◄►) to copy the clips notes.
• This will copy the step range of notes in the current view on the grid
at the current scroll and zoom position.
• The time range of notes is what is copied including all notes out of
view above and below the pad range.
• Copy can be performed from one clip to another in the same or
different songs as well as within the same clip.
2. Select the new location for pasting the previously copied range. For
example extend the clip length or scroll to another part of the clip.
3. Press [SHIFT] + [LEARN / INPUT] + press (SCROLL◄►) to paste the
current clips notes:
• When pasting, the notes are pasted into the current view.
• If the destination view is transposed from the original copied location
the notes are pasted into the new transposed position.
• If only a part of the grid is selected as the destination, the notes for
the available columns are pasted and the rest discarded.
• Notes will be pasted into any new zoom levels where notes will be
stretched or reduced to meet the destination zoom view.
NOTES
Page 45

8Deluge Ofcial Manual
Sequencer3
3.8 Navigating the Grid
Deluge has a 16 x 8 grid of pads which is used when sequencing notes and creating melodies and
patterns. The actual programming grid is not limited to the 16 x 8 pads in focus and on view.
Scrolling The Grid
Higher and lower notes (synth) or different samples (kit) can be scrolled up and down or longer time
sequences left / right are available. The focus area can be scrolled and zoomed across the pattern
real estate to suit your workow and area of interest.
Sequence Plays Left to Right
1 2 3 4 5 6 7 8 9 10 11 12 13 14 15 16
Lower
notes *
* Rows represent notes for a synth (illustrated) and samples for a kit
Higher
notes *
Higher notes or
more sounds Time
Turn (SCROLL▼▲) to move the
grid focus up or down. Some rows
will be out of focus and hence not
visible within the physical grid.
Default: 16th notes represented by each column of the grid.
Press (SCROLL◄►) to check the current zoom setting as shown on the display.
16 x 8 Grid In Focus
Turn (SCROLL◄►) to move the grid
focus left and right in time.
Display shows by temporarily ashing
the grid position.
First digit - bar
Second digit - beat in current bar
Third digit (if visible) - 16th note within
the current beat. 1.1.0
Beat Beat Beat Beat
Bar
No Change

9
Deluge Ofcial Manual
Sequencer 3
Zooming The Grid
Zooming the grid also uses the scroll and zoom rotary control. Zooming is performed across the
horizontal timeline of the grid. The grid resolution will change to the zoom level selected and as
such may include more or less visible information. Zooming-in is possible from the 16th default to
128th notes.
Beat Beat Beat Beat
Bar
Sequence Plays Left to Right
1 172 183 194 205 216 227 238 249 2510 2611 2712 2813 2914 3015 3116 32
Time
Note / step detail is expanded or contracted. Moving from the default 16th view to 32nd view
will still be one bar but add more resolution detail effectively doubling the note / step detail
from the rst 8 columns of the 16th view across to the entire 16 columns in 32nd view.
Example: 32nd notes representing the zoomed grid.
Press (SCROLL◄►) to check the current zoom setting as shown on the display.
16 x 8 Grid In Focus
Display shows the grid
position when scrolling.
Bar : Beat
1.1.0 Bar : Beat
1.3.0
Press + turn (SCROLL◄►) to zoom the
grid in and out. Shows more or less detail.
Press to check zoom level.
Turn (SCROLL◄►) to scroll the wider grid
into focus of the physical grid pads.
Page 53

10 Deluge Ofcial Manual
Sequencer3
NOTES
▌SCROLLING CLIPS HORIZONTALLY
1. Press [CLIP] to select clip view. This is indicated by the clip button
illuminated blue.
2. Select SYNTH or KIT by pressing [SYNTH] or [KIT]. The selected
button illuminates red.
3. Turn (SCROLL◄►) to scroll the grid in focus. If there are no notes /
steps existing beyond the visible pad grid then no scrolling will take
place. Scrolling will move by the full page of 16 steps.
4. Editing of notes and steps is retained irrespective of whether the notes
are in focus and viewed within the pad grid. Horizontal scrolling adjust
the step columns in focus based on the time division
▌SCROLLING CLIPS VERTICALLY
1. Press [CLIP] to select clip view. This is indicated by the clip button
illuminated blue.
2. Select SYNTH or KIT by pressing [SYNTH] or [KIT]. The selected
button illuminates red.
3. Turn (SCROLL▼▲) to scroll the grid in focus. Scrolling will take place.
Scrolling will move by one row at a time and for synth notes the audition
pads will show the root note position for synths and the selected row for
kits.
4. Editing of notes and steps is retained irrespective of whether the notes
are in focus and viewed within the pad grid. Vertical scrolling adjusts the
step rows in focus based on the note pitch for synths or specic sounds
for kits.
No Change

11
Deluge Ofcial Manual
Sequencer 3
NOTES
▌ZOOMING THE GRID HORIZONTALLY
1. Press [CLIP] to select clip view. This is indicated by the clip button
illuminated blue.
2. Select SYNTH or KIT by pressing [SYNTH] or [KIT]. The selected
button illuminates red.
3. Press + turn (SCROLL◄►) to zoom the grid showing more or less
detail. Step resolution will expand up to 128th notes and shrink
depending on the zoom level. Default is 16th notes.
4. The bar, beat of the current bar and (if visible) the 16th note in the
current beat ashes for a short period on the display as adjustments are
made.
▌CHECKING ZOOM LEVEL RESOLUTION
1. Press [CLIP] to select clip view. This is indicated by the clip button
illuminated blue.
2. Select SYNTH or KIT by pressing [SYNTH] or [KIT]. The selected
button illuminates red.
3. Press (SCROLL◄►). The display will ash showing the timing division
resolution depending on the clip length. Examples are:-
16th notes 32nd notes
1.3.0
Bar Beat
64th notes 128th notes
Page 55

12 Deluge Ofcial Manual
MIDI12
NOTES
12.1 MIDI Connections
MIDI is a a standard music protocol used to connect multiple devices in
order to communicate and was rst introduced in the early 1980’s. Deluge
uses the most common 5 Pin DIN connection as well as a USB connection.
MIDI DIN synchronises on PPQN pules per quarter note. 24 and 48 pulses
per quarter note (PPQN) are most common. This can be adjusted in the
settings, trigger menu in Deluge and by default is set to 24.
Deluge uses MIDI CC (control change) messages while also providing
program change and bank change options. This allows the presets and
patches of other synths and gear to be changed and controlled as well as
adjusting parameters remotely.
USB Host
When Deluge is powered up (external supply, not internal battery) it can be
connected via the USB connection to other devices as a USB host. The
USB MIDI device must be connected on starting / booting Deluge up. The
connection can be disconnected / reconnected once it’s booted in this set-
up.
Deluge supports one USB MIDI ‘hub’ devices as a host. Powered USB
Hubs are also useful in powering up Deluge as well as other connected
USB devices. Deluge will blink “MIDI” for a working MIDI device, or
“UNKNown” for anything else. Multiple hubs especially more than four
connected may not operate correctly and “FULL” is displayed if more than
four devices are connected. Deluge will blink “HUB” when a connected hub
device is detected and working and “DETAch” when a devices is detached.
If your device doesn’t work and you get no error message, it may be a
power issue.
Hosted MIDI USB devices are supported for both MIDI input and output.
Deluge has both a MIDI in and
Out 5-pin DIN connection.
USB MIDI is also available via
the Type-B USB connection.
Page 226

13
Deluge Ofcial Manual
MIDI 12
NOTES 12.2 MIDI Hardware Conguration
MIDI conguration requires the match up of both Deluge along with the
external device. It is important to check out the manufacturers instructions
when connecting other devices.
Typical MIDI Set Up
MIDI CH 1
MIDI out
MIDI out
MIDI out
MIDI CH 10
MIDI in
MIDI CH 1
MIDI IN
Synth module
controllable via the
Deluge sequencer.
USB MIDI connected
devices compatible
with USB hosting.
MIDI settings
[SHIFT] + press (SELECT)
setting menu provides
options for MIDI.
External keyboard or controller to play chords / notes
pitch wheel / mod wheel / controls / pads
MIDI CH 10
No Change

14 Deluge Ofcial Manual
System & General14
NOTES
14.1 System Settings
A number of parameter exist that are considered ‘system’ wide. These are
accessible from the SETTINGS menu [SHIFT] + press (SELECT).
Navigating the menu follows the same principle as the sound editor.
Function Sub Category Setting Options
CV Out 1 & Out 2 Volts per octave.
Transpose
GATE Out 1 to Out 4 Sets gate output type.
OFFtime Minimum switching time between gate notes.
TCLO
Trigger Clock
INput
PPQN - sync pulses. Pulses per quarter note.
AUTO Start on/off. On the presence of a trigger
clock.
OUTput PPQN - sync pulses. Pulses per quarter note.
MIDI
MIDI Settings
CLOCk
IN - MIDI beat clock input ON or OFF.
OUT - MIDI beat clock output ON or OFF.
MAGN - tempo magnitude matching ON or OFF.
THRU MIDI Thru, ON or OFF.
CMD Global MIDI
Command
PLAY
RESTart - restart playback if already playing.
RECord
TAP tempo
UNDO
REDO
LOOP
LAYEr - Same as loop but with overdubs layers.
DEFAults
(SCROLL◄►) within tempo,
swing & key, sets a min & max
range where a random value is
automatically set
Tempo Applied to a new blank song upon creation.
Swing Applied to a new blank song upon creation.
KEY Applied to a new blank song upon creation.
SCALe None, major, minor, Dorian, Phrygian, Lydian,
Mixolydian, Locrian & rand - dedicated random
setting
VELOcity Sets the default velocity for newly entered notes
between 1-127. Default is 64
RESOlution Resolution for new songs. Options are 96, 192,
384, 768, 1536, 3072, 6144. Default is 384
SWINg
Interval Sets the timing interval at which swing may be applied. This is song
specic and saved with the song. New songs use this default - 16th notes
PAdS
Shortcut / Alphanumeric layout
SHORTcuts 1.0 or 3.0 shortcut options to match the software
version and Deluge overlay.
KEYBoard Style of alphanumeric keyboard, QWERTY,
AZERTY, QWERTZ.
COLOurs
Set mute / launch pad colours for rows as:-
Active; Green, Blue, Yellow, Cyan, Purple, Amber,
White, Pink, Red.
Muted; Green, Blue, Yellow, Cyan, Purple, Amber,
White, Pink, Red.
Stopped; Green, Blue, Yellow, Cyan, Purple,
Amber, White, Pink, Red.
Soloed; Green, Blue, Yellow, Cyan, Purple, Amber,
White, Pink, Red.
PREView ON / OFF/ CONDitional : Refers to the previewing of sounds from the
SD card. Conditional is based on the playback mode.
Page 258

15
Deluge Ofcial Manual
System & General 14
NOTES
System Settings (Continued)
▌CHANGING A SYSTEM PARAMETER SETTING
1. Press [SHIFT] + press (SELECT) to access the settings conguration
menu.
2. Turn (SELECT) and scroll to the desired parameter. Press (SELECT)
3. Turn (SELECT) when the parameter is in-focus to change its value or
setting.
4. Press [BACK / UNDO] to back up out of the menu at any time.
▌PERFORMING A FACTORY RESET
1. Ensure Deluge is switched OFF / powered down.
2. Press & hold (SELECT) and switch power ON to Deluge.
3. The display will blink ‘RESE’ to conrm reset is complete.
Function Sub Category Setting Options
CURSor Controls appearance of the play cursor. FAST (short sharp blinks) or
SLOW (solid white squares) or OFF
RECOrd
COUNt In Turns RECORD count In ON or OFF.
QUANtization Sets the level at which recorded notes are
quantized. OFF (192nd notes),.
MARGins Sets a fade margin to avoid clicks at the loop point
in an audio clip. Feature is set ON or OFF.
MONItoring Sampling options: ON / OFF/ CONDitional :
monitor on = headphones in + mic recording.
monitoring always on = line in.
FIRMware Indicates only the current rmware version of Deluge.
Note: Only the swing setting is saved with a song. Other parameters are not saved with song and are system specic.
Page 259

16 Deluge Ofcial Manual
System & General14
NOTES
▌PERFORMING A DELUGE UPDATE
1. Check and note the current rmware version from within the settings
menu.
2. Download the latest version (a .bin le) and install onto the root
directory of the SD card. This is typically performed with a PC or Mac.
3. Power Deluge OFF. Insert the SD card pins up into Deluge.
4. Ensure Deluge has enough power or is connected to a power supply.
Do not switch off during the update.
5. Press & hold [SHIFT] on Deluge.
6. While holding SHIFT power up Deluge.
7. An ‘UPdA’ - update message is shown and then a spinning cursor will
display while the update is being performed.
8. Once complete, ‘DonE’ - done, is displayed.
9. Check the new version in the settings menu.
10. Deluge is ready to use.
Firmware Update in Progress
No Change

17
Deluge Ofcial Manual
System & General 14
NOTES 14.3 Deluge Pad Colours
Deluge has options to change the pad illumination including colours,
brightness and refresh rate. A predened refresh rate is set for optimal user
comfort. However there may be a requirement to lm deluge with various
devices such as smart-phones, tablets, cameras, etc. The refresh rate may
be set to match your device and allow a higher quality recording of Deluge.
▌SETTING DELUGE USER INTERFACE REFRESH RATE
1. Press & hold [CLIP] + turn (SELECT).
2. Adjust until the ickering as observed through the camera or device has
gone or been reduced. Settings above 200 and below 8 are NOT
recommended as this may affect visual performance.
3. Settings are not saveable so this would need to be changed per lming
session.
▌SETTING DELUGE PAD BRIGHTNESS
1. Press & hold [SHIFT] + [LEARN / INPUT] + turn (SCROLL▼▲).
2. Adjust until the desired pad brightness.
3. Settings are not saveable.
▌SETTING DELUGE PAD COLOURS
1. In [CLIP] view.
2. Press & hold [SHIFT] + turn (SCROLL▼▲).
3. Adjust until the desired pad colours are set. Colours will be reected in
other views. This may be particularly useful in SONG view.
Note: Default Mute / Launch pad rows colours for active, muted, stopped and
soloed states can also be set in the pad menu within the settings options.
Page 263

18 Deluge Ofcial Manual
System & General14
Context Action Command
All Views
System Adjust brightness [SHIFT] + [LEARN / INPUT] + turn (SCROLL▼▲)
System Settings menu [SHIFT] + (SELECT)
System Undo [BACK / UNDO]
System Redo [SHIFT] + [BACK / UNDO]
System Tempo change Turn (TEMPO)
System Tempo change 1BPM inc Push & turn (TEMPO)
System Swing adjustment [SHIFT] + turn (TEMPO)
System Metronome on/off [SHIFT] + [TAP TEMPO]
Navigation Check current zoom level Push (SCROLL◄►)
Navigation Change current zoom level Push & turn (SCROLL◄►)
Navigation Scroll left or right Turn (SCROLL◄►)
Navigation Scroll up or down Turn (SCROLL▼▲)
Song Load song (saved tempo) [LOAD] + turn (SELECT), then [LOAD]
Song Load song (current tempo) [LOAD] + turn (SELECT), then push (TEMPO) + [LOAD]
Song Delete song [SHIFT] + [SAVE]
Song New song [SHIFT] + [LOAD], then [LOAD]
Song Delay load [LOAD], Then turn (SELECT)
Sampling Loop resample [RECORD] + [PLAY] then [RECORD] + [PLAY]
Sampling Resample [SHIFT] + [RECORD]
Sequencer Nudge clock Push (SCROLL◄►) + turn (TEMPO)
Parameter Control - Rotary Push Controls - Toggle Options
FX LP, HP, EQ option [CUTOFF / RES] = on, press (UPPER)
FX LPF slope type [CUTOFF / RES] = on, press (LOWER)
FX Ping-Pong on/off [DELAY TIME / AMOUNT] = on, press (UPPER)
FX Delay style digital / analog [DELAY TIME / AMOUNT] = on, press (LOWER)
FX Compressor sync 8th - 32nd [SIDECHAIN / REVERB] = on, press (UPPER)
FX Reverb room size preset [SIDECHAIN / REVERB] = on, press (LOWER)
FX Effect song or kit: chorus, anger,
phaser [MOD RATE / DEPTH] & affect entire = on, press (UPPER)
FX Effect song or kit: depth, offset,
feedback [MOD RATE / DEPTH] & affect entire = on, press (LOWER)
FX Stutter [STUTTER / CUSTOM 1] = on, press (UPPER)
FX Stutter - ramp speed [STUTTER / CUSTOM 1] = on, press & turn (UPPER)
Quick Reference Commands
No Change

19
Deluge Ofcial Manual
System & General 14
Context Action Command
Song View
Song Clip parameter adjustment Hold [PAD] on the grid + turn (UPPER) or (LOWER)
Song Change section assignment /
Colour [SHIFT] + [SECTION]
Song Section repeats / share status Press [SECTION] + turn (SELECT)
Song Move row Hold [PAD] of row to move + turn (SCROLL▼▲)
Song Clone clip Hold [PAD] of master clone clip + press [PAD] of another row
Song Solo section Tap [SECTION] pad
Song Solo clip (arm) Hold (SCROLL◄►) + press clip’s [LAUNCH] pad
Song Solo clip (Immediate) Hold (SCROLL◄►) + [SHIFT] + press clip’s [LAUNCH] pad
Song Un-solo Press clip’s [MUTE] pad
Song Instant mute / launch [SHIFT] + [MUTE] pad
Song Delete clip Hold [PAD] of clip to delete + press [SAVE / DELETE]
Song Drag clip instance to arranger Hold [PAD] + press [SONG] + turn (SCROLL◄►) then
release pad
Song Record to arranger Hold [RECORD] + press [SONG]
Looping Create audio clip Hold [PAD] of empty clip + press (SELECT)
Looping Set input source for audio clip Hold [LEARN/INPUT] + Press [PAD] of clip
Looping Loop record In record mode, press [PLAY] with armed, empty audio clip(s)
present
Looping Close loop recording Press [LAUNCH] pad of clip
Looping Close loop + immediate solo Hold (SCROLL◄►) + press [LAUNCH] Pad to close loop.
Looping Loop record during playback In record mode, unmute armed, empty (audio) clip
Looping Overdub Hold [RECORD] + press [PAD] of clip row underneath
Looping Continuous overdub layering Hold [RECORD] + press [AUDITION] Pad of row underneath
Looping ‘Loop pedal’ record Record loop while no other clip is playing / unmuted and
metronome is off
Looping Grab tempo from audio clip Hold (TEMPO) + press [PAD] for clip row (song view) or any
pad in clip view
Looping Select MIDI switch LOOP target Enter audio clip or hold clip row in song view + press switch
Looping Auto extending instrument clip
record In record mode, unmute armed empty clip during playback
Quick Reference Commands (Cont.)
No Change

20 Deluge Ofcial Manual
System & General14
Context Action Command
Arranger View
Clip Place clip instance [PAD]
Clip Delete clip instance [PAD] Leftmost start pad of an instance
Clip Clip instance length Hold [PAD] start + press [PAD] end on the same row
Clip Move clip instance horizontally Hold [PAD] + turn (SCROLL◄►)
Clip Change instance clip Hold [PAD] + turn (SELECT)
Clip Make clip instance unique [SHIFT] + [PAD] creates a ‘white’ clip instance
Clip Adjust clip instance parameters Hold [PAD] + turn (UPPER) or (LOWER) for the selected
parameter
Clip Enter clip view for a clip [PAD] of any clip instance pad other than the rst / leftmost
Clip Drag ‘unique’ clip instance to song
view Hold [PAD] + [SONG] + turn (SCROLL▼▲) then release pad
Row Move track Hold [AUDITION] pad + turn (SCROLL▼▲)
Instrument Mute / unmute track [MUTE] pad for row
Instrument Solo track Press & hold (SCROLL◄►) + [MUTE] for instrument
Instrument Change or Add new instrument Hold [AUDITION] pad + turn (SELECT) or press
[INSTRUMENT] type
Instrument Delete track row Hold [AUDITION] pad + [SAVE / DELETE]
Instrument Audition instrument [AUDITION] - Songs root note or snare drum in kit mode
Arrangement Clear arrangement Press & hold (SCROLL◄►) + [BACK / UNDO]
Audio Create new audio track Empty lane [AUDITION] + press (SELECT)
Audio Set input source for audio track [LEARN / INPUT] + [AUDITION] pad of audio track
Audio Record audio from current position [PLAY] while in [RECORD], with armed audio present
Clip View
Clip Change clip colour [SHIFT] + turn (SCROLL▼▲)
Clip Change clip preset, MIDI Ch, CV
out Turn (SELECT)
Clip Adjust clip length [SHIFT] + turn (SCROLL◄►)
Clip Duplicate / multiply and append
clip content [SHIFT] + press (SCROLL◄►)
Clip Horizontal clip shift / nudge L-R Press & hold (SCROLL▼▲) + turn (SCROLL◄►)
Clip Playback from current screen Press & hold (SCROLL◄►) + [PLAY]
Clip Clear clip Push (SCROLL◄►) + [BACK / UNDO]
Quick Reference Commands (Cont.)
No Change
Other manuals for Deluge
1
Table of contents
Other Synthstrom Audible Recording Equipment manuals